")
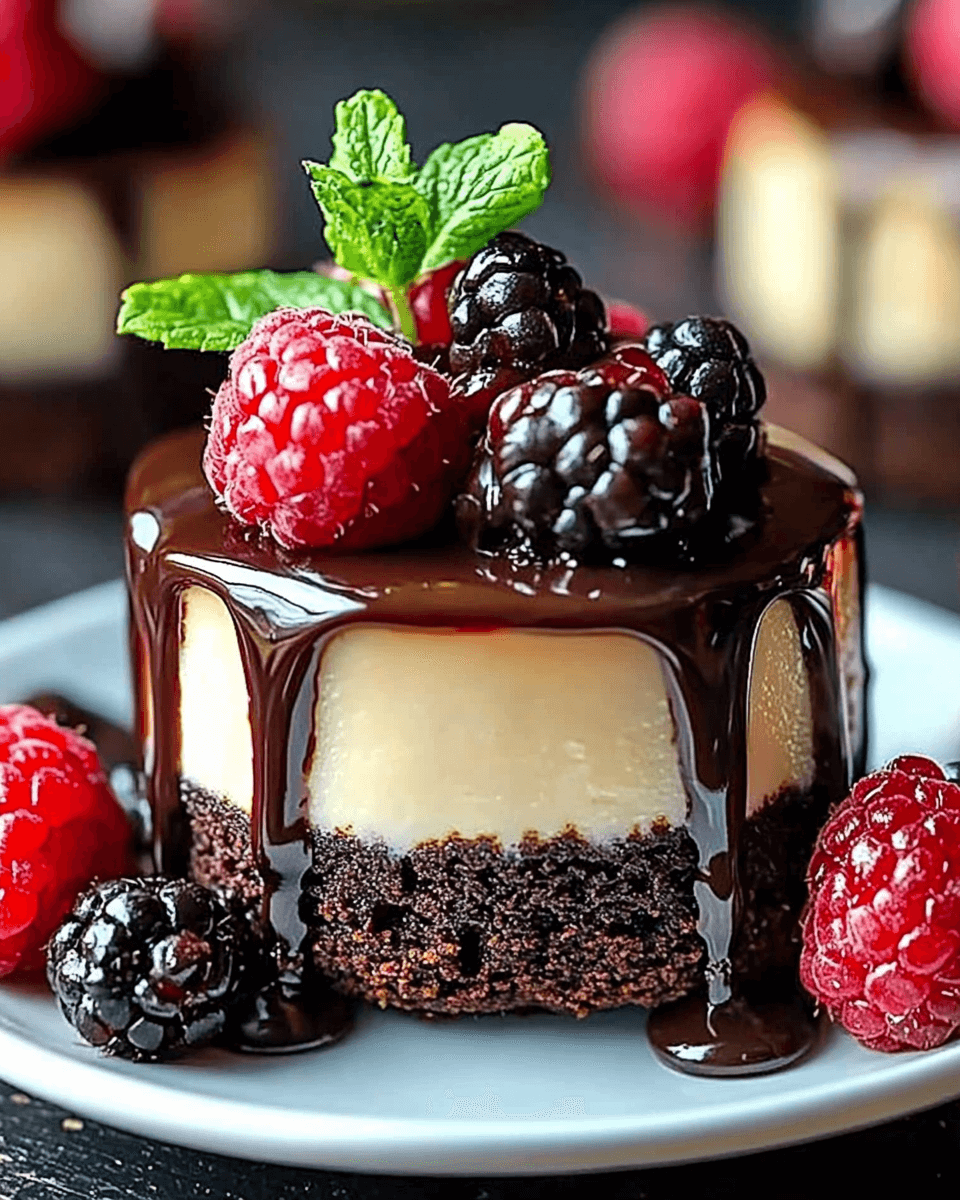
Introduction to Brownie Bottom Mini Cheesecakes
There’s something magical about desserts that combine two favorites into one delightful treat. Brownie Bottom Mini Cheesecakes are just that—a luscious cheesecake perched atop a rich brownie base. Whether you’re looking to impress guests or simply satisfy a sweet tooth after a long day, this recipe is your go-to solution. It’s quick, easy, and perfect for any occasion, from casual family dinners to festive gatherings. Plus, who can resist the charm of mini desserts? They’re just the right size for indulging without the guilt!
Why You’ll Love This Brownie Bottom Mini Cheesecakes
These Brownie Bottom Mini Cheesecakes are a dream come true for any home cook. They’re incredibly easy to whip up, making them perfect for busy weeknights or last-minute gatherings. The combination of rich brownie and creamy cheesecake creates a flavor explosion that will leave your taste buds dancing. Plus, their mini size means you can enjoy a sweet treat without overindulging. Trust me, once you try them, you’ll be hooked!
Ingredients for Brownie Bottom Mini Cheesecakes
Gathering the right ingredients is the first step to creating these delightful Brownie Bottom Mini Cheesecakes. Here’s what you’ll need:
- Brownie mix: The star of the show! This provides the rich, chocolatey base.
- Vegetable oil: Adds moisture to the brownie mix, ensuring a fudgy texture.
- Egg: Essential for binding the ingredients together and giving structure.
- Water: Helps to combine the brownie mix smoothly.
- Cream cheese: The creamy foundation of the cheesecake layer, bringing richness and tang.
- Granulated sugar: Sweetens the cheesecake, balancing the flavors perfectly.
- Vanilla extract: A splash of this adds depth and enhances the overall flavor.
- Sour cream: Contributes to a creamy texture and a slight tanginess.
- Chocolate chips (optional): For those who crave extra chocolatey goodness, fold these in for a delightful surprise.
For exact measurements, check the bottom of the article where you can find everything listed for easy printing. Happy baking!
How to Make Brownie Bottom Mini Cheesecakes
Creating these Brownie Bottom Mini Cheesecakes is a delightful journey that’s as enjoyable as the final product. Follow these simple steps, and you’ll have a batch of mini cheesecakes that will impress everyone!
Step 1: Preheat and Prepare
Start by preheating your oven to 325°F (163°C). This is crucial for achieving that perfect bake. While the oven warms up, line a muffin tin with paper liners. This not only makes for easy removal but also adds a touch of charm to your mini cheesecakes.
Step 2: Make the Brownie Base
In a medium bowl, combine the brownie mix, vegetable oil, egg, and water. Stir until everything is well blended. The batter should be smooth and glossy. Now, divide this rich brownie batter evenly among the muffin cups, filling each about one-third full. This will create a delicious base for your cheesecake layer.
Step 3: Bake the Brownie Layer
Pop the muffin tin into the oven and bake for 10 minutes. This initial bake is essential for setting the brownie layer. Once the time is up, remove the tin from the oven and let it cool slightly. You want the brownie base to be firm enough to hold the cheesecake but still warm.
Step 4: Prepare the Cheesecake Mixture
In another bowl, beat the softened cream cheese until it’s smooth and creamy. This is where the magic happens! Add the granulated sugar and vanilla extract, mixing until everything is well combined. The mixture should be velvety and inviting.
Step 5: Add Eggs and Sour Cream
Next, incorporate the egg and sour cream into the cream cheese mixture. Beat until it’s creamy and smooth. If you’re feeling adventurous, fold in some chocolate chips for an extra chocolatey surprise. Trust me, it’s worth it!
Step 6: Assemble the Mini Cheesecakes
Now comes the fun part! Spoon the cheesecake mixture over the brownie layer in each muffin cup, filling them almost to the top. Don’t worry if it looks a bit messy; it’ll all come together beautifully in the oven.
Step 7: Bake Again
Return the muffin tin to the oven and bake for an additional 15-18 minutes. You want the cheesecake to be set but still slightly jiggly in the center. This ensures that creamy texture we all love. Keep an eye on them; every oven is a little different!
Step 8: Cool and Refrigerate
Once baked, remove the mini cheesecakes from the oven and let them cool at room temperature. After they’ve cooled down, refrigerate them for at least 2 hours before serving. This step is crucial for allowing them to firm up and develop that perfect cheesecake consistency.
Tips for Success
- Use room temperature cream cheese for a smoother cheesecake mixture.
- Don’t overmix the cheesecake batter; it can lead to cracks.
- For easy removal, let the mini cheesecakes cool completely before refrigerating.
- Experiment with different toppings like caramel sauce or fresh fruit.
- Keep an eye on the baking time; every oven varies slightly.
Equipment Needed
- Muffin tin: Essential for shaping your mini cheesecakes. A silicone muffin pan works great for easy removal.
- Mixing bowls: Use a medium bowl for the brownie mix and a larger one for the cheesecake mixture.
- Electric mixer: A hand mixer or stand mixer makes beating the cream cheese a breeze.
- Measuring cups and spoons: For accurate ingredient measurements, essential for baking success.
Variations
- Gluten-Free: Substitute the brownie mix with a gluten-free version to accommodate dietary needs.
- Nutty Delight: Add chopped nuts like walnuts or pecans to the brownie base for an extra crunch.
- Fruit-Infused: Swirl in fruit preserves or fresh fruit puree into the cheesecake mixture for a fruity twist.
- Chocolate Lovers: Use dark chocolate brownie mix and add a layer of ganache on top for a rich finish.
- Vegan Option: Replace cream cheese with a vegan alternative and use flax eggs instead of regular eggs.
Serving Suggestions
- Pair with a scoop of vanilla ice cream for a delightful contrast in temperature and texture.
- Serve alongside fresh berries for a pop of color and a refreshing taste.
- Drizzle with chocolate or caramel sauce for an extra indulgent touch.
- Garnish with whipped cream and a sprig of mint for an elegant presentation.
FAQs about Brownie Bottom Mini Cheesecakes
Can I make these Brownie Bottom Mini Cheesecakes ahead of time?
Absolutely! These mini cheesecakes can be made a day in advance. Just store them in the refrigerator until you’re ready to serve. They actually taste even better after chilling overnight!
What can I use instead of cream cheese?
If you’re looking for a substitute, try using mascarpone cheese or a vegan cream cheese alternative. Both will give you a creamy texture, though the flavor may vary slightly.
How do I know when the mini cheesecakes are done baking?
Look for a slight jiggle in the center of the cheesecakes. They should be set around the edges but still a bit wobbly in the middle. This ensures a creamy texture once they cool.
Can I freeze Brownie Bottom Mini Cheesecakes?
Yes, you can freeze them! Just wrap each mini cheesecake tightly in plastic wrap and place them in an airtight container. They can be frozen for up to three months. Thaw them in the refrigerator before serving.
What toppings work best with these mini cheesecakes?
There are so many delicious options! Whipped cream, fresh berries, or a drizzle of chocolate or caramel sauce all make fantastic toppings. Get creative and make them your own!
Final Thoughts
Creating Brownie Bottom Mini Cheesecakes is more than just baking; it’s about crafting sweet memories. Each bite offers a delightful blend of rich brownie and creamy cheesecake that brings smiles to faces. Whether you’re sharing them at a gathering or enjoying one after a long day, these mini treats are sure to elevate any moment. Plus, the joy of making them is just as rewarding as the delicious outcome. So, roll up your sleeves, gather your ingredients, and let the magic unfold in your kitchen. Trust me, you’ll be glad you did!
PrintBrownie Bottom Mini Cheesecakes: A Sweet Delight Recipe!
- Total Time: 2 hours 48 minutes
- Yield: 12 servings
- Diet: Vegetarian
Description
Brownie Bottom Mini Cheesecakes are a delightful dessert combining a rich brownie base with a creamy cheesecake topping, perfect for any occasion.
Ingredients
- 1 cup brownie mix
- 2 tablespoons vegetable oil
- 1 large egg
- 1/4 cup water
- 8 ounces cream cheese, softened
- 1/2 cup granulated sugar
- 1 teaspoon vanilla extract
- 1 large egg
- 1/4 cup sour cream
- 1/4 cup chocolate chips (optional)
Instructions
- Preheat your oven to 325°F (163°C) and line a muffin tin with paper liners.
- In a medium bowl, combine the brownie mix, vegetable oil, egg, and water. Stir until well blended.
- Divide the brownie batter evenly among the muffin cups, filling each about 1/3 full. Bake for 10 minutes, then remove from the oven and let cool slightly.
- In another bowl, beat the softened cream cheese until smooth. Add the sugar and vanilla extract, mixing until well combined.
- Add the egg and sour cream to the cream cheese mixture, beating until smooth and creamy. If desired, fold in the chocolate chips.
- Spoon the cheesecake mixture over the partially baked brownie layer in each muffin cup, filling them almost to the top.
- Bake for an additional 15-18 minutes, or until the cheesecake is set but still slightly jiggly in the center. Remove from the oven and let cool at room temperature.
- Once cooled, refrigerate the mini cheesecakes for at least 2 hours before serving to allow them to firm up.
Notes
- For a richer flavor, try adding a tablespoon of cocoa powder to the cheesecake mixture.
- You can also top the mini cheesecakes with whipped cream or fresh berries for a delightful presentation.
- Prep Time: 20 minutes
- Cook Time: 25-28 minutes
- Category: Dessert
- Method: Baking
- Cuisine: American
Nutrition
- Serving Size: 1 mini cheesecake
- Calories: 180
- Sugar: 10g
- Sodium: 150mg
- Fat: 10g
- Saturated Fat: 4g
- Unsaturated Fat: 6g
- Trans Fat: 0g
- Carbohydrates: 18g
- Fiber: 1g
- Protein: 3g
- Cholesterol: 40mg
")