")
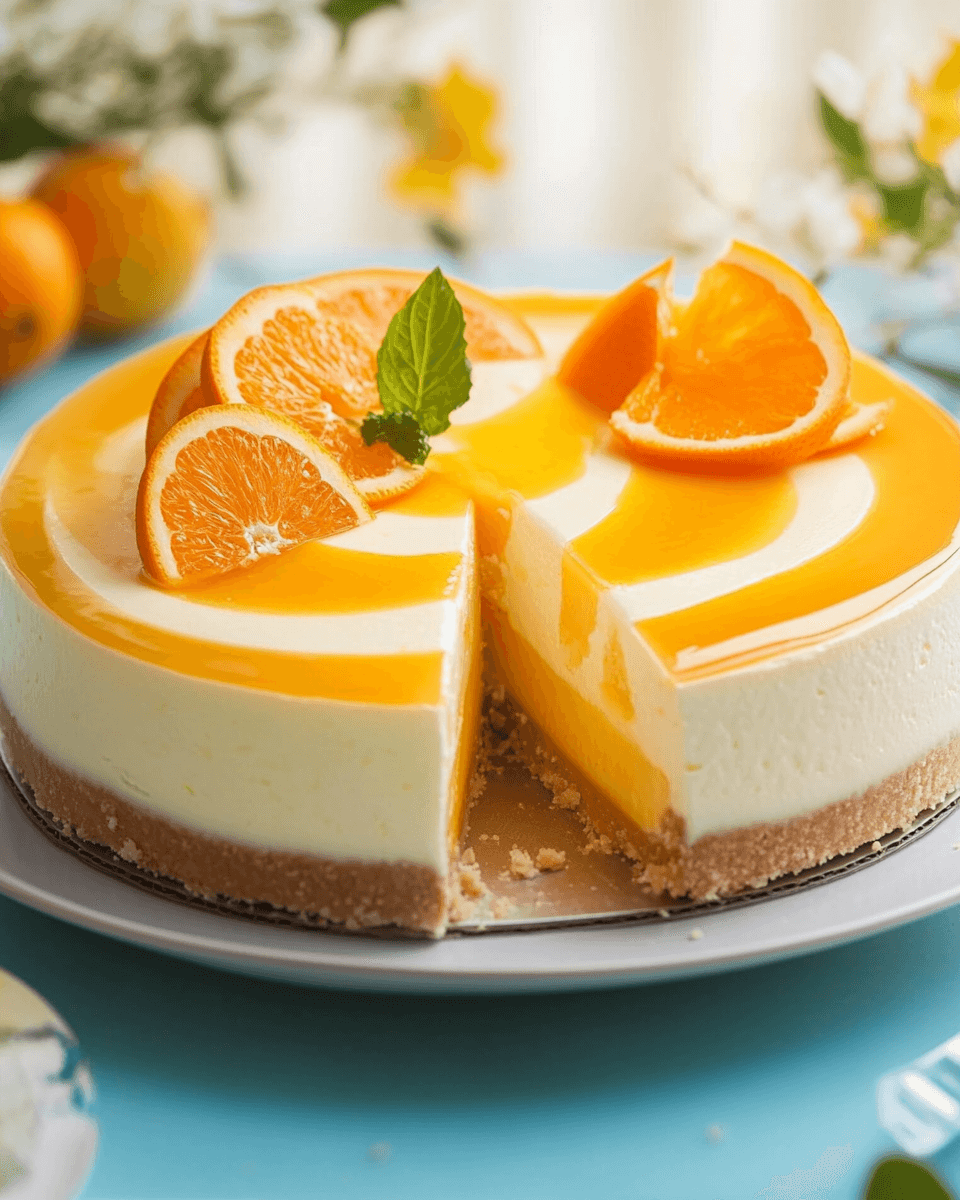
Introduction to No-Bake Creamsicle Cheesecake (Orange & Vanilla Swirl)
There’s something magical about the combination of orange and vanilla that takes me back to my childhood.
The No-Bake Creamsicle Cheesecake (Orange & Vanilla Swirl) captures that nostalgia perfectly.
This dessert is not just a treat; it’s a quick solution for those warm days when you want something refreshing without turning on the oven.
Whether you’re hosting a backyard barbecue or simply craving a sweet indulgence, this cheesecake is sure to impress your loved ones.
With its creamy texture and vibrant flavors, it’s a delightful way to celebrate any occasion.
Why You’ll Love This No-Bake Creamsicle Cheesecake (Orange & Vanilla Swirl)
This No-Bake Creamsicle Cheesecake is a game-changer for dessert lovers.
It’s incredibly easy to whip up, requiring no baking skills whatsoever.
In just a few simple steps, you can create a stunning dessert that tastes like summer.
The creamy orange and vanilla swirl is not only delicious but also visually appealing, making it perfect for impressing guests or treating yourself.
Plus, it’s a refreshing way to cool down on a hot day!
Ingredients for No-Bake Creamsicle Cheesecake (Orange & Vanilla Swirl)
Creating this No-Bake Creamsicle Cheesecake is a breeze, thanks to a handful of simple ingredients.
Here’s what you’ll need:
- Graham cracker crumbs: These form the base of your cheesecake, providing a sweet and crunchy texture.
- Unsalted butter: Melted butter binds the crumbs together, ensuring a firm crust that holds its shape.
- Cream cheese: The star of the show! Softened cream cheese gives the cheesecake its rich and creamy texture.
- Powdered sugar: This sweetener adds just the right amount of sweetness without the graininess of granulated sugar.
- Vanilla extract: A splash of vanilla enhances the overall flavor, making it even more delightful.
- Heavy whipping cream: Whipped to stiff peaks, it adds lightness and a fluffy texture to the cheesecake.
- Orange juice: Freshly squeezed is best! It brings that zesty, citrusy flavor that pairs perfectly with vanilla.
- Orange zest: This adds an extra punch of orange flavor, making each bite burst with freshness.
- Unflavored gelatin: This helps the cheesecake set without baking, giving it a smooth consistency.
- Cold water: Used to bloom the gelatin, ensuring it dissolves properly for a perfect texture.
For those looking to customize, consider using low-fat cream cheese for a lighter version or adding fresh orange slices on top for a pop of color and flavor.
You can find the exact measurements for each ingredient at the bottom of the article, ready for printing!
How to Make No-Bake Creamsicle Cheesecake (Orange & Vanilla Swirl)
Making this No-Bake Creamsicle Cheesecake is a fun and straightforward process.
Follow these steps, and you’ll have a stunning dessert that’s sure to impress.
Step 1: Prepare the Crust
Start by combining graham cracker crumbs and melted butter in a medium bowl.
Mix until everything is well combined.
Then, press this mixture firmly into the bottom of a 9-inch springform pan.
This will form a solid crust that holds the cheesecake together.
Refrigerate the crust for about 30 minutes to set.
This step is crucial for a sturdy base!
Step 2: Make the Cream Cheese Mixture
In a large mixing bowl, beat the softened cream cheese with an electric mixer until it’s smooth and creamy.
Gradually add in the powdered sugar and vanilla extract.
Mix until everything is fully incorporated.
This mixture is the heart of your No-Bake Creamsicle Cheesecake, so make sure it’s nice and fluffy!
Step 3: Whip the Cream
In a separate bowl, whip the heavy cream until stiff peaks form.
This step adds lightness to your cheesecake.
Gently fold the whipped cream into the cream cheese mixture.
Be careful not to deflate the whipped cream; you want to keep that airy texture!
Step 4: Bloom the Gelatin
In a small bowl, sprinkle the unflavored gelatin over cold water.
Let it sit for about 5 minutes to bloom.
Then, heat the mixture in the microwave for about 10-15 seconds until the gelatin dissolves completely.
Stir in the orange juice and orange zest.
This mixture will help your cheesecake set beautifully.
Step 5: Combine Mixtures
Now, divide the cream cheese mixture in half.
Mix the orange juice mixture into one half until well combined.
Leave the other half plain.
This creates the two distinct flavors for your cheesecake.
Step 6: Create the Swirl
Spoon the orange mixture over the chilled crust, spreading it evenly.
Then, dollop the plain cream cheese mixture on top of the orange layer.
Using a knife or skewer, swirl the two mixtures together for a marbled effect.
This step is where the magic happens, creating that beautiful orange and vanilla swirl!
Step 7: Chill and Serve
Cover the cheesecake with plastic wrap and refrigerate for at least 4 hours, or overnight if you can wait.
This allows it to set properly.
When you’re ready to serve, slice and enjoy this delightful No-Bake Creamsicle Cheesecake.
It’s a refreshing treat that’s perfect for any occasion!
Tips for Success
- Make sure your cream cheese is at room temperature for easy mixing.
- Use fresh orange juice and zest for the best flavor.
- Don’t skip the chilling time; it’s essential for the cheesecake to set properly.
- For a cleaner slice, use a hot knife to cut through the cheesecake.
- Experiment with different toppings like whipped cream or fresh berries for added flair.
Equipment Needed
- 9-inch springform pan: Essential for easy removal of the cheesecake. A regular pie dish works too, but slicing may be trickier.
- Mixing bowls: Use a large bowl for the cream cheese mixture and a smaller one for the gelatin.
- Electric mixer: Ideal for beating the cream cheese. A whisk can work, but it’ll take more effort.
- Spatula: Perfect for folding in the whipped cream and spreading the mixtures.
Variations of No-Bake Creamsicle Cheesecake (Orange & Vanilla Swirl)
- Chocolate Orange Twist: Drizzle melted dark chocolate over the top before serving for a rich contrast to the citrus flavors.
- Berry Bliss: Add a layer of fresh berries, like strawberries or blueberries, on top for a fruity burst and vibrant color.
- Low-Fat Option: Substitute low-fat cream cheese and whipped topping to create a lighter version without sacrificing flavor.
- Nutty Crust: Replace graham cracker crumbs with crushed nuts or a nut-based crust for a gluten-free alternative.
- Spiced Up: Incorporate a pinch of cinnamon or nutmeg into the cream cheese mixture for a warm, spiced flavor.
Serving Suggestions for No-Bake Creamsicle Cheesecake (Orange & Vanilla Swirl)
- Pair with a refreshing glass of iced tea or lemonade for a perfect summer vibe.
- Top with a dollop of whipped cream and a sprinkle of orange zest for added flair.
- Serve alongside fresh fruit, like berries or orange slices, for a colorful presentation.
- For a fun twist, add a scoop of vanilla ice cream on the side.
FAQs about No-Bake Creamsicle Cheesecake (Orange & Vanilla Swirl)
Can I make this No-Bake Creamsicle Cheesecake ahead of time?
Absolutely! This cheesecake is perfect for making ahead. Just prepare it the day before and let it chill overnight. It will be ready to impress your guests the next day!
How long does the No-Bake Creamsicle Cheesecake last in the fridge?
This delightful dessert can last up to 5 days in the refrigerator. Just make sure to cover it well to keep it fresh and tasty.
Can I use a different flavor of juice?
Yes! While orange juice gives it that classic creamsicle flavor, feel free to experiment with other juices like lemon or lime for a zesty twist. Just remember to adjust the sweetness if needed.
Is it possible to make this cheesecake gluten-free?
What can I do if my cheesecake doesn’t set properly?
If your cheesecake doesn’t set, it might be due to not enough gelatin or not chilling it long enough. Make sure to follow the instructions carefully, and if needed, you can always pop it back in the fridge for a bit longer!
Final Thoughts
Creating this No-Bake Creamsicle Cheesecake (Orange & Vanilla Swirl) is more than just making a dessert; it’s about crafting memories.
Each slice brings a burst of nostalgia, reminding me of carefree summer days.
The vibrant colors and delightful flavors make it a showstopper at any gathering.
Whether you’re enjoying it with family or sharing it with friends, this cheesecake is sure to spark joy.
So, roll up your sleeves and dive into this easy recipe.
You’ll not only satisfy your sweet tooth but also create a delicious moment worth savoring!
PrintNo-Bake Creamsicle Cheesecake: A Delightful Recipe!
- Total Time: 4 hours 30 minutes
- Yield: 8 servings
- Diet: Vegetarian
Description
A delightful No-Bake Creamsicle Cheesecake featuring a delicious orange and vanilla swirl, perfect for warm weather desserts.
Ingredients
- 1 ½ cups graham cracker crumbs
- ½ cup unsalted butter, melted
- 2 cups cream cheese, softened
- 1 cup powdered sugar
- 1 teaspoon vanilla extract
- 1 cup heavy whipping cream
- 1 cup orange juice
- 2 tablespoons orange zest
- 1 tablespoon unflavored gelatin
- 3 tablespoons cold water
Instructions
- In a medium bowl, combine graham cracker crumbs and melted butter. Mix until well combined. Press the mixture firmly into the bottom of a 9-inch springform pan to form the crust. Refrigerate for 30 minutes to set.
- In a large mixing bowl, beat the softened cream cheese with an electric mixer until smooth. Gradually add the powdered sugar and vanilla extract, mixing until fully incorporated.
- In a separate bowl, whip the heavy cream until stiff peaks form. Gently fold the whipped cream into the cream cheese mixture until combined.
- In a small bowl, sprinkle the gelatin over cold water and let it sit for about 5 minutes to bloom. Then, heat the mixture in the microwave for about 10-15 seconds until the gelatin dissolves. Stir in the orange juice and orange zest.
- Divide the cream cheese mixture in half. Mix the orange juice mixture into one half of the cream cheese mixture until well combined. Leave the other half plain.
- Spoon the orange mixture over the chilled crust, spreading it evenly. Then, dollop the plain cream cheese mixture on top of the orange layer. Use a knife or skewer to swirl the two mixtures together for a marbled effect.
- Cover the cheesecake with plastic wrap and refrigerate for at least 4 hours, or overnight, until set.
- Slice and serve chilled.
Notes
- For a lighter version, substitute low-fat cream cheese and whipped topping.
- Add a layer of fresh orange slices on top for added flavor and decoration.
- For a chocolate twist, drizzle melted dark chocolate over the top before serving.
- Prep Time: 30 minutes
- Cook Time: 0 minutes
- Category: Dessert
- Method: No-Bake
- Cuisine: American
Nutrition
- Serving Size: 1 slice
- Calories: 320
- Sugar: 14g
- Sodium: 200mg
- Fat: 24g
- Saturated Fat: 14g
- Unsaturated Fat: 10g
- Trans Fat: 0g
- Carbohydrates: 24g
- Fiber: 0g
- Protein: 4g
- Cholesterol: 80mg
")