")
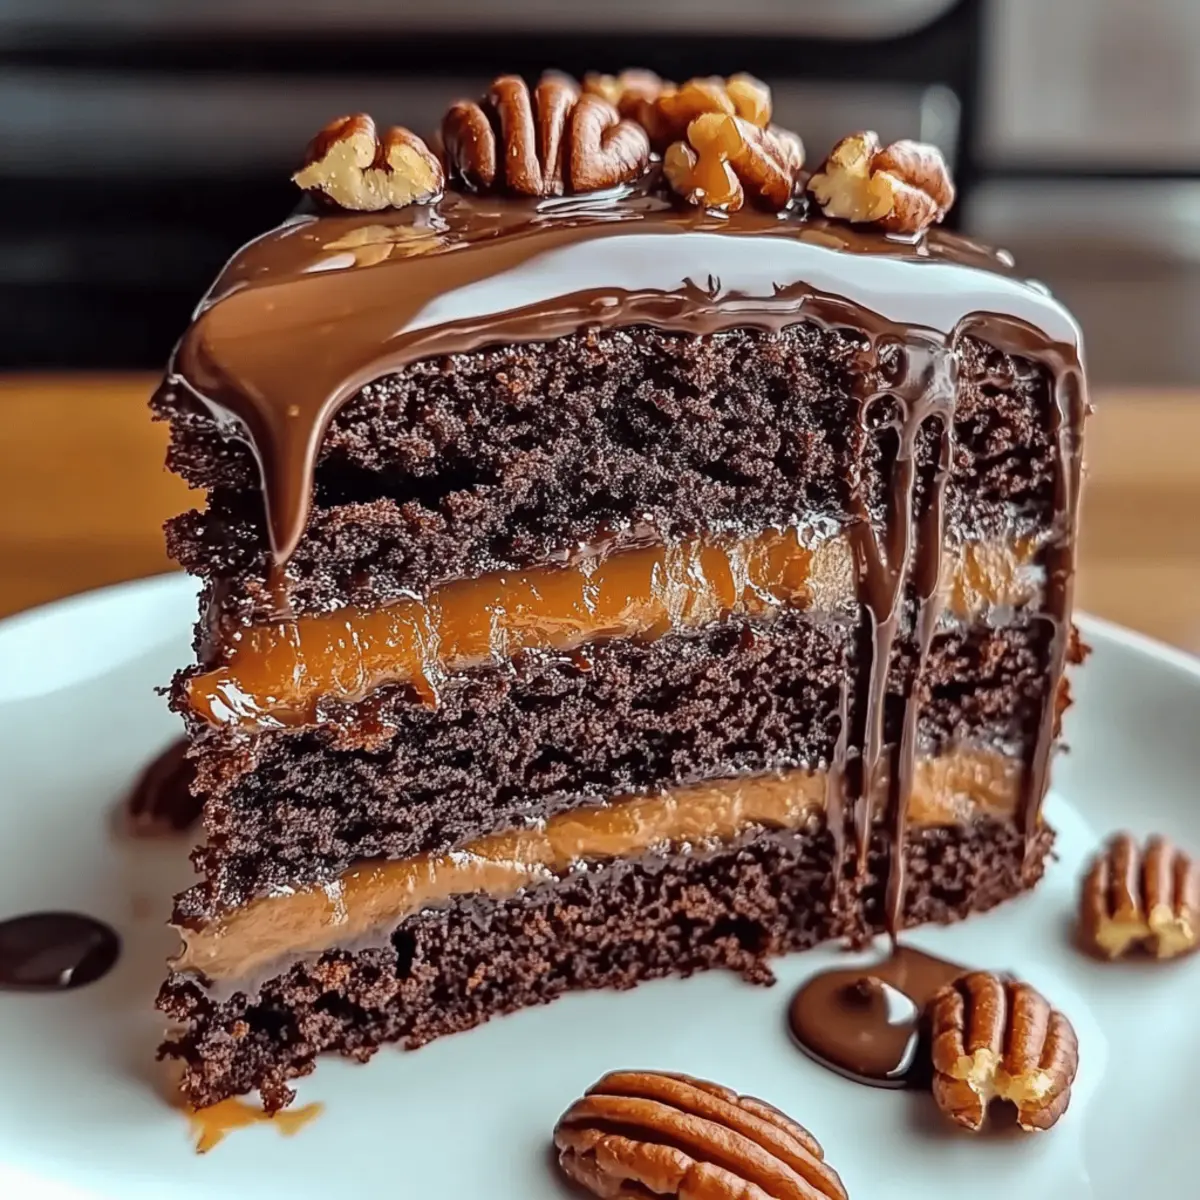
The moment I lifted the lid on my cake dome and revealed the Chocolate Turtle Dream Cake, a wave of sweet nostalgia washed over me, reminiscent of indulging in favorite childhood treats. This glorious four-layer cake boasts rich chocolate, gooey caramel, and crunchy pecans, promising a delightful experience that’s as eye-catching as it is delicious. Not only is this recipe beginner-friendly, making it perfect for aspiring bakers, but it also serves as a festive centerpiece for any gathering or celebration. Each bite offers a rich, moist texture that melts in your mouth, inviting everyone to savor the sweetness. Are you ready to create your own masterpiece that’ll have everyone asking for seconds? Let’s dive into this decadent adventure!
Why is this cake irresistible?
Decadent Delight: The Chocolate Turtle Dream Cake is the epitome of indulgence, blending rich chocolate layers with sweet, gooey caramel. Each bite brings an explosion of flavors sure to please.
Beginner-Friendly: Even novice bakers will shine with this simple recipe—no fancy techniques required!
Crowd-Pleaser: Perfect for celebrations, this cake impresses guests of all ages, making it the star of any gathering.
Versatile Options: Feel free to play with nut varieties or swap the chocolate—your creativity will shine.
Texture Magic: With its moist crumb and crunchy pecans, this cake creates a delightful balance that’s hard to resist.
Pair this cake with a scoop of vanilla ice cream for a decadent treat, or check out our Easy Lemon Cake Mix Cookies for a summery dessert alternative.
Chocolate Turtle Dream Cake Ingredients
For the Cake Layers
• All-Purpose Flour – Provides structure to the cake; substitute with gluten-free flour for a gluten-sensitive version.
• Granulated Sugar – Sweetens the cake and helps achieve a moist texture; no direct substitution recommended.
• Cocoa Powder – Adds deep chocolate flavor; use high-quality for the best results.
• Baking Soda – Provides leavening to help the cake rise; ensure it’s fresh for optimal results.
• Baking Powder – Works with baking soda to create lift; check the expiration date before use.
• Salt – Enhances the overall flavor; opt for sea salt for a gourmet touch.
• Eggs – Bind ingredients and provide moisture; use at room temperature for better blending.
• Vegetable Oil – Adds moisture and richness; can be substituted with coconut oil for a unique flavor.
• Buttermilk – Contributes to the cake’s tenderness; replace with milk plus a tablespoon of vinegar or lemon juice if necessary.
• Vanilla Extract – Enhances flavor; extract or vanilla paste can be used interchangeably.
• Hot Water – Hydrates the batter and creates a moist crumb; do not skip this step.
For the Layers and Topping
• Caramel Sauce – Provides the signature sweet, gooey layer; use store-bought or homemade.
• Chopped Pecans – Adds crunch and nutty flavor; feel free to adjust the amount based on preference.
• Semi-Sweet Chocolate Ganache – Creates a smooth, rich finish; ensure it’s cooled slightly before pouring over the cake.
Indulge in the richness of this Chocolate Turtle Dream Cake that will leave everyone wanting more!
Step‑by‑Step Instructions for Chocolate Turtle Dream Cake
Step 1: Preheat the Oven
Begin by preheating your oven to 350°F (175°C). While the oven warms, prepare four 8-inch round cake pans by greasing them with butter and lightly dusting them with flour. This will ensure that your Chocolate Turtle Dream Cake layers release easily after baking.
Step 2: Mix the Dry Ingredients
In a large mixing bowl, whisk together the all-purpose flour, granulated sugar, cocoa powder, baking soda, baking powder, and salt until well combined. Aim for a uniform brown color, as this mixture forms the backbone of your cake layers. Setting this aside will allow you to focus on the wet ingredients next.
Step 3: Incorporate the Wet Ingredients
Add the eggs, vegetable oil, buttermilk, and vanilla extract to the dry ingredients. Using an electric mixer on medium speed, mix until the batter is smooth and free of lumps, approximately 2-3 minutes. This will create a luscious base for your Chocolate Turtle Dream Cake.
Step 4: Add Hot Water
Gradually stir in the hot water, making sure it’s well-blended into the batter. The hot water not only hydrates the mixture but also creates a light batter that will bake to tender perfection. Take a moment to appreciate the rich aroma as you combine this essential ingredient.
Step 5: Bake the Layers
Evenly divide the batter among the prepared cake pans. Place them in the preheated oven and bake for 20-25 minutes, or until a toothpick inserted into the center comes out clean. Once done, remove the pans from the oven and allow them to cool in the pans for about 10 minutes; this prevents sticking while you finalize the assembly.
Step 6: Layer the Cake
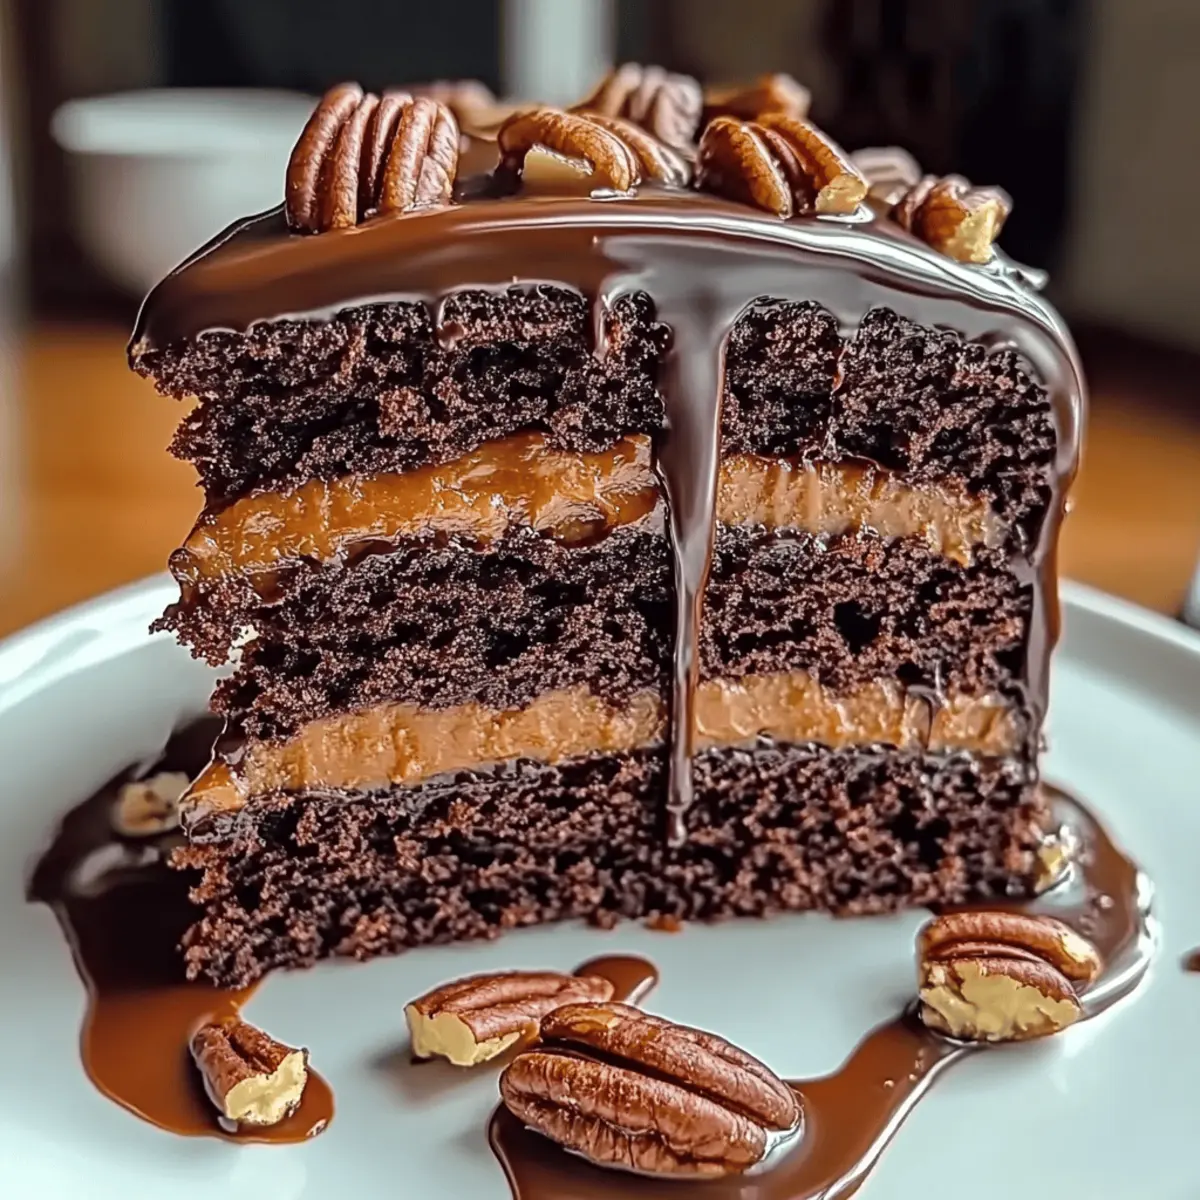
Once the cake layers have cooled, carefully remove them from the pans and place the first layer on a serving plate. Spread a generous layer of caramel sauce over the top, then repeat this process with the second and third layers. By this point, the Chocolate Turtle Dream Cake is starting to take shape!
Step 7: Finish with Ganache
Place the fourth layer on top and prepare to pour the chocolate ganache over the entire cake. Ensure the ganache has cooled slightly to achieve a desirable drip effect. Allow it to cascade down the sides of the cake while you garnish with additional chopped pecans for that perfect finishing touch.
Chocolate Turtle Dream Cake Variations
Feel free to let your creativity run wild with these delightful variations, each adding a unique spin to this indulgent cake experience!
-
Nut Options: Swap out pecans for walnuts or almonds for a different nut flavor; this simple change can bring fresh inspiration to your dessert.
-
Dark Chocolate Delight: Use dark chocolate instead of semi-sweet for a more intense chocolate experience. The richness will elevate your cake to new heights.
-
Sea Salt Twist: Add a sprinkle of flaky sea salt atop the ganache for a scrumptiously simple sweet-salty contrast that perfectly complements the rich flavors.
-
Gluten-Free: Substitute all-purpose flour with a gluten-free blend to enjoy this decadent dessert without gluten—great for those with dietary restrictions!
-
Caramel Upgrade: Use homemade caramel sauce for a truly gourmet touch. The extra effort pays off in taste and adds a personal element to your cake.
-
Cream Cheese Frosting: Replace the chocolate ganache with cream cheese frosting for a tangy twist; this can add a delightful creamy texture to the layers.
-
Flavor Infusion: Mix in a teaspoon of espresso powder to the batter for a subtle coffee undertone that enhances the chocolate flavor.
-
Fruity Burst: Layer fresh berries between cake layers or use them as a vibrant garnish for a refreshing contrast against the rich chocolate and caramel – plus, they add a pop of color!
Explore these variations to make your Chocolate Turtle Dream Cake truly your own. For even more sweet inspiration, check out our decadent Chocolate Chalet Cake or indulge in an easy Strawberry Cake Filling for that beautiful burst of flavor!
How to Store and Freeze Chocolate Turtle Dream Cake
Room Temperature: Store the assembled cake in an airtight container at room temperature for up to 3 days. It will maintain its moist texture appealing to every sweet tooth.
Fridge: If you prefer a longer lifespan, you can refrigerate the Chocolate Turtle Dream Cake for up to a week. Just ensure it’s tightly wrapped to prevent it from absorbing any fridge odors.
Freezer: For extended storage, freeze the cake layers (without ganache) wrapped well in plastic wrap, then in aluminum foil. It can last in the freezer for up to 3 months. Thaw in the fridge overnight before frosting.
Reheating: After freezing, enjoy your cake at room temperature or gently reheat individual slices in the microwave for about 10-15 seconds to revive its decadent flavors.
Make Ahead Options
These Chocolate Turtle Dream Cake layers are perfect for meal prep, saving you time on busy days! You can bake the cake layers and store them in an airtight container at room temperature for up to 3 days. Additionally, prepare the chocolate ganache and caramel sauce ahead; refrigerate both for up to 5 days—just warm them slightly before serving to restore their luscious consistency. When you’re ready to assemble, simply layer the cooled cake with the prepped caramel and finish with the ganache. Trust me, even when made ahead, this decadent treat remains as delicious and impressive as if freshly baked!
Expert Tips for Chocolate Turtle Dream Cake
-
Measure Accurately: Use a kitchen scale or measuring cups for precise flour measurement to ensure the right texture in your chocolate turtle dream cake.
-
Cool Completely: Allow the cake layers to cool thoroughly before assembling to prevent the caramel from melting and making a gooey mess.
-
Perfect Ganache: Let the chocolate ganache cool slightly before pouring for a controlled drip effect that enhances the cake’s appearance.
-
Layer Generation: Alternate layering with caramel and pecans to create delightful surprises in every bite, enhancing both texture and flavor.
-
Storage Secrets: If planning to make ahead, store the assembled cake in an airtight container—this keeps it moist and fresh for your celebration.
What to Serve with Chocolate Turtle Dream Cake
Imagine a beautifully set table adorned with delicious side dishes that complement your indulgent dessert, creating an unforgettable dining experience.
-
Whipped Cream:
A dollop of freshly whipped cream adds a light, airy texture that balances the richness of the cake. -
Vanilla Ice Cream:
Creamy vanilla ice cream enhances the chocolate and caramel flavors, providing a delightful temperature contrast. -
Caramel Sauce Drizzle:
A drizzle of extra caramel sauce over the cake intensifies the sweet experience, tying in the dessert’s delicious layers. -
Chopped Nuts:
Crunchy chopped pecans or walnuts on top deliver a satisfying crunch that complements the cake’s soft texture. -
Fresh Berries:
Juicy raspberries or strawberries offer a tart burst that cuts through the sweetness, refreshing the palate with each bite. -
Coffee or Espresso:
A steaming cup of coffee elevates the dessert experience, with its rich flavors pairing perfectly with chocolate and caramel. -
Mint Leaves for Garnish:
Fresh mint adds a pop of color and a hint of freshness, visually and aromatically enhancing the presentation. -
Chocolate Ganache Tart:
A slice of chocolate ganache tart echoes the flavors, creating a delightful dessert duo for chocolate lovers. -
Hazelnut Liqueur:
For adults, serving a chilled glass of hazelnut liqueur alongside the cake creates a sophisticated pairing that enhances its nutty notes.

Chocolate Turtle Dream Cake Recipe FAQs
How do I select the right chocolate for my cake?
Absolutely! For the best results, always opt for high-quality cocoa powder and semi-sweet chocolate when making your Chocolate Turtle Dream Cake. Look for cocoa powder that’s labeled as Dutch-processed for a deeper, richer flavor. When choosing chocolate, select brands without additives; pure chocolate will yield the creamiest ganache.
What’s the best way to store my Chocolate Turtle Dream Cake?
To keep your cake fresh, store the assembled Chocolate Turtle Dream Cake in an airtight container at room temperature for up to 3 days. If you wish to enjoy it longer, you can refrigerate it for up to a week. Just make sure it’s well-wrapped to prevent it from absorbing other flavors from the fridge.
Can I freeze the Chocolate Turtle Dream Cake?
Yes, you can! For freezing, remove the ganache and wrap each cake layer tightly in plastic wrap, followed by aluminum foil. Store them in the freezer for up to 3 months. When you’re ready to enjoy, let the layers thaw in the fridge overnight, then frost with the ganache.
What should I do if my cake is too dry?
If you find that your cake turned out drier than expected, consider these tips for next time. First, make sure to accurately measure the flour; too much can lead to dryness. Also, adding an extra egg or a bit more buttermilk can add moisture. Finally, try adding a simple syrup by simmering equal parts sugar and water until dissolved, then brush this over the cooled layers before assembling.
Are there any dietary restrictions I should consider?
Certainly! If you’re making this Chocolate Turtle Dream Cake for someone with dietary allergies, it’s wise to check for nut allergies if you’re including chopped pecans. Additionally, you can accommodate gluten-sensitive guests by substituting all-purpose flour with a gluten-free blend designed for baking. Always read labels on your store-bought caramel and chocolate to ensure they meet any dietary needs.
What’s the secret to achieving a perfect ganache?
To create a velvety chocolate ganache, start by heating heavy cream until it’s almost boiling, then pour it over chopped chocolate. Let it sit for a few minutes to soften the chocolate before whisking until smooth. If your ganache is too thick, add a touch more cream; if it’s too thin, let it sit at room temperature to thicken. Always allow it to cool slightly before pouring over your cake for an exquisite finish!

Decadent Chocolate Turtle Dream Cake for Sweet Celebrations
Ingredients
Equipment
Method
- Preheat your oven to 350°F (175°C) and prepare four 8-inch round cake pans by greasing them with butter and dusting with flour.
- Whisk together the all-purpose flour, granulated sugar, cocoa powder, baking soda, baking powder, and salt in a large mixing bowl until well combined.
- Add the eggs, vegetable oil, buttermilk, and vanilla extract to the dry ingredients; mix with an electric mixer until smooth, about 2-3 minutes.
- Gradually stir in the hot water until well-blended; this hydrates the batter.
- Divide the batter evenly among the cake pans and bake for 20-25 minutes, or until a toothpick comes out clean.
- Allow the cakes to cool in the pans for about 10 minutes before removing.
- Layer the cake by placing the first layer on a serving plate, spreading caramel sauce, and repeating with the second and third layers.
- Place the last layer on top and pour cooled ganache over the entire cake, allowing it to drip down the sides and garnish with chopped pecans.
")