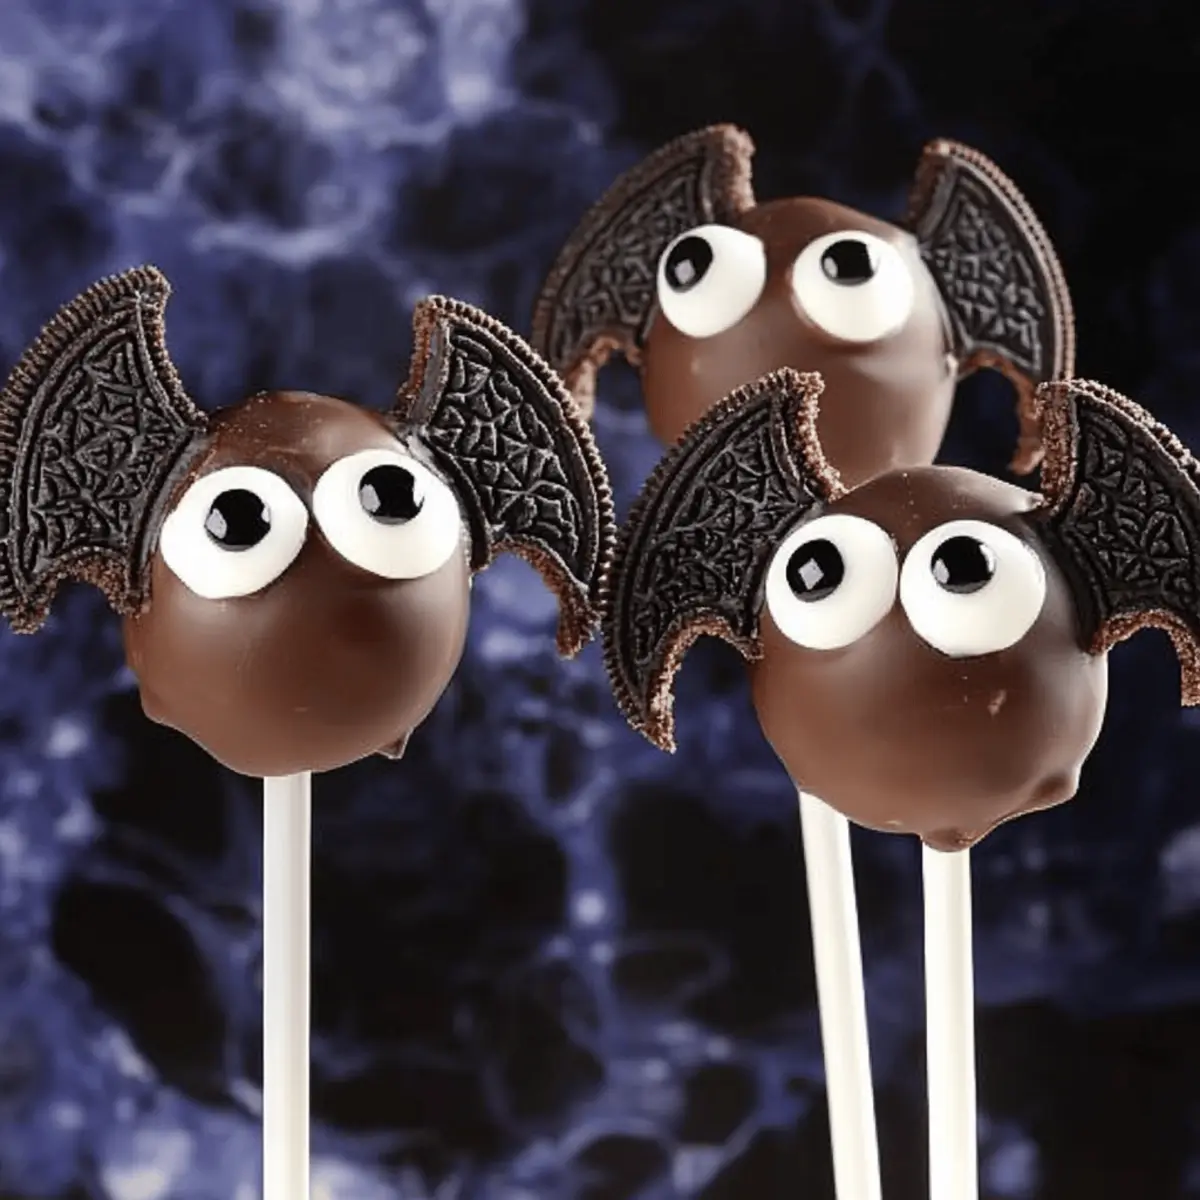
As I was sifting through my Halloween-themed decorations, I stumbled upon a delightful idea: OREO Bat Cookie Ball Pops! These no-bake treats are not just a feast for the eyes, but they promise to bring joy and excitement to both kids and adults alike. With their smooth, creamy centers and festive OREO wings, they’re the perfect addition to any Halloween gathering. Plus, the best part? They’re incredibly simple to whip up, making them a win for busy home chefs like us. Imagine the smiles as everyone bites into these adorable bat-shaped delights! Curious about how you can create these charming pops for your next celebration? Let’s get started!

Why are OREO Bat Cookie Pops a Must-Try?
No-Bake Delight: These cookie ball pops require zero baking, making them a breeze for those hectic Halloween nights.
Kid-Friendly Fun: Perfect for little hands, kids will love getting involved in the assembly!
Unique Presentation: With their adorable bat design, these treats are sure to be the highlight of your spooky spread.
Rich, Creamy Goodness: The combination of OREO and cream cheese creates a decadent filling that’s simply irresistible.
Time-Saver: Ready in just a few hours, your guests will indulge in these delightful creations without the wait.
Versatile Decoration: Get creative with toppings—try adding colored candy melts for a pop of color or mix up the cookies for different flavors. Make your Halloween memorable with these treats that rival the classic Cool Whip Cookies in simplicity and fun!
OREO Bat Cookie Ball Pops Ingredients
For the Cookie Balls
• OREO Cookies – The heart of the treat, these cookies provide a delightful flavor and texture. Gluten-free alternatives can cater to dietary needs.
• Brick Cream Cheese – This creamy binder adds both richness and a smooth consistency; make sure it’s softened for easy mixing.
For the Coating
• Semi-Sweet Baking Chocolate – A glossy, rich coating that envelops the treats, enhancing their chocolate flavor; try milk or dark chocolate for a twist.
For Decoration
• Mini Candy Button Eyes – These whimsical eyes give your bats personality; melted white chocolate or icing can also stand in for a playful look.
• Miniature Semi-Sweet Chocolate Chips – Perfect for adding details to the bats’ faces; they’ll give your pops an extra touch of charm.
• White Decorating Icing – Use this icing for fine details on the eyes; chocolate icing or omitting it altogether works if you’re in a pinch.
Now that you have all the ingredients ready, it’s time to dive into the fun of creating these adorable OREO Bat Cookie Ball Pops!
Step‑by‑Step Instructions for OREO Bat Cookie Ball Pops
Step 1: Prepare the Cookie Mixture
Start by finely crushing 9 OREO cookies in a food processor or by placing them in a zip-top bag and rolling with a rolling pin. This should resemble fine crumbs. Break the remaining OREO cookies in half and set aside for later. The cookie crumbs will form the base for your OREO Bat Cookie Ball Pops, so ensure they’re well-crushed for a smooth mixture.
Step 2: Mix the Filling
In a mixing bowl, combine the crushed OREO crumbs with softened cream cheese using a spatula or mixer until the mixture is smooth and fully blended. The cream cheese binds the crumbs together, creating a creamy filling. Once mixed, scoop the filling and shape it into 12 balls, about 1 inch in diameter. This is where your pops start to take shape!
Step 3: Insert Lollipop Sticks
Melt a small amount of semi-sweet chocolate in a microwave-safe bowl for about 30 seconds, stirring until smooth. Dip one end of each lollipop stick into the melted chocolate, then gently insert it into the center of each cookie ball. Place the cookie balls on a lined baking sheet. This anchoring technique helps secure the stick in the OREO Bat Cookie Ball Pops as they set.
Step 4: Freeze the Cookie Balls
Transfer the baking sheet with the cookie balls to the freezer and let them chill for about 10 minutes. This step firms up the balls for easier coating. When you remove them, they should be firm to the touch but still soft enough to work with. The chilling will ensure your pops maintain their shape when coated in chocolate.
Step 5: Coat in Chocolate
Prepare another batch of melted semi-sweet chocolate by microwaving it for an additional 30 seconds or until fully melted and smooth. Dip each chilled cookie ball fully into the melted chocolate, allowing any excess chocolate to drip off. Return them to the baking sheet to set, ensuring a smooth, even coating over the OREO Bat Cookie Ball Pops.
Step 6: Attach the Wings
With clean hands, cut the flat ends off the two cookie halves you set aside earlier. Dip these cut edges into the melted chocolate and attach them to the sides of each cookie ball to form the wings. The candy-coated wings will give your OREO Bat Cookie Ball Pops their whimsical bat design, adding both charm and creativity.
Step 7: Decorate the Bats
Now it’s time for the fun part: decorating! Use the mini candy button eyes and the miniature semi-sweet chocolate chips to create adorable facial features on the bats. Position the eyes on the cookie balls and add the chocolate chips to give your bat pops character. If desired, use white decorating icing to draw additional details on the eyes, enhancing their adorable appearance.
Step 8: Chill Again
Finally, place the decorated OREO Bat Cookie Ball Pops back in the refrigerator for about 1 hour to ensure they set completely. This last chilling step allows all the decorations to adhere beautifully and firm up the chocolate coating. When they’re done, your spooky and delicious treats will be ready to serve at your Halloween gathering!

Make Ahead Options
These OREO Bat Cookie Ball Pops are a fantastic option for meal prep, perfect for busy Halloween schedules! You can make the cookie mixture and shape it into balls up to 3 days in advance, storing them in an airtight container in the refrigerator to maintain their creamy texture. Additionally, once coated in chocolate, the pops can be refrigerated for up to 24 hours before serving. To ensure they stay fresh, make sure they are completely cooled and set before placing them in the fridge. When you’re ready to serve, simply decorate them with the wings and candy features for delightful, spooky treats that will impress your guests!
Variations & Substitutions for OREO Bat Cookie Ball Pops
Mix up your OREO Bat Cookie Ball Pops with these fun and flavorful ideas that will surely excite your taste buds!
-
Gluten-Free: Use gluten-free sandwich cookies for a delightful treat that everyone can enjoy without restriction. You won’t lose any of the rich flavor!
-
Candy Coating Colors: Swap traditional chocolate for vibrant colored candy melts to match your Halloween theme or party colors. This adds a festive flair that kids will love!
-
Add Nuts: Incorporate finely chopped nuts, like pecans or almonds, into the cookie mixture for a lovely crunch. This twist enhances texture and flavor, making your pops even more irresistible.
-
Flavor Variations: Try using flavored sandwich cookies, like mint or peanut butter, for a unique take on the classic recipe. These flavors elevate the treat and surprise your taste buds.
-
Decadent Drizzle: After dipping in chocolate, drizzle white chocolate over the pops for an extra layer of sweetness and decoration. It’s a simple touch that adds a gourmet vibe!
-
Customize Eyes: Instead of mini candy buttons or chocolate chips for the eyes, use edible googly eyes or colorful sprinkles for a fun character. This little change can bring your bats to life!
-
Peppermint Twist: Add crushed peppermint candies in the filling for a festive minty flavor if you’re making these for a winter celebration. They’ll be perfect for holiday gatherings!
-
Chocolate-Covered Almonds: Instead of cookie wings, use chocolate-covered almonds to create more structure and an added crunch to your bat designs. This alternative can transform the pop while keeping it bat-like!
Experiment with these variations and substitutions based on your taste and dietary needs! For more fun and simple recipes, consider trying Mastering Nestle Cookie or whipping up a batch of Cake Mix Cookies. Happy baking!
Helpful Tricks for OREO Bat Cookie Ball Pops
Cream Cheese Importance: Ensure cream cheese is fully softened for a smooth mixture without lumps, making your OREO Bat Cookie Ball Pops perfectly creamy.
Stick Insertion Care: Use gentle pressure when inserting lollipop sticks to prevent cracking the cookie balls; this will keep them intact and ready for decorating.
Drip Off Excess: Allow excess chocolate to drip off each pop before placing them back on the tray to avoid clumping and ensure an even coating.
Cookie Crumb Consistency: Aim for finely crushed cookie crumbs; larger pieces may result in uneven shapes. A smooth base will yield flawless cookie balls.
Freezing Time: Don’t skip the chilling steps! Freezing the cookie balls helps them firm up for easier handling during the chocolate coating process.
What to Serve with OREO Bat Cookie Ball Pops?
As you whip up these enchanting treats, envision a delightful spread that complements their whimsical charm and creamy indulgence.
-
Pumpkin Spice Latte: The warm spices and rich flavors of this classic beverage echo the comforting vibes of Halloween.
-
Chocolate Milkshake: Creamy and sweet, a milkshake pairs perfectly with the chocolatey goodness of your cookie pops, enticing both kids and adults.
-
Candy Corn Parfait: Layered with whipped cream and pumpkin puree, this treat adds color and a playful sweetness that balances the rich cookie bites.
-
Apple Slices with Caramel Dip: The crunchy apple combined with sweet caramel offers a refreshing, fruity contrast to the dense richness of the cookie balls.
-
Popcorn Mix: Make a festive Halloween popcorn mix with candy corn and chocolate drizzle; its crunchiness adds a fun texture alongside the cookie pops.
-
Ghoul-Aid Punch: Create a spooky yet delicious drink with fruit juices and gummy worms, making it a perfect party centerpiece for your Halloween gathering.
Imagine this charming table setting as friends and family gather around, all indulging in your delightful OREO Bat Cookie Ball Pops surrounded by an array of playful and delicious pairings!
Storage Tips for OREO Bat Cookie Ball Pops
Fridge: Store your OREO Bat Cookie Ball Pops in an airtight container in the refrigerator for up to 1 week. This keeps them fresh and delicious for those spooky celebrations.
Freezer: For longer storage, these cookie pops can be frozen for up to 3 months. Place them in a single layer on a baking sheet to freeze first, then transfer to a sealed container.
Thawing: When ready to enjoy, simply remove from the freezer and let them sit at room temperature for about 15-20 minutes before serving to soften slightly.
Reheating: While these treats are best enjoyed chilled, if you’d like to make them a bit more decadent, consider lightly warming them in the microwave for 10 seconds for a gooey experience.

OREO Bat Cookie Ball Pops Recipe FAQs
How do I choose the right OREO cookies?
Absolutely! To maximize flavor, opt for classic OREO cookies over off-brand versions. Look for packages without broken cookies; fresh, unblemished cookies yield the best texture for your bat pops.
What are the best storage methods for OREO Bat Cookie Ball Pops?
To keep your OREO Bat Cookie Ball Pops fresh, store them in an airtight container in the refrigerator for up to 1 week. If you need them to last longer, they can be frozen for up to 3 months. For freezing, lay them in a single layer on a baking sheet until firm, then transfer to a sealed container for storage.
Can I freeze OREO Bat Cookie Ball Pops?
Yes, you can definitely freeze these delicious bat pops! Begin by placing them on a baking sheet in a single layer, freeze until solid, then transfer to an airtight container for longer storage. When you’re ready to indulge, thaw them in the fridge overnight or let them sit at room temperature for about 15-20 minutes before serving.
What if the cookie balls crack when inserting the sticks?
If your OREO Bat Cookie Ball Pops crack during the stick insertion, don’t worry! It happens. Simply reshape the balls gently with your hands and ensure you’re using gentle pressure while inserting the sticks. Make sure the cookie balls are adequately chilled; this usually helps minimize cracking.
Are there any dietary considerations I should keep in mind?
Very! For gluten-free options, you can substitute traditional OREO cookies with gluten-free chocolate sandwich cookies. Additionally, if there are nut allergies to consider, check the packaging of your cream cheese and chocolate for any cross-contamination warnings.
How can I make these pops more visually appealing?
Get creative with decorations! Besides the suggested mini candy eyes and chocolate chips, you can use colored candy melts to coat the cookie balls. This adds festive splashes of color, making your OREO Bat Cookie Ball Pops even more eye-catching on your dessert table.

Delicious OREO Bat Cookie Ball Pops for Spooky Festivities
Ingredients
Equipment
Method
- Finely crush 9 OREO cookies in a food processor until resembling fine crumbs. Break the remaining OREO cookies in half and set aside.
- In a mixing bowl, combine the crushed OREO crumbs with softened cream cheese until smooth. Shape into 12 balls about 1 inch in diameter.
- Melt a small amount of semi-sweet chocolate in a microwave-safe bowl for 30 seconds. Dip one end of each lollipop stick in the melted chocolate, then insert it into the center of each cookie ball. Place them on a lined baking sheet.
- Transfer the baking sheet with the cookie balls to the freezer for 10 minutes to firm them up.
- Dip each chilled cookie ball fully into the melted chocolate. Allow excess chocolate to drip off before returning them to the baking sheet.
- Cut the flat ends off the two cookie halves. Dip these edges in melted chocolate and attach them to the sides of each cookie ball to form wings.
- Use mini candy button eyes and chocolate chips to create faces on the bats. Optionally, use white decorating icing for additional details.
- Place the decorated pops back in the refrigerator for about 1 hour to set completely.


