")
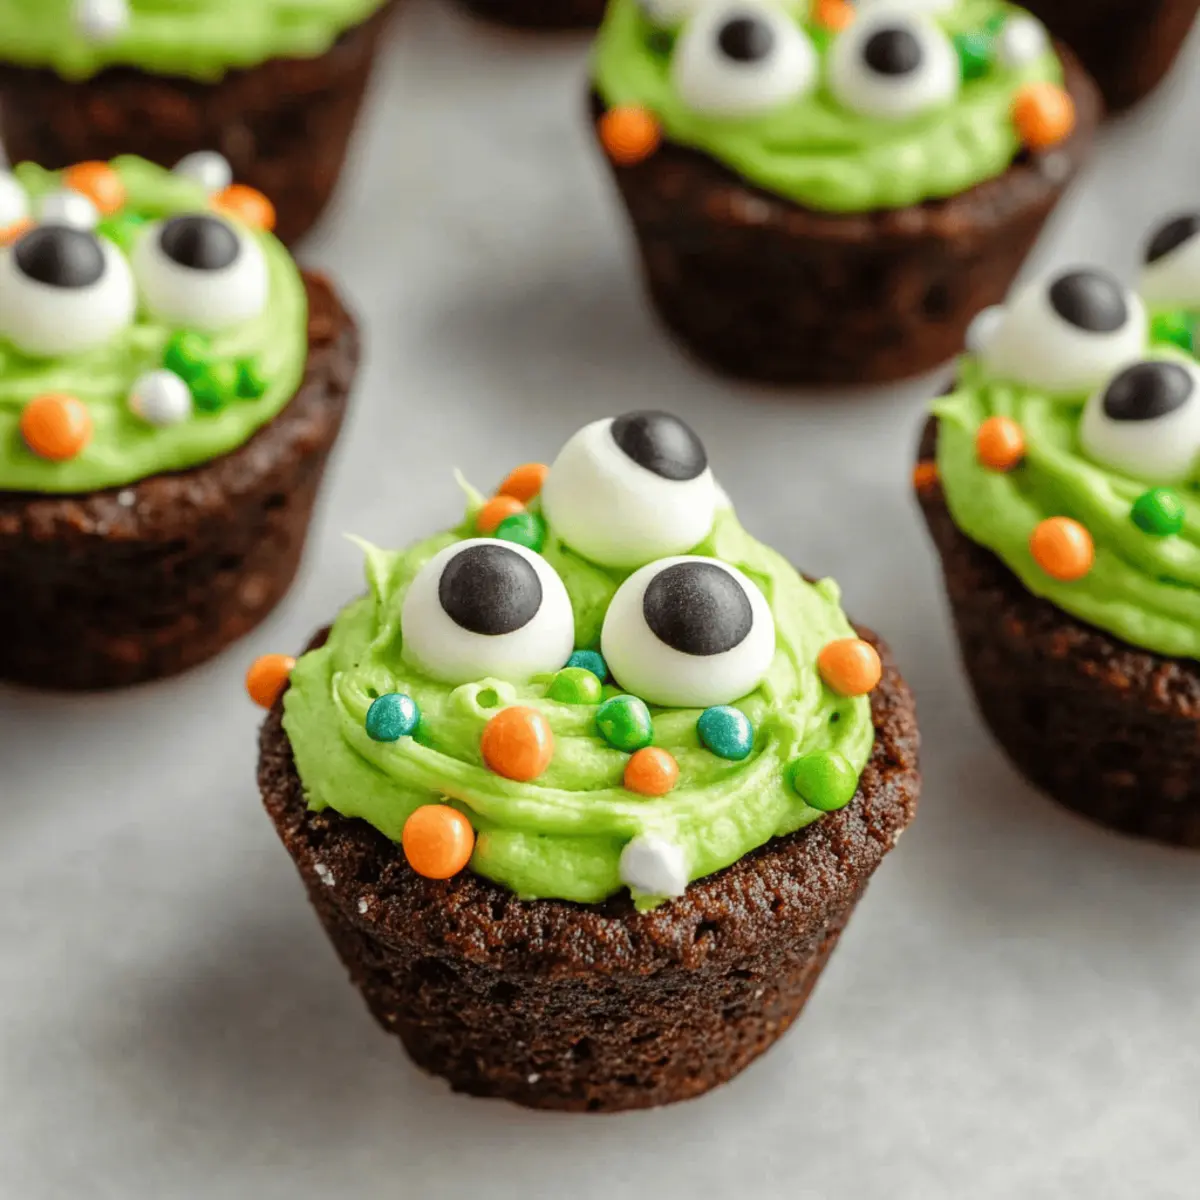
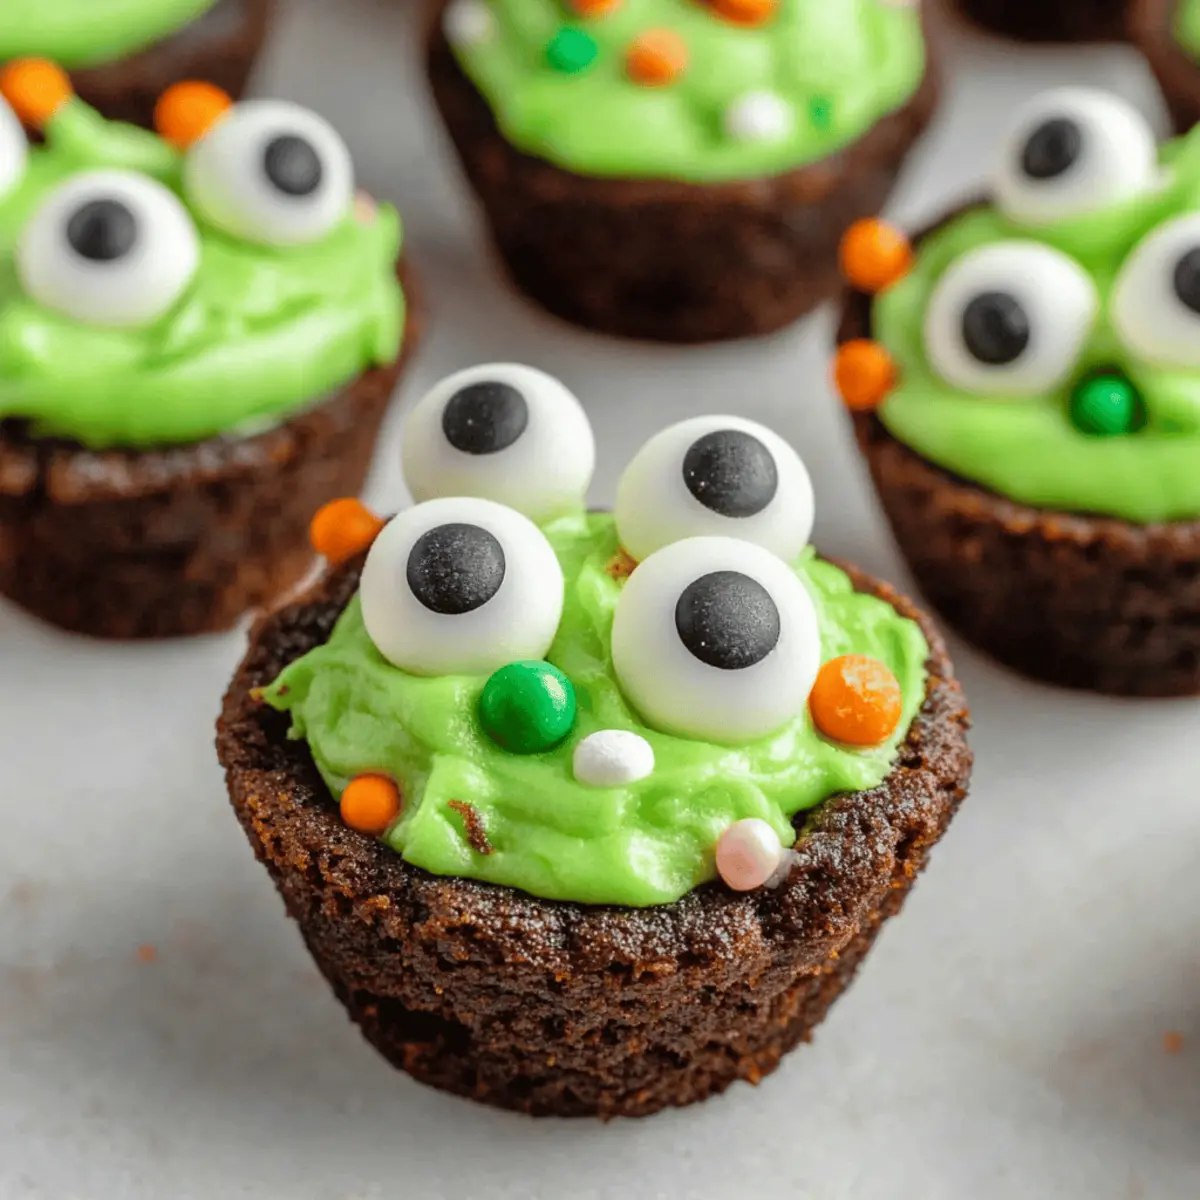
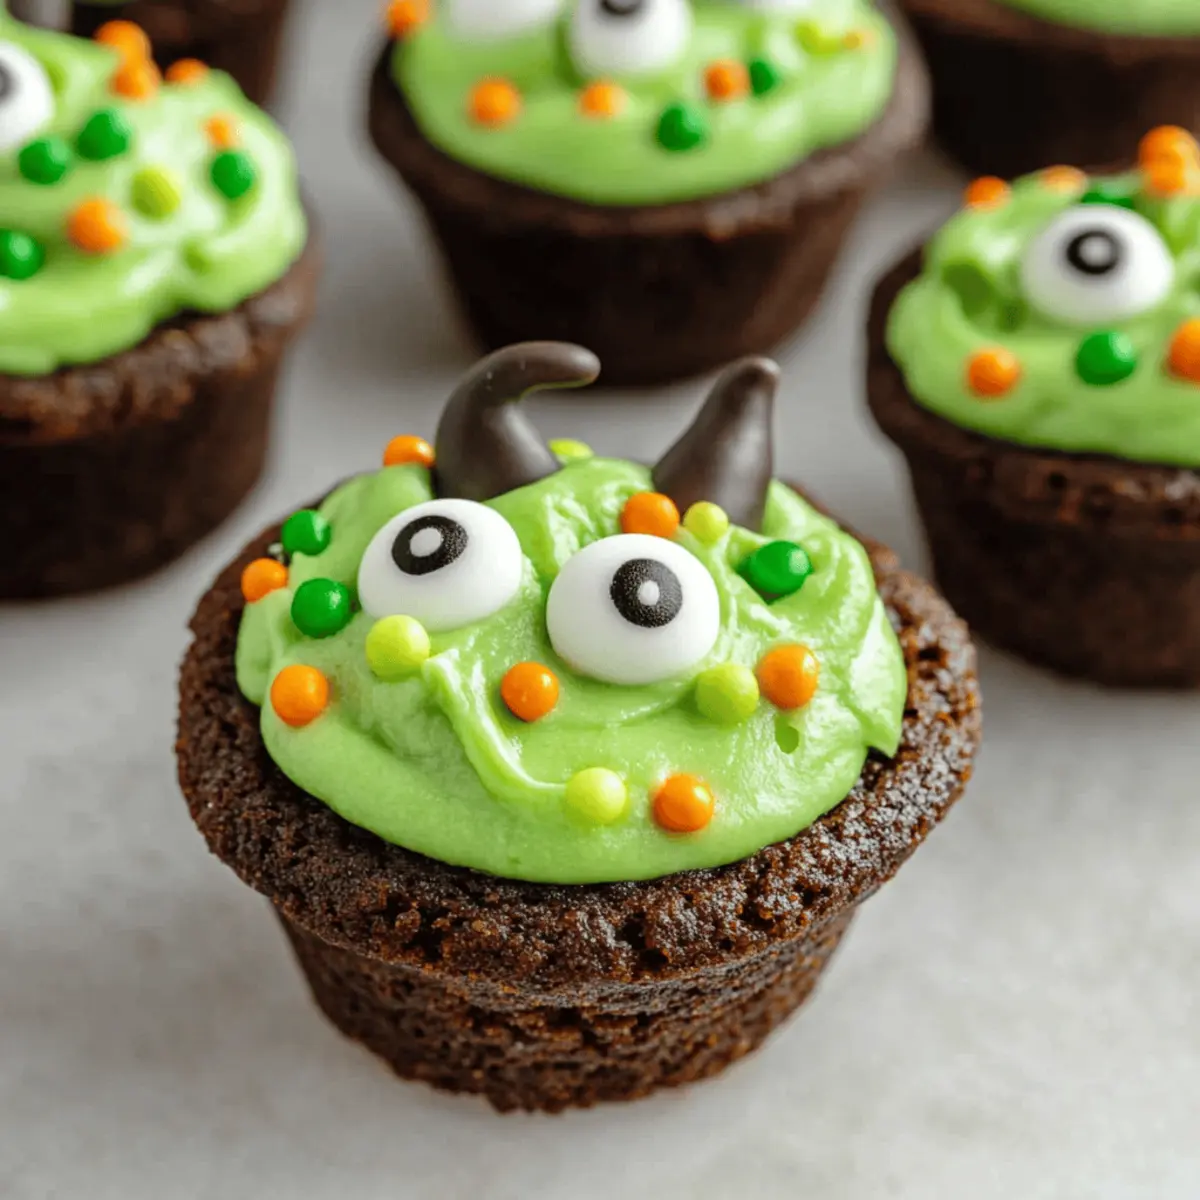
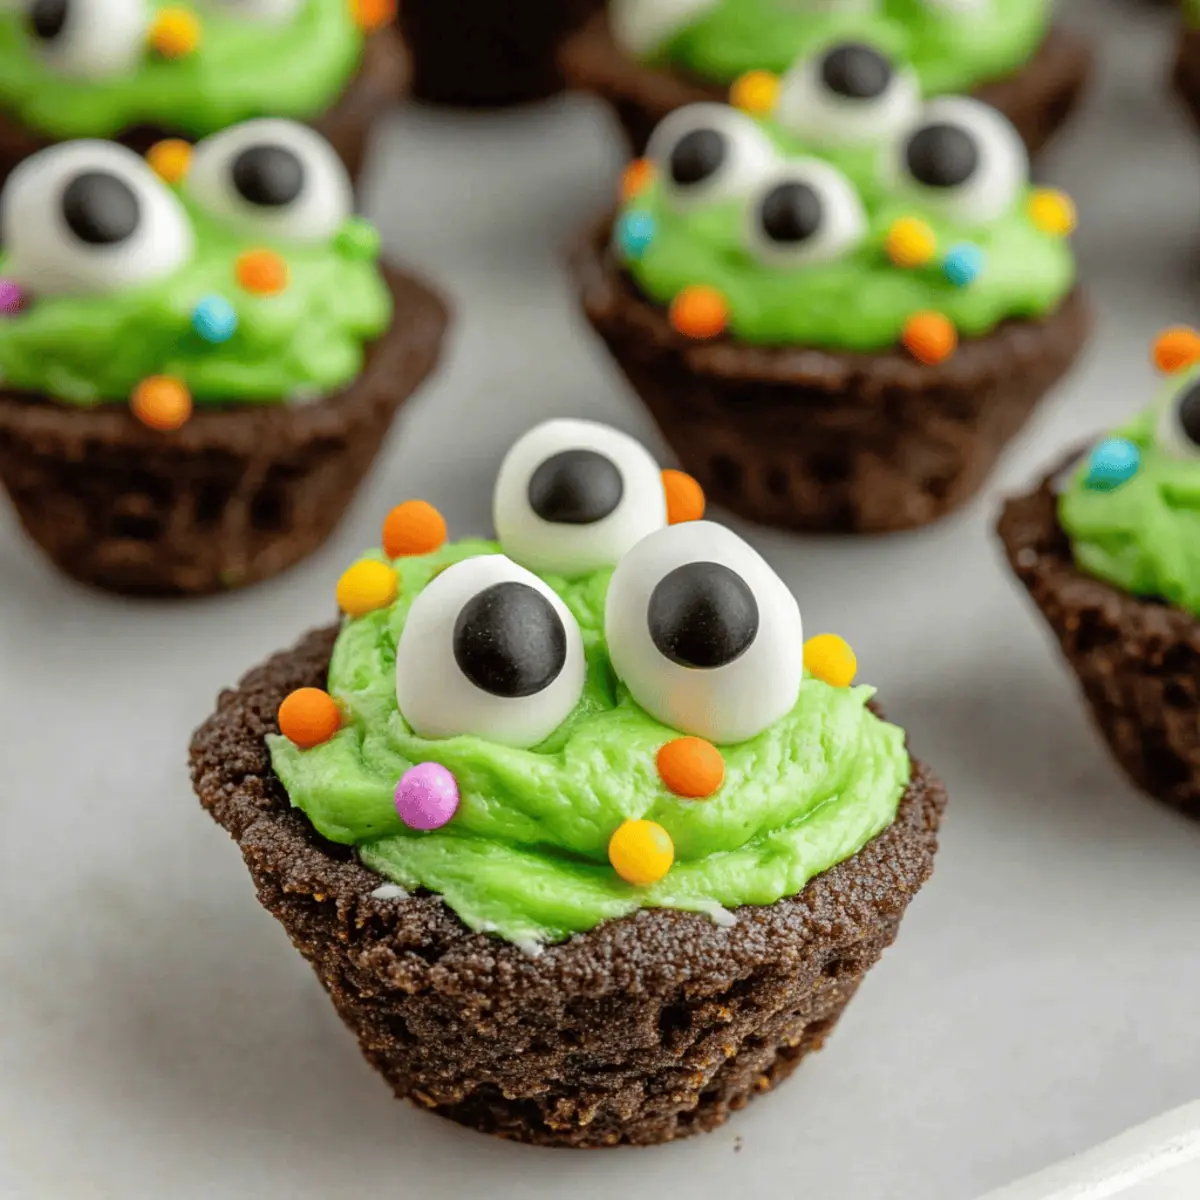
As the leaves turn and the air grows crisp, it’s time to conjure up some magic in the kitchen with my Easy Cauldron Cookies! This Halloween-inspired recipe features soft cookie cups made from chocolate cake mix, each filled with creamy, vibrant green buttercream that looks just like bubbling potions. Not only are these spooky treats quick to whip up, but they also promise a delightful decorating experience that kids will adore. It’s a fun way to create memories with your little ones while transforming simple ingredients into whimsical sweets. Curious about how to craft these enchanting cookies and make your Halloween festivities even more memorable? Let’s dive in!
Why Are Easy Cauldron Cookies a Must-Try?
Kid-Friendly Fun: These cookies are not only delicious but also serve as a fantastic activity for kids! They get to help decorate, creating their own spooky designs.
Quick to Make: With minimal prep time and simple ingredients, you can whip up a batch in no time. Perfect for those last-minute Halloween gatherings!
Endless Creativity: Customize your Cauldron Cookies with various sprinkles, food coloring, and decorations. Experimenting with flavors can lead to delightful surprises!
Whimsical Presentation: The combination of cookie cups and vibrant buttercream creates a visually impressive treat that will wow your guests and trick-or-treaters alike.
Great for Parties: These cookies pair fantastically with themed drinks or as part of a Halloween dessert table, ensuring there’s something fun for everyone. Spread the joy of baking this season!
Easy Cauldron Cookies Ingredients
For the Cookie Cups
• Devil’s Food Cake Mix – Provides a rich, chocolatey base, but feel free to substitute with any chocolate cake mix you have on hand.
• Eggs – They add essential structure and moisture; for a vegan option, mix flaxseed meal with water instead.
• Canola or Vegetable Oil – This helps keep your cookie cups moist and chewy; melted coconut oil works well as a substitute.
• Black Food Coloring (optional) – If you’re looking for that spooky touch, this will darken the cookies; omit if you prefer a classic look.
For the Buttercream Frosting
• Unsalted Butter – It’s a must-have for creamy frosting; switch to vegan butter for a dairy-free version.
• Powdered Sugar – Sweetens and thickens your frosting for that perfect potion-like appearance.
• Vanilla Extract – Adds delightful flavor; using pure vanilla extract elevates the taste even more.
• Salt – Just a pinch balances the sweetness wonderfully.
• Milk (1-3 tbsp) – Adjusts frosting consistency; any non-dairy milk is a great substitute.
• Green Food Coloring – This transforms your frosting into a bubbling potion shade—magical!
For Decoration
• Round Green Sprinkles, Halloween Sprinkles, Candy Eyeballs – Get creative with these fun toppings to enhance the spooky festivities!
• Pretzel Sticks – Serve as whimsical “stir sticks” for your potion-filled cookies.
With these ingredients in hand, you’re ready to conjure up some delicious Easy Cauldron Cookies that are sure to delight and entertain during this spooky season!
Step‑by‑Step Instructions for Easy Cauldron Cookies
Step 1: Preheat the Oven
Begin by preheating your oven to 350°F (175°C). While the oven warms up, grease three 12-count mini muffin pans with cooking spray or a thin layer of butter to prevent sticking. This preparation ensures your Easy Cauldron Cookies release easily after baking, so they maintain their delightful cup shape.
Step 2: Mix the Dough
In a large mixing bowl, combine the Devil’s Food Cake Mix, eggs, canola oil, and optional black food coloring. Use a wooden spoon or electric mixer to blend the ingredients until fully incorporated, resembling a thick, smooth batter. This mixture creates the rich, chocolatey foundation for your cauldron cookies, ready to be transformed into spooky treats.
Step 3: Scoop the Dough
Using a tablespoon or a small ice cream scoop, portion out 1/2 tablespoon of the cookie dough into each greased mini muffin cup. Lightly flatten the dough with your fingers to form little cups. Arrange them evenly in the pans, making sure not to overcrowd. With this step, you are shaping the cauldrons that will hold your vibrant frosting.
Step 4: Bake the Cookies
Place the muffin pans in the preheated oven and bake for 8-10 minutes. The edges of the cookies should be set while the centers remain slightly soft. As they bake, keep an eye on them to prevent overbaking. Once done, remove the pans from the oven and immediately press the back of a tablespoon into the center of each cookie to form an indentation.
Step 5: Cool the Cookie Cups
Allow the cookie cups to cool in the pans for about 5 minutes, then carefully transfer them to a wire rack to cool completely. This cooling step is essential before decorating, as it prevents the buttercream from melting when added to your Easy Cauldron Cookies later on.
Step 6: Prepare the Buttercream
While the cookies cool, begin making the buttercream frosting. In a mixing bowl, beat the softened unsalted butter on medium speed until creamy and fluffy. Gradually add in powdered sugar, vanilla extract, and a pinch of salt, mixing until smooth. Adjust the consistency with milk as needed, then add green food coloring to achieve your desired potion-like hue.
Step 7: Pipe the Frosting
Once the cookie cups are completely cooled, use a piping bag fitted with a round tip to fill each cup with the vibrant green buttercream. Give it a generous swirl to mimic a bubbling cauldron. This is the fun part of making your Easy Cauldron Cookies, as you bring them to life with spooky frosting.
Step 8: Add Final Decorations
To elevate your cookies, get creative with decorations! Sprinkle the tops with round green sprinkles, Halloween-themed sprinkles, and candy eyeballs for a playful effect. Lastly, insert a pretzel stick into each filled cup as a whimsical “stir stick,” perfect for adding to the potion-like aesthetic of your Halloween treats.
Step 9: Serve and Enjoy
Present your Easy Cauldron Cookies on a festive platter or as part of a Halloween-themed dessert table. These delightful treats are now ready to bring joy to your festivities. Share them with family and friends, and delight in the smiles they bring to everyone’s faces!
Storage Tips for Easy Cauldron Cookies
Room Temperature: Store cookie cups in an airtight container at room temperature for up to 3-4 days to maintain their freshness and texture.
Fridge: If you prefer, you can refrigerate the decorated cookies for up to a week; just ensure they’re covered, so the frosting and decorations don’t dry out.
Freezer: Undecorated cookie cups can be frozen for up to three months. Make sure to wrap them tightly in plastic wrap or store in an airtight container to prevent freezer burn.
Reheating: If you wish to enjoy a warm treat, reheat unfilled cookies in the microwave for about 10 seconds. Avoid thawing decorated cookies, as sprinkles may bleed.
What to Serve with Easy Cauldron Cookies?
As you prepare for a ghoulish gathering, let’s discover delightful accompaniments that will elevate your spooky treat experience!
- Witch’s Brew Punch: A fizzy, green beverage that complements the whimsical theme of the cookies, making it a fun choice for all ages.
- Mummy Dogs: These fun, savory treats are easy to make and provide a delicious contrast to the sweet flavor of the cookies.
- Candy Corn Trail Mix: This crunchy mix of nuts, popcorn, and candy corn adds a delightful texture and sweetness that pairs beautifully with chocolate cookies.
- Pumpkin Spice Hot Chocolate: A creamy, cozy drink that brings warmth to your Halloween festivities, turning it into a complete haunting experience.
- Spooky Cheese Platter: A selection of themed cheeses and crackers that balances out the sweetness of the cookies with savory flavors and fun presentation.
- Monster Fruit Skewers: Skewers of colorful fruits are a healthy addition that adds a bright contrast to the dark, rich look of your Easy Cauldron Cookies.
- Chocolate Bat Cookies: For more chocolatey fun, these bat-shaped cookies echo the themes of Halloween and will be a hit among guests.
- Halloween Cupcakes: Dress them up with spooky toppings for a festive dessert table that complements the cauldron theme while offering variety.
Make Ahead Options
These Easy Cauldron Cookies are fantastic for meal prep and can be made ahead of time to ease your Halloween festivities! You can prepare the cookie cups up to 24 hours in advance by baking them and then storing them in an airtight container at room temperature. For the buttercream frosting, make it ahead and refrigerate it for up to 3 days—just be sure to bring it to room temperature before piping. When it’s time to serve, simply fill the cooled cookie cups with the frosting and decorate them with sprinkles and pretzel sticks. Your spooky treats will be just as delicious, allowing you to focus on enjoying the festivities!
Easy Cauldron Cookies Variations & Substitutions
Customize your Easy Cauldron Cookies to make them even more fun and delicious!
-
Brownie Base: Swap the cake mix for brownie mix for a richer, fudgier cookie cup that adds a delightful twist.
-
Store-Bought Frosting: For a faster treat, use store-bought frosting; simply tint it green and get decorating!
-
Colorful Potions: Experiment with different food coloring shades to create a variety of potion colors that match your Halloween theme.
-
Add Texture: Incorporate mini marshmallows or chocolate chips into the cookie dough for added texture and taste. The gooey marshmallows will bring an extra touch of sweetness!
-
Nutty Flavor: Stir in chopped nuts like walnuts or pecans to the cookie batter for a crunchy surprise in every bite.
-
Spicy Kick: Enhance the flavor by adding a dash of cinnamon or cayenne pepper to the cookie dough for a subtle spicy element.
-
Cream Cheese Frosting: For a tangy twist, replace the buttercream with cream cheese frosting—it’s a delightful contrast with the chocolate cookie!
-
Themed Decorating: Use spooky candies like gummy worms or edible glitter to create unique designs that will excite the kids.
The versatility of these Easy Cauldron Cookies means there’s limitless fun to be had in the kitchen! Sprinkle in your creativity, and why not pair them with some Millies Cookies Bake for even more treats?
Expert Tips for Easy Cauldron Cookies
• Cool Before Decorating: Allow cookie cups to cool completely before applying frosting to prevent it from melting—keep your cauldrons looking spooktacular!
• Frosting Consistency: If your green buttercream is too thick, add milk one tablespoon at a time to reach a piping consistency that’s easy to work with.
• Creative Decorations: Encourage kids to express their creativity with different Halloween sprinkles and edible decorations to personalize their Easy Cauldron Cookies!
• Dough Measurement: Use a small ice cream scoop for uniform scoops of dough—this ensures perfectly sized cookie cups that bake evenly.
• Avoid Overbaking: Keep an eye on the cookie cups as they bake, as overbaking can lead to a dry texture. The centers should be slightly soft for best results.
Easy Cauldron Cookies Recipe FAQs
What type of cake mix should I use for Easy Cauldron Cookies?
Absolutely! I recommend using Devil’s Food Cake Mix for a rich chocolate flavor, but you can easily substitute it with any chocolate cake mix you have on hand. If you’re feeling adventurous, a brownie mix could also elevate this cookie cup into a fudgy delight!
How should I store my Easy Cauldron Cookies?
You can store your cookie cups in an airtight container at room temperature for 3-4 days. If you prefer a longer shelf life, it’s best to refrigerate decorated cookies for up to a week. Just make sure they are well-covered so the frosting remains fresh and doesn’t dry out.
Can I freeze the Easy Cauldron Cookies?
Yes! Undecorated cookie cups can be frozen for up to three months. To freeze, wrap each cookie cup tightly in plastic wrap or place them in an airtight container. When you’re ready to enjoy them, simply thaw for a few minutes at room temperature or pop them in the microwave for about 10 seconds for a slightly warm treat!
What should I do if my cookie cups don’t hold their shape?
Very! If your cookie cups spread too much during baking, try chilling the dough for about 30 minutes before baking. This helps solidify the fats, preventing excessive spreading. Additionally, ensure that you’re measuring the ingredients accurately and not overmixing the dough.
Can I make these cookies allergy-friendly?
Absolutely! To cater to dietary restrictions, use vegan alternatives like flax eggs and plant-based butter for a dairy-free version. Make sure to choose allergy-friendly sprinkles and food coloring as well. Always check labels to avoid potential allergens, particularly if serving to children.
What if my frosting is too thick?
No worries! If your buttercream frosting isn’t spreading well, simply add milk one tablespoon at a time until you reach a smooth, pipeable consistency. Adjusting the texture will ensure that your Easy Cauldron Cookies look and taste perfect when decorated.
Easy Cauldron Cookies: A Fun Halloween Treat to Bake Together
Ingredients
Equipment
Method
- Preheat your oven to 350°F (175°C) and grease the mini muffin pans.
- Mix the Devil's Food Cake Mix, eggs, canola oil, and optional black food coloring until smooth.
- Scoop 1/2 tablespoon of dough into each muffin cup and lightly flatten.
- Bake for 8-10 minutes until edges are set; press the back of a tbsp into each cookie to form an indentation.
- Cool the cookie cups for 5 minutes, then transfer to a wire rack.
- Beat softened butter, then add powdered sugar, vanilla, and salt; adjust consistency with milk and add green food coloring.
- Pipe the green buttercream into cooled cookie cups, swirling to mimic a bubbling cauldron.
- Decorate with sprinkles, candy eyeballs, and insert a pretzel stick into each cookie.
- Serve on a festive platter or dessert table and enjoy!
")