")
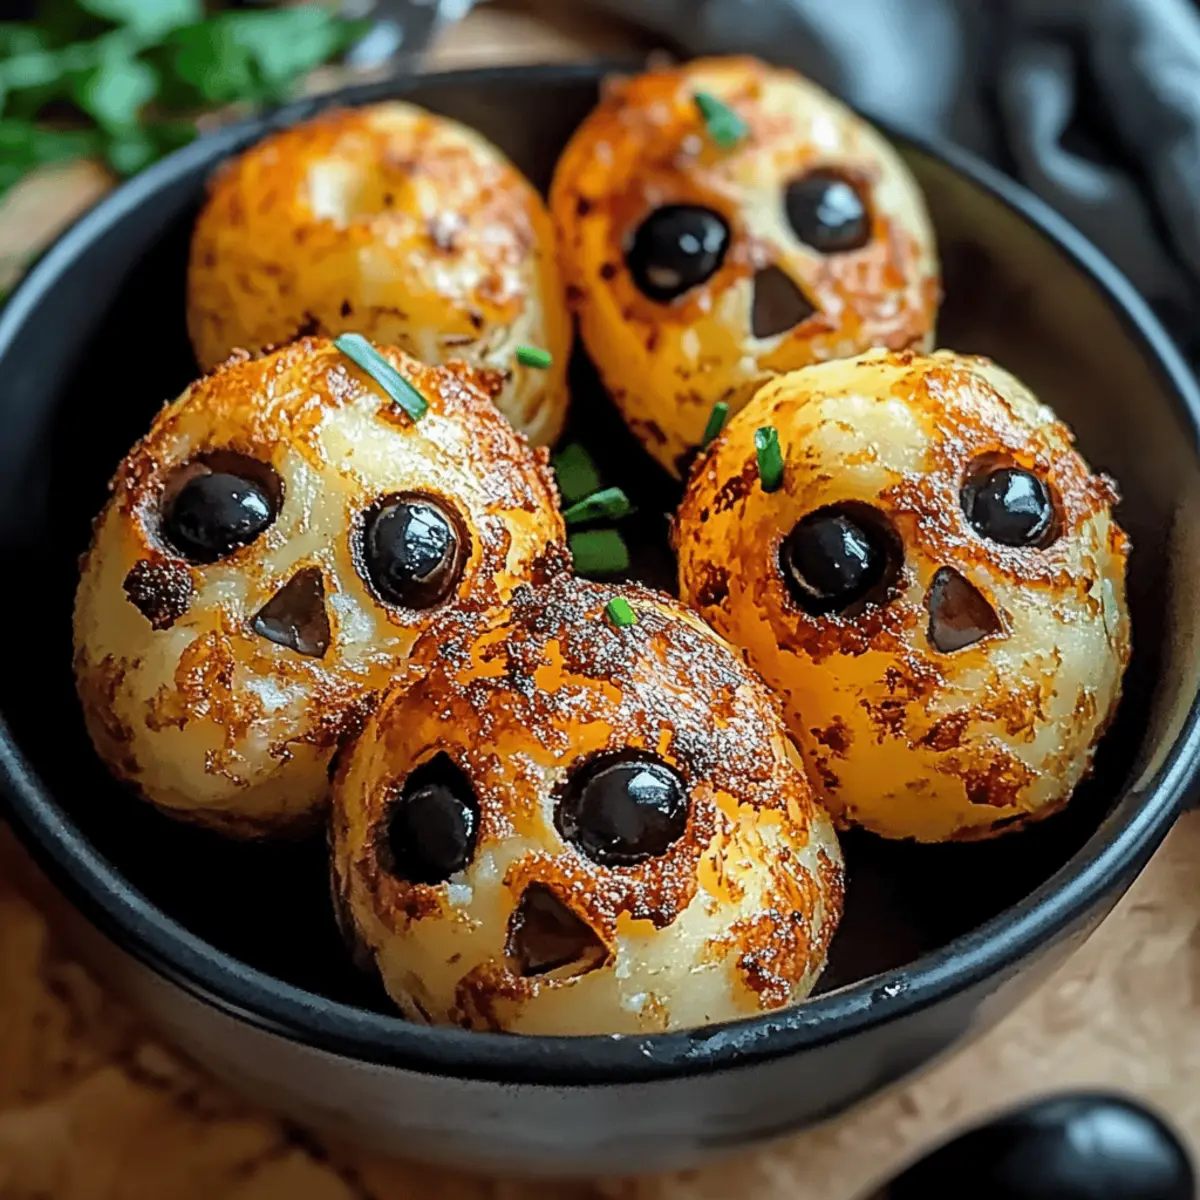
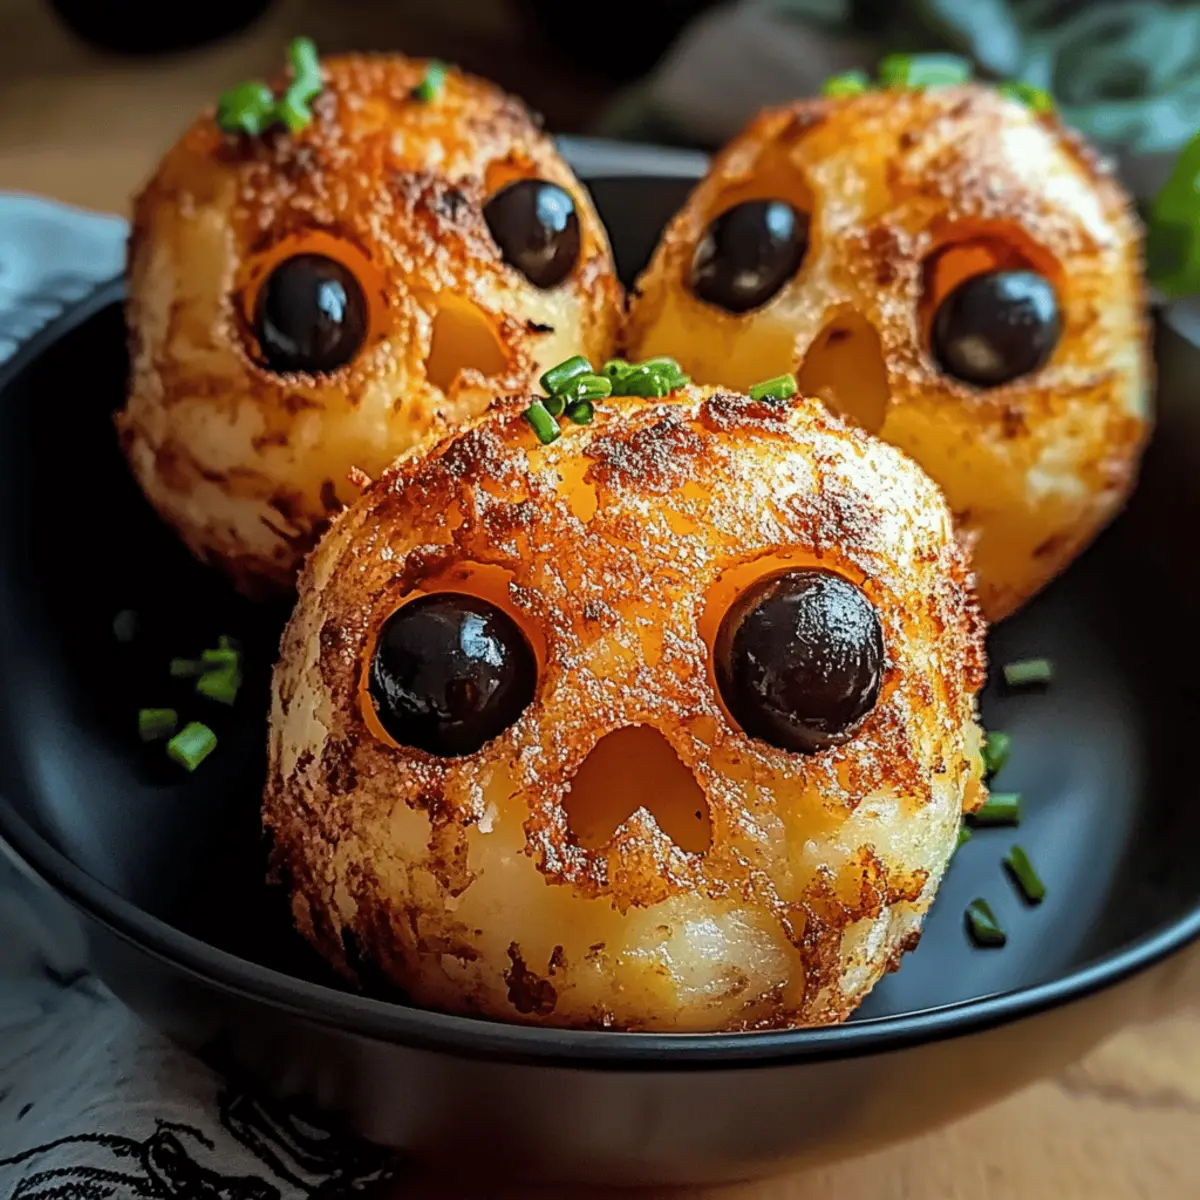
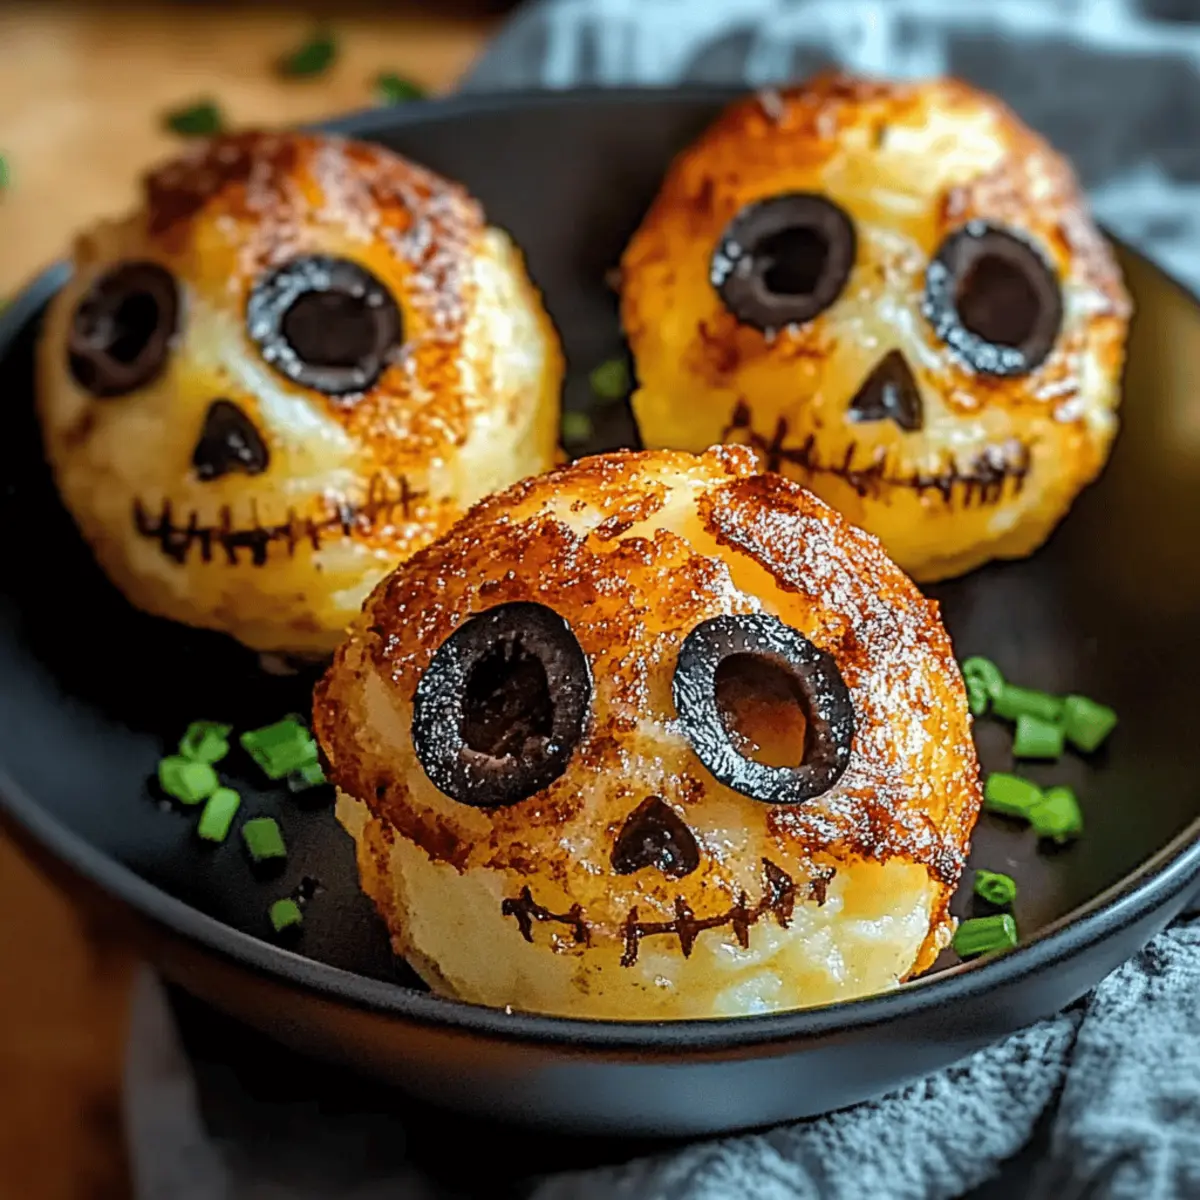
The crisp autumn air has a hint of magic, a time when the colors shift and the leaves dance. It’s the perfect backdrop for whipping up something fun, don’t you think? Enter my Spooky Skull Potatoes—an exciting twist on traditional mashed potatoes that transforms them into delightfully eerie Halloween shapes! Not only are these mashed potatoes creamy and delectable, but they also make for a captivating centerpiece at any Halloween gathering. With just a bit of creativity, you’ll wow your guests, whether you’re an experienced cook or trying something new. So let’s roll up our sleeves and dive into this festive recipe that’s bound to bring out your inner mad scientist in the kitchen! What other haunting shapes will you create this season?
Why You’ll Crave Spooky Skull Potatoes?
Uniquely Festive: These Spooky Skull Potatoes are not just any ordinary mashed potatoes— they are a fun, Halloween-inspired treat that adds a whimsical flair to your table.
Creamy Delight: Experience the rich, creamy texture that melts in your mouth, making every bite a velvety adventure.
Easy to Make: The simple steps mean anyone can create these fun shapes, making them ideal for cooking with kids or impressing guests without the stress!
Crowd-Pleasing Appeal: With their playful design, these potatoes are sure to be a conversation starter and a favorite among both kids and adults at your Halloween party.
Make-Ahead Magic: Preparing them in advance allows you to save time on the day of your festivity, so you can focus on enjoying the spooky fun. Plus, for extra inspiration, you might find some fantastic ideas in Making Air Potatoes for your next gathering!
Spooky Skull Potatoes Ingredients
For the Potatoes
• Large Russet Potatoes – The ideal base for creamy mash; you can swap with Yukon Gold for a buttery flavor.
• Heavy Cream – Adds a rich and smooth texture to your spooky skull potatoes; substitute with milk for a lighter option.
• Butter – Enhances the creamy flavor; make sure to melt it before mixing in. Dairy-free? Margarine works too!
For Seasoning
• Salt – A little enhances all flavors; add to taste.
• Pepper – Brings warmth and spice; adjust according to your preference.
For Decoration
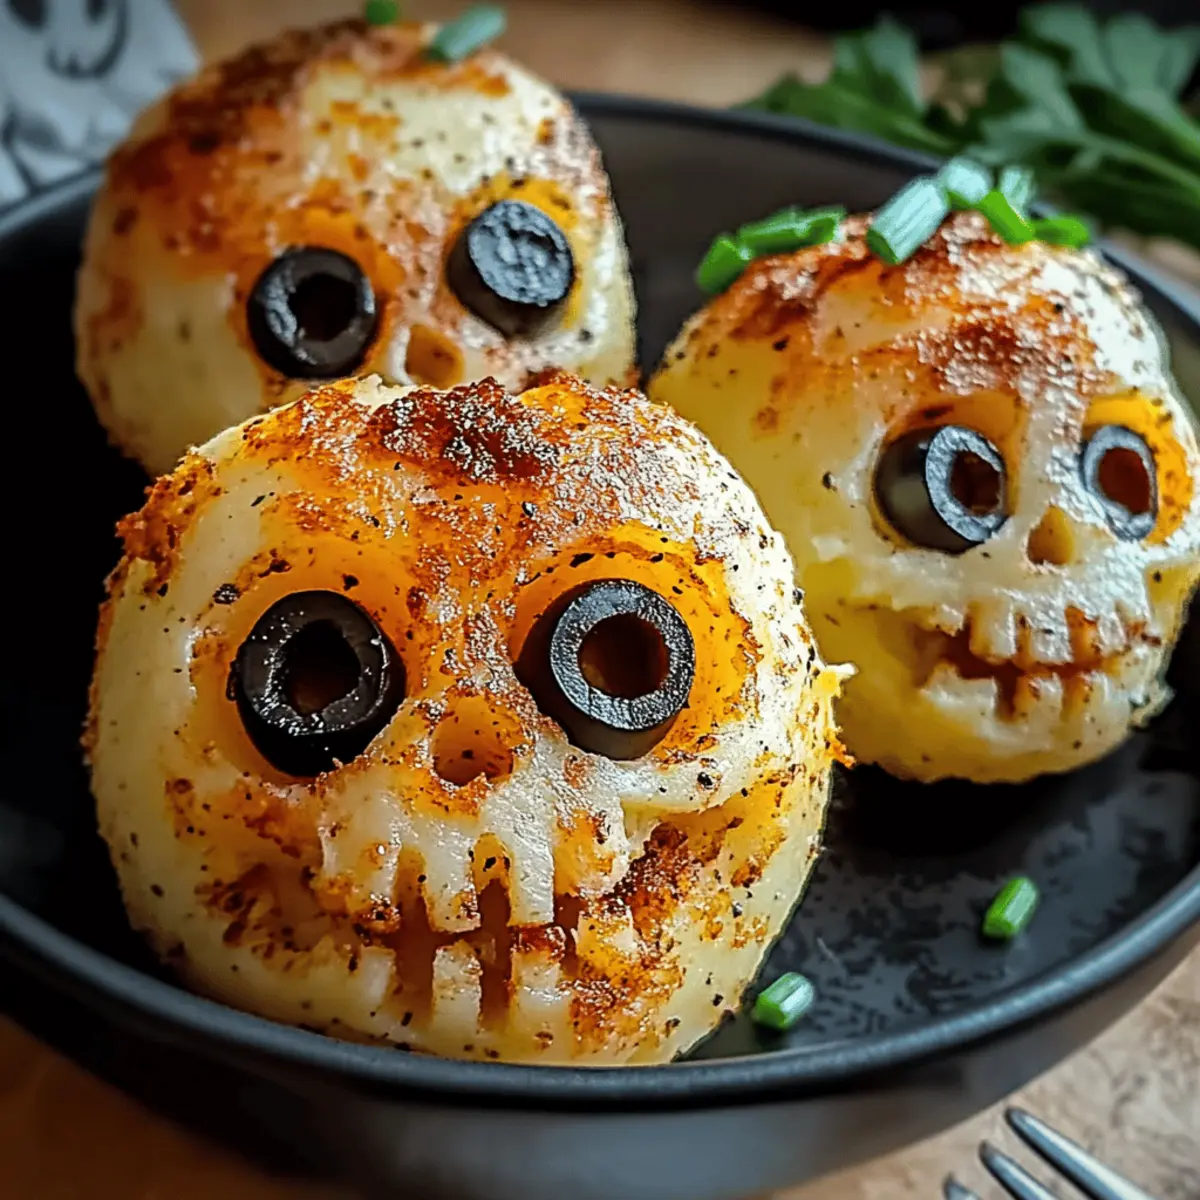
• Black Olives – Perfect for creating the skull’s eyes; optional, but highly recommended for that spooky effect!
• Fresh Chives/Green Onions – Use these as a garnish to add color and a mild onion flavor to your dish, enhancing the festive look.
Make your Halloween gatherings extra special with these spooky skull potatoes that not only taste fantastic but also bring a playful spirit to your table!
Step‑by‑Step Instructions for Spooky Skull Potatoes
Step 1: Prepare Potatoes
Begin by peeling and chopping the large russet potatoes into 2-inch chunks. Place the potato pieces into a large pot and cover them with salted cold water. Bring the water to a boil over medium-high heat, then reduce to a simmer and cook for about 15-20 minutes until the potatoes are fork-tender, meaning a fork should easily slide in.
Step 2: Mash Potatoes
Once the potatoes are cooked, drain them thoroughly and return them to the pot. Over low heat, mix in the heavy cream, melted butter, salt, and pepper, using a potato masher to blend everything together until you achieve a smooth, creamy consistency. If you prefer a chunkier texture, mash them to your taste while ensuring it remains flavorful.
Step 3: Shape into Skulls
With your delightful mashed potato mixture ready, it’s time to shape them. You can either use a skull mold or shape them by hand, packing the mixture tightly to ensure they hold their form. Carefully place each skull-shaped potato onto a parchment-lined baking sheet, creating a spooky lineup that’s ready for the oven!
Step 4: Bake
Preheat your oven to 375°F (190°C). Once hot, bake the shaped skulls in the oven for 15-20 minutes, allowing them to crisp up slightly. Keep an eye on them—you’re looking for a golden, slightly crispy top that adds a lovely texture to your Spooky Skull Potatoes.
Step 5: Decorate
As soon as the potatoes are out of the oven, it’s time for some fun decoration! Use sliced black olives to create the skull’s eyes, enhancing their spooky design. For an extra touch, feel free to add chopped fresh chives or green onions for a pop of color that brightens your Halloween dish.
Step 6: Serve
Serve your Spooky Skull Potatoes warm as a festive side dish or stunning centerpiece at your Halloween gathering. Arrange them on a platter and consider adding themed decor around the dish to create an inviting and spooky atmosphere. They’ll be the star of the show, inviting guests to enjoy this hauntingly tasty treat!
Make Ahead Options
These Spooky Skull Potatoes are perfect for busy cooks looking to save time on Halloween! You can prepare the mashed potato mixture up to 24 hours in advance; simply follow the first three steps of the recipe and shape them into skulls, then store them on a parchment-lined baking sheet in the refrigerator. To maintain their quality, cover them tightly with plastic wrap to prevent drying out or absorbing odors. When you’re ready to bake, remove them from the fridge and let them sit at room temperature for about 15 minutes before preheating your oven to 375°F (190°C) and baking for 15-20 minutes until golden. Enjoy the ease of this make-ahead option while still serving a delicious, festive dish!
Expert Tips for Spooky Skull Potatoes
- Perfect Potato Choice: Use large russet potatoes for the best creamy texture. Yukon Gold is a great alternative for a buttery flavor, but stick to these options for spooky skull potatoes.
- Watch the Cooking Time: Avoid overcooking your potatoes; check for fork tenderness at 15 minutes to keep them from becoming mushy.
- Season Well: Taste your mashed potato mixture before shaping. Proper seasoning ensures a delicious flavor that complements the fun presentation.
- Tightly Pack Molds: When shaping your skulls, make sure to pack the potato mixture tightly; this prevents them from losing shape during baking.
- Crispy Finish: Bake until slightly golden to achieve a crispy exterior. This texture contrast enhances the overall experience of your spooky skull potatoes!
What to Serve with Spooky Skull Potatoes?
Transform your Halloween gathering into a feast by pairing exciting sides and drinks that complement these whimsically eerie mashed potatoes.
- Creepy Cauliflower “Brain”: This roasted cauliflower shaped like a brain adds a spooky touch and is perfect for dipping into your favorite creamy sauces.
- Graveyard Salad: A fresh salad with spooky decorations like tombstone-shaped croutons and black olive spiders for an impressive counterpoint to the heavy potatoes.
- Pumpkin Soup: A warm, comforting pumpkin soup offers a velvety texture and sweet flavor that pairs beautifully with the richness of the skull potatoes.
- Spooky Vegetable Platter: Arrange colorful carrots, cucumbers, and bell peppers in a creepy design to provide a crunchy contrast, alongside a vibrant dip to embrace the playful theme.
- Witch’s Brew Punch: A deliciously spooky drink made from cranberry and lime juices, served in a cauldron for extra atmosphere. This tangy beverage balances the creamy potatoes perfectly!
- Chilling Chocolate Mousse: This rich dessert completes the meal, with its dark hue matching the Halloween spirit and providing a luscious finish after the savory feast.
Spooky Skull Potatoes Variations & Substitutions
Feel free to get creative with these ideas to make your Spooky Skull Potatoes even more fun and flavorful!
-
Dairy-Free: Use almond or coconut milk in place of heavy cream, along with margarine instead of butter for a creamy, dairy-free delight.
-
Herb-Infused: Blend in fresh herbs like parsley or dill for a flavorful twist. This adds brightness and a visually appealing touch to your spooky dish.
-
Cheesy Goodness: Stir in shredded cheese, such as cheddar or mozzarella, while mashing for a rich, cheesy flavor. Your skulls will not only look ghoulishly appealing, but taste divine!
-
Colorful Mash: Add a few drops of green or purple food coloring to the mashed potatoes for a burst of vibrant color, making them even spookier while delighting the kids.
-
Spicy Kick: Mix in a dash of cayenne pepper or diced jalapeños for a spicy version of these Halloween treats. This twist offers a surprising flavor notes to those brave enough to try!
-
Bacon Lovers: Fold in crispy bacon bits for a savory crunch that pairs perfectly with the creamy potatoes, giving your skulls a delightful twist that meat-lovers will enjoy.
-
Veggie Add-ins: Enhance your mash by incorporating finely chopped spinach or kale for added nutrition and a pop of color, making this a slightly healthier option.
-
Garlic Mashed Potatoes: Add roasted garlic to the potatoes before mashing for a richly aromatic and flavorful twist that both adults and kids will love.
When you’re in the mood for more mouthwatering sides, don’t miss out on Making Air Potatoes for a delightful complement to your Halloween feast!
How to Store and Freeze Spooky Skull Potatoes
Fridge: Store any leftover Spooky Skull Potatoes in an airtight container for up to 3 days. Reheat in the microwave or oven until warmed through.
Freezer: Place shaped, uncooked skull potatoes on a baking sheet until frozen solid, then transfer to a freezer-safe bag or container. They can be kept for up to 1 month.
Reheating: If frozen, do not thaw before baking; simply add an extra 5-10 minutes to the baking time at 375°F (190°C). This helps achieve that delightful crispiness!
Make-Ahead: Prepare and shape your spooky skulls a day in advance, storing them in the fridge before baking to save time on your Halloween celebration day!
Spooky Skull Potatoes Recipe FAQs
Can I use different types of potatoes for this recipe?
Absolutely! While large russet potatoes are ideal for creating creamy mashed potatoes, you can also use Yukon Gold potatoes for a richer, buttery flavor. Both options work wonderfully, so feel free to choose based on your taste preferences!
How should I store leftovers of Spooky Skull Potatoes?
To keep your leftover Spooky Skull Potatoes fresh, simply place them in an airtight container and store in the refrigerator for up to 3 days. When you’re ready to enjoy them again, reheat in the microwave or oven until warmed through.
Can I freeze Spooky Skull Potatoes?
Yes, you can freeze them! Shape the uncooked skull potatoes and place them on a baking sheet until they are frozen solid. Once frozen, transfer them to a freezer-safe bag or container. They can be stored in the freezer for up to 1 month. When ready to bake, there’s no need to thaw—just add an extra 5-10 minutes to the baking time at 375°F (190°C) for that perfect crispiness!
What should I do if my potatoes turn out too mushy?
If your potatoes end up too mushy, it likely means they were overcooked or too much liquid was added. For future attempts, check for fork tenderness around the 15-minute mark while boiling. A good balance of heavy cream and butter while mashing is key; aim for a creamy texture without excess moisture. If they do come out mushy, try adding a little more mashed potato or even some grated cheese to bind the mixture together!
Are there any dietary considerations I should keep in mind?
Yes! If you’re cooking for someone with dietary restrictions, the recipe can easily be adjusted. For a dairy-free option, simply substitute heavy cream with almond or coconut milk and use margarine instead of butter. Also, remember to check with your guests about olive allergies when using black olives for decoration. Feel free to get creative with other ingredients if you have specific requirements!
Spooky Skull Potatoes: A Hauntingly Tasty Halloween Treat
Ingredients
Equipment
Method
- Peel and chop the large russet potatoes into 2-inch chunks. Place into a large pot and cover with salted cold water. Bring to a boil over medium-high heat, then reduce to a simmer and cook for 15-20 minutes until fork-tender.
- Drain the potatoes and return to the pot. Mix in the heavy cream, melted butter, salt, and pepper over low heat, using a potato masher to blend until smooth.
- Shape the mashed potatoes into skulls using a mold or by hand, packing tightly. Place on a parchment-lined baking sheet.
- Preheat oven to 375°F (190°C). Bake shaped skulls for 15-20 minutes until slightly golden.
- Use sliced black olives for the skull's eyes and garnish with fresh chives or green onions after baking.
- Serve warm as a festive side dish or centerpiece, adding themed decor around the dish for ambiance.
")