")
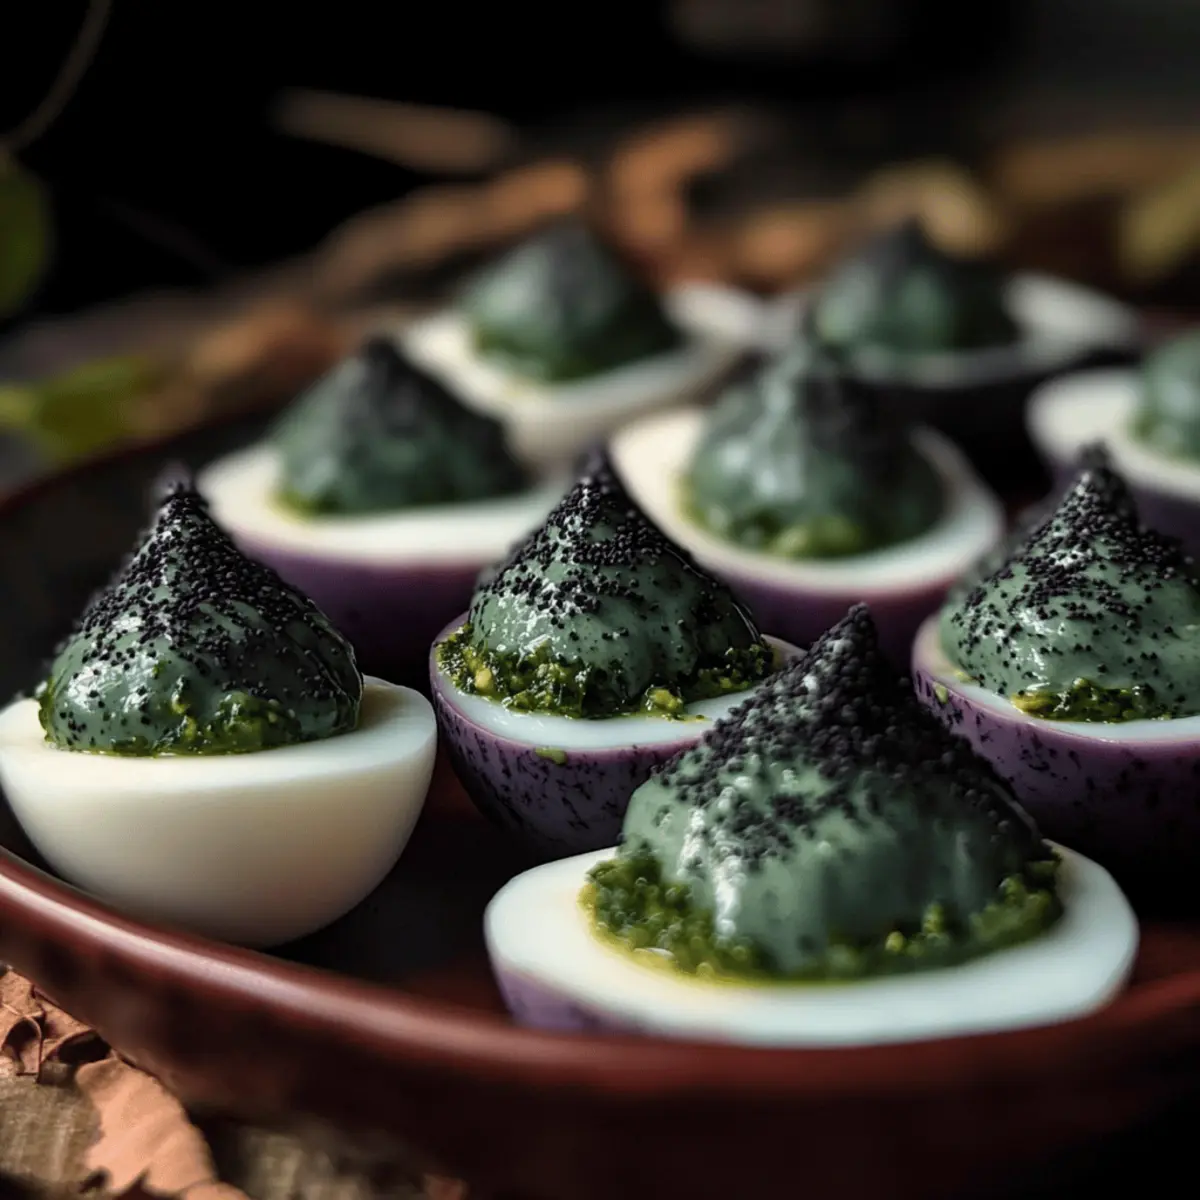
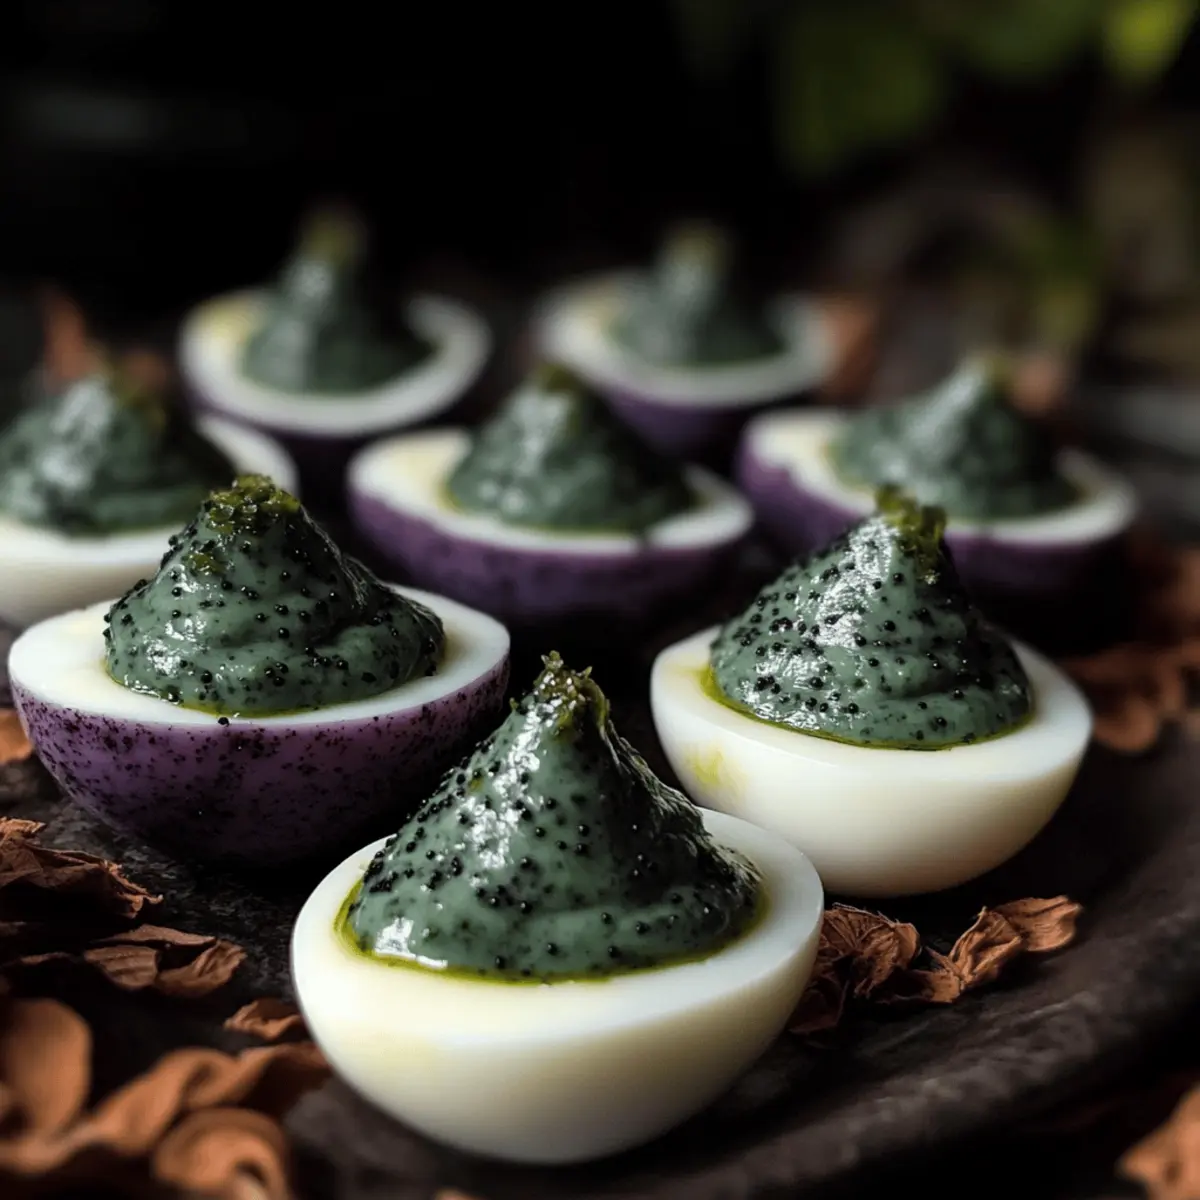
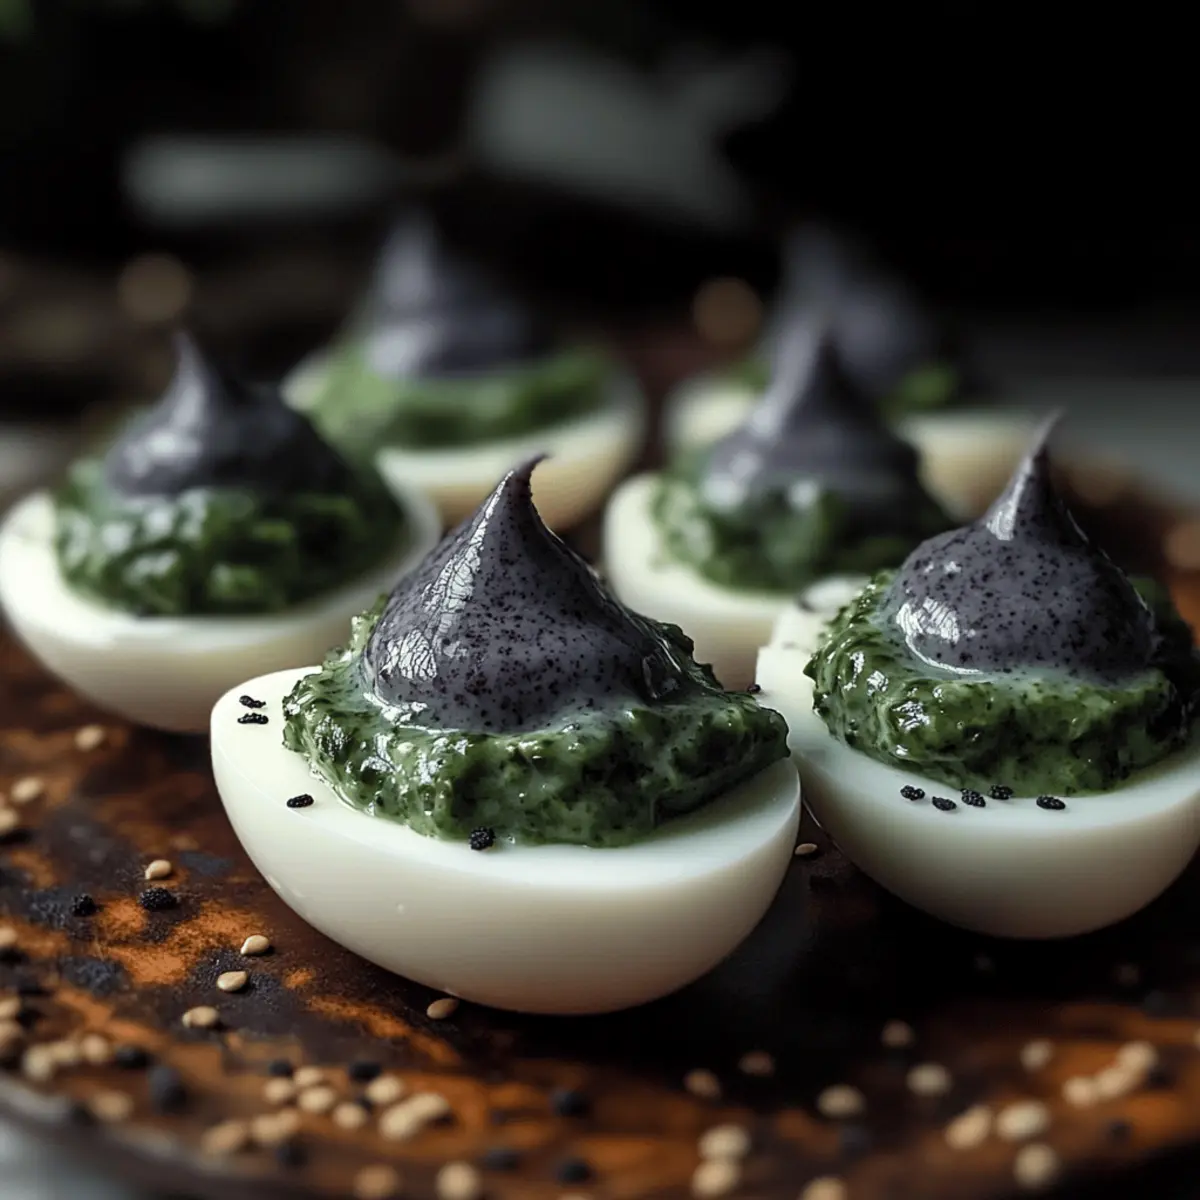
As I stood in the kitchen surrounded by all things autumn, I was struck by the idea of giving a familiar classic an enchanting twist. Why not transform traditional deviled eggs into spooky Halloween Deviled Eggs that could be the centerpiece of any fright night feast? With their naturally dyed, crackled exteriors resembling something drawn from a murky swamp, these ghoulish treats not only boast a creamy garlic and dill filling but are also a crowd-pleaser that offers a fun alternative to sugary sweets this Halloween. Plus, the natural dyes make them a healthier choice, allowing you to impress your guests while indulging your creative side. Are you ready to conjure up some culinary magic with me?
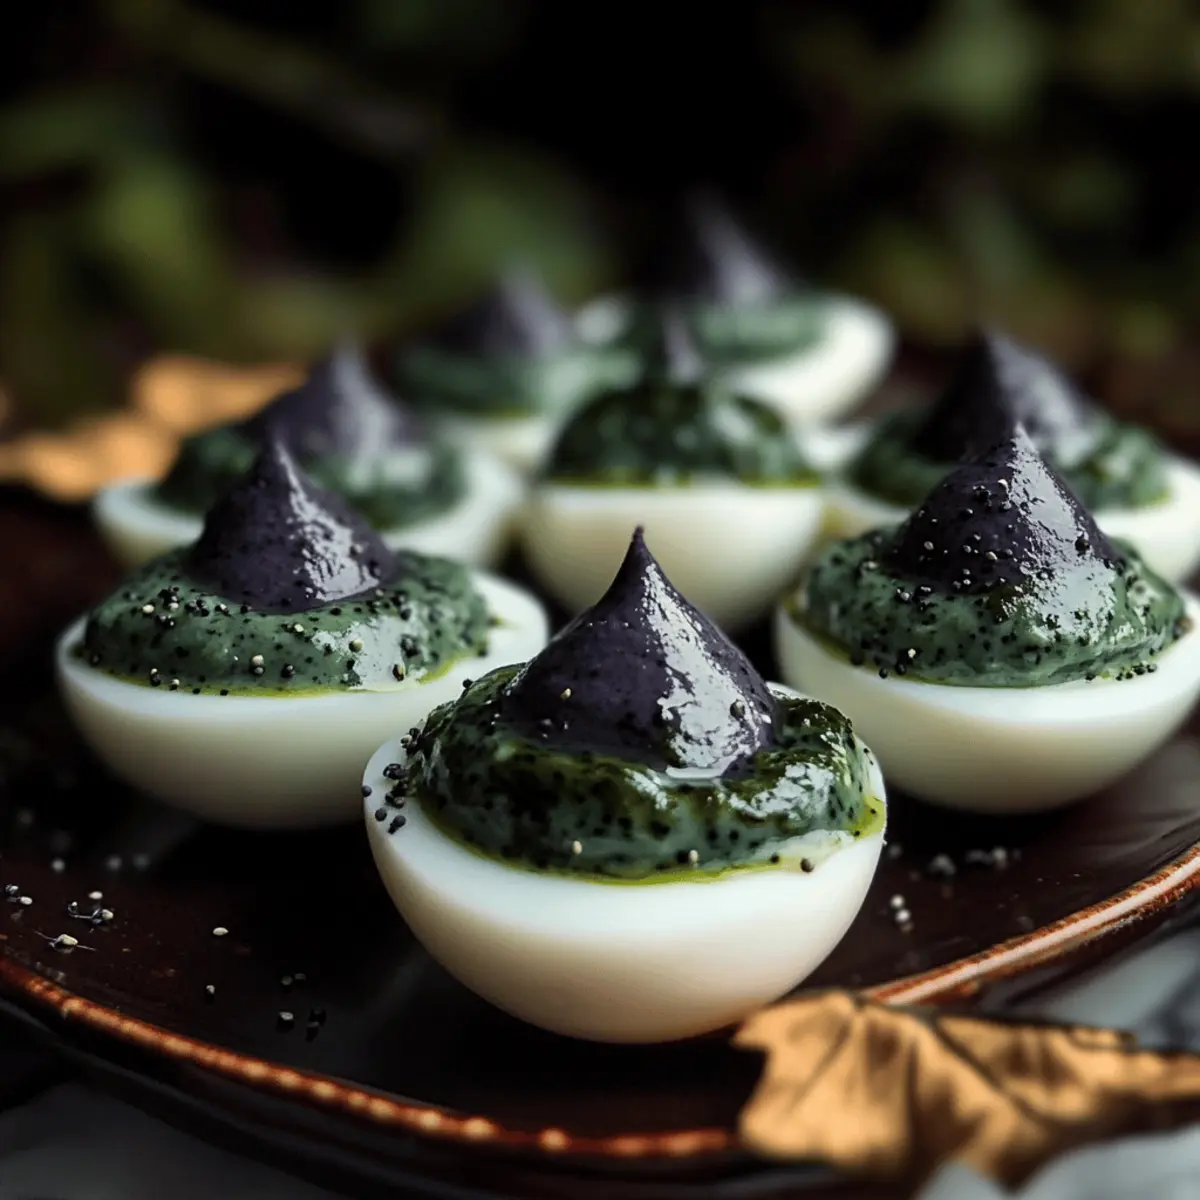
Why Are These Eggs So Spooky?
Fun and Festive: These Halloween Deviled Eggs are not just a treat; they’re a conversation starter! Their eerie appearance makes them perfect for any Halloween gathering.
Wholesome Ingredients: Crafted with naturally derived dyes, you can enjoy these creatively spooky snacks without any artificial colors that compromise health.
Crowd Pleaser: It’s hard to resist a creamy, garlic-flavored filling tucked inside a fun, visually appealing package — your guests will be raving about them!
Versatility: While perfect for Halloween, you can easily adapt them for Easter or other celebrations by swapping out the dyes for seasonal colors to fit any occasion.
Quick and Easy: With straightforward instructions, you’ll have these delightful deviled eggs ready in no time, allowing you to spend more time enjoying the festivities.
Halloween Deviled Eggs Ingredients
For the Eggs
• Large Eggs – The primary base for these Halloween Deviled Eggs; ensure they are hard-boiled.
• Frozen Blueberries – Used to create a natural purple dye on the eggshells; thaw before use.
• Hot Water – Activates the dyes effectively for stunning colors.
• Distilled White Vinegar – Helps set the dye and maintains egg quality.
For the Filling
• Egg Yolks – Provide richness and creaminess, forming the delicious base of the filling.
• Mayonnaise – Ensures a creamy texture; opt for full-fat for the best flavor.
• Liquid Chlorophyll – Adds a unique green hue to the filling while enhancing the taste.
• Salt – Essential for enhancing the overall flavor profile.
• Black Pepper – Introduces a mild spice that complements the filling.
• Fresh Dill – Adds a fragrant herbal note that balances the other flavors.
• Fresh Chives – Provides a mild onion flavor and a pop of color.
• Clove of Garlic – Infuses depth and flavor into the creamy mixture.
• Poppy Seeds – Optional garnish that enhances visual appeal and adds texture.
Step‑by‑Step Instructions for Spooky Swamp Eggs – Naturally Dyed Halloween Deviled Eggs
Step 1: Prepare the Eggs
Begin by hard-boiling your large eggs. Place them in a pot, cover them with cold water, and bring to a gentle boil over medium heat. Once boiling, cover the pot and turn off the heat, letting the eggs sit for 12 minutes. Afterward, transfer the eggs to an ice bath to cool completely for easy peeling.
Step 2: Dye the Eggs
Once the eggs are cool and peeled, crack the shells slightly to allow the dye to penetrate. In a bowl, combine thawed frozen blueberries, hot water, and a splash of distilled white vinegar. Submerge the cracked eggs in this mixture, allowing them to soak for about an hour. The longer they soak, the more vibrant the color will be, resembling spooky swamp eggs!
Step 3: Make the Filling
While the eggs soak, prepare the filling for your Halloween Deviled Eggs. In a mixing bowl, mash the hard-boiled egg yolks with mayonnaise, liquid chlorophyll, salt, pepper, fresh dill, fresh chives, and crushed garlic. Blend the mixture until it’s creamy and smooth, ensuring all ingredients are well incorporated for a deliciously rich flavor.
Step 4: Fill the Eggs
Once the eggs are dyed and filled, carefully remove them from the dye and rinse under cold water to remove any excess color. Using a piping bag or a small spoon, fill each cracked egg with the yolk mixture. Make sure to mound the filling slightly above the edges of each egg white for an inviting and generous presentation.
Step 5: Garnish the Eggs
To enhance the spooky look of your deviled eggs, sprinkle poppy seeds on top of the filling. This step not only adds a visual appeal but also hints at the texture, giving your Halloween Deviled Eggs a unique touch that will intrigue your guests.
Step 6: Serve or Store
Chill the filled eggs in the refrigerator until you’re ready to serve. For the best experience, enjoy these creepy delights within two hours of preparing them. If you’re making them ahead of time, store the filled deviled eggs in an airtight container for up to four days, but apply the natural dye no more than two hours before serving for the optimal display.
Expert Tips for Halloween Deviled Eggs
• Choose Quality Eggs: Use fresh large eggs for the best results; they’ll peel more easily and yield a creamier filling for your Halloween Deviled Eggs.
• Natural Dye Prep: Thaw blueberries fully for effective dyeing; they release their color better when allowed to sit at room temperature before use.
• Control the Color: Soak eggs longer if you prefer deeper hues, but keep an eye on the dye to ensure you achieve that perfect spooky shade without overdoing it.
• Filling Consistency: For the creamiest filling, ensure your mayonnaise is at room temperature before mixing to achieve a smooth, blendable texture.
• Timing Matters: Fill the eggs just before serving; this keeps the filling looking pristine and prevents the eggs from drying out, ensuring your Halloween Deviled Eggs are as delightful in taste as they are in appearance.
What to Serve with Spooky Halloween Deviled Eggs
Elevate your festive gatherings with delightful sides that perfectly complement these eerie yet creamy treats.
-
Crispy Veggie Platter: A vibrant assortment of fresh veggies adds crunch and color, balancing the creaminess of the deviled eggs beautifully. Pair it with a zesty dip for extra flavor.
-
Spider Web Cheese Dip: Whip up a warm cheese dip and create a spider web with sour cream on top. This inviting dish is perfect for gathering around and pairs wonderfully with your ghoulish eggs.
-
Roasted Garlic Breadsticks: Golden and buttery, these soft breadsticks are perfect for scooping up the leftover filling as guests enjoy the Halloween Deviled Eggs.
-
Autumn Salad: A crisp mix of greens, roasted squash, and cranberries brings freshness and sweetness to the table, contrasting with the savory flavors of the eggs beautifully.
-
Witch’s Brew Punch: A spooky themed drink will get everyone in the Halloween spirit. Create a refreshing punch with seasonal fruits, offering a vibrant, fruity contrast to the savory deviled eggs.
-
Chocolate Mousse Cups: For dessert, indulge in creamy chocolate mousse served in small cups. The rich chocolate is a delightful way to end the meal after your Halloween-themed appetizers.
These pairings ensure a deliciously haunting feast that will leave your guests enchanted.
Halloween Deviled Eggs Variations
Feel free to get creative and put your own twist on these spooky Halloween Deviled Eggs!
-
Easter Twist: Swap the natural dyes for pastel colors using ingredients like beet juice or spinach for a festive Easter treat.
-
Cream Cheese Filling: Replace mayonnaise with cream cheese for a richer, thicker filling that adds a delightful creaminess to each bite.
-
Bacon Flavored: Stir in crispy bacon bits to the filling for a smoky and savory flavor that complements the garlic perfectly.
-
Spicy Kick: Mix in a teaspoon of sriracha or your favorite hot sauce to the filling for those who enjoy a bit of heat.
-
Vegan Option: Substitute eggs with avocado and use vegan mayo to create a plant-based version that’s creamy and packed with healthy fats.
-
Textured Topping: Try crushed tortilla chips or crumbled crackers on top for a crunchy contrast to the creamy filling.
-
Herb Explosion: Enhance flavor by adding a combination of other fresh herbs like basil or tarragon, providing a fresh twist and complexity to the filling.
-
Cheesy Delight: Fold in grated cheese, like cheddar or pepper jack, for a cheesy version that adds depth to your deviled eggs.
For even more festive ideas, consider mixing and matching these variations, and don’t forget to check out our Creative Ways to Use Natural Dyes for more inspiration!
Storage Tips for Halloween Deviled Eggs
Fridge: Store your prepared Halloween Deviled Eggs in an airtight container in the refrigerator for up to 4 days, ensuring they remain fresh and delicious.
Natural Dye Application: For the best presentation, apply the natural dye no more than 2 hours before serving; this keeps the colors vibrant and striking.
Reheating: Since these eggs are best served cold, reheating isn’t necessary; just chill them well for a delightful treat at your Halloween gathering.
Make Ahead Options
These Spooky Halloween Deviled Eggs are perfect for meal prep, making them an ideal choice for busy hosts! You can hard-boil the eggs and keep them unpeeled for up to 7 days in the refrigerator, ensuring they’re fresh and easy to dye. The creamy filling can be whipped up up to 24 hours in advance and stored in an airtight container to maintain its rich flavor and texture. On the day of serving, simply dye the eggs, fill them with the prepared yolk mixture, and garnish with poppy seeds. This way, you can enjoy the haunting delight of these Halloween Deviled Eggs with minimal last-minute effort!
Halloween Deviled Eggs Recipe FAQs
How do I pick the best eggs for my deviled eggs?
Absolutely! I recommend using fresh, large eggs for your Halloween Deviled Eggs. Fresh eggs are easier to peel once boiled and result in a creamier filling. Check for the best-by date to ensure maximum freshness.
How should I store leftover Halloween Deviled Eggs?
Very straightforward! You can store your prepared Halloween Deviled Eggs in an airtight container in the refrigerator for up to 4 days. To maintain their taste and texture, avoid leaving them out at room temperature for more than 2 hours.
Can I freeze leftover Halloween Deviled Eggs?
I don’t recommend freezing deviled eggs, as the texture of the filling can change dramatically once thawed, leading to an unappealing consistency. It’s best to enjoy them fresh, keeping them refrigerated for up to 4 days.
What can I do if my egg yolk filling isn’t creamy enough?
If your egg yolk filling is grainy or not creamy, it might be because the mayonnaise was too cold when mixed. Make sure the mayonnaise is at room temperature before adding it to the yolks. Blend the mixture well until smooth; if needed, add a splash of additional mayonnaise to achieve your desired consistency!
Can I adjust the ingredients for dietary restrictions?
Absolutely! If you or your guests have dietary restrictions, you can use yogurt or a plant-based mayonnaise for a lighter filling. For those sensitive to garlic, you can reduce the amount or replace it with a pinch of garlic powder for a subtler flavor. Always double-check product labels to ensure they meet dietary needs.
How do I ensure the natural dye works effectively?
To achieve vibrant colors with your natural dye, follow these steps: thaw the blueberries completely before use so they release their color more effectively. Crack the shells of the eggs slightly and allow them to soak in the dye mixture for about an hour. The longer you soak, the more intense the color will be!
Spooky Halloween Deviled Eggs with Natural Dyes Made Easy
Ingredients
Equipment
Method
- Prepare hard-boiled large eggs; place in pot with cold water and bring to boil. Cover and let sit for 12 minutes, then transfer to ice bath.
- Crack shells slightly to allow dye penetration, combine blueberries, hot water, and vinegar. Soak eggs for about an hour.
- Prepare filling by mashing egg yolks with mayonnaise, chlorophyll, salt, pepper, dill, chives, and garlic until smooth.
- Fill eggs with yolk mixture using a piping bag or spoon, mound filling slightly above egg whites.
- Sprinkle poppy seeds on top for visual appeal.
- Chill until serving; consume within two hours or store in an airtight container for up to four days.
")