")
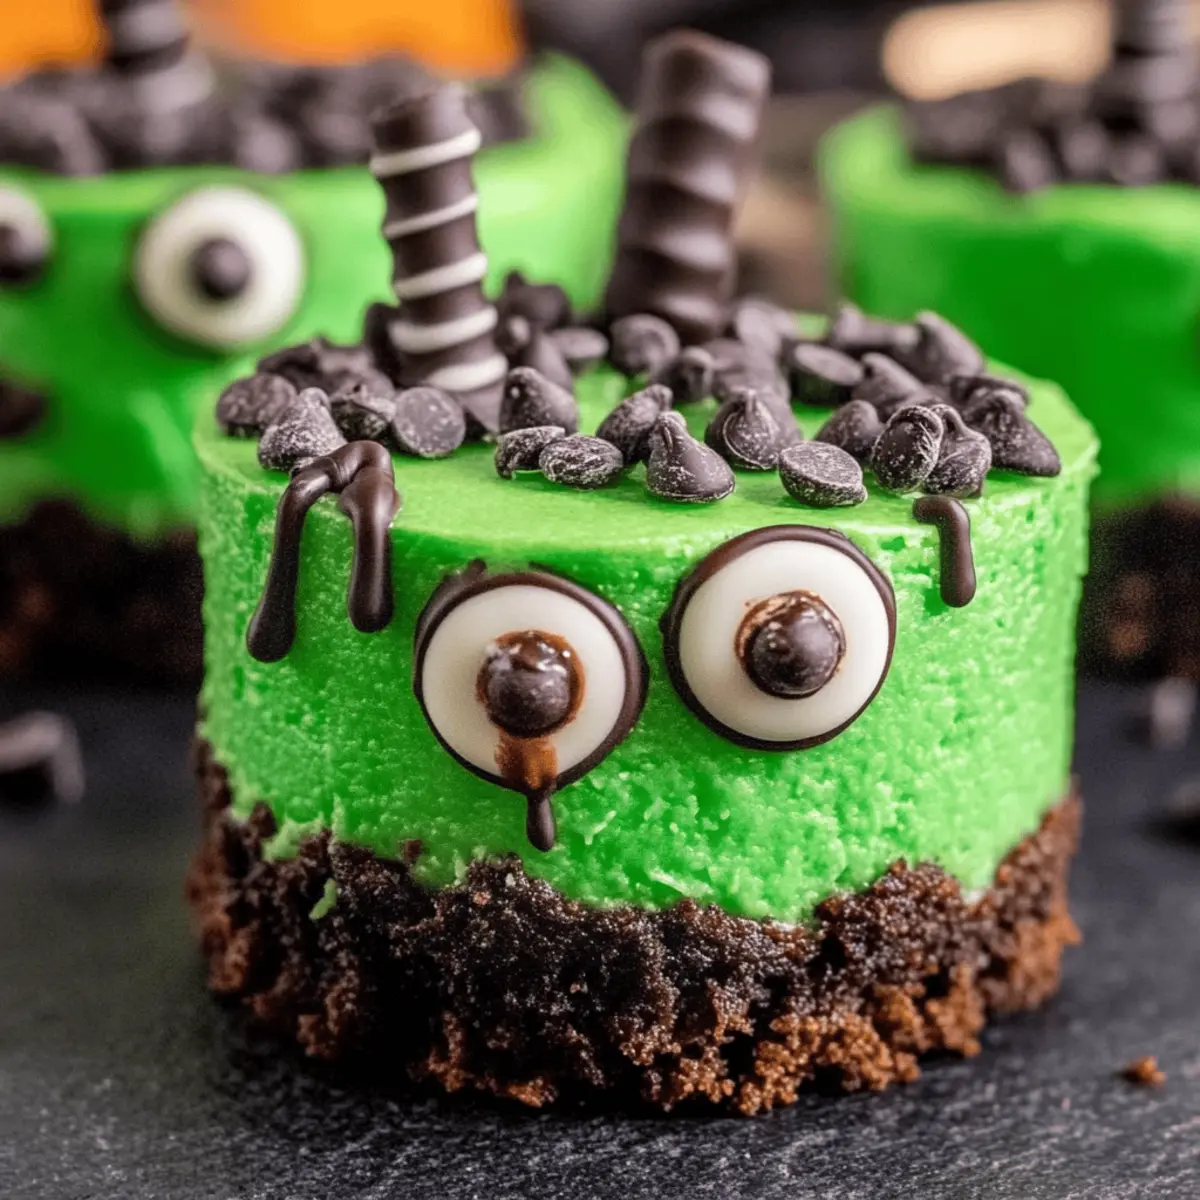
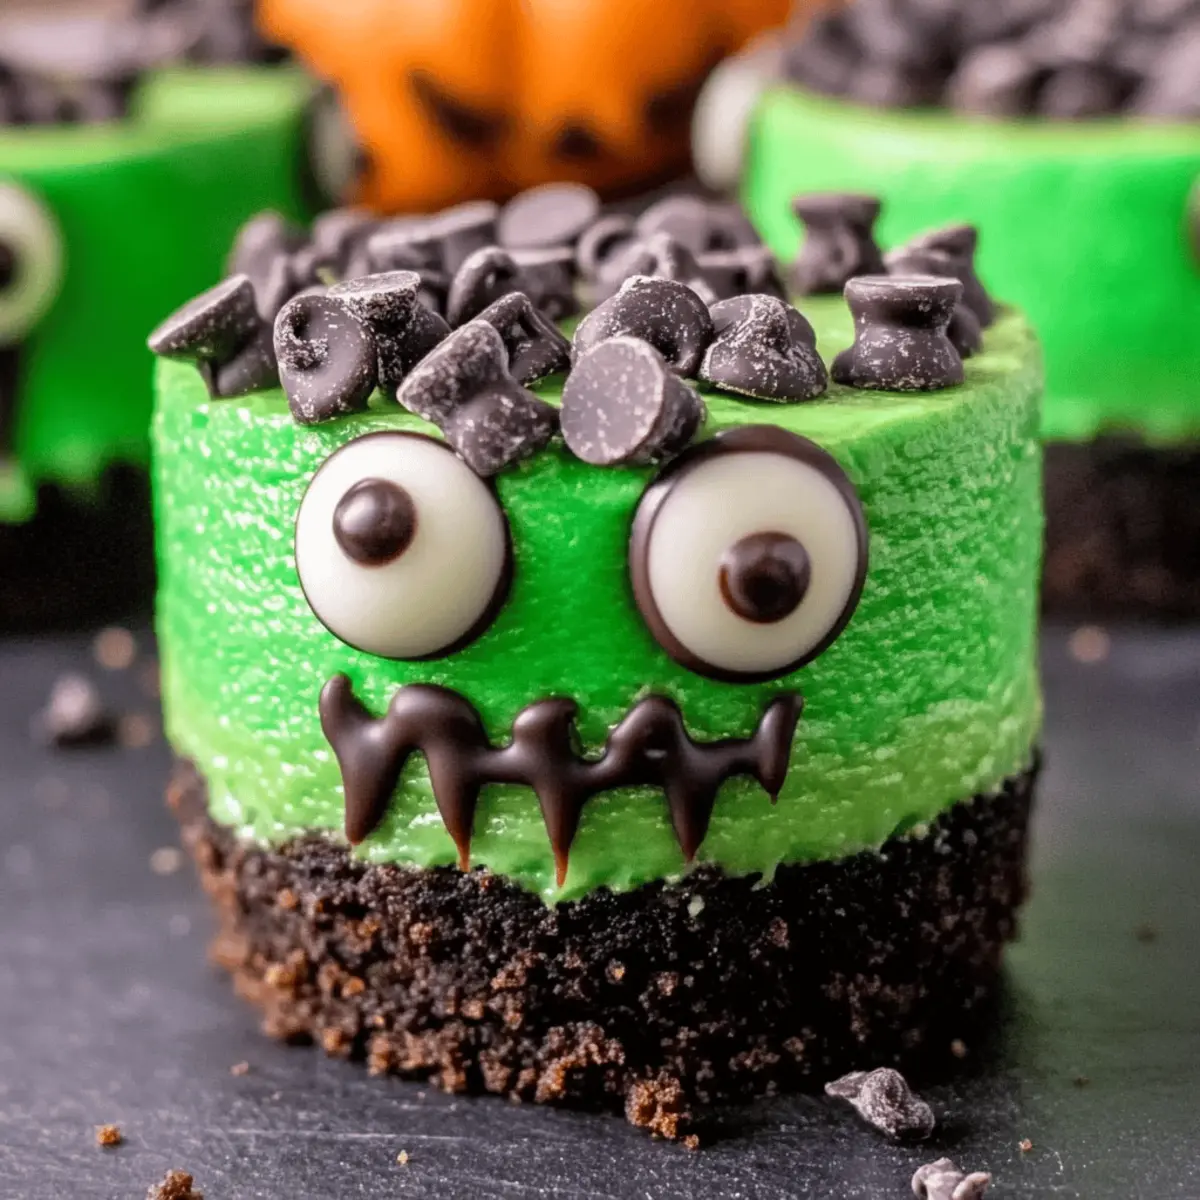
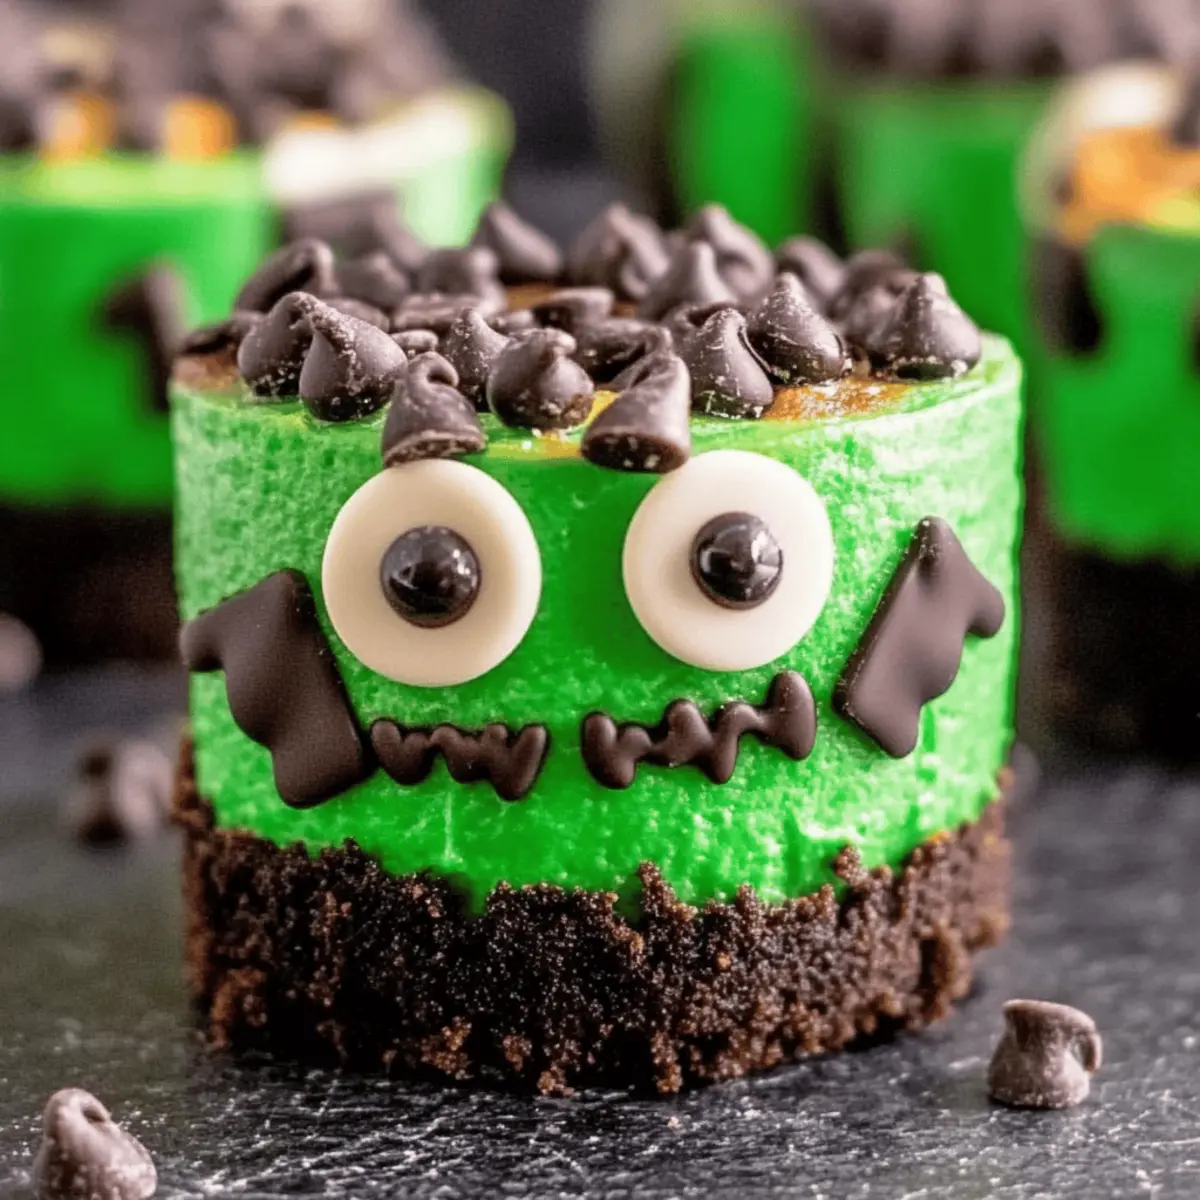
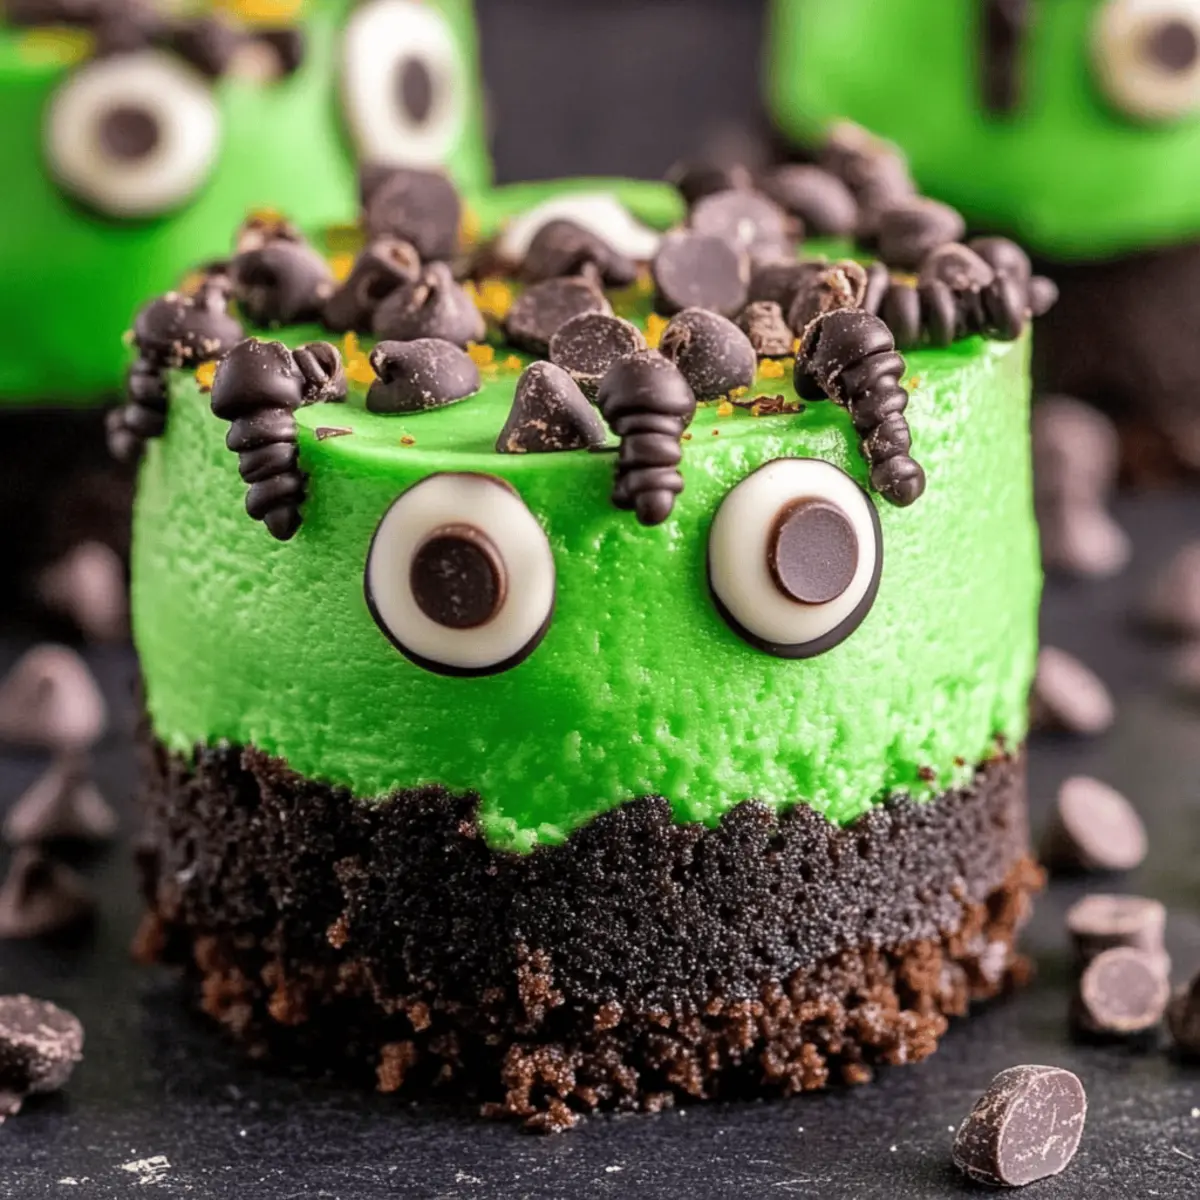
Halloween is just around the corner, and I can’t help but feel a little giddy thinking about all the spooktacular treats you can whip up! One of my favorites is these Frankenstein Mini Cheesecakes, which combine creamy goodness with a playful design that will wow both kids and adults alike. The best part? They’re incredibly easy to make, so you can spend less time in the kitchen and more time enjoying the festive spirit. Plus, they make for a perfect finger food at any Halloween gathering, delighting your guests with every delicious bite. Are you ready to conjure up some fun in the kitchen with this enchanting dessert?
Why Are These Cheesecakes a Must-Try?
Splash of Color: The vibrant green hue makes these cheesecakes visually striking, ideal for Halloween festivities.
Kid-Approved Fun: Kids love their playful design, making them perfect for Halloween parties and family gatherings.
Simplicity: With easy-to-follow instructions, even baking novices can create impressive desserts.
Versatile Flavor: Feel free to switch up the crust or toppings! Try a graham cracker base or mix in some spooky sprinkles.
Quick Preparation: These mini treats can be whipped up in no time, allowing you to focus on the party. Serve them alongside Chick Fil Chicken and other festive goodies for an unforgettable spread!
Frankenstein Mini Cheesecakes Ingredients
Get ready to create a delightful Halloween treat with these Frankenstein Mini Cheesecakes!
For the Batter
• Cream Cheese – Provides the creamy texture of the cheesecake; make sure it’s softened for easy mixing.
• Sugar – Adds sweetness to balance the creamy cheese; feel free to reduce for a less sweet variation.
• Eggs – Acts as a binder, giving structure to the cheesecake; using room temperature eggs helps them mix better.
• Flour – Helps stabilize the cheesecake; gluten-free flour can be swapped for a GF option.
• Vanilla Extract – Enhances flavor wonderfully; imitation vanilla works too.
• Green Food Coloring – For that signature Frankenstein hue; adjust the drops according to your color preference.
For the Crust
• OREO Cookies (Crushed) – Forms a delicious, sweet crust; any chocolate cookie can substitute if needed.
• Butter – Binds the crust ingredients together; use unsalted butter for better control over saltiness.
For Decoration
• Edible Eyes – Perfect for adding a fun, spooky touch; candy eyes can be a delightful alternative.
• Chocolate Chips (Melted) – Used for decorating the tops, adding a rich chocolate flavor.
• Chocolate Sprinkles – Enhances visual appeal and adds texture; optional, but highly recommended.
• Chocolate Chips – Used as bolts on Frankenstein’s neck; mini chocolate pieces can work as a substitute.
Step‑by‑Step Instructions for Frankenstein Mini Cheesecakes
Step 1: Prepare the Crust
Preheat your oven to 350°F (175°C). In a mixing bowl, combine melted unsalted butter with crushed OREO cookies, stirring until well combined. Use a mini cheesecake pan and form 1-inch balls with the mixture, pressing them into the bottoms to create a crust. You want them to be compact and evenly spread for a delicious base.
Step 2: Make the Cheesecake Batter
In a large bowl, beat softened cream cheese until smooth. Gradually add sugar, eggs, and vanilla extract, mixing thoroughly. Slowly incorporate flour, then add green food coloring drop by drop, mixing until you achieve your desired Frankenstein green hue. The batter should be creamy and free of lumps, perfect for the mini cheesecakes.
Step 3: Bake
Pour the cheesecake batter into the mini cheesecake pan, filling each crust almost to the top. Place the pan in the preheated oven and bake for about 15 minutes. The cheesecakes are done when they are set but still slightly jiggly in the center, indicating a creamy texture inside.
Step 4: Cool and Decorate
Once baked, remove the pan from the oven and let the cheesecakes cool completely. Carefully release the cheesecakes from the pan and set them on a wire rack. Dip the tops into melted chocolate, and then into chocolate sprinkles for a festive touch. Use the melted chocolate to pipe fun mouth designs and attach edible eyes for the full Frankenstein effect.
How to Store and Freeze Frankenstein Mini Cheesecakes
Fridge: Store your Frankenstein Mini Cheesecakes in an airtight container for up to 3 days. This keeps them fresh and ready to delight family and guests!
Freezer: For longer storage, freeze the mini cheesecakes individually wrapped in plastic wrap, then in an airtight container for up to 2 months. Thaw in the fridge overnight before serving.
Reheating: If desired, you can gently reheat them in the microwave for about 10-15 seconds for a warm treat, but enjoy them chilled for the best cheesecake experience!
Frankenstein Mini Cheesecakes Variations & Substitutions
Feel free to unleash your creativity and customize these delightful mini cheesecakes to suit your taste!
-
Graham Cracker Crust: Swap the OREO cookies for crushed graham crackers for a classic flavor profile with a hint of sweetness. This subtle change can bring a lovely texture to your cheesecakes.
-
Dairy-Free Delight: Use dairy-free cream cheese and margarine to cater to lactose-intolerant guests. These substitutions maintain creamy richness without losing flavor, keeping everyone happy.
-
Vibrant Color: Experiment with different food colors, like blue or purple, for a fun twist. This can add an unexpected pop of excitement to your Halloween table!
-
Texture Twist: Incorporate crushed nuts into the crust for added crunch. Pecans or walnuts can bring a delightful surprise that contrasts beautifully with the smooth cheesecake filling.
-
Spiced Flavors: Stir in a pinch of cinnamon or pumpkin spice into the batter for a warm, cozy flavor. This addition can evoke the autumn vibe that Halloween embodies.
-
Marshmallow Topping: Instead of melted chocolate, whip up some marshmallow fluff and spread it on top for a light and airy finish, making it reminiscent of ghostly treats.
-
Boozy Punch: For a festive adult twist, add a splash of flavored liqueur like Amaretto or Frangelico to the cheesecake batter. This delightful tweak adds an unexpected depth of flavor.
-
Decorative Elements: Switch up the edible eyes with cute Halloween-themed sprinkles or gummy candies for a visual delight. Little bats and ghost candies could elevate the fun quotient at your gathering!
No matter what variations you choose, these Frankenstein Mini Cheesecakes will surely be a hit! Serve them alongside other spooky treats like Chick Fil Chicken for a festive feast that everyone will be talking about!
What to Serve with Frankenstein Mini Cheesecakes
Elevate your Halloween celebrations by pairing these delightful treats with fun accompaniments that bring joy to every bite.
-
Spooky Punch: A vibrant, fruity drink enhances the festive atmosphere while providing a refreshing contrast to the rich cheesecakes. Serve it in a cauldron for extra flair!
-
Ghostly Fruit Skewers: Fresh fruit adds a splash of color and healthy goodness. Use bananas, grapes, and kiwi to create funny ghost shapes that delight kids and adults alike.
-
Mummy Hot Dogs: These playful snacks are perfect for nibbling alongside the cheesecakes. Wrapped in crescent dough, they’re a savory palate cleanser that balances the sweetness.
-
Chocolate-Covered Pretzels: Offering a crunchy texture, these salty-sweet bites pair perfectly with the creamy cheesecakes. Each bite brings a satisfying contrast to the dessert.
-
Halloween Cookie Platter: Bring in sugar cookies shaped like bats, pumpkins, and ghosts. The variety of flavors and textures will make your dessert table even more exciting.
-
Witch’s Brew Coffee: Serve a warm drink to balance the cool sweetness of the cheesecakes. Add a spooky twist with cinnamon or nutmeg for an aromatic delight that complements dessert.
-
Vampire Bite Cupcakes: Add another sweet option with these chocolate cupcakes adorned with red frosting. They’re a fun way to tie in a classic Halloween theme.
-
Candy Corn: Stick with tradition by including a bowl of candy corn. The colorful treat brings nostalgia and adds a festive touch!
-
Chilling Milkshakes: Blend vanilla ice cream with milk for a creamy shake that cools down the palate. Top with whipped cream for a decadent finish alongside the mini cheesecakes.
Make Ahead Options
These Frankenstein Mini Cheesecakes are perfect for meal prep, allowing you to enjoy the Halloween festivities without the last-minute rush! You can make the cheesecake batter and prepare the OREO crust up to 24 hours in advance. Simply store the batters in separate airtight containers in the refrigerator to keep them fresh and to prevent any unwanted browning or drying out. When you’re ready to bake, follow the final steps by filling the crusts with the chilled batter, baking, and letting them cool before decorating. This way, you can have these delightful treats ready to impress your guests with minimal effort!
Expert Tips for Frankenstein Mini Cheesecakes
-
Soften Cream Cheese: Ensure it’s at room temperature to prevent lumps; this creates a smoother batter that blends easily.
-
Crust Control: Use a mini cheesecake pan for best results; if using a muffin tin, grease it well to avoid sticking problems.
-
Doneness Check: Look for a set cheesecake with a slight jiggle in the center; overbaking can lead to a dry texture.
-
Creative Decor: Get creative with decorations! Use candy corn or chocolate drizzle to customize your Frankenstein Mini Cheesecakes beyond the traditional look.
-
Cooling Time: Allow these treats to cool completely before decoration; this ensures the chocolate topping sets well and looks appealing.
Frankenstein Mini Cheesecakes Recipe FAQs
What type of cream cheese should I use?
Opt for full-fat cream cheese for the best creamy texture. Ensure that it’s softened to room temperature for smooth mixing. I recommend sticking with brick-style cream cheese rather than whipped varieties, as they contain more moisture and won’t blend as well.
How should I store leftover mini cheesecakes?
Absolutely! Store your Frankenstein Mini Cheesecakes in an airtight container in the refrigerator for up to 3 days. This method keeps them fresh and ready to enjoy. If you’re making them ahead of time, the fridge is the best place to maintain their delightful texture.
Can I freeze these cheesecakes?
Very! You can freeze the mini cheesecakes. Wrap each one tightly in plastic wrap and place them in an airtight container. They will last for up to 2 months in the freezer. When you’re ready to enjoy them, simply thaw them overnight in the refrigerator. This will help preserve their creamy goodness!
Why did my cheesecakes crack while baking?
A common reason for cracks in cheesecakes is overbaking. Ensure you take them out of the oven when they’re set but still slightly jiggly in the center. Another tip is to bake them in a water bath to maintain moisture. If you notice dark spots on the surface, it may be a sign of overbaking or uneven cooking temperature.
Can I make these gluten-free?
Absolutely! To create gluten-free Frankenstein Mini Cheesecakes, substitute the all-purpose flour in the batter and the OREO cookies for gluten-free alternatives. Gluten-free graham crackers or chocolate cookies work wonderfully for the crust. It’s a delicious way to accommodate those with gluten sensitivities!
Are these cheesecakes suitable for kids?
Very much so! These mini cheesecakes are perfect for kids with their fun, spooky design and delicious flavor. Just keep an eye on the chocolate decorations if you have any allergies to consider. The bright green coloring and edible eyes are sure to bring smiles at any Halloween party!
Frankenstein Mini Cheesecakes That Will Spook Your Guests
Ingredients
Equipment
Method
- Preheat your oven to 350°F (175°C). In a mixing bowl, combine melted unsalted butter with crushed OREO cookies, stirring until well combined. Use a mini cheesecake pan and form 1-inch balls with the mixture, pressing them into the bottoms to create a crust. You want them to be compact and evenly spread for a delicious base.
- In a large bowl, beat softened cream cheese until smooth. Gradually add sugar, eggs, and vanilla extract, mixing thoroughly. Slowly incorporate flour, then add green food coloring drop by drop, mixing until you achieve your desired Frankenstein green hue. The batter should be creamy and free of lumps, perfect for the mini cheesecakes.
- Pour the cheesecake batter into the mini cheesecake pan, filling each crust almost to the top. Place the pan in the preheated oven and bake for about 15 minutes. The cheesecakes are done when they are set but still slightly jiggly in the center, indicating a creamy texture inside.
- Once baked, remove the pan from the oven and let the cheesecakes cool completely. Carefully release the cheesecakes from the pan and set them on a wire rack. Dip the tops into melted chocolate, and then into chocolate sprinkles for a festive touch. Use the melted chocolate to pipe fun mouth designs and attach edible eyes for the full Frankenstein effect.
")