")
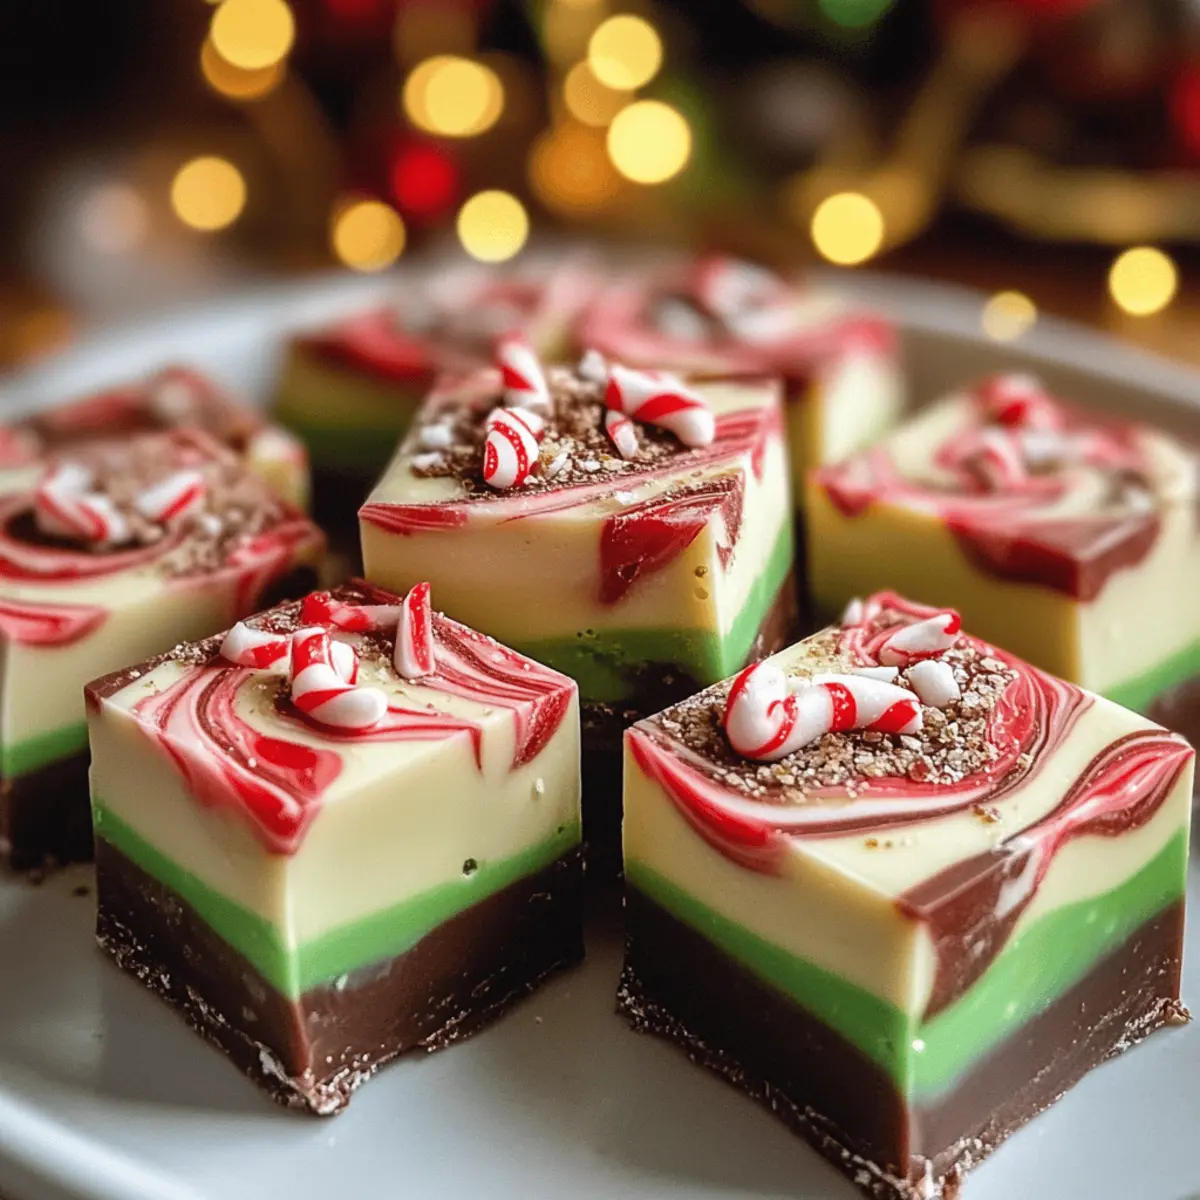
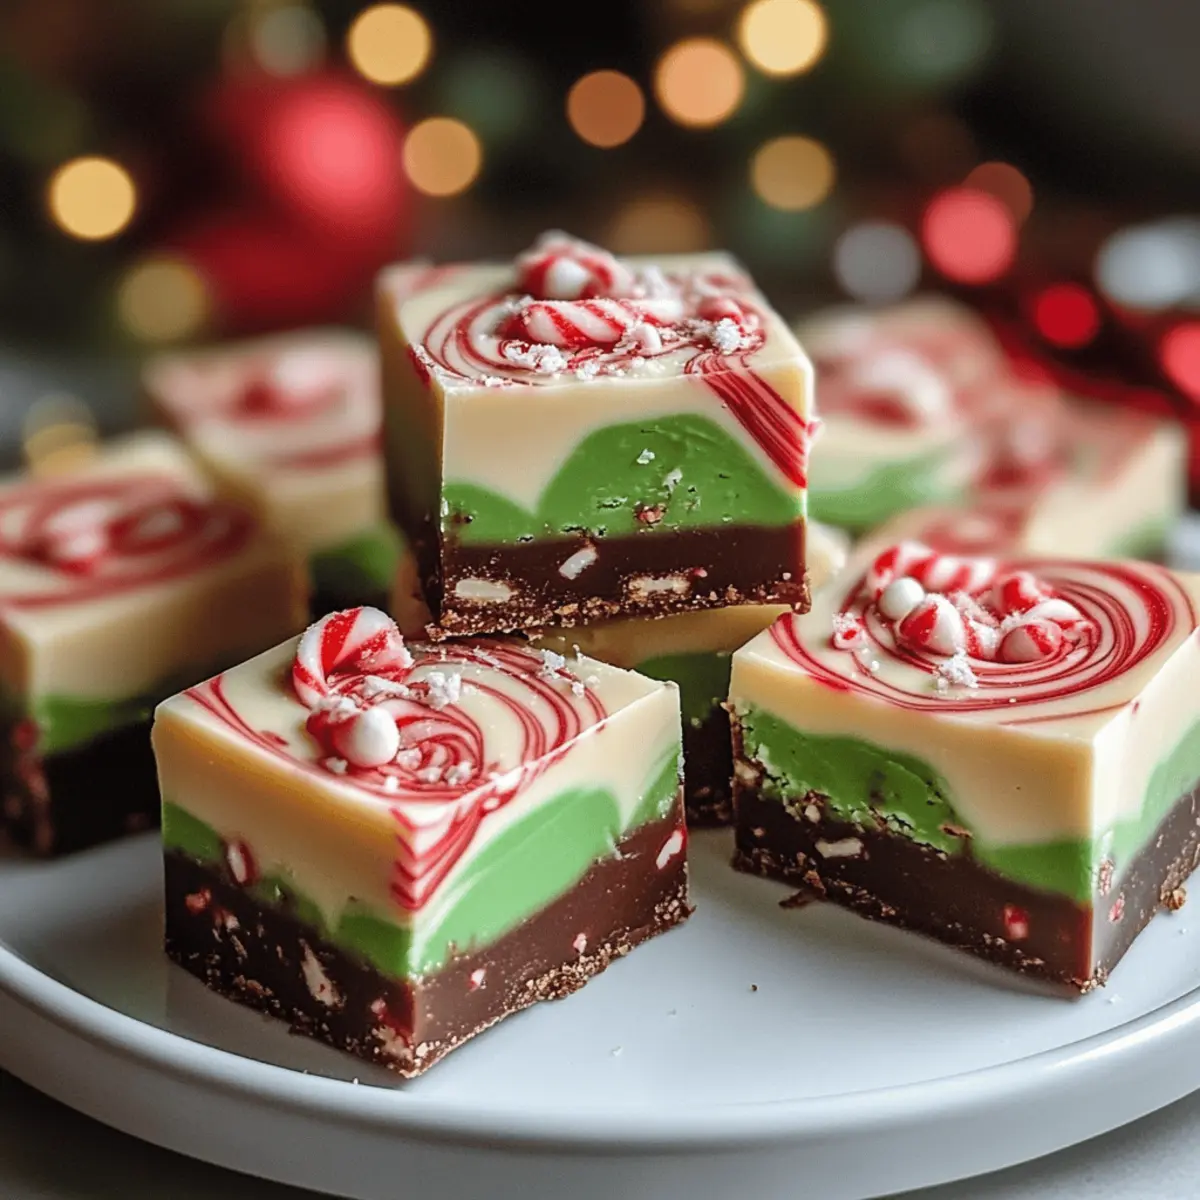
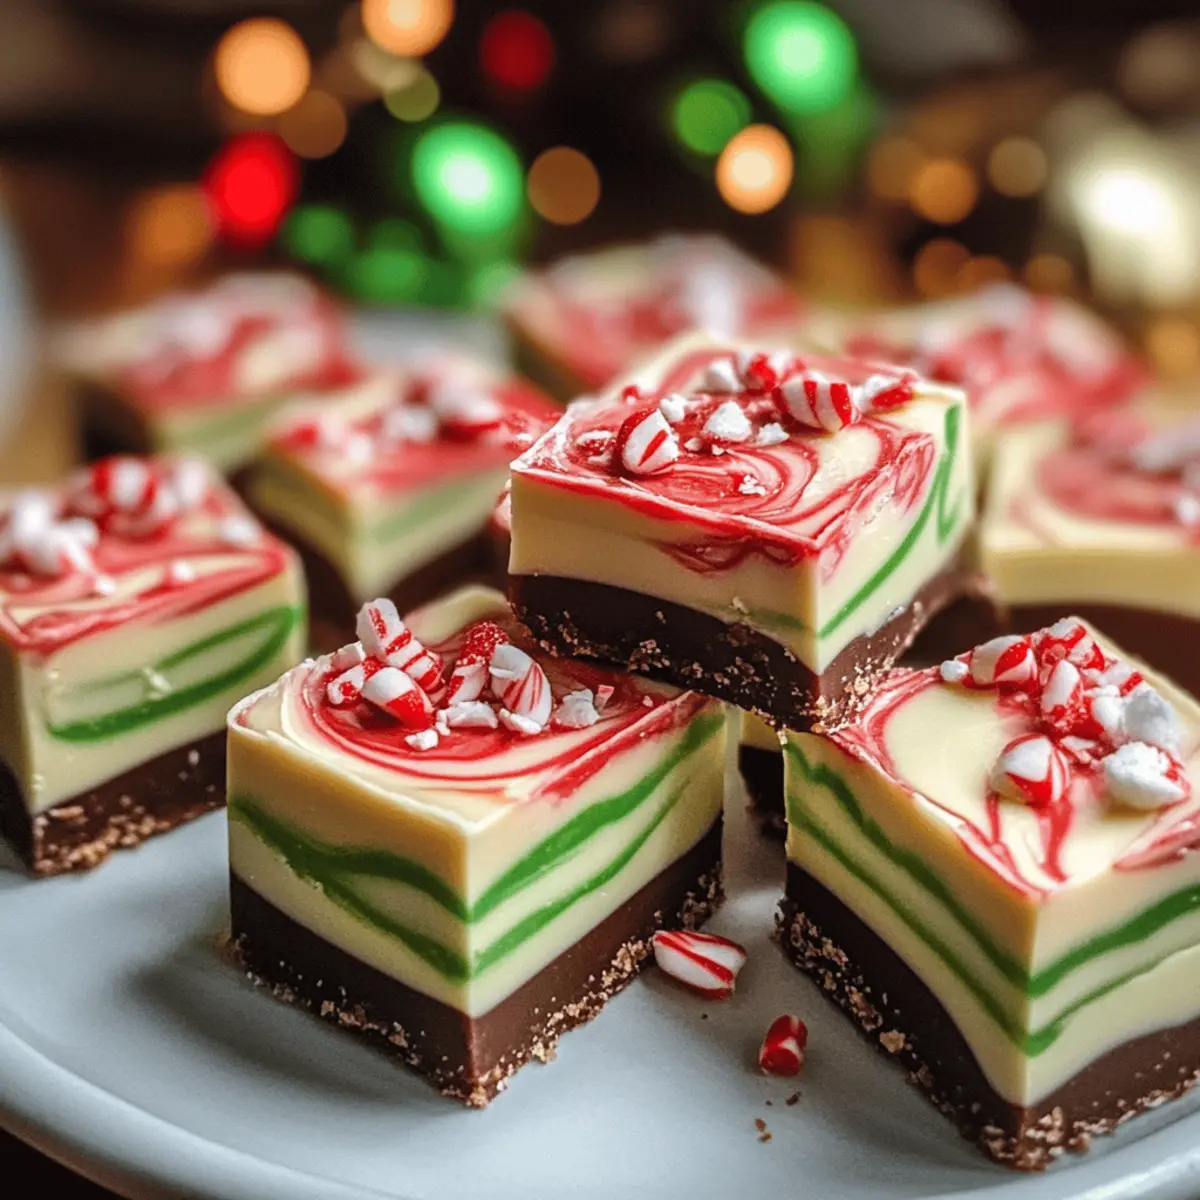
Is there anything more comforting in the kitchen than the warm aroma of melting chocolate and holiday cheer drifting through the air? This Easy Christmas Fudge recipe is not just a delightful treat; it’s a simple no-bake dessert that transforms any ordinary evening into a festive gathering. With layers of rich white chocolate and sweetened condensed milk, this fudge becomes a creamy, melt-in-your-mouth experience that’s perfect for sharing during the holidays. Not only is it an effortless crowd-pleaser, but it’s also a wonderful way to bond with family and friends as you whip up batches together. So, are you ready to dive into the festive spirit and create some delicious memories? Let’s make some Christmas Fudge!

What makes Christmas Fudge so irresistible?
Easy, no-bake preparation means you can whip this up in no time, freeing you for more holiday fun! Vibrant colors make it an eye-catching addition to any festive spread, while the irresistible creaminess will have everyone reaching for seconds. Customizable flavors allow for endless variations, whether you’re feeling classic or adventurous. Plus, it’s the perfect family bonding activity, turning time in the kitchen into joyful moments. Looking for more holiday inspiration? Check out our easy no-bake desserts to keep the festivities delicious!
Christmas Fudge Ingredients
For the Fudge Base
- White Chocolate – Provides sweetness and creaminess; substitute with semi-sweet or dark chocolate for a flavor twist.
- Sweetened Condensed Milk – Crucial for achieving the fudge’s decadent texture; opt for non-dairy alternatives to create a vegan version.
- Food Coloring – Used for adding vibrant hues; omit for classic fudge or explore beet juice as a natural option.
For the Toppings (optional)
- Crushed Candy Canes – Adds a festive crunch and peppermint flavor; perfect for enhancing your Christmas Fudge presentation.
- Holiday-Themed Candies – Bring colorful fun to your fudge; they make wonderful decorations for a cheerful touch.
With these ingredients on hand, you’re just moments away from creating a holiday treat that will make your gatherings even more special! Enjoy the process, and let the blending of flavors spark joy in your kitchen.
Step‑by‑Step Instructions for Christmas Fudge
Step 1: Prepare the Pan
Start by lining an 8-inch square baking dish with parchment paper, ensuring it overhangs slightly for easy removal later. This will prevent the fudge from sticking and allow for clean cuts once it sets. Set the prepared pan aside while you gather the ingredients and equipment for making your delicious Christmas Fudge.
Step 2: Melt the Chocolate Mixture
In a microwave-safe bowl, combine 12 ounces of white chocolate chips with one 14-ounce can of sweetened condensed milk. Microwave in short bursts of 30 seconds, stirring well in between each interval until the mixture is completely smooth and creamy. This should take about 1 to 2 minutes total. The glossy texture signals it’s ready for the next step.
Step 3: Add Color
Once your mixture is melted and smooth, it’s time to add a festive touch! Add a few drops of food coloring to the chocolate mixture, stirring until the color is uniformly blended and achieves your desired hue. This is where the magic happens—watch your Christmas Fudge transform into a vibrant holiday treat that looks as good as it tastes.
Step 4: Pour and Spread
Carefully pour the colorful fudge mixture into your prepared pan, using a spatula to spread it evenly across the surface. Take your time to ensure it’s level, creating a beautiful base for your holiday treat. The fudge should be smooth and shiny, making it irresistible as you prepare it to set.
Step 5: Set at Room Temperature
Allow the fudge to sit at room temperature for about 30 minutes, letting it cool and thicken slightly. This initial setting helps create the perfect texture. If you’re in a hurry, follow up with the next step; however, letting it rest is key to achieving that softer, melt-in-your-mouth consistency.
Step 6: Chill to Firm Up
After the fudge has set at room temperature, cover it with plastic wrap and place it in the refrigerator for at least 2 hours. Chilling allows your Christmas Fudge to firm up completely, making it easier to cut into neat squares. You’ll know it’s ready when the center feels firm but slightly soft to the touch.
Step 7: Cut into Squares
Using a sharp knife, remove the chilled fudge from the baking dish by lifting the parchment paper. Cut the fudge into equal squares, wiping the knife clean between cuts for neat edges. The vibrant colors and smooth edges make each piece a delightful holiday treat that’s ready to be enjoyed.
Step 8: Serve and Store
Once cut, arrange the squares on a festive platter or in a holiday gift box—perfect for sharing! Store any leftovers in an airtight container in the refrigerator for up to one week, or freeze for up to three months. With your holiday spirit ignited, enjoy your delicious homemade Christmas Fudge with friends and family!
What to Serve with Christmas Fudge
Indulging in a festive treat like this fudge opens the door to countless delicious pairings that enhance your holiday gatherings.
- Creamy Hot Chocolate: The rich, chocolatey goodness creates a perfect balance with the sweet fudge, warming your spirit as you indulge.
- Gingerbread Cookies: Their spicy warmth and delightful crunch contrast beautifully with the smooth creaminess of the fudge. Perfect for a festive platter!
- Sugary Shortbread: This buttery treat offers a light crunch that complements the fudge’s soft texture, making each bite even more decadent.
- Sparkling Fruit Punch: A refreshing fruity drink cleanses your palate, keeping the focus on the creamy richness of the fudge without overshadowing it.
- Peppermint Mocha: The combination of coffee, chocolate, and mint enhances the fudge’s festive charm, perfect for a cozy holiday brunch with friends.
- Mini Cheesecakes: Creamy and rich, they provide a lovely contrast, making this dessert duo a hit during any festive gathering.
- Spiced Apple Cider: Warm spiced cider adds warmth and a hint of sweetness, making it a comforting companion for your fudge while enjoying holiday conversations.
- Classic Vanilla Ice Cream: A scoop of ice cream with your fudge brings depth to the dessert experience, offering delightful temperature and texture contrast.
Christmas Fudge Variations & Substitutions
Unleash your creativity in the kitchen by customizing this festive fudge recipe to suit your taste and dietary needs!
-
Dairy-Free: Use non-dairy chocolate and sweetened condensed coconut milk for a creamy vegan version everyone can enjoy.
-
Flavorful Extracts: Add a splash of peppermint or almond extract for a delicious twist that enhances the fudge’s sweetness and holiday spirit. Just a hint can elevate the entire flavor profile!
-
Nutty Crunch: Stir in chopped nuts like pecans or walnuts to add an irresistible crunch and a boost of heartiness. This gives your fudge a delightful texture that’s perfect for festive gatherings.
-
Spicy Kick: Infuse a touch of cinnamon or nutmeg into the mixture for a warm, spiced flavor that complements the sweetness beautifully. The festive aroma will have your guests enchanted!
-
Colorful Layers: Create a striped effect by dividing the fudge mixture and adding different colors of food coloring, layering them in the pan for a gorgeous visual treat. It’s a fun way to personalize your dessert!
-
Holiday Sprinkles: Top your fudge with festive sprinkles or crushed candies for a pop of color; they not only look great but also add an extra crunch that delights the senses.
-
Salted Caramel Drizzle: Elevate the sweetness by drizzling a homemade or store-bought salted caramel over the top before chilling. The combination of sweet and salty is simply divine!
For more exciting dessert ideas, check out our no-bake treats collection or learn about various ways to add flavor using essential oils in your cooking!
Expert Tips for Christmas Fudge
• Use Quality Chocolate: Opt for high-quality white chocolate to achieve a rich flavor and creamy texture in your Christmas Fudge.
• Avoid Overheating: Microwave in shorter intervals to prevent burning the chocolate; stirring frequently helps ensure a smooth melt.
• Coloring Caution: Start with just a few drops of food coloring; you can always add more until you achieve your desired festive hue.
• Cool, Then Chill: Allow the fudge to set at room temperature before refrigerating; this step helps create the perfect melt-in-your-mouth consistency.
• Cut with Care: Use a sharp knife and clean it between cuts for beautifully neat squares of Christmas Fudge that will impress your guests.
How to Store and Freeze Christmas Fudge
Fridge: Store your Christmas Fudge in an airtight container in the refrigerator for up to one week. This keeps it fresh and ready for those sweet cravings!
Freezer: If you want to keep it longer, seal the fudge in a freezer-safe bag or container. It will stay good for up to three months—just thaw in the fridge before serving!
Wrapping: For optimal freshness, you can wrap individual squares in plastic wrap before placing them in a container. This way, you can easily grab a piece whenever you want!
Reheating: If you enjoy a warm treat, simply microwave a square for about 10-15 seconds. This revives that creamy texture and delightful sweetness!
Make Ahead Options
These Christmas Fudge are perfect for busy home cooks looking to save time during the holiday season! You can prepare the fudge mixture up to 24 hours in advance; simply follow the melting and coloring steps, then pour the mixture into the lined pan and refrigerate without cutting. Cover it tightly with plastic wrap to maintain its creamy texture. When you’re ready to enjoy your festive treat, simply take it out, let it sit at room temperature for about 10-15 minutes, slice it into squares, and serve. Your Christmas Fudge will be just as delicious and a delightful addition to any holiday gathering with minimal effort!
Christmas Fudge Recipe FAQs
What kind of chocolate should I use for the best Christmas Fudge?
Absolutely, using high-quality white chocolate is key to achieving a rich and creamy fudge. I recommend opting for brands that have a higher cocoa butter content, as they melt beautifully and contribute to a smooth texture. If you prefer a different flavor profile, semi-sweet or dark chocolate makes wonderful substitutes!
How should I store my Christmas Fudge for maximum freshness?
Your Christmas Fudge can be stored in an airtight container in the refrigerator for up to one week. This keeps the fudge fresh and allows you to enjoy it whenever a sweet craving strikes! For longer storage, wrap individual squares in plastic wrap and place them in a freezer-safe container. This way, you can easily grab a piece of fudge whenever you need a festive treat.
Can I freeze Christmas Fudge?
Yes, you can freeze Christmas Fudge! Simply seal it in a freezer-safe bag or container and it will remain delicious for up to three months. When you’re ready to enjoy, just move the fudge to the refrigerator for a few hours or overnight to thaw. For a quick fix, you can also pop it in the microwave for 10-15 seconds to warm it slightly before indulging.
What do I do if my fudge isn’t setting properly?
If your Christmas Fudge isn’t setting as expected, don’t worry! It could be due to the fudge not cooling long enough at room temperature before refrigeration. Make sure to let it sit at room temperature for about 30 minutes before chilling. If it still seems too soft after chilling, you might need to return it to the microwave and add a little more chocolate, reheating in short intervals while stirring until smooth.
Is this Christmas Fudge recipe safe for those with nut allergies?
Yes, the basic Christmas Fudge recipe is nut-free, making it a delightful option for those with nut allergies! Just be sure to check any toppings you might add, such as crushed candy canes or holiday-themed candies, as some of them may contain traces of nuts or be produced in facilities that handle nuts. Always read the labels to ensure safety!
How long can I keep Christmas Fudge in the fridge or freezer?
Your delicious Christmas Fudge can be kept in the refrigerator for up to one week. When freezing, wrap squares individually in plastic wrap and store in a freezer-safe container where they’ll stay fresh for up to three months. When ready to enjoy, just let them thaw in the fridge overnight for a sweet, festive treat!
Decadent Christmas Fudge: A Festive No-Bake Treat
Ingredients
Equipment
Method
- Line an 8-inch square baking dish with parchment paper, allowing it to overhang slightly for easy removal later.
- In a microwave-safe bowl, combine the white chocolate chips and sweetened condensed milk. Microwave in 30-second bursts, stirring in between until smooth.
- Add food coloring to the melted mixture, stirring until evenly blended.
- Pour the mixture into the prepared pan and spread it evenly using a spatula.
- Let the fudge sit at room temperature for about 30 minutes to cool and thicken.
- Cover with plastic wrap and refrigerate for at least 2 hours until firm.
- Lift the fudge from the baking dish using the parchment paper and cut it into squares.
- Arrange the squares on a platter or in a gift box for sharing.
")