")
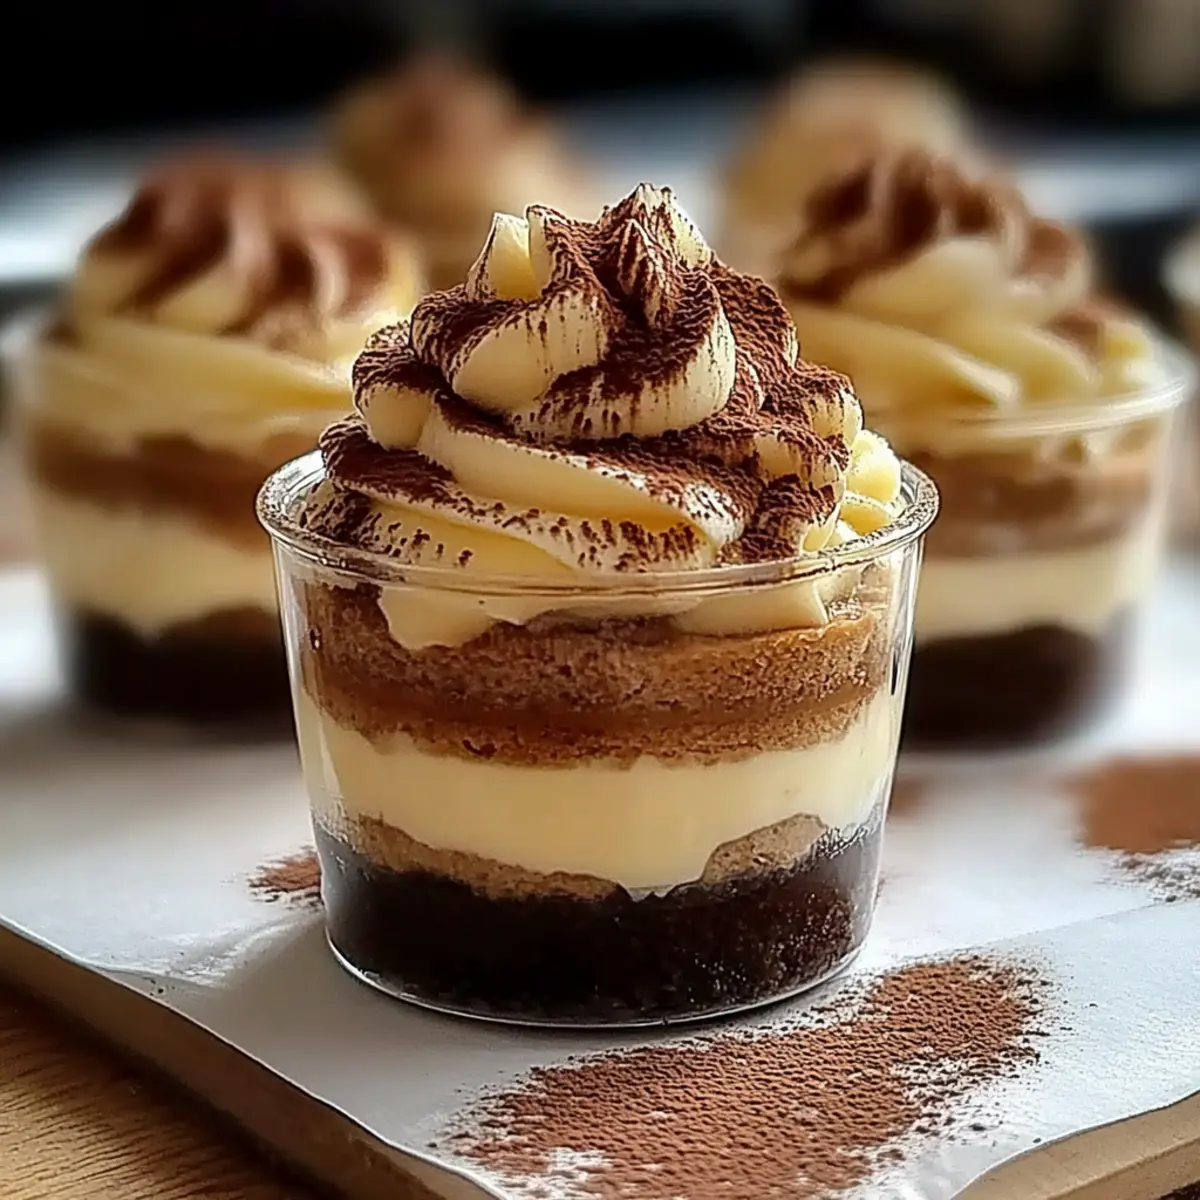
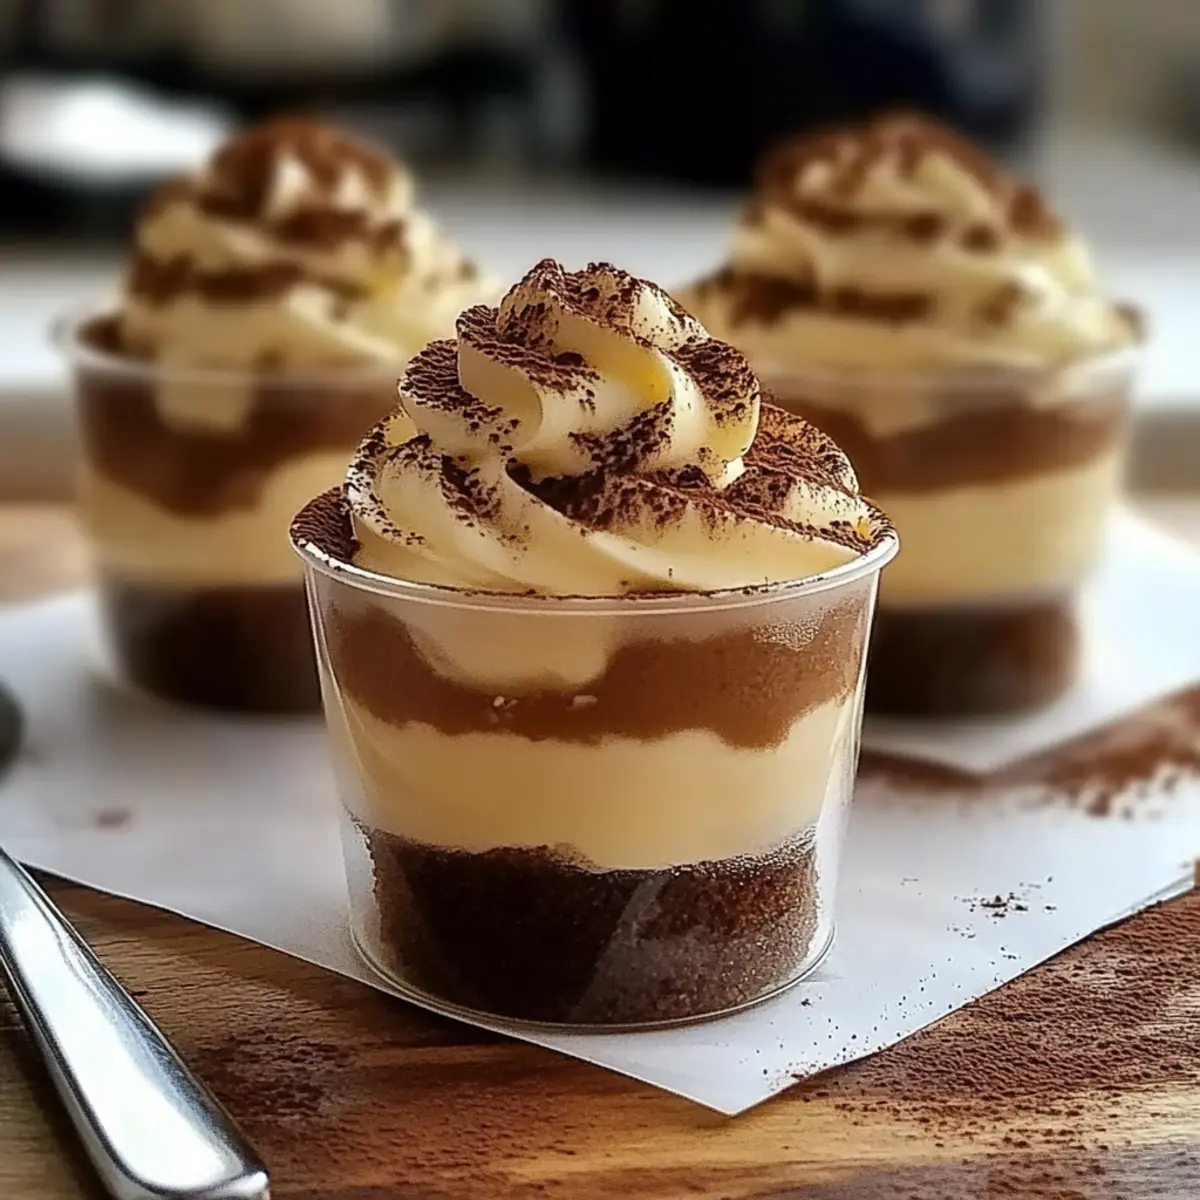
There’s something undeniably enchanting about indulging in dessert while exploring its vibrant history; that’s exactly what Mini Tiramisu Cups embody. These delightful layers of rich mascarpone cream, coffee-soaked ladyfingers, and a dusting of cocoa create a visually stunning presentation that’s sure to wow your guests. Not only are they quick to whip up, but they’re also a crowd-pleaser that can cater to your gluten-free friends with a simple swap. These cups transform the classic tiramisu into an accessible and elegant treat that captures both flavor and joy in every bite. Ready to bring a touch of Italy to your kitchen? Let’s dive into this luscious recipe!

Why Are Mini Tiramisu Cups a Must-Try?
Irresistible Layers: Each cup is a delightful tapestry of rich mascarpone cream and coffee-soaked ladyfingers that melt in your mouth.
Quick & Easy: Perfect for both novice cooks and seasoned chefs, this recipe comes together in just a few steps!
Gluten-Free Options: You can easily cater to gluten-free friends by substituting with gluten-free ladyfingers.
Visual Appeal: Serve in elegant cups for a stunning dessert presentation that will impress at any gathering.
Crowd-Pleaser: With coffee’s robust flavor and creamy texture, these mini cups guarantee smiles all around! For more fun dessert ideas, check out my Copycat Chick Treat for adventurous takes on classic flavors.
Mini Tiramisu Cups Ingredients
For the Cream
• Mascarpone Cheese – Provides a rich and creamy base that makes these Mini Tiramisu Cups a heavenly treat.
• Sugar – Sweetens the mascarpone mixture; feel free to adjust according to your taste.
• Vanilla Extract – Enhances the overall flavor profile; opt for pure vanilla for the best taste.
For Assembly
• Ladyfingers – Act as the structural component; soak them in coffee to bring moisture and flavor. Gluten-free ladyfingers can be used for a gluten-free version.
• Brewed Coffee – Infuses the essential coffee flavor characteristic of tiramisu; choose a strong coffee like espresso for best results.
For Topping
• Cocoa Powder – Adds a decorative touch and complements the dessert’s flavors; use high-quality cocoa for an authentic taste.
These simple yet essential ingredients come together beautifully, transforming into delightful Mini Tiramisu Cups that cater to both your cravings and your guests’ dietary needs.
Step‑by‑Step Instructions for Mini Tiramisu Cups
Step 1: Prepare the Coffee
Begin by brewing a strong cup of coffee using your favorite espresso or Arabica beans. Allow it to cool to room temperature, setting aside a shallow dish for soaking the ladyfingers. This fragrant coffee will be key in creating the delicious layers that make these Mini Tiramisu Cups unforgettable.
Step 2: Mix the Cream
In a large bowl, combine the mascarpone cheese, sugar, and vanilla extract. Using a hand mixer or a whisk, beat the mixture until it’s smooth and creamy, achieving soft peaks. This delightful cream will be layered between the coffee-soaked ladyfingers, creating a rich texture that balances perfectly with the coffee flavor.
Step 3: Soak Ladyfingers
Dip each ladyfinger into the cooled brewed coffee quickly, ensuring they absorb the coffee without becoming overly soggy. Arrange them in a single layer at the bottom of your serving cups. This step is crucial for achieving the ideal moisture level; the ladyfingers should be moist but still hold their shape for the Mini Tiramisu Cups.
Step 4: Layer the Cups
Spoon a generous layer of the mascarpone cream over the soaked ladyfingers in the cups. Spread it evenly to ensure every bite possesses that creamy goodness. Nestle layers of soaked ladyfingers on top of the cream, creating a beautiful stack that will showcase the wonderful layers of your Mini Tiramisu Cups.
Step 5: Repeat Layers
Continue layering the ingredients: dip more ladyfingers in coffee, then add another layer of the mascarpone cream on top. Repeat the process until the cups are filled to the brim, making sure to finish with a final layer of mascarpone. This careful stacking will bring height and elegance to your Mini Tiramisu Cups.
Step 6: Chill
Cover the cups with plastic wrap or lids and refrigerate for at least four hours, or overnight if possible. Chilling allows time for the flavors to meld together, creating a harmonious blend that enhances the taste and texture of your Mini Tiramisu Cups, ensuring they’re perfectly set by serving time.
Step 7: Finish
Just before serving, dust the tops of your Mini Tiramisu Cups with a generous sprinkling of cocoa powder, using a fine mesh sieve for an even distribution. This final touch not only enhances the visual appeal but adds a rich cocoa flavor that beautifully accents the creamy layers below.

Expert Tips for Mini Tiramisu Cups
- Chill for Flavor: Allow your Mini Tiramisu Cups to chill overnight for the best flavor. This time helps the layers meld beautifully.
- Avoid Sogginess: Dip ladyfingers quickly in coffee; they should be moist but hold their shape. Too long can lead to mushy layers!
- Use Quality Ingredients: Opt for high-quality mascarpone and cocoa powder. They significantly elevate the overall taste and texture of your dessert.
- Mixing Technique: When beating the mascarpone, avoid overmixing to maintain a light and creamy consistency.
- Layering Importance: Pay attention to layering; it’s key to achieving visually stunning Mini Tiramisu Cups with a delightful contrast of textures and flavors.
How to Store and Freeze Mini Tiramisu Cups
Fridge: Store your Mini Tiramisu Cups in the refrigerator, covered, for up to 2 days for optimum freshness and flavor.
Freezer: Freezing is not recommended as it may alter the creamy texture of the mascarpone and make the ladyfingers soggy upon thawing.
Reheating: These Mini Tiramisu Cups are best served chilled and do not require reheating, allowing the flavors to shine in their delightful cold state.
Presentation: If you plan to store them, keep the cocoa powder separate until serving to maintain the visual appeal—dust it on just before enjoying!
What to Serve with Mini Tiramisu Cups?
Imagine ending your meal with a splash of elegant flavors and textures that perfectly complement your delightful dessert.
-
Espresso Shots: The robust flavors of freshly brewed espresso enhance the coffee notes in your Mini Tiramisu Cups and awaken your taste buds.
-
Savory Bacon-Wrapped Asparagus: The savory crunch of bacon and the earthiness of asparagus create a delightful contrast to the sweet creaminess of the cups.
-
Chocolate-Dipped Strawberries: They offer a refreshing burst of fruit that balances the richness of the tiramisu, making each bite a celebration of flavors.
-
Simple Arugula Salad: Tossed lightly in olive oil, this peppery salad provides a fresh, crisp element that cleanses the palate between the layers of indulgence.
-
Sparkling Prosecco: This bubbly drink perfectly complements the textures of your dessert, adding a festive touch to any gathering.
-
Creamy Vanilla Gelato: As a sidekick to your Mini Tiramisu Cups, this gelato mirrors the dessert’s creaminess while introducing subtle vanilla notes for a harmonious finish.
Mini Tiramisu Cups Variations & Substitutions
Feel free to unleash your creativity and customize these Mini Tiramisu Cups to suit your taste!
- Gluten-Free Swap: Use gluten-free ladyfingers to make this indulgent dessert accessible for those with dietary needs.
- Coffee Alternative: Replace brewed coffee with chocolate milk for a delightful chocolate version that adds a sweet twist.
- Flavorful Liqueur: Add a splash of coffee liqueur or rum to the mascarpone cream for an adult-friendly treat bursting with flavor.
- Fruit Infusion: Layer in some fresh raspberries or strawberries between the mascarpone and ladyfingers for a fruity twist that balances the richness.
- Nutty Flavor: Incorporate finely chopped hazelnuts or almonds into the mascarpone cream for an added crunch and depth of flavor.
- Citrus Zest: Add a hint of lemon or orange zest to the cream for a refreshing citrus twist that cuts through the richness beautifully.
- Decadent Chocolate: Mix in melted dark chocolate into the mascarpone for an ultra-rich variant that chocolate lovers will adore.
These variations invite exploration, making every batch of Mini Tiramisu Cups a unique culinary adventure! And for more sweet recipes, don’t forget to check out my Copycat Chick Treat for delicious twists on classic favorites. Enjoy crafting your delicious desserts!
Make Ahead Options
These Mini Tiramisu Cups are perfect for meal prep enthusiasts seeking a delicious dessert! You can prepare the mascarpone cream and soak the ladyfingers up to 24 hours in advance. Simply assemble the layers in cups and refrigerate until ready to serve. For the best flavor, allow the assembled cups to chill overnight, which helps the flavors meld beautifully. When you’re ready to wow your guests, just dust with cocoa powder before serving, and you’ll have an irresistible treat that’s just as delightful as if made fresh that day. This make-ahead option saves you precious time, making your gatherings stress-free and enjoyable!
Mini Tiramisu Cups Recipe FAQs
What type of coffee should I use for Mini Tiramisu Cups?
I highly recommend using a strong coffee like espresso or Arabica for the best flavor. The robust coffee acts as a delicious soak for the ladyfingers, allowing them to retain their structure while infusing them with the iconic tiramisu taste.
How do I store left-over Mini Tiramisu Cups?
Store your Mini Tiramisu Cups in the refrigerator, covered, for up to 2 days. This keeps them fresh and flavorful. It’s best to wait to dust with cocoa powder until right before serving to maintain their beautifully layered presentation.
Can I freeze the Mini Tiramisu Cups?
Freezing is not recommended, as it can alter the delicate texture of the mascarpone cream and result in soggy ladyfingers once thawed. Keeping them chilled in the refrigerator is the ideal way to maintain their rich creaminess and delightful layers.
What if my ladyfingers become too soggy?
If your ladyfingers absorb too much coffee and become overly soggy, they may lose their structural integrity. To prevent this, dip each ladyfinger in the coffee quickly—just enough to soak the surface without letting it fall apart. This ensures they remain moist yet sturdy in your Mini Tiramisu Cups.
Are Mini Tiramisu Cups suitable for gluten-free diets?
Absolutely! To make gluten-free Mini Tiramisu Cups, simply substitute regular ladyfingers with gluten-free ladyfingers available at most grocery stores. This way, you can cater to your gluten-sensitive friends without sacrificing flavor or presentation.
Delicious Mini Tiramisu Cups: Your New Favorite Dessert
Ingredients
Equipment
Method
- Prepare the coffee by brewing a strong cup using espresso or Arabica beans. Allow it to cool and set aside a shallow dish for soaking.
- In a large bowl, mix mascarpone cheese, sugar, and vanilla extract until smooth and creamy.
- Quickly dip each ladyfinger into the cooled coffee and arrange in single layer at the bottom of your serving cups.
- Spoon a generous layer of mascarpone cream over the soaked ladyfingers.
- Continue layering by dipping more ladyfingers in coffee and adding another layer of cream, finishing with a layer of mascarpone.
- Cover and refrigerate for at least four hours, preferably overnight.
- Before serving, dust tops with cocoa powder using a fine mesh sieve.
")