")
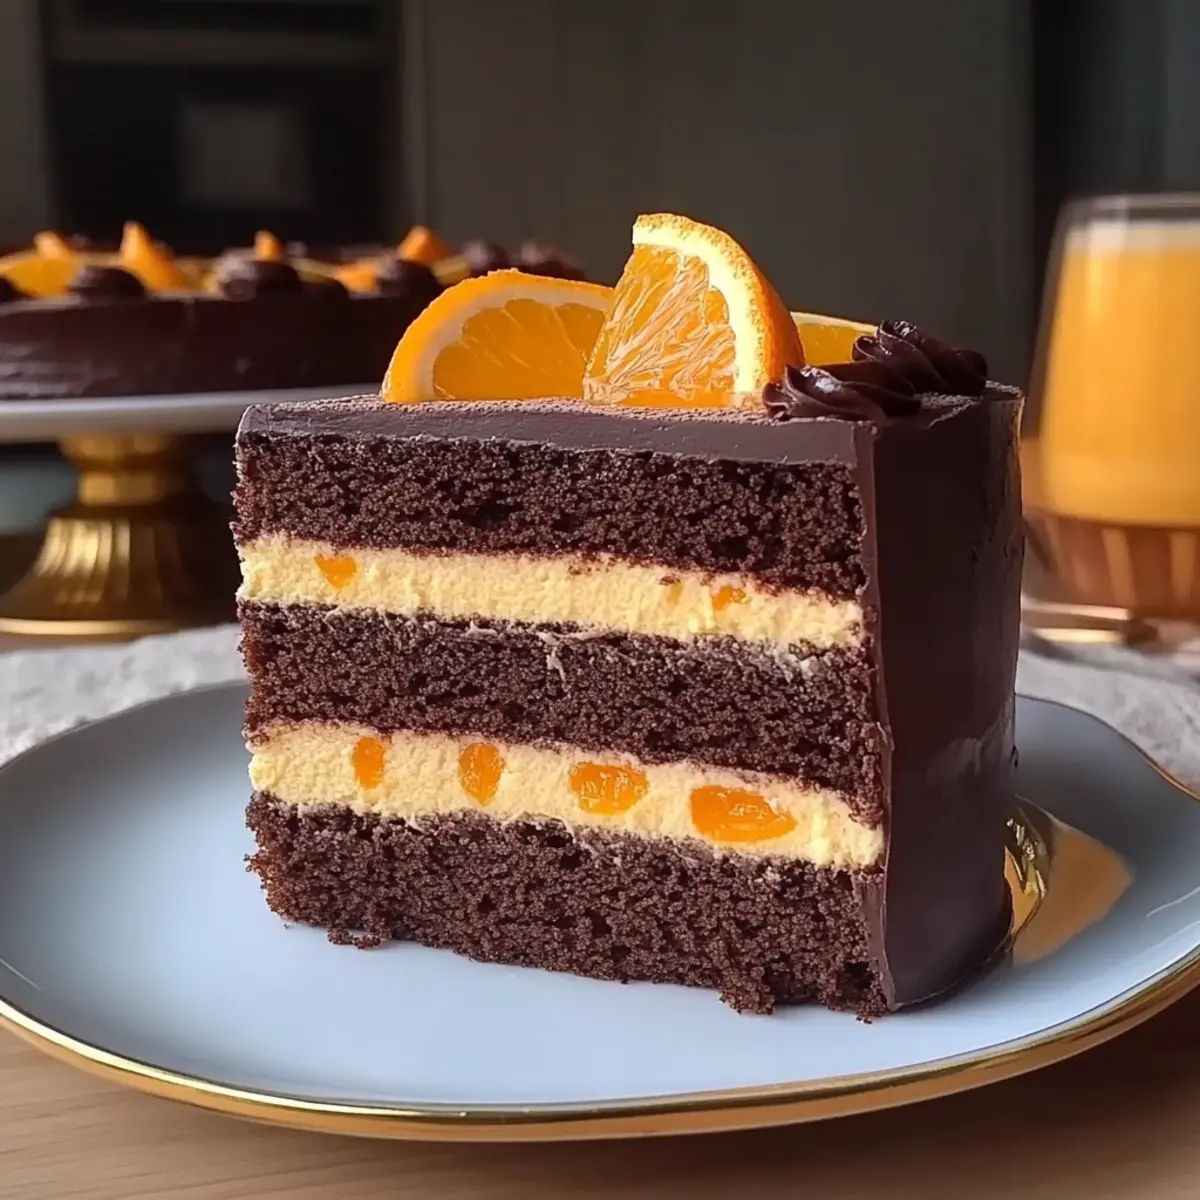
As I sifted through my pantry one rainy afternoon, my eyes landed on a neglected bag of cocoa powder, and suddenly, a spark of inspiration hit me—a zesty Chocolate & Orange Punchcake was in order! This delightful cake perfectly marries indulgent chocolate with the bright, refreshing zing of citrus, creating an experience that’s as uplifting as it is delicious. Whether you’re celebrating a birthday, hosting a cozy gathering, or simply want to treat yourself after a long day, this recipe is a guaranteed crowd-pleaser that’s easy to whip up. Plus, it’s adaptable, allowing you to play with flavors and ingredients based on what you have on hand. Curious to find out just how simple and scrumptiously satisfying this cake can be? Let’s dive in!
Why is this Punchcake So Irresistible?
Indulging in this Chocolate & Orange Punchcake is like a party in your mouth! Bright flavors of zesty citrus paired with rich chocolate create a taste experience that excites the palate. Simplicity is key—this cake combines easily accessible ingredients, making it perfect for both novice bakers and seasoned chefs alike. Crowd-pleasing and visually stunning, it’s ideal for celebrations, bringing joy to birthdays or holiday gatherings. Whether paired with a dollop of whipped cream or a scoop of vanilla ice cream, each bite is a delightful treat. If you’re looking for more indulgence, check out my Swiss Chocolate Chalet or satisfy your chocolate cravings with delicious Chocolate Chips Cookies!
Chocolate & Orange Punchcake Ingredients
• Prepare to indulge in a delightful mix of chocolate and citrus!
- For the Batter
- All-purpose flour – Provides structure; substitute with gluten-free flour for a gluten-free option.
- Granulated sugar – Adds sweetness; can be replaced with coconut sugar for a lower glycemic alternative.
- Unsweetened cocoa powder – Delivers rich chocolate flavor; Dutch-processed cocoa gives deeper color and smoothness.
- Baking powder – Essential leavening agent; ensure freshness for optimal rising.
- Baking soda – Works alongside baking powder; vital for balancing the acidity from the orange juice.
- Salt – Enhances the overall flavor profile.
- Large eggs – Help bind ingredients and add moisture; use flax eggs for a vegan version.
- Whole milk – Adds richness and moisture; almond milk can be used for a dairy-free option.
- Vegetable oil – Contributes moisture and fat; consider substituting with melted coconut oil for added flavor.
- Vanilla extract – Amplifies sweetness and depth of flavor.
- Boiling water – Helps invigorate cocoa for enhanced color and flavor.
- Orange zest – Infuses a fresh citrus note; a microplane works wonders for fine zesting.
- Orange juice – Elevates moisture and citrus flavor; freshly squeezed is highly recommended.
- Semisweet chocolate chips – Provide texture and bursts of chocolate goodness; swap for dark chocolate chips for a richer taste.
Enjoy crafting your Chocolate & Orange Punchcake! Each bite promises to be a zesty and indulgent delight.
Step‑by‑Step Instructions for Chocolate & Orange Punchcake
Step 1: Preheat and Prepare
Preheat your oven to 350°F (175°C) to ensure a perfect bake. While the oven warms, prepare two 9-inch round cake pans by greasing them with butter or oil and dusting with flour to prevent sticking. This step is crucial for the Chocolate & Orange Punchcake to release easily after baking and maintain its beautiful shape.
Step 2: Mix Dry Ingredients
In a large mixing bowl, sift together your all-purpose flour, granulated sugar, unsweetened cocoa powder, baking powder, baking soda, and salt. This aerates the dry ingredients and combines them evenly. You should have a fluffy, evenly-mixed mixture that gives a rich chocolate aroma—this foundational step sets the stage for the delicious Chocolate & Orange Punchcake ahead.
Step 3: Whisk Wet Ingredients
In a separate bowl, whisk together the large eggs, whole milk, vegetable oil, and vanilla extract until fully combined and smooth. This blending of wet ingredients will add richness and moisture to the Chocolate & Orange Punchcake. Aim for a silky texture; it’s key for producing a delectable cake that’s not only tasty but also moist throughout.
Step 4: Combine Wet and Dry Mixtures
Gradually pour the wet mixture into your dry ingredients, stirring gently to combine. As you mix, carefully incorporate the boiling water. This vital step will invigorate the cocoa, enhancing its flavor and keeping your batter smooth. The resulting mix should be glossy and well-blended, indicating it’s ready for the final flavorful additions.
Step 5: Add Zest and Chocolate Chips
Gently fold in the fresh orange zest and orange juice, followed by the semi-sweet chocolate chips. These ingredients bring brightness and bursts of chocolate that complement the rich cake beautifully. Ensure all elements are evenly distributed throughout the batter, as this will elevate the unique flavor profile of your Chocolate & Orange Punchcake.
Step 6: Bake the Cake
Divide the batter evenly between the prepared cake pans and smooth the tops with a spatula. Place the pans in your preheated oven and bake for 30-35 minutes, or until a toothpick inserted in the center comes out clean. Your kitchen will fill with heavenly aromas, and the cakes should rise nicely, appearing set and slightly springy to the touch.
Step 7: Cool the Cakes
Once baked, remove the pans from the oven and allow them to cool for about 10 minutes on a wire rack. This cooling time helps the Chocolate & Orange Punchcake to stabilize before being transferred. Carefully run a knife around the edges to release the cakes from the pans, ensuring a smooth transition.
Step 8: Assemble and Garnish
After the cakes cooled completely, stack them with a generous layer of chocolate ganache in between. For an appealing finish, garnish the top with fresh orange slices. This assembly not only enhances the visual appeal but also deepens the flavor of your Chocolate & Orange Punchcake, making it a delightful centerpiece for any celebration.

What to Serve with Zesty Chocolate & Orange Punchcake
The perfect way to round out your celebration is with delightful pairings that enhance every slice of this indulgent treat.
-
Whipped Cream: The light, airy texture complements the dense cake, adding a creamy dimension that balances the richness of chocolate.
-
Vanilla Ice Cream: A classic choice, the cold creaminess brings a refreshing contrast to the warm, zesty flavors, creating a truly decadent experience.
-
Fresh Berries: Strawberries or raspberries add a pop of color and vibrant acidity, making each bite feel light and wonderfully balanced.
Pairing berries with this cake enhances both presentation and flavor, creating a beautiful contrast that’s visually stunning on the plate.
-
Chocolate Ganache Drizzle: Elevate each serving with an extra drizzle of velvety ganache, intensifying the chocolate flavor while adding a luxurious touch.
-
Mint Tea: For a soothing drink option, mint tea provides a fresh palate cleanser that complements the citrus notes beautifully. Its herbal undertones make for a comforting pairing.
-
Citrus Salad: A refreshing salad of orange and grapefruit segments brightens up the table, tying in the zesty flavors from the cake while providing a crisp texture.
-
Coffee: A robust cup of coffee harmonizes with the cake’s rich chocolate, enhancing its flavor while offering a warm and inviting finish to your meal.
Let these delightful suggestions inspire your next gathering, ensuring that every slice of your Zesty Chocolate & Orange Punchcake is paired perfectly for maximum enjoyment!
How to Store and Freeze Chocolate & Orange Punchcake
Room Temperature: Keep the cake covered at room temperature for up to 3 days to maintain its freshness and flavor.
Fridge: For longer preservation, wrap the cake tightly in plastic wrap and store it in the fridge for up to 1 week; this will keep it moist and delicious.
Freezer: To freeze, slice the Chocolate & Orange Punchcake and wrap each piece in foil or an airtight container. It can be frozen for up to 3 months.
Reheating: Thaw individual slices in the fridge overnight, and gently reheat in the microwave or enjoy it chilled for a refreshing treat!
Make Ahead Options
These Chocolate & Orange Punchcake are perfect for busy weeknights or special occasions! You can bake the cakes up to 24 hours in advance—just let them cool completely, then wrap them tightly in plastic wrap or store in an airtight container. This method keeps the cakes moist and fresh, preventing any drying out. On the day of serving, simply layer the cakes with chocolate ganache and garnish with fresh orange slices just before presenting. This way, you can enjoy a stunning dessert with minimal stress, ensuring that your Chocolate & Orange Punchcake is just as delicious as if freshly baked!
Chocolate & Orange Punchcake Variations
Feel free to explore these exciting twists on the classic Chocolate & Orange Punchcake, tailoring it to your family’s taste buds!
- Gluten-Free: Substitute all-purpose flour with a gluten-free blend for a cake everyone can enjoy.
- Lower Sugar: Use coconut sugar instead of granulated sugar for a healthier sweetening option.
- Vegan: Swap large eggs for flax eggs and use almond milk for a delightful plant-based version. You’ll still get that moist texture!
- Citrus Twist: Experiment with different citrus fruits! Lime or lemon zest can add a refreshing zing that pairs beautifully with chocolate.
- Nutty Crunch: Add chopped walnuts or pecans into the batter for an unexpected crunchy texture.
- Chocolate Overload: Go for dark chocolate chips instead of semisweet for a richer chocolate experience; it’s heavenly!
- Chili Kick: Feel adventurous? Add a pinch of cayenne pepper to the batter for a surprising kick that balances the sweetness.
- Frosting Swaps: Top with cream cheese frosting instead of ganache for a tangy contrast that complements the sweetness beautifully.
Whether you stick to the classic recipe or try out one of these variations, the Chocolate & Orange Punchcake is sure to be a hit at any gathering! If you’re in the mood for something different, check out my indulgent Swiss Chocolate Chalet or satisfy your sweet tooth with my delicious Chocolate Chips Cookies. Happy baking!
Expert Tips for Chocolate & Orange Punchcake
-
Fresh Leavening Agents: Ensure your baking powder and baking soda are fresh to achieve a lovely rise. Stale agents can lead to a dense cake instead of the light, fluffy texture desired.
-
Boiling Water is Key: Don’t skip the boiling water! It not only enhances the cocoa flavor but also helps to keep the cake moist—a crucial element for your Chocolate & Orange Punchcake.
-
Timing for Flavor: Allow the cake to rest for a few hours before serving. This helps deepen the flavors, making each bite even more delightful and indulgent.
-
Serrated Knife for Slicing: Use a serrated knife to cut the cake layers neatly. This method prevents crumbling and ensures beautiful layers for frosting.
-
Zest with Care: When zesting the orange, be sure to only scrape the outer layer to avoid the bitter white pith underneath. This brings out a fresh citrus note without the bitterness.
-
Stored for Freshness: If making ahead, bake the cake a day in advance, wrap it well, and frost just before serving to maintain the beautiful texture and taste of your Chocolate & Orange Punchcake.

Chocolate & Orange Punchcake Recipe FAQs
How do I select ripe oranges for zest and juice?
Absolutely! Look for firm oranges that feel heavy for their size. A vibrant, smooth skin is also a good indicator of ripeness. Avoid any with dark spots or blemishes, which could indicate overripeness. Freshly squeezed orange juice will bring a burst of flavor to your Chocolate & Orange Punchcake!
What’s the best way to store leftover Chocolate & Orange Punchcake?
For optimal freshness, keep the cake covered at room temperature for up to 3 days. If you’d like to extend its shelf life, wrap it tightly in plastic wrap and refrigerate for up to 1 week while retaining moisture. Just remember to bring it to room temperature before serving for maximum flavor!
Can I freeze my Chocolate & Orange Punchcake?
Yes, you can! To freeze, slice the cake and wrap each piece in foil or store them in an airtight container. It can be frozen for up to 3 months. When you’re ready to enjoy it again, simply thaw the slices in the fridge overnight. You can reheat them gently in the microwave or enjoy them chilled for a refreshing delight.
What if my Chocolate & Orange Punchcake turns out dry?
Very importantly, dry cake usually stems from overbaking. To ensure moistness, keep an eye on your cake during the last few minutes of baking. Use the toothpick test; if it comes out clean but has a bit of moist crumb, it’s done! If your cake has already cooled and you find it dry, you can try brushing it lightly with simple syrup or a bit of orange juice to add moisture back.
Are there any allergies I should consider when making this recipe?
Definitely keep allergies in mind! The Chocolate & Orange Punchcake contains common allergens such as eggs, dairy, and gluten. For egg allergies, substituting with flax eggs works well. For a dairy-free option, almond milk can be used, and gluten-free flour can replace all-purpose flour. Always double-check for any specific allergies your guests may have to ensure everyone can indulge safely!

Moist Chocolate & Orange Punchcake for Your Next Celebration
Ingredients
Equipment
Method
- Preheat your oven to 350°F (175°C). Prepare two 9-inch round cake pans by greasing them with butter or oil and dusting with flour.
- In a large mixing bowl, sift together all-purpose flour, granulated sugar, unsweetened cocoa powder, baking powder, baking soda, and salt.
- In a separate bowl, whisk together the large eggs, whole milk, vegetable oil, and vanilla extract until fully combined and smooth.
- Gradually pour the wet mixture into your dry ingredients, stirring gently to combine. Carefully incorporate the boiling water.
- Gently fold in the fresh orange zest and orange juice, followed by the semi-sweet chocolate chips.
- Divide the batter evenly between the prepared cake pans and smooth the tops. Bake for 30-35 minutes, or until a toothpick comes out clean.
- Allow the cakes to cool for about 10 minutes on a wire rack. Run a knife around the edges to release the cakes from the pans.
- Once cooled, stack the cakes with a generous layer of chocolate ganache in between. Garnish with fresh orange slices.
")