")
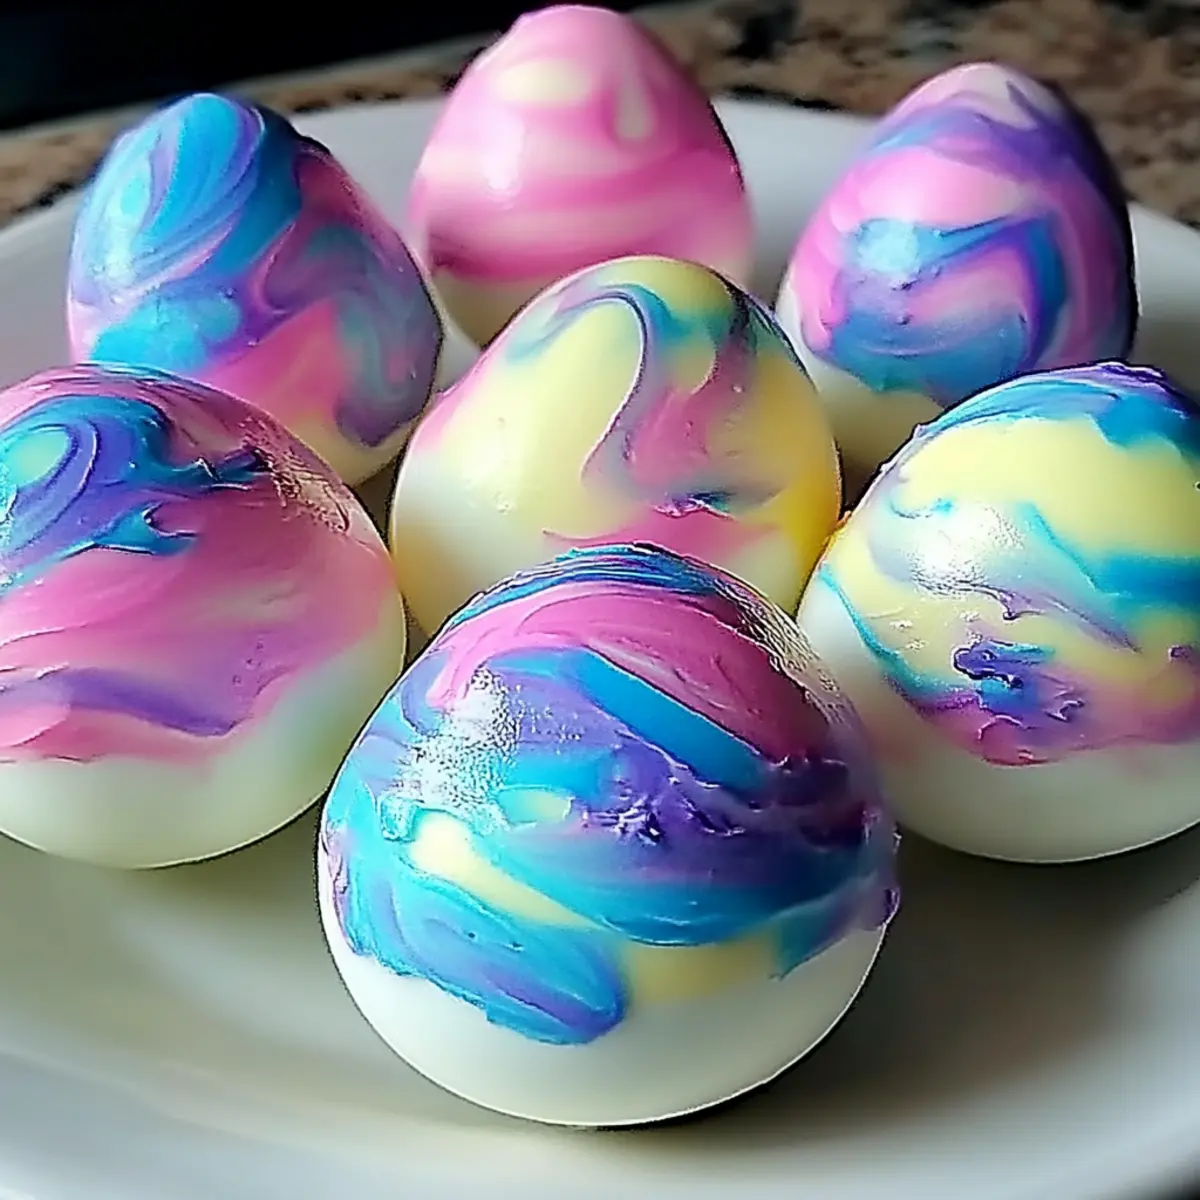
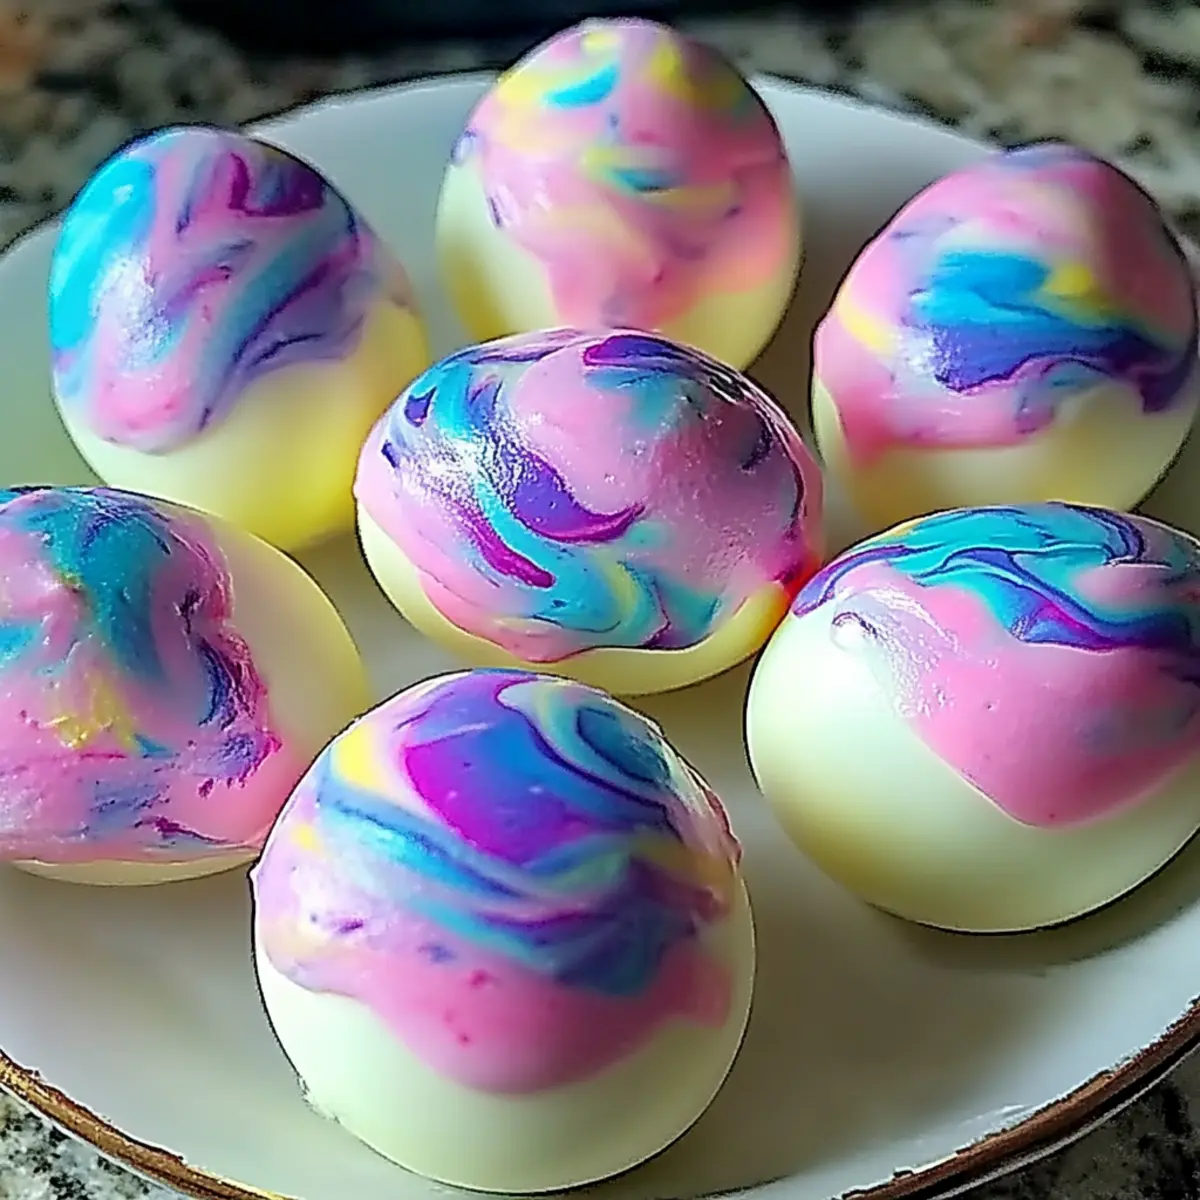
As the first rays of spring sunlight dance through the kitchen window, I can’t help but feel inspired to create something vibrant and fun. This year, I’m excited to share my recipe for Cool Whip Easter Eggs, a whimsical treat that encourages both creativity and family bonding. Not only are these colorful eggs incredibly easy to whip up, but they’re also a delightful addition to any Easter brunch table, guaranteed to make everyone smile. With just a few simple ingredients and endless room for customization, these festive eggs are perfect for making cherished memories with loved ones. So, are you ready to dive into this colorful culinary adventure? Let’s get decorating!
Why Make Cool Whip Easter Eggs?
Family-Friendly Fun: These Cool Whip Easter Eggs are not just a treat; they’re a delightful activity for kids and adults alike. Quick Preparation: With a simple process and minimal ingredients, you’ll have beautifully decorated eggs in no time! Customizable Creations: Let your creativity shine by experimenting with food coloring and flavors, such as infusing whipped topping with vanilla or coconut. Visual Appeal: The vibrant colors and whimsical designs make them a stunning centerpiece for any Easter brunch. Memorable Moments: Share laughter and joy as you whip up these treats together; they are bound to spark cherished family memories! Looking for more easy recipes? Check out these Cool Whip Cookies for another fun baking adventure!
Ingredients for Whip Easter Eggs
• Get ready to create deliciously colorful treats!
For the Eggs
- Hard-Boiled White Eggs – Use unpeeled eggs for best results to maintain a firm structure while decorating.
For the Topping
- White Vinegar – Soaking eggs enhances dye adherence; just 2 minutes do the trick!
- Whipped Topping – Acts as the perfect decorative coating; swap in homemade whipped cream for a richer flavor.
For the Color
- Food Coloring – Add a burst of color for a festive appearance; gel food coloring works wonderfully for vibrant results.
Turn these Whip Easter Eggs into a creative project with your family!
Step‑by‑Step Instructions for Whip Easter Eggs
Step 1: Prepare the Eggs
Start by ensuring your hard-boiled white eggs are completely cooled. For enhanced dye adherence, soak the eggs in a bowl of white vinegar for about 2 minutes. After soaking, drain the vinegar and gently pat the eggs dry with a paper towel. This step is crucial for creating beautifully colorful Whip Easter Eggs, setting the stage for decorating.
Step 2: Create the Colorful Topping
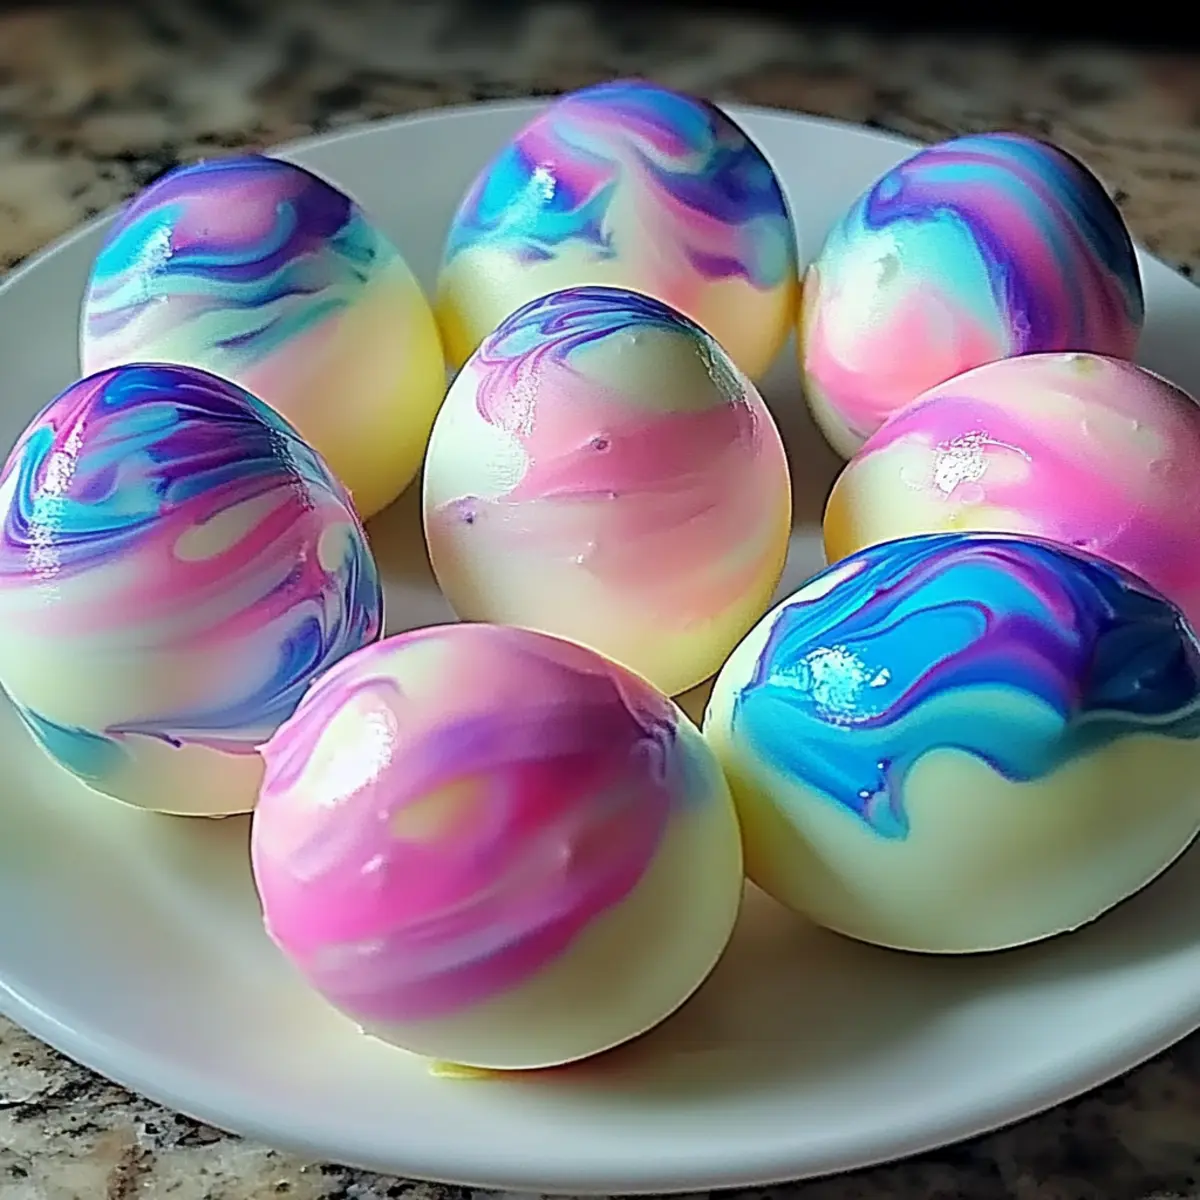
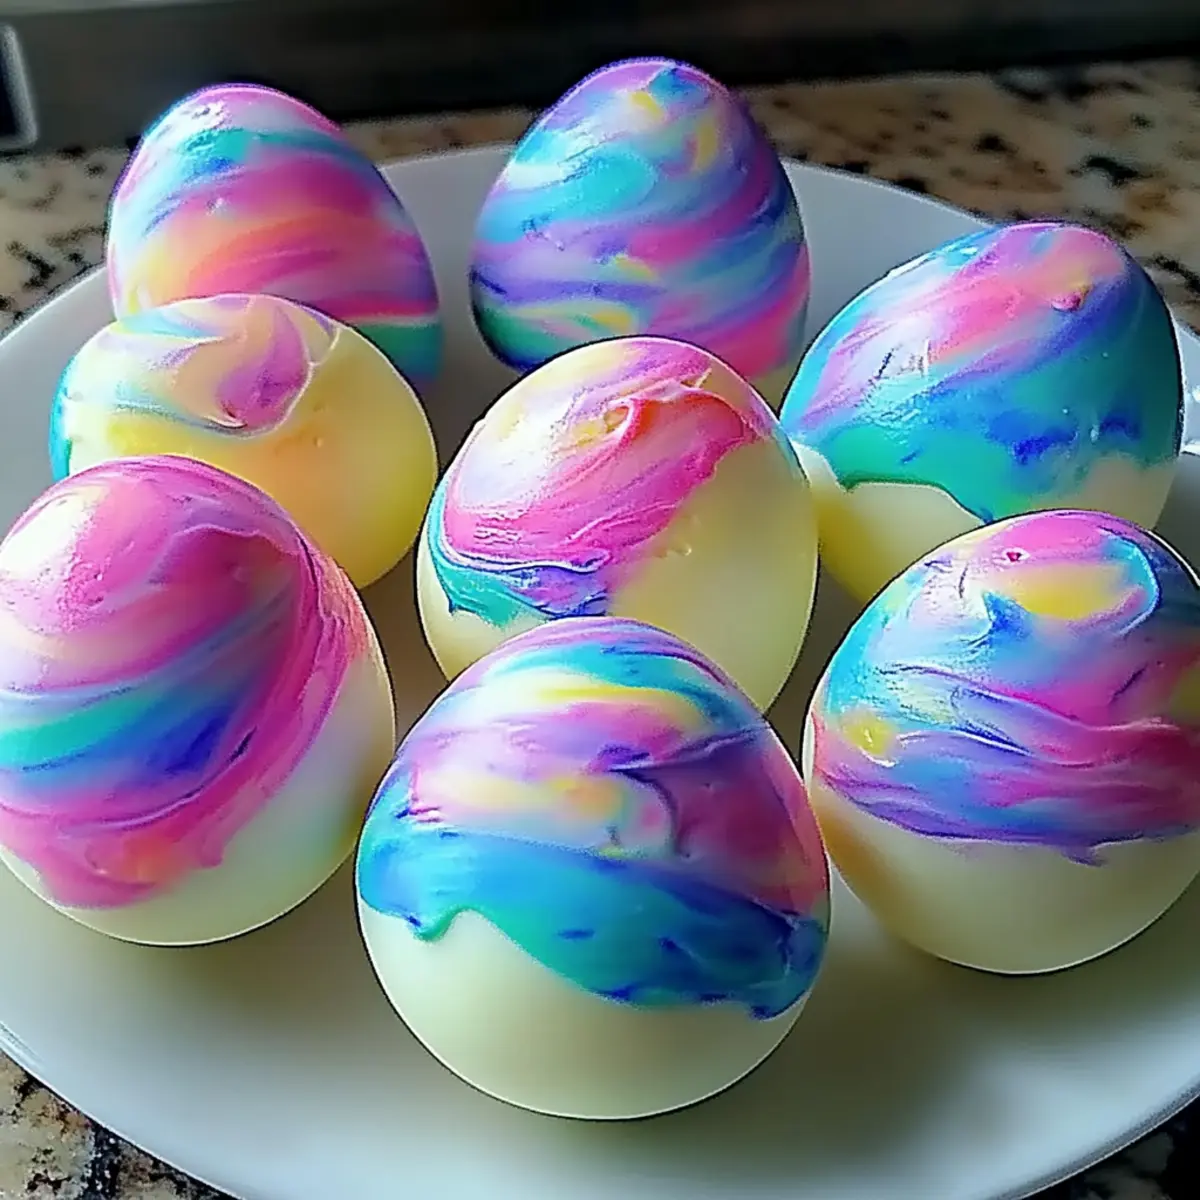
On a large plate, spread a thick layer of the whipped topping, making it about ½ inch thick. Add drops of food coloring across the topping, using a variety of colors for a vibrant effect. Gently swirl the food coloring through the whipped topping with a toothpick, being careful to create beautiful patterns without overmixing. This will prepare a fun and colorful coating for your Whip Easter Eggs.
Step 3: Decorate the Eggs
Take each cooled egg and roll it gently in the colorful whipped topping until it is fully coated. Make sure to rotate the egg to cover all surfaces evenly for a fun look. Once coated, place the eggs on a cooling rack or a clean plate. Allow the eggs to rest for about 10-15 minutes, letting the topping set slightly for best presentation.
Step 4: Rinse and Dry
After resting, it’s time to rinse the eggs gently under cool running water to remove any excess whipped topping. This ensures that the colors are vibrant and that the eggs aren’t overly sweet. Carefully dry each egg on paper towels, ensuring they’re completely dry before presenting them. This step helps maintain the festive appeal of your Whip Easter Eggs.
Step 5: Serve and Enjoy
Once dried, these colorful Whip Easter Eggs are ready to make a festive appearance at your Easter brunch! Arrange them in a decorative bowl or plate as a centerpiece. If there are leftovers, store them in an airtight container in the refrigerator, where they will stay fresh for up to one week. Share the joy of these delightful treats with your family and friends!
Make Ahead Options
These Cool Whip Easter Eggs are perfect for meal prep enthusiasts looking to save time during the busy holiday season! You can prepare hard-boiled eggs up to 3 days in advance, keeping them unpeeled in the refrigerator to maintain their firmness. The whipped topping can also be made 24 hours ahead; simply store it in an airtight container in the fridge until you’re ready to use it. When it’s time to decorate, just follow the final steps—coat the eggs in the whipped topping and rinse gently. This way, you’ll have bright and whimsical Cool Whip Easter Eggs ready for your Easter brunch with minimal last-minute effort!
Expert Tips for Whip Easter Eggs
- Wear Gloves: Protect your hands from staining by wearing disposable gloves during the decorating process; food coloring can be tough to wash off!
- Limit Vinegar Soaking: Soaking the eggs in white vinegar for too long can weaken the shells. Stick to 2 minutes for optimal results.
- Swirl Gently: To keep beautiful, distinct patterns, gently swirl food coloring into the whipped topping without overmixing.
- Store Properly: Keep decorated Whip Easter Eggs in an airtight container in the fridge and consume within a week for the best texture and flavor.
- Avoid Freezing: Freezing the decorated eggs can negatively affect the whipped topping’s consistency, so it’s best to keep them refrigerated.
What to Serve with Cool Whip Easter Eggs?
Treat your family and guests to a delightful spread that elevates the vibrant spirit of these festive treats.
- Fluffy Pancakes: Light and airy pancakes are perfect for brunch, offering a soft texture that complements the playful eggs.
- Fresh Fruit Salad: Bright, juicy fruit adds a refreshing touch, enhancing the colorful experience of your Easter table.
- Spinach Salad: A crisp spinach salad with a tangy vinaigrette introduces an earthy balance to the sweetness of the Cool Whip Easter Eggs.
- Honey-Glazed Carrots: The caramelized sweetness of honey-glazed carrots adds warmth, appealing to those who crave a bit of savory against the backdrop of sweetness.
- Mini Quiches: Savory mini quiches provide a hearty bite that balances beautifully with the lightness of the Cool Whip eggs.
- Chocolate Milkshakes: Creamy, rich chocolate milkshakes create a fun dessert drink pairing that both kids and adults will adore.
- Coffee or Tea: A steaming cup of your favorite coffee or tea offers a cozy complement to the whimsical eggs, rounding out the meal.
- Lemon Mousse: End the meal on a light note with a citrusy lemon mousse that offers a zesty contrast to the sweet Cool Whip topping.
- Carrot Cake: A slice of moist carrot cake brings a classic Easter flavor, harmonizing with the festive theme and making a delightful dessert table centerpiece.
How to Store and Freeze Whip Easter Eggs
Fridge: Store decorated Whip Easter Eggs in an airtight container in the refrigerator for up to one week to maintain freshness and texture.
Freezer: Avoid freezing these eggs, as the whipped topping may lose its creamy consistency when thawed.
Leftovers: If you have any leftover eggs, they can be kept in the fridge and enjoyed as a fun snack throughout the week.
Rinsing: After rinsing, be sure to dry the eggs thoroughly to prevent excess moisture that could affect their storage.
Whip Easter Eggs Variations & Substitutions
Feel free to let your imagination run wild and craft variations that will make these delightful eggs even more special!
-
Dairy-Free: Substitute coconut cream for whipped topping for a rich, dairy-free alternative. The tropical flavor of coconut adds a fun twist!
-
Flavor Boost: Infuse your whipped topping with vanilla or almond extract for an extra layer of delicious taste. Just a teaspoon can elevate the sweetness beautifully.
-
Vibrant Colors: Use gel food coloring instead of liquid to achieve deeper, more saturated colors. It makes decorating a visual fiesta, perfect for Easter!
-
Spicy Kick: Add a dash of cayenne pepper or chili powder to your whipped topping for a surprising and tasty spicy twist. This unexpected heat enhances the egg’s sweetness!
-
Herb Infusion: Try adding minced fresh herbs like mint or basil to the whipped topping for a unique flavor profile. This fresh element can be a delightful surprise in every bite.
-
Texture Twist: Roll the decorated eggs in crushed nuts or sprinkles after coating them. The added crunch creates an exciting textural contrast to the creamy topping.
-
Leftover Delight: Transform leftover decorated eggs into a zesty egg salad. Simply chop the eggs and mix them with a squeeze of lemon and your favorite seasonings for a deliciously creative reuse.
For another delightful adventure in sweet treats, don’t forget to explore these easy Cool Whip Cookies! These variations will ensure your Cool Whip Easter Eggs are as memorable as they are delicious!
Whip Easter Eggs Recipe FAQs
How do I choose the right eggs for decorating?
Absolutely! When selecting eggs, always choose fresh, unpeeled white eggs for the best results. Look for eggs without any cracks or dark spots, as these can indicate age or spoilage. Fresh eggs will maintain their structure better during decoration and give you a lovely canvas to work with.
What is the best way to store decorated Whip Easter Eggs?
Store your colorful Whip Easter Eggs in an airtight container in the refrigerator and they’ll stay fresh for up to one week! Ensure the container is clean and dry before placing the eggs inside to maintain their vibrant colors and tasty texture.
Can I freeze my decorated Easter eggs?
I would advise against freezing decorated Whip Easter Eggs. The whipped topping can become watery and lose its delightful creamy texture once thawed, which might spoil the fun of these treats. Just keep them in the refrigerator – they’ll be lovely for about a week!
What if my eggs don’t have vibrant colors after decorating?
Not to worry! If the colors aren’t showing up well, it might be due to an insufficient soak in vinegar before decorating. Ensure that the egg is soaked for about 2 minutes to help the colors adhere better. You can also try using gel food coloring, which can provide more vivid hues than liquid colorings.
Are there any dietary considerations for Whip Easter Eggs?
Good question! If you have allergies to dairy, consider substituting the whipped topping with coconut cream to make a delicious dairy-free version. Always ensure the food coloring you choose is allergen-free as well, as some may contain ingredients that could trigger sensitivities. If planning to share with kids or pets, confirm that all ingredients are safe for them too!
Can I make these eggs in advance?
Certainly! You can prepare hard-boiled eggs up to 3 days in advance, just keep them unpeeled in the refrigerator. As for the whipped topping, you can prepare it and store it covered in the fridge for up to 24 hours before adding it to your eggs. This way, you’re ready for a fun decorating day when Easter arrives!
Whip Easter Eggs: Fun Family Treats for Spring Celebrations
Ingredients
Equipment
Method
- Start by ensuring your hard-boiled white eggs are completely cooled. Soak the eggs in white vinegar for about 2 minutes, then drain and pat dry.
- Spread a thick layer of whipped topping on a large plate, about ½ inch thick. Add drops of food coloring and swirl with a toothpick without overmixing.
- Roll each cooled egg gently in the colorful whipped topping until fully coated, ensuring even coverage.
- After resting for about 10-15 minutes, rinse the eggs gently under cool running water to remove excess topping. Dry thoroughly on paper towels.
- Once dried, serve these colorful Whip Easter Eggs as a festive centerpiece or store in an airtight container for up to a week.
")