")
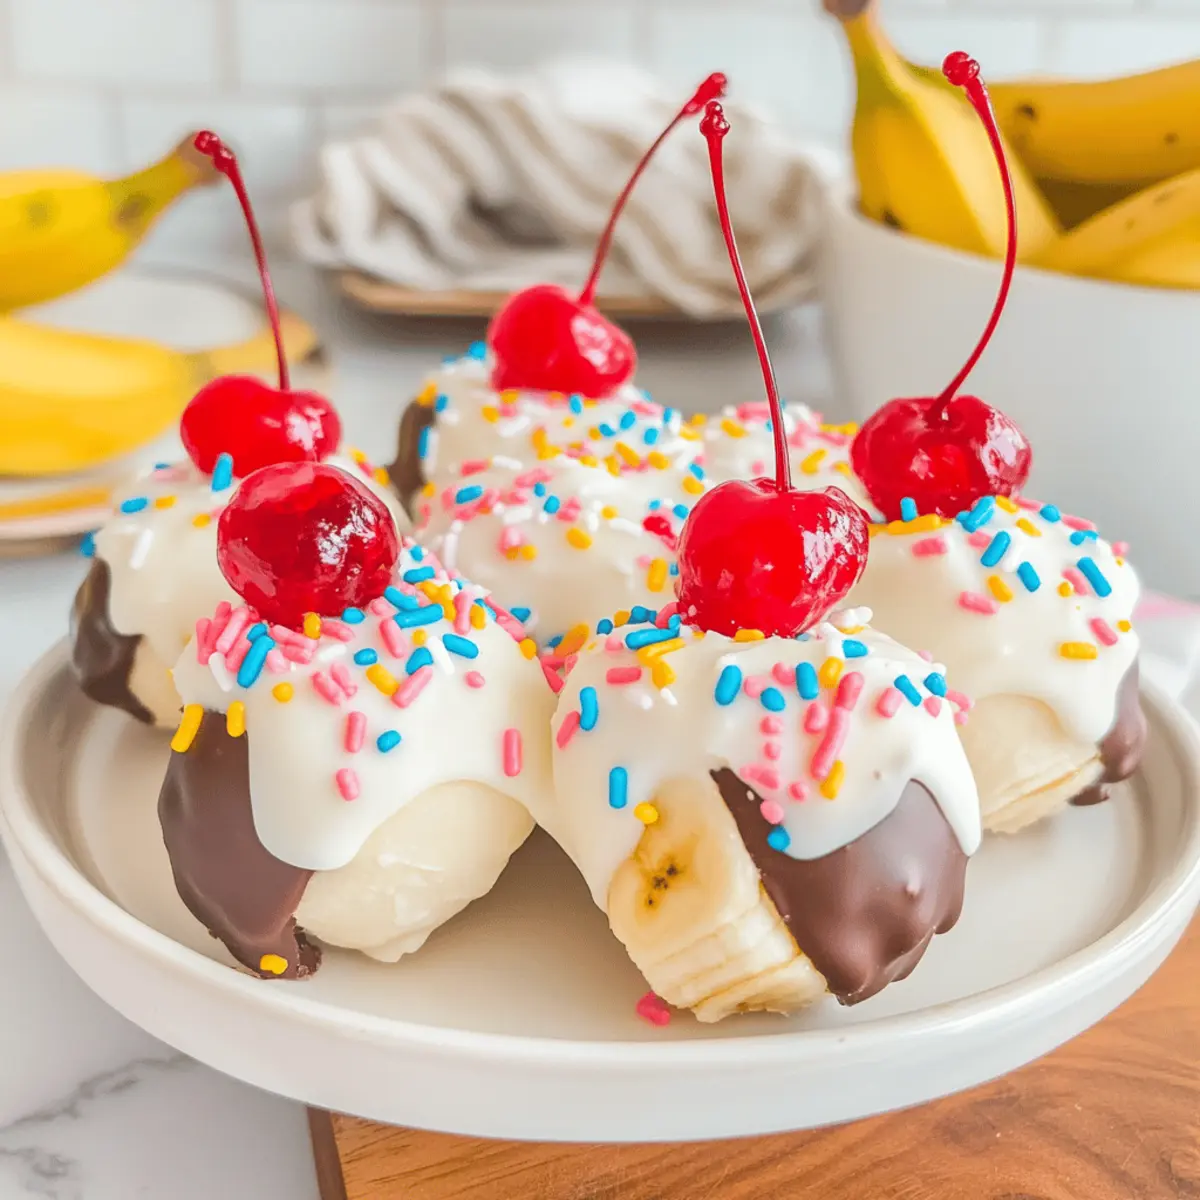
“What’s for dessert?” It’s a question that often sends us into a tiny panic, especially when the craving for something sweet strikes unexpectedly. Enter my No-Bake Banana Split Truffles—a delightful solution that transforms the beloved flavors of a classic banana split into a fun, easy-to-make treat. These luscious truffles are not only a hit at any gathering but also boast the charm of a homemade dessert that can be whipped up in no time. With their creamy banana center, smooth white chocolate coating, and colorful sprinkles, they’re perfect for parties or a sweet indulgence anytime. Ready to impress your friends and family with this quick dessert that needs no oven? Let’s dive into the recipe and bring some fun to your dessert table!
Why are Banana Split Truffles irresistible?
Irresistible Flavors: These No-Bake Banana Split Truffles capture the nostalgic flavor of a classic dessert, delivering a creamy banana center wrapped in luscious white chocolate.
Quick & Easy: Perfect for those busy days, this recipe requires minimal prep time and no oven, making it an ideal choice for spontaneous cravings or last-minute gatherings.
Crowd-Pleasing: Whether at a party or a cozy movie night, these truffles are sure to be a hit with family and friends, leaving everyone wanting more!
Customizable Delight: Feel free to personalize the toppings and fillings; swap nuts or add coconut flakes for a tropical twist. For more fun ideas, check out my variation ideas.
Convenient Storage: Easily made ahead and stored, these truffles can stay fresh for up to 5 days in the fridge, perfect for meal prep or to satisfy those late-night sweets cravings.
Ingredients for Banana Split Truffles
Discover all the essentials you need to create these delicious Banana Split Truffles!
For the Batter
- White Cake Mix – A base structure for truffles; use heat-treated cake mix for safety to kill any bacteria.
- Cream Cheese – Adds creaminess and richness; ensure it’s softened to room temperature for easy mixing.
- Vanilla Extract – Enhances the flavor profile; use pure vanilla for the best result.
- Crushed Pineapple – Infuses fruity flavor; make sure it is very well drained to prevent excess moisture.
- Chopped Walnuts – Adds texture and nuttiness; can be substituted with any preferred nuts or omitted for nut-free options.
- Banana – Fresh fruit for authentic banana split flavor; use ripe bananas for sweetness and enhanced flavor.
For the Coating
- White Candy Coating – For coating the truffles; you can use dark or milk chocolate as an alternative for a different taste.
- Chocolate Melting Wafers – For decorating the truffles; this will create the “chocolate syrup” effect on each.
For Garnishing
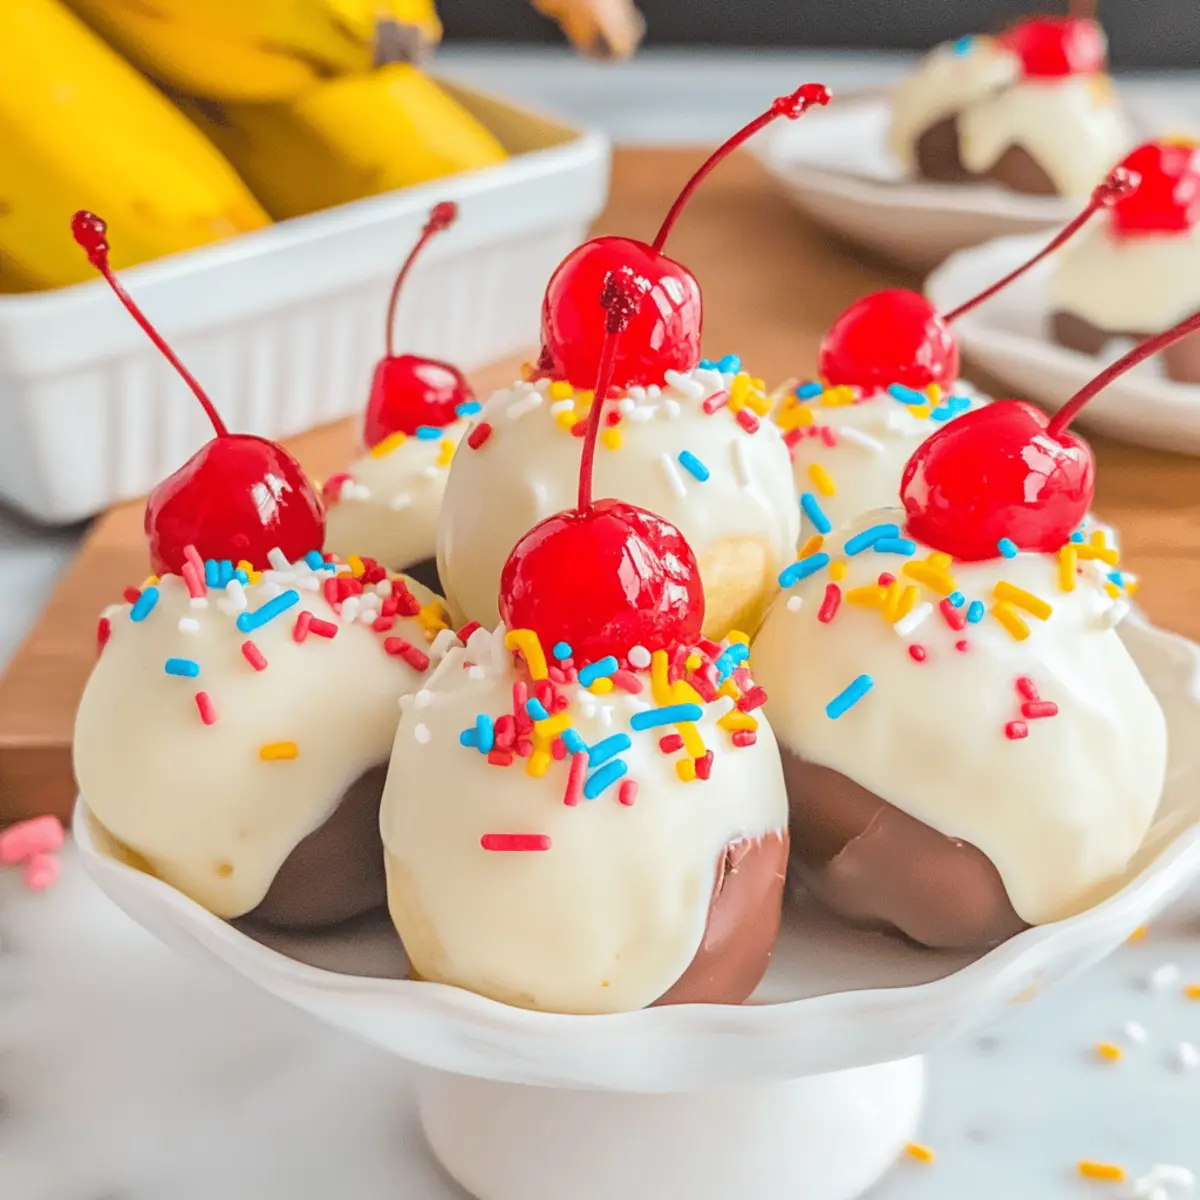
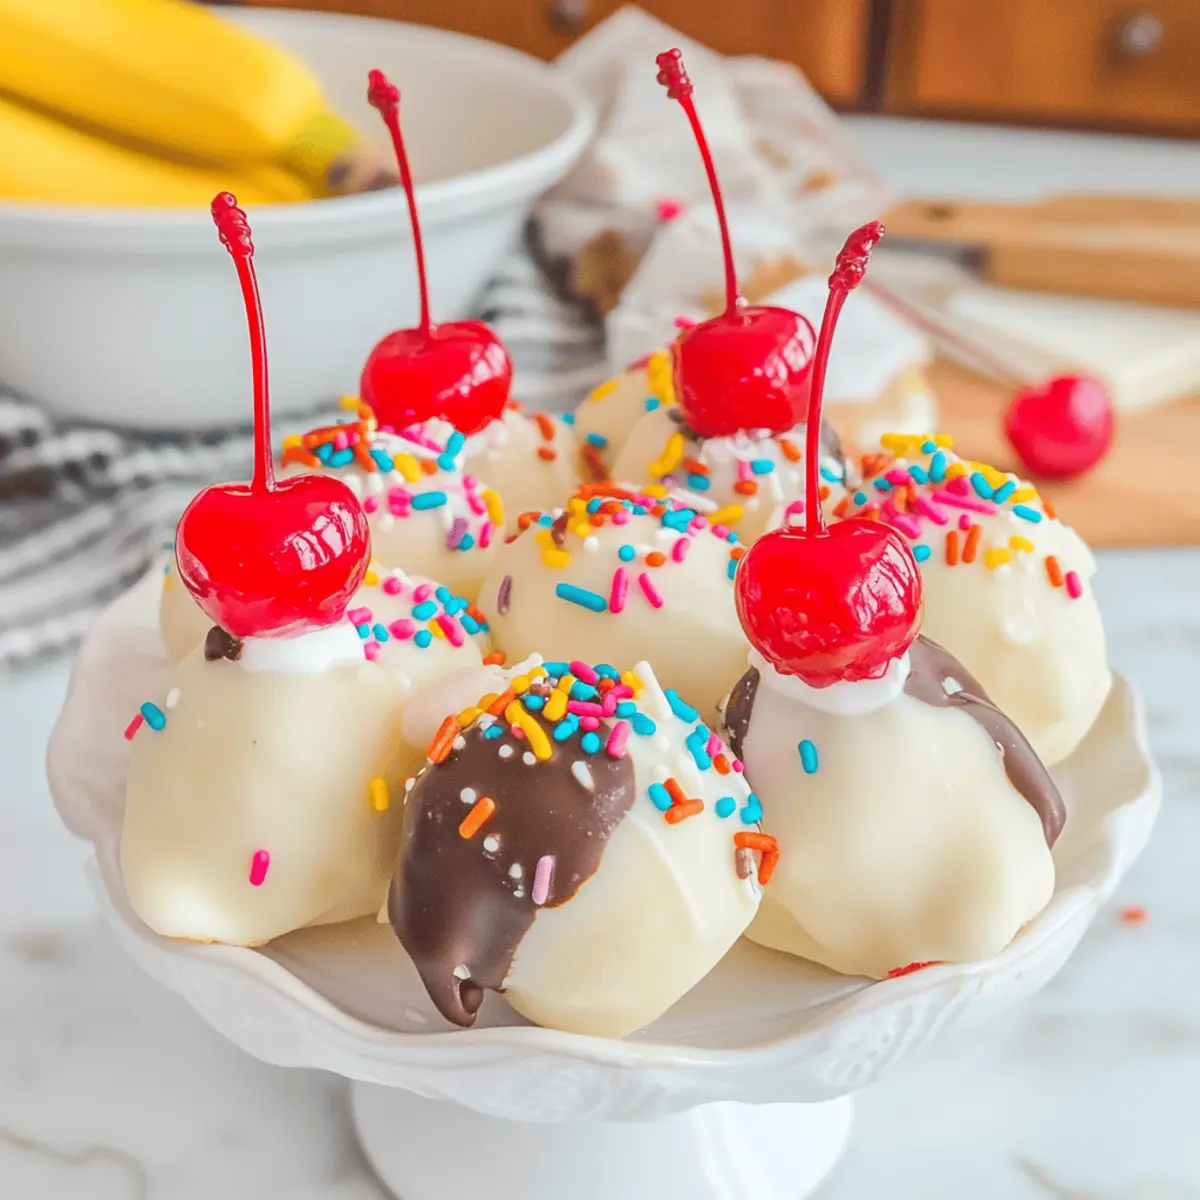
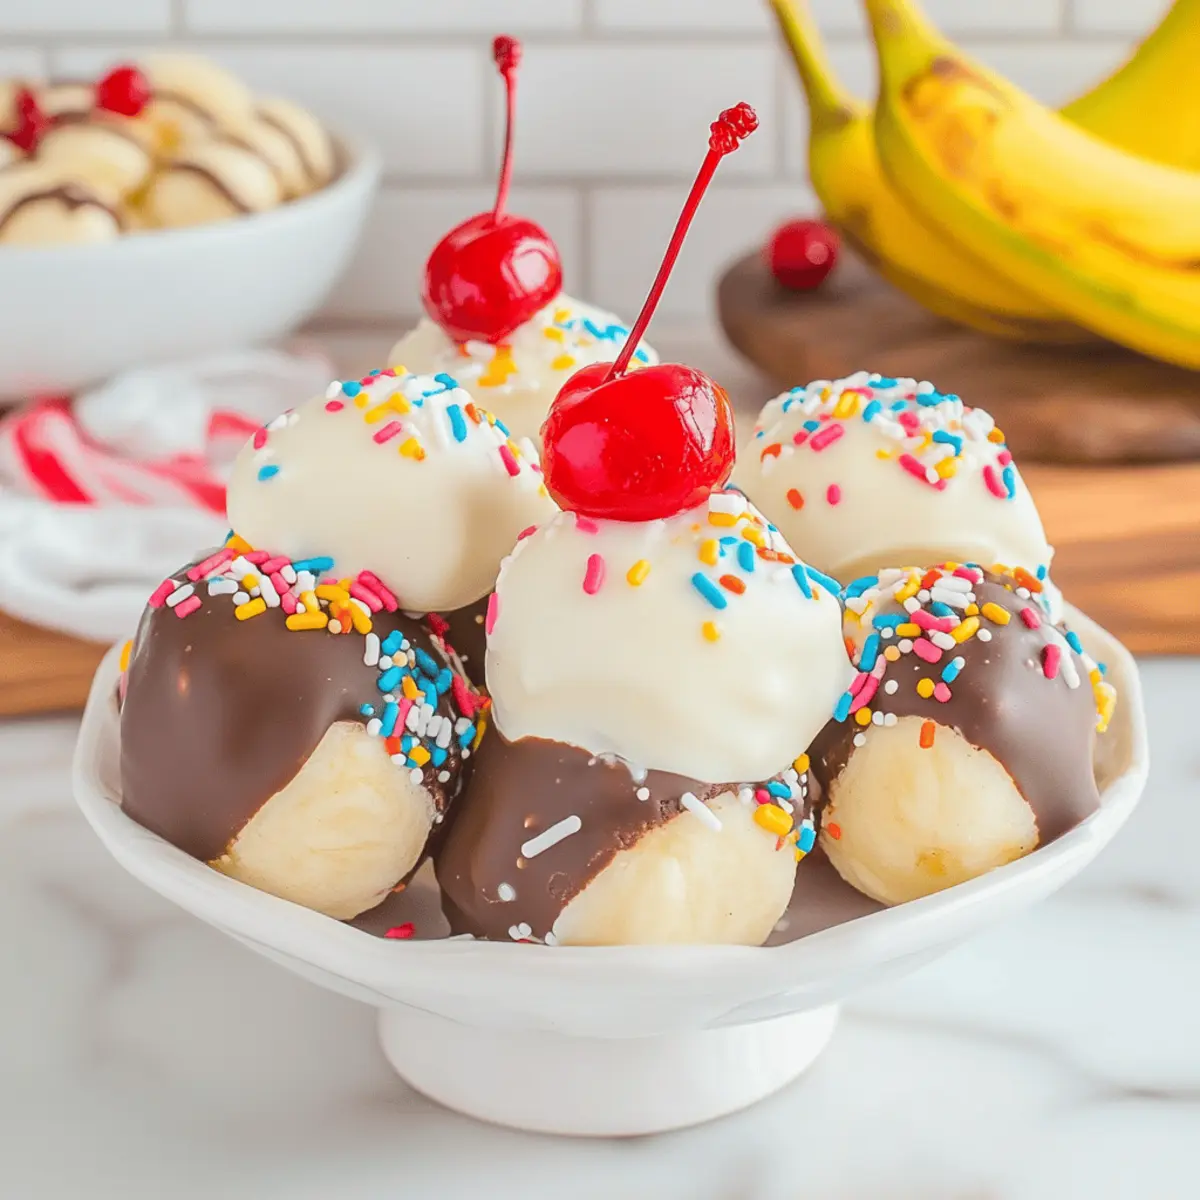
- Rainbow Sprinkles – Adds visual appeal; they’ll enhance the fun and festive look of the truffles.
- Maraschino Cherries – Perfect for topping; they supply the classic banana split flair and a pop of color.
Step‑by‑Step Instructions for Banana Split Truffles
Step 1: Prepare Baking Sheet
Begin by lining a large cookie sheet with parchment paper to create a non-stick surface for your Banana Split Truffles. This will help prevent any sticking during the chilling process. Make sure the paper is smooth and covers the entire surface to ensure easy cleanup.
Step 2: Mix Ingredients
In a medium mixing bowl, combine the heat-treated white cake mix, softened cream cheese, and a splash of vanilla extract. Using a spatula or a hand mixer, mix until the ingredients form a dough-like consistency that holds together well. Take a moment to enjoy the delightful aroma as the flavors blend!
Step 3: Add Fill-Ins
Gently fold in the well-drained crushed pineapple, chopped walnuts, and ripe banana slices into the mixture. Make sure to distribute them evenly throughout the dough for a balanced flavor in every Banana Split Truffle. The sweet aroma of bananas and pineapple will fill your kitchen, heightening your excitement!
Step 4: Shape Truffles
With clean hands, scoop out portions of the mixture, aiming for 1 to 1.5 inches in size, and roll them into smooth balls. Place these truffle balls on the prepared baking sheet, making sure they are spaced apart to avoid sticking. Each ball should be uniform in shape for an elegant appearance.
Step 5: Chill
Once all the truffles are shaped, refrigerate them for 1 hour to allow them to firm up. This chilling step is crucial for achieving a perfect texture that’s easy to coat. You’ll know they’re ready when they are firm to the touch, ensuring they hold their shape during the next steps.
Step 6: Melt Coating
While the truffles chill, prepare the white candy coating. In a microwave-safe bowl, melt the coating, heating it in 30-second intervals. Stir in between to ensure smooth melting without scorching. You’ll want a silky consistency that shines, ready to envelop your chilled truffles.
Step 7: Coat Truffles
Using a fork, dip each truffle into the melted white candy coating, turning it to ensure it’s fully covered. Gently tap the fork against the edge of the bowl to remove any excess coating before returning the truffles to the baking sheet. They should glisten and be beautifully coated for the best presentation.
Step 8: Decorate
Melt the chocolate melting wafers in the same manner as the candy coating and drizzle over each coated truffle using a spoon or a piping bag for precision. Immediately place a maraschino cherry on top of each and sprinkle with rainbow sprinkles for that classic banana split finish, making them visually stunning!
Step 9: Final Chill
Refrigerate the decorated Banana Split Truffles for an additional 30 minutes, allowing the coating to set completely. After this time, they will be ready to serve and enjoy. You’ll see the candy coating become firm, locking in all the delightful flavors and textures you’ve created.
Make Ahead Options
These No-Bake Banana Split Truffles are fantastic for busy home cooks looking to save time during hectic weeks! You can prepare the truffle mixture up to 24 hours in advance; simply mix all ingredients, shape into balls, and place them on a parchment-lined baking sheet. Refrigerate until firm, then cover tightly with plastic wrap. When it’s time to finish them, melt the white candy coating and coat the truffles directly from the fridge to maintain their texture. After coating, decorate as desired and chill for about 30 minutes. This way, you’ll have delightful, ready-to-serve treats that taste just as delicious as when made fresh!
Banana Split Truffles Variations & Substitutions
Feel free to unleash your creativity and customize these truffles to suit your taste and dietary needs!
-
Nut-Free: Omit the chopped walnuts entirely or replace them with sunflower seeds for a crunchy texture without the nuts.
-
Chocolate Twist: Swap the white cake mix for chocolate cake mix to give those truffles an indulgent twist that chocolate lovers will adore.
-
Tropical Flavor: Add shredded coconut to the mixture for a tropical flair that perfectly complements the banana and pineapple flavors.
-
Vegan Option: Use a vegan cream cheese alternative and ensure the candy coating is dairy-free for a completely plant-based treat.
-
Fruit Fusion: Incorporate other fruits like diced strawberries or crushed mango for a fun flavor variation that adds a burst of freshness with every bite.
-
Heat Things Up: Add a pinch of cayenne pepper or chili powder to the batter for a spicy kick that plays off the sweetness of the banana and chocolate.
-
Mini Truffles: Small bites are always a hit! Shape the truffles smaller for bite-sized, poppable treats that are perfect for parties.
-
Gourmet Presentation: Dip half of each truffle in dark chocolate and drizzle with white chocolate for a beautiful, gourmet finish.
For more delightful ideas on customizing your desserts, don’t miss checking out my article on creative dessert ideas to inspire your next sweet adventure!
Expert Tips for Banana Split Truffles
-
Quality Matters: Use high-quality white chocolate for coating to enhance the flavor and texture of your Banana Split Truffles for the best results.
-
Uniform Size: Roll the truffles into uniform shapes while they are still semi-chilled; this ensures they are smooth and look appealing.
-
Avoid Moisture: Make sure to drain the crushed pineapple very well to prevent excess moisture, which can affect the consistency of your truffles.
-
Customization Fun: Set up a toppings bar with various nuts, sprinkles, and coconut to let guests customize their truffles, providing a fun interactive experience.
-
Chill Time Is Key: Do not skip the chilling steps, as proper chilling helps the truffles maintain their shape and makes them easier to coat.
What to Serve with No-Bake Banana Split Truffles
Transform your dessert spread into a delightful experience by pairing these scrumptious bites with complementary dishes.
-
Creamy Mashed Potatoes: Their rich, buttery flavor contrasts beautifully with the sweetness of the truffles, creating a balanced meal.
-
Fresh Fruit Salad: A light mix of seasonal fruits adds freshness and brightness, enhancing the tropical notes of the banana flavor.
-
Chocolate Chip Cookies: Indulge in a timeless classic; the chewy texture and sweetness of cookies create a fun dessert duo.
-
Fluffy Vanilla Ice Cream: Elevate your dessert game by serving these truffles alongside a scoop of cool, creamy vanilla ice cream.
-
Nutty Granola: A sprinkle of granola on top adds a delightful crunch, echoing the walnut pieces within the truffles and making for an exciting texture contrast.
-
Sparkling Lemonade: This refreshing drink’s citrusy zing beautifully complements the sweetness of the truffles, balancing out the flavors.
-
Whipped Cream Topping: Add a dollop of fresh whipped cream beside the truffles, enhancing the dessert’s richness while inviting indulgence.
-
Chocolate Milkshake: A creamy shake pairs harmoniously, making every bite of the truffle feel like an extravagant treat.
-
Pineapple Upside-Down Cake: Reinforcing the tropical essence, this cake brings a soft, cake-like texture that mirrors the truffles’ creamy center.
-
Fruit-Infused Water: Keep it light with flavored water that cleanses the palate between bites of the sweet truffles, enhancing the overall experience.
How to Store and Freeze Banana Split Truffles
Fridge: Keep the Banana Split Truffles in an airtight container in the refrigerator for up to 5 days, ensuring they stay fresh and delicious.
Freezer: For longer storage, freeze the truffles in a single layer on a baking sheet, then transfer to a freezer-safe container for up to 2 months.
Thawing: To enjoy frozen truffles, simply thaw them at room temperature for about 30 minutes before serving for the best texture and flavor.
Reheating: Avoid reheating these truffles. Enjoy them chilled straight from the fridge or after thawing for a delightful treat!
Banana Split Truffles Recipe FAQs
What type of bananas should I use?
Absolutely! Use ripe bananas for your Banana Split Truffles. Ripe bananas are sweeter and have a more intense flavor, which is essential for that authentic banana split taste. Look for bananas with a few brown spots for the best flavor.
How should I store Banana Split Truffles?
Keep your truffles in an airtight container in the refrigerator for up to 5 days. This will ensure they stay fresh and maintain their delightful flavor. If you want to enjoy them later, you can also freeze them!
Can I freeze these truffles?
Very! To freeze your Banana Split Truffles, first place them in a single layer on a baking sheet and freeze until solid. Then, transfer the frozen truffles to a freezer-safe container, where they’ll keep for up to 2 months. To enjoy, simply thaw them at room temperature for about 30 minutes before serving.
What if my truffle mixture is too wet?
If your mixture feels too wet to shape into balls, try adding a bit more heat-treated cake mix. Start with a tablespoon at a time until the consistency is manageable. Also, ensure your crushed pineapple is well-drained as excess moisture can lead to a gooey mixture.
Can I alter the ingredients for dietary needs?
Absolutely! For a nut-free version, simply omit the chopped walnuts or replace them with seeds like sunflower seeds. Additionally, if you have lactose intolerances, you can try using a dairy-free cream cheese alternative and ensure your white chocolate is dairy-free as well. Adjusting the ingredients based on dietary needs makes these treats even more inclusive!
Can I use a different type of chocolate for coating?
Yes! While the recipe traditionally calls for white candy coating, you can definitely use dark or milk chocolate for a different taste profile. Just follow the same melting instructions, and enjoy the variations!
Irresistible Banana Split Truffles for Your Next Movie Night
Ingredients
Equipment
Method
- Begin by lining a large cookie sheet with parchment paper to create a non-stick surface.
- In a medium mixing bowl, combine the heat-treated white cake mix, softened cream cheese, and vanilla extract.
- Gently fold in the well-drained crushed pineapple, chopped walnuts, and ripe banana slices.
- Scoop out portions of the mixture, roll them into smooth balls, and place them on the prepared baking sheet.
- Refrigerate the truffles for 1 hour to allow them to firm up.
- Melt the white candy coating in a microwave-safe bowl, heating it in 30-second intervals until smooth.
- Dip each truffle into the melted candy coating and place them back on the baking sheet.
- Melt the chocolate melting wafers and drizzle over each coated truffle, then add a maraschino cherry and rainbow sprinkles.
- Refrigerate the decorated truffles for an additional 30 minutes to set the coating.
")