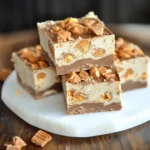
Have you ever taken a bite of Butterfinger candy and wished you could turn that crunchy, peanut-buttery goodness into a rich, creamy dessert? Butterfinger Fudge takes everything you love about the iconic candy bar and turns it into a decadent, melt-in-your-mouth treat. Perfect for holiday parties, gifting, or just indulging in a moment of sweetness, this fudge is surprisingly simple to make.
In just a few easy steps, you’ll have a dessert that combines a creamy fudge base with crunchy Butterfinger pieces, creating a sweet-and-salty masterpiece. Ready to make some magic in your kitchen? Let’s get started!
Why You’ll Love Butterfinger Fudge
Butterfinger Fudge is the ultimate dessert for so many reasons:
- Easy to Make: This no-bake dessert requires just a few steps and simple ingredients.
- Crowd-Pleasing: Perfect for sharing at potlucks, bake sales, or holiday gatherings.
- Customizable: Add more candy, drizzle chocolate on top, or mix in nuts to make it your own.
- Rich and Creamy: The marshmallow cream and white chocolate base create a soft texture that perfectly complements the crunchy Butterfinger pieces.
If you’re ready to wow your family and friends, this recipe is for you!
Ingredients for Butterfinger Fudge
Here’s everything you’ll need to make this delectable treat:
| Ingredient | Quantity |
|---|---|
| Granulated sugar | 2 cups |
| Heavy whipping cream | ¾ cup |
| Unsalted butter | ¾ cup |
| Kosher salt | Pinch |
| White chocolate chips | 11 ounces |
| Marshmallow cream | 1 jar (7 ounces) |
| Butterfinger bars (snack-sized) | 8 bars, crushed |
Note: Reserve ¼ cup of crushed Butterfinger pieces for topping.
Step-by-Step Instructions for Butterfinger Fudge
Follow these easy steps to make the most delicious Butterfinger Fudge ever!
1. Prepare the Baking Pan
- Line an 8×8-inch baking dish with parchment paper, leaving an overhang on the sides.
- This will make it easier to lift the fudge out once it’s set.
2. Cook the Fudge Base
- In a medium saucepan, combine granulated sugar, heavy whipping cream, unsalted butter, and a pinch of kosher salt.
- Heat over medium heat, stirring frequently, until the mixture comes to a boil.
- Reduce the heat to medium-low and let it simmer for 4-5 minutes, stirring constantly.
3. Melt the Chocolate and Marshmallow
- Remove the saucepan from heat.
- Immediately add the white chocolate chips and stir until fully melted and smooth.
- Stir in the marshmallow cream until it’s completely incorporated into the mixture.
4. Add the Butterfinger Crunch
- Stir in the crushed Butterfinger bars, reserving ¼ cup for topping.
- Mix until the Butterfinger pieces are evenly distributed throughout the fudge.
5. Set the Fudge
- Pour the fudge mixture into the prepared baking dish and spread it evenly.
- Sprinkle the reserved Butterfinger pieces on top, pressing them lightly into the surface.
6. Cool and Chill
- Let the fudge cool at room temperature for 1 hour.
- Transfer the dish to the refrigerator and chill for 2-3 hours, or until the fudge is fully set.
7. Cut and Serve
- Once firm, lift the fudge out of the pan using the parchment paper.
- Cut into squares and serve.
8. Store the Fudge
- Keep the fudge in an airtight container in the refrigerator for up to 1 week.
Tips for Making Perfect Butterfinger Fudge
- Use Fresh Butterfinger Bars: For maximum crunch, make sure your candy bars are fresh and not stale.
- Don’t Overcook the Base: Stir constantly and remove the saucepan from heat as soon as the mixture simmers to prevent burning.
- Press Toppings Lightly: Gently press the Butterfinger pieces into the fudge so they stay in place but don’t sink.
- Room Temperature for Serving: Let the fudge sit at room temperature for 10 minutes before serving for the best texture.
Customization Ideas for Butterfinger Fudge
- Add Toppings: Drizzle melted milk or dark chocolate on top for an extra layer of flavor.
- Mix It Up: Add chopped peanuts or pretzels for a sweet-and-salty twist.
- Different Candy Bars: Try using Snickers, Reese’s, or Kit Kat instead of Butterfinger for variety.
- Festive Decorations: Add colorful sprinkles or edible glitter for holidays or special occasions.
Nutritional Information (Per Serving)
| Nutrient | Amount |
|---|---|
| Calories | ~180 |
| Total Fat | 9g |
| Saturated Fat | 5g |
| Carbohydrates | 25g |
| Sugar | 20g |
| Protein | 1g |
Note: Nutritional values may vary depending on ingredient brands and serving sizes.
FAQs About Butterfinger Fudge
1. Can I make Butterfinger Fudge ahead of time?
Yes! Butterfinger Fudge can be made up to a week in advance. Store it in an airtight container in the refrigerator until ready to serve.
2. What can I use instead of white chocolate chips?
You can substitute white chocolate chips with chopped white chocolate bars. Just ensure they’re high quality for the best texture and flavor.
3. How do I crush Butterfinger bars?
Place the Butterfinger bars in a zip-top bag and gently crush them using a rolling pin or the bottom of a heavy glass.
4. Can I freeze Butterfinger Fudge?
Yes, you can freeze Butterfinger Fudge for up to 3 months. Wrap it tightly in plastic wrap and store it in a freezer-safe container. Let it thaw in the refrigerator before serving.
5. Can I use salted butter instead of unsalted?
Yes, but omit the pinch of kosher salt if you’re using salted butter.
6. How do I ensure my fudge doesn’t turn out grainy?
Make sure to stir the mixture constantly while it cooks and avoid overcooking the sugar. This helps prevent crystallization, which can cause a grainy texture.
Conclusion: Butterfinger Fudge Is a Sweet Treat You’ll Love
Butterfinger Fudge is everything you want in a dessert—rich, creamy, and packed with the peanut-buttery crunch of Butterfinger candy. With its easy, no-bake process and indulgent flavor, this fudge is perfect for sharing or savoring on your own.
Whether you’re preparing for the holidays, gifting treats to loved ones, or simply treating yourself, Butterfinger Fudge is guaranteed to be a hit. So grab your ingredients, follow the steps, and enjoy this irresistible dessert today!
Print
How to Make Butterfinger Fudge: A Delicious, No-Bake Treat
- Total Time: 3 hours 20 minutes
- Yield: 16-20 squares
Description
Butterfinger Fudge is a rich, creamy dessert with the perfect balance of sweet and salty flavors. Combining a smooth white chocolate fudge base with crunchy Butterfinger candy pieces, this no-bake treat is easy to make and perfect for any occasion—whether it’s a holiday party, a potluck, or just a sweet craving at home.
Ingredients
- 2 cups granulated sugar
- ¾ cup heavy whipping cream
- ¾ cup unsalted butter
- Pinch of kosher salt
- 11 ounces white chocolate chips
- 1 jar marshmallow cream (7 ounces)
- 8 snack-sized Butterfinger bars, crushed (reserve ¼ cup for topping)
Instructions
-
Prepare the Baking Dish:
- Line an 8×8-inch baking dish with parchment paper, leaving some overhang on the sides for easy removal.
-
Make the Fudge Base:
- In a medium saucepan, combine granulated sugar, heavy whipping cream, unsalted butter, and a pinch of kosher salt.
- Heat over medium heat, stirring frequently, until the mixture comes to a boil.
- Reduce the heat to medium-low and simmer for 4-5 minutes, stirring constantly.
-
Melt the Chocolate and Marshmallow Cream:
- Remove the saucepan from the heat.
- Add the white chocolate chips and stir until fully melted and smooth.
- Fold in the marshmallow cream and mix until completely combined.
-
Add the Butterfinger Crunch:
- Stir in the crushed Butterfinger bars, reserving ¼ cup for topping.
- Mix until the Butterfinger pieces are evenly distributed throughout the fudge.
-
Set the Fudge:
- Pour the fudge mixture into the prepared baking dish and spread it evenly.
- Sprinkle the reserved Butterfinger pieces on top and press them lightly into the surface.
-
Chill the Fudge:
- Let the fudge cool at room temperature for 1 hour.
- Transfer the dish to the refrigerator and chill for 2-3 hours, or until fully set.
-
Cut and Serve:
- Once the fudge is firm, lift it out of the baking dish using the parchment paper.
- Cut into squares and serve immediately.
Notes
- Use fresh Butterfinger bars for maximum crunch and flavor.
- To crush Butterfinger bars, place them in a zip-top bag and gently crush them with a rolling pin.
- For a smoother texture, ensure the sugar mixture doesn’t overcook—stir constantly and remove from heat promptly after 4-5 minutes.
- Store fudge in an airtight container in the refrigerator for up to 1 week or freeze for up to 3 months.
- Prep Time: 15 minutes
- Cook Time: 3 hours 5 minutes
- Category: Dessert
- Method: No-Bake
- Cuisine: American


