Few things in life are as satisfying as biting into a warm, buttery roll filled with gooey, melted cheese. Cheesy Garlic Bombs are the ultimate snack or side dish that brings comfort and joy in every bite. Whether you’re serving them as an appetizer, pairing them with pasta, or simply indulging in a savory treat, these garlic bombs are guaranteed to impress.
Why You’ll Love This Recipe
These cheesy garlic bombs are easy to make, require only a handful of ingredients, and are bursting with flavor. The combination of soft bread, stretchy mozzarella, and rich garlic butter makes this recipe a crowd-pleaser. Plus, it’s versatile enough to fit into a busy weeknight dinner or a party spread. No matter the occasion, they’ll leave everyone asking for more.
Ingredients for Cheesy Garlic Bombs
Here’s everything you need to whip up these delicious bites:
For the Dough
| Ingredient | Amount |
| Frozen Texas rolls (thawed) | 8 rolls (Rhodes brand recommended) |
For the Filling
| Ingredient | Amount |
| Mozzarella cheese sticks | 4 sticks (cut into 16 pieces) |
For the Garlic Butter
| Ingredient | Amount |
| Salted butter (melted) | 4 tbsp |
| Garlic (minced) | 2 cloves |
| Parsley flakes (chopped or dried) | 1 tbsp |
Step-by-Step Instructions
1. Prepare the Dough
- Place the frozen Texas rolls on a plate, cover them with plastic wrap, and refrigerate for at least 4 hours or overnight to thaw.
2. Preheat the Oven
- Preheat your oven to 350°F (175°C) and line a baking sheet with parchment paper to prevent sticking.
3. Prepare the Cheese Filling
- Cut the mozzarella cheese sticks into approximately 1-inch pieces.
- You should end up with 16 evenly sized pieces, two for each roll.
4. Flatten and Fill the Dough
- Using your hands, flatten each thawed dough ball into a round disk.
- Place two pieces of mozzarella cheese in the center of each disk.
- Pinch the edges of the dough firmly together to seal the cheese inside, ensuring no gaps remain.
5. Arrange on the Baking Sheet
- Place the sealed dough balls seam side down on the prepared baking sheet, spacing them apart to allow room for rising.
6. Bake the Rolls
- Bake the rolls in the preheated oven for 9–11 minutes, or until they begin to turn golden brown.
- Keep an eye on them to avoid over-baking.
7. Make the Garlic Butter
- While the rolls are baking, melt the butter in a microwave-safe dish or saucepan.
- Stir in the minced garlic and parsley flakes until well combined.
8. Brush with Garlic Butter
- Once the rolls are golden brown, remove them from the oven.
- Immediately brush each one generously with the garlic butter mixture, ensuring the tops are evenly coated.
9. Serve and Enjoy
- Allow the cheesy garlic bombs to cool slightly before serving. Serve warm for the best gooey, cheesy experience.
Tips for Perfect Cheesy Garlic Bombs
1. Seal the Edges Well
Make sure the dough is sealed tightly around the cheese to prevent it from oozing out during baking.
2. Use Fresh Ingredients
Fresh garlic and parsley elevate the flavor of the garlic butter. If you don’t have fresh parsley, dried parsley works as a great substitute.
3. Experiment with Cheese
While mozzarella is a classic choice, you can also try other cheeses like cheddar, provolone, or pepper jack for a fun twist.
4. Serve Immediately
These garlic bombs taste best when served warm. The cheese is gooey, and the bread is soft and fluffy.
Nutritional Information
Here’s an approximate breakdown of the nutritional content per cheesy garlic bomb (serves 16):
| Nutrient | Amount |
| Calories | 110 |
| Protein | 4g |
| Fat | 7g |
| Carbohydrates | 9g |
| Fiber | 0.5g |
| Sodium | 190mg |
Creative Variations
1. Spicy Garlic Bombs
Add a pinch of red pepper flakes to the garlic butter for a spicy kick.
2. Italian-Style Bombs
Sprinkle Italian seasoning or grated Parmesan cheese on top of the garlic butter for an extra flavor boost.
3. Stuffed with Meat
Place a small piece of pepperoni or cooked sausage inside the dough along with the cheese for a meaty variation.
4. Sweet Option
Replace the garlic butter with melted butter and cinnamon sugar for a dessert version.
5. Gluten-Free Version
Use gluten-free frozen rolls to make this recipe suitable for gluten-sensitive individuals.
Serving Suggestions
Pair these cheesy garlic bombs with your favorite dishes for a complete meal:
- Pasta: Serve alongside spaghetti, fettuccine alfredo, or lasagna.
- Soup: Pair with tomato soup or minestrone for a cozy comfort meal.
- Salad: Add to a Caesar or garden salad for a satisfying side.
Storage and Reheating Tips
1. Refrigeration
Store leftover garlic bombs in an airtight container in the refrigerator for up to 3 days.
2. Freezing
Freeze uncooked rolls by placing them on a tray and freezing until solid. Transfer to a freezer-safe bag for up to 3 months. Bake directly from frozen, adding a few extra minutes to the baking time.
3. Reheating
Reheat in a 350°F oven for 5–7 minutes to restore the crispy texture. Avoid microwaving as it may make the bread soggy.
FAQs
1. Can I use homemade dough?
Absolutely! Homemade bread dough works perfectly for this recipe. Just ensure it’s rolled out and portioned correctly.
2. What if I don’t have mozzarella cheese sticks?
You can use block mozzarella or shredded mozzarella, shaping it into small portions to fit inside the dough.
3. Can I prepare these in advance?
Yes! Assemble the rolls and refrigerate them for up to 8 hours before baking.
4. How do I prevent the cheese from leaking out?
Seal the dough edges tightly and avoid overfilling with cheese.
5. Can I make these in an air fryer?
Yes! Air fry at 350°F for about 8–10 minutes, checking for doneness.
6. Can I double the recipe?
Absolutely! Simply double all the ingredients and bake in batches if needed.
Conclusion
These Cheesy Garlic Bombs are the ultimate snack or side dish that combines gooey cheese, buttery garlic, and fluffy bread into one irresistible bite. Perfect for any occasion, this recipe is as easy to make as it is delicious. Whether you’re hosting a party or treating your family to something special, these garlic bombs will quickly become a favorite.
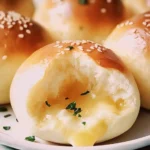
Cheesy Garlic Bombs Recipe: Irresistibly Gooey and Delicious
- Total Time: 25 minutes
- Yield: 16 garlic bombs
Description
Few things are as satisfying as biting into a warm, crispy roll filled with gooey, melted cheese. These Cheesy Garlic Bombs are the ultimate treat that brings comfort and joy in every bite. Whether you’re serving them as an appetizer, pairing them with pasta, or simply indulging in a savory snack, these garlic bombs are sure to impress.
Ingredients
For the Dough:
- 8 frozen Texas rolls (thawed) (Rhodes brand recommended)
For the Filling:
- 4 mozzarella cheese sticks (cut into 16 pieces)
For the Garlic Butter:
- 4 tbsp salted butter (melted)
- 2 cloves garlic (minced)
- 1 tbsp parsley flakes (chopped or dried)
Instructions
- Prepare the Dough
- Place the frozen Texas rolls on a plate, cover with plastic wrap, and refrigerate for at least 4 hours or overnight to thaw.
- Preheat the Oven
- Preheat your oven to 350°F (175°C) and line a baking sheet with parchment paper to prevent sticking.
- Prepare the Cheese Filling
- Cut the mozzarella cheese sticks into approximately 1-inch pieces to get 16 pieces, two for each roll.
- Flatten and Fill the Dough
- Using your hands, flatten each thawed dough ball into a round disk.
- Place two pieces of mozzarella cheese in the center of each disk.
- Pinch the edges of the dough firmly to seal the cheese inside, ensuring no gaps remain.
- Arrange on the Baking Sheet
- Place the sealed dough balls seam side down on the prepared baking sheet, leaving space between them to allow for rising.
- Bake the Rolls
- Bake for 9–11 minutes, or until they begin to turn golden brown. Keep an eye on them to avoid over-baking.
- Make the Garlic Butter
- While the rolls are baking, melt the butter in a microwave-safe dish or saucepan.
- Stir in the minced garlic and parsley flakes until well combined.
- Brush with Garlic Butter
- Once the rolls are golden brown, remove them from the oven.
- Immediately brush each roll generously with the garlic butter mixture, ensuring the tops are evenly coated.
- Serve and Enjoy
- Allow the cheesy garlic bombs to cool slightly before serving. Serve warm for the best gooey, cheesy experience.
Notes
- Seal the Edges Well: Ensure the dough is tightly sealed around the cheese to prevent it from oozing out during baking.
- Use Fresh Ingredients: Fresh garlic and parsley elevate the garlic butter’s flavor.
- Experiment with Cheese: Try cheddar, provolone, or pepper jack cheese for a fun twist.
- Prep Time: 10 minutes
- Cook Time: 15 minutes
- Category: Snack, Side Dish
- Method: Baking
- Cuisine: American


