")
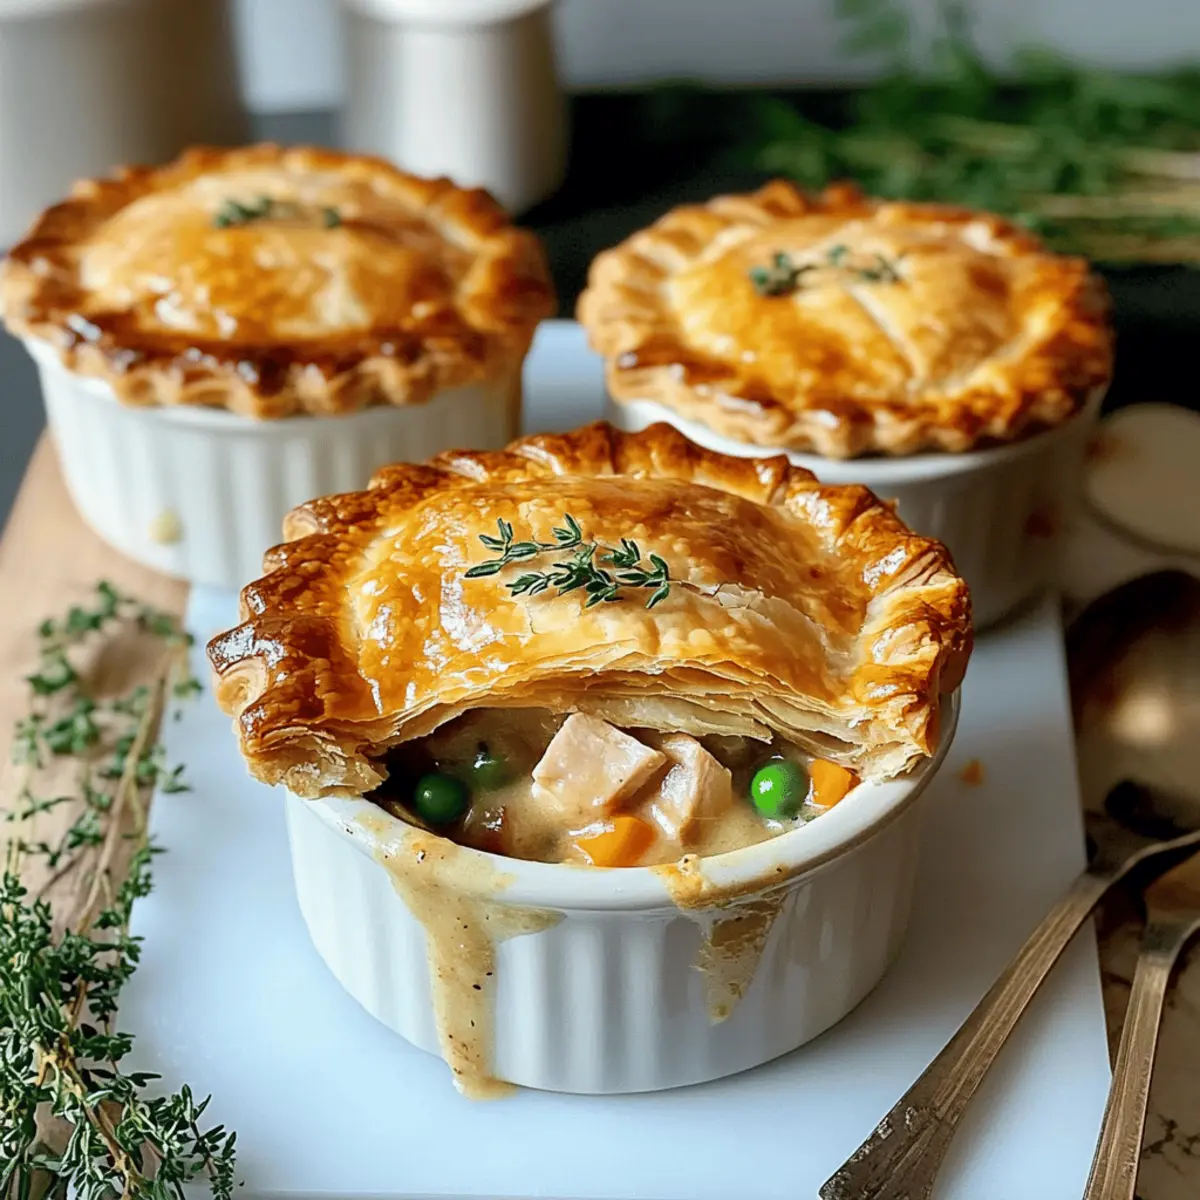
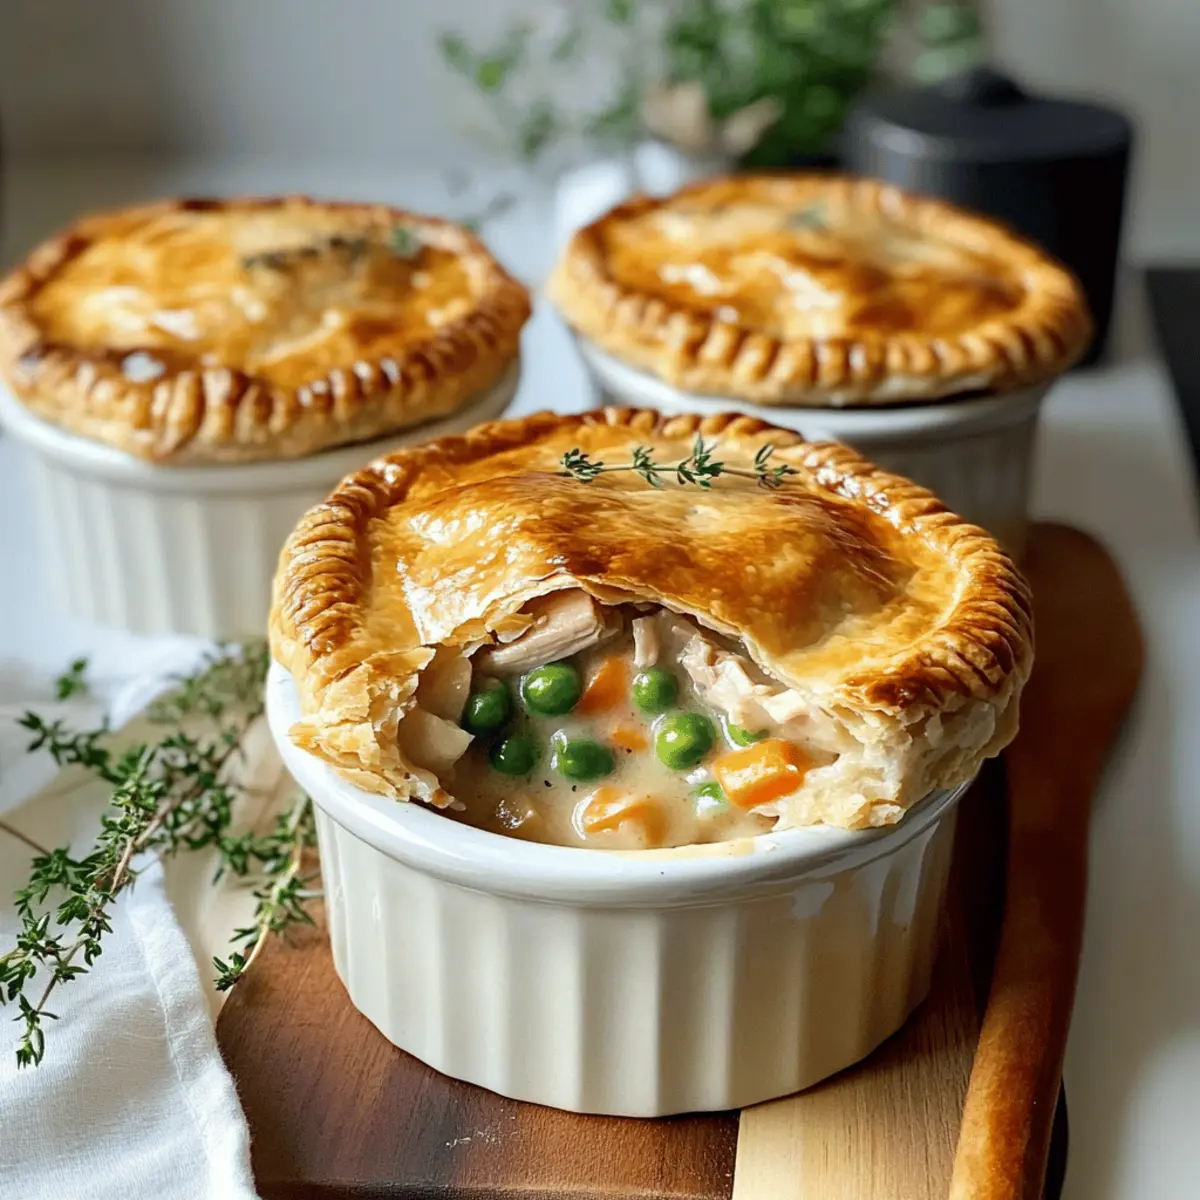
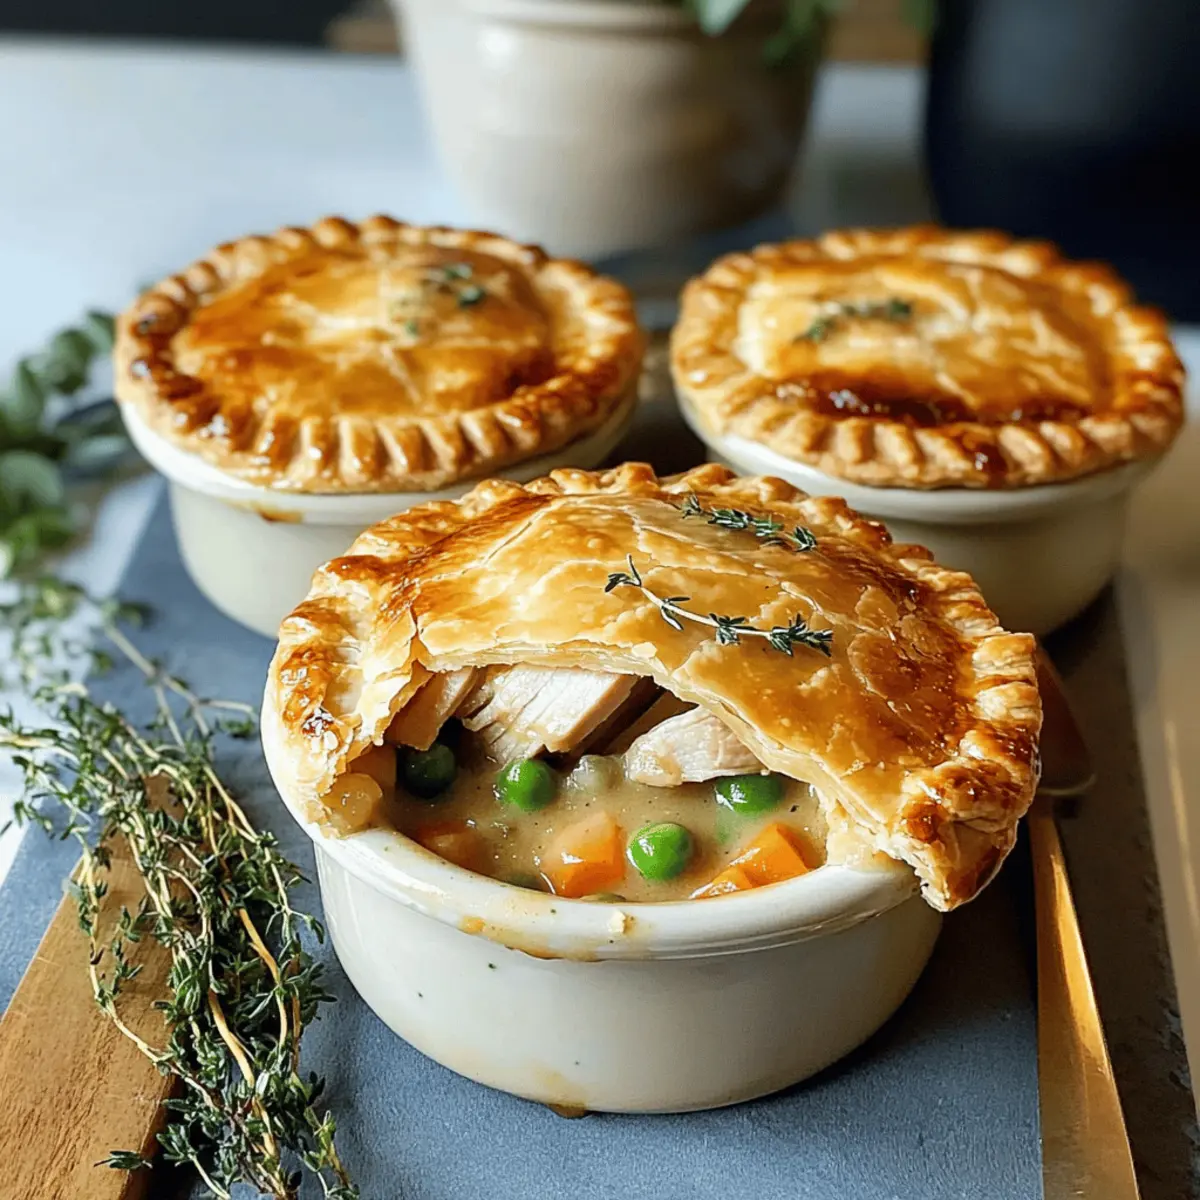
On a crisp evening, as the golden sun starts to dip behind the horizon, the kitchen fills with the comforting aroma of my Creamy Turkey Pot Mini Pies. These delightful individual servings are not just a nod to nostalgia; they offer a quick and adaptable solution to weeknight meals, perfect for busy families or anyone craving a bit of warmth and comfort. With options for various proteins and vegetables, these mini pies welcome your creativity while being kid-friendly and satisfying. Whether you’re hosting a cozy gathering or treating yourself to a quiet night in, let’s together create these little bundles of joy. Are you ready to roll up your sleeves and elevate your dinner game?
Why Choose Creamy Turkey Pot Mini Pies?
Comforting and heartwarming, these mini pies are a delightful twist on a classic favorite, enveloping you in cozy flavors perfect for any gathering. Versatile enough to adapt to your pantry staples, they allow for creativity with various proteins or veggies. Time-saving convenience comes with using store-bought crust, making them an ideal weeknight meal. Kid-friendly and fun to eat, they can delight even the pickiest eaters in your family. Serve them alongside a simple salad for a complete meal or store leftovers easily for a quick lunch. If you’re looking for more culinary inspiration, check out my Leftover Pot Roast ideas for using those meal remnants creatively!
Creamy Turkey Pot Mini Pies Ingredients
For the Filling
• Turkey – The star of the dish, providing a hearty and satisfying protein base; feel free to swap with leftover chicken or beef.
• Carrots – Adds a touch of sweetness and vibrant color; you could also use parsnips for an earthy twist.
• Peas – Bring freshness and a pop of green; corn or diced mushrooms work as great alternatives for variation.
• Cream – Delivers that rich and velvety texture; substitute with low-fat cream for a lighter delight if desired.
• Thyme – Layers the filling with aromatic notes; fresh herbs will brighten up the flavors beautifully!
• Parsley – A dash of freshness to complement the savory filling; basil or chives can also add a lovely taste twist.
For the Crust
• Pie Crust – Forms the flaky exterior that everyone loves; don’t hesitate to use store-bought for a quick meal prep.
With these ingredients, you’ll create irresistibly delicious Creamy Turkey Pot Mini Pies that will warm your heart and gather your loved ones around the table.
Step‑by‑Step Instructions for Creamy Turkey Pot Mini Pies
Step 1: Preheat the Oven
Begin by preheating your oven to 350°F (175°C). This temperature ensures that the crusts bake to a perfectly golden brown while the savory filling heats through. While the oven warms up, gather all your ingredients and equipment—it’s time to create those delightful Creamy Turkey Pot Mini Pies!
Step 2: Sauté the Filling
In a large skillet over medium heat, add a splash of oil and sauté your turkey until it’s browned and cooked through, about 5-7 minutes. Add in diced carrots and peas, cooking for an additional 3-4 minutes until the vegetables are tender and vibrantly colored. Stir in the cream and seasonings, allowing the flavors to meld for another minute, and then remove from heat.
Step 3: Cool the Filling
Transfer the warm filling to a separate bowl and let it cool for about 10 minutes. This cooling step is essential, as it prevents the filling from making the crust soggy. As you wait, you can prepare your pie crust, ensuring the mini pies will have a flaky, delicious outer layer.
Step 4: Prepare the Crust
Roll out your pie crust on a lightly floured surface until it’s about ¼-inch thick. Use a round cutter to cut shapes that fit your mini pie dishes or muffin tin. A fun tip is to use different size cutters for variety! Place the cutouts into the greased mini pie pans, gently pressing them down to fit snugly.
Step 5: Fill the Crusts
Once your filling has cooled, carefully spoon it into each pie crust, filling them just to the top without overflowing. Leave a little room to ensure the filling doesn’t spill over during baking. The combination of creamy turkey and tender vegetables is what makes these Creamy Turkey Pot Mini Pies so irresistible!
Step 6: Seal and Vent
Cut out smaller circles or shapes from the remaining pie crust for the tops. Place them gently over each filled mini pie and press the edges to seal. Don’t forget to cut a few small vent holes in the top crust to allow steam to escape, ensuring a perfectly baked pie with delightful textures.
Step 7: Bake the Mini Pies
Carefully place the mini pies in the preheated oven and bake for approximately 30 minutes. Keep an eye on them as they bake; you’re looking for a golden brown crust and bubbling filling. The aroma wafting through your kitchen will be a delightful sign that these Creamy Turkey Pot Mini Pies are almost ready!
Step 8: Cool and Serve
After baking, remove the mini pies from the oven and let them cool for about 5 minutes. This cooling period allows the filling to set slightly, making them easier to eat. Serve them warm and enjoy these cozy bites filled with comfort and flavor, perfect for any gathering or a nice night in.
Expert Tips for Creamy Turkey Pot Mini Pies
-
Cool the Filling: Allow the filling to cool for at least 10 minutes. This step is crucial, as it prevents a soggy crust when the filling is too hot.
-
Avoid Overfilling: Fill each mini pie crust just to the top. Overfilling can lead to delicious but messy spills while baking!
-
Create Vents: Use kitchen scissors to cut small vent holes in the top crust. This allows steam to escape and ensures a crispy crust rather than a soggy one.
-
Watch the Edges: If the edges of your mini pies brown too quickly, cover them with foil to prevent burning while the pie continues to bake.
-
Variations Galore: Feel free to swap turkey with leftover chicken, beef, or even chickpeas for a vegetarian option, opening endless creativity with these Creamy Turkey Pot Mini Pies!
How to Store and Freeze Creamy Turkey Pot Mini Pies
Fridge: Store leftover mini pies in an airtight container for up to 3 days. This helps maintain their flaky texture and delicious flavor while keeping them fresh.
Freezer: Unbaked mini pies can be frozen for up to 2 months. Assemble them, then place in a freezer-safe container. When ready to bake, cook from frozen by adding a few extra minutes to the bake time.
Reheating: To reheat baked mini pies, place them in a preheated oven at 350°F (175°C) for about 15-20 minutes until warmed through, preserving that delightful crust.
Wrapping: For best results, wrap each mini pie in plastic wrap or aluminum foil before freezing. This prevents freezer burn and keeps your Creamy Turkey Pot Mini Pies tasting fresh and delicious!
What to Serve with Creamy Turkey Pot Mini Pies
A warm kitchen filled with delicious aromas invites a perfect dining experience, enhanced by delightful sides and beverages.
- Crunchy Garden Salad: A light, fresh salad complements the creamy richness of the mini pies, adding a refreshing crunch in every bite.
- Roasted Veggies: Seasoned seasonal vegetables offer a satisfying contrast in texture and are a delightful way to sneak in more nutrients.
- Creamy Mashed Potatoes: Buttery, fluffy mashed potatoes bring comfort to the table, pairing deliciously with the rich filling of the mini pies.
- Steamed Green Beans: Tender green beans add a pop of color and a healthy touch, providing a crisp texture that balances the meal beautifully.
- Savory Garlic Bread: Slices of warm, garlic-infused bread are perfect for dipping into the pie filling, adding another comforting layer to your dining experience.
- Homemade Applesauce: The sweet-tartness of applesauce makes an excellent side, cutting through the richness of the creamy turkey and bringing a touch of sweetness.
- Chilled White Wine: A crisp Sauvignon Blanc elevates the meal, complementing the savory notes of the mini pies while refreshing your palate.
- Decadent Chocolate Mousse: For dessert, a rich chocolate mousse feels like a luxurious finish, inviting you to indulge after the hearty main course.
- Herbal Iced Tea: A glass of lightly brewed herbal tea keeps the mood light and pairs well either warm or chilled, refreshing your taste buds between bites.
Make Ahead Options
These Creamy Turkey Pot Mini Pies are perfect for meal prep enthusiasts! You can prepare the filling up to 3 days in advance by sautéing the turkey and vegetables, then stirring in the cream and seasonings. Allow the filling to cool before storing it in an airtight container in the refrigerator to maintain its delicious texture. The pie crusts can also be cut and stored in the fridge for 24 hours—just be sure to keep them covered to prevent drying out. When you’re ready to bake, simply fill the crusts with the chilled filling, seal them, add vent holes, and pop them in the oven for freshly baked mini pies that taste just as delightful as if they were made on the spot!
Variations & Substitutions for Creamy Turkey Pot Mini Pies
Feel free to let your imagination run wild while making these comforting mini pies! Each variant will bring forth its own delightful twist.
-
Chicken Swap: Substitute turkey with leftover chicken for a quick and hearty variation that your family will love. This switch is perfect for using up those post-holiday leftovers!
-
Vegetarian Delight: For a meatless option, try chickpeas, lentils, or a mix of your favorite veggies. This not only maintains the creaminess but expands the flavor profile beautifully!
-
Mushroom Medley: Add diced mushrooms to the filling for an earthy flavor burst, enhancing the umami experience within these cozy pies. The texture will give an amazing, satisfying bite!
-
Spicy Kick: Incorporate a teaspoon of red pepper flakes into your filling for a subtle heat that livens up the flavor. Your taste buds will enjoy the warmth that envelops each delightful bite!
-
Low-Cal Option: Use a whole wheat crust and low-fat cream for a lighter version that still packs all the comforting flavors without sacrificing enjoyment. It’s a guilt-free indulgence!
-
Herb Varieties: Experiment with flavors by changing herbs; rosemary or sage could bring a whole new aromatic note to the creamy filling. Just a touch of fresh herbs can transform your dish!
-
Sweet Corn Addition: Throw in some sweet corn kernels for an extra pop of sweetness and a vibrant splash of color. It complements the savory filling perfectly!
-
Root Veggie Twist: Instead of carrots, try adding parsnips or sweet potatoes for a unique sweetness that plays well with the savory turkey. This will give the dish a comforting autumn feel!
These variations not only cater to diverse tastes but also enable you to play around with what’s in your pantry. For more scrumptious ideas, don’t forget to check out my delicious Leftover Pot Roast recipes or even my Tortilla Soup Hearty for some beautiful meal inspiration!

Creamy Turkey Pot Mini Pies Recipe FAQs
How do I select the right turkey for my mini pies?
Absolutely! When choosing turkey, look for fresh, pale pink meat without any dark spots or strong odors. If using leftovers, ensure they were cooked within the last 3-4 days to ensure freshness and safety.
What’s the best way to store leftover mini pies?
Store any leftover Creamy Turkey Pot Mini Pies in an airtight container in the refrigerator for up to 3 days. This helps retain their flaky crust and savory filling. For longer storage, consider freezing them!
Can I freeze unbaked mini pies?
Very! Assemble the mini pies without baking them, and place them in a freezer-safe container or wrap them tightly in plastic wrap. They can be frozen for up to 2 months. When ready to enjoy them, bake straight from frozen, adding a few extra minutes to the cook time for best results.
What should I do if my crust is soggy after baking?
If your crust turns out soggy, it’s often because the filling was too hot when assembled. To prevent this next time, always allow your filling to cool for at least 10 minutes before filling the crusts. You can also try blind baking the crust for 5-7 minutes before adding the filling for added crispiness.
Are Creamy Turkey Pot Mini Pies suitable for those with allergies?
Absolutely! If you or your loved ones have dietary concerns, there are many alternatives. Use gluten-free pie crust for those with gluten sensitivities or substitute the cream with a plant-based milk alternative to make it dairy-free. Always check labels for hidden allergens!
How can I adjust the recipe for a vegetarian option?
For a vegetarian version, replace the turkey with cooked chickpeas and add a mix of your favorite vegetables, like mushrooms, bell peppers, and additional spices for flavor. Use vegetable broth instead of cream, or opt for a creamy plant-based alternative to keep the essence of the dish while making it meat-free!
Creamy Turkey Pot Mini Pies for Cozy Nights In
Ingredients
Equipment
Method
- Preheat your oven to 350°F (175°C).
- In a large skillet over medium heat, cook turkey until browned and cooked through, about 5-7 minutes. Add carrots and peas, cooking for an additional 3-4 minutes.
- Stir in cream and seasonings, allowing flavors to meld for another minute, then remove from heat.
- Transfer the filling to a bowl and let it cool for about 10 minutes.
- Roll out pie crust until about ¼-inch thick and cut shapes for mini pie dishes.
- Spoon filling into each crust up to the top without overflowing.
- Cut out shapes for top crust and seal, making sure to cut vent holes.
- Bake in preheated oven for approximately 30 minutes, until golden brown.
- Let cool for 5 minutes before serving warm.
")