When you’re in the mood for something indulgent, smooth, and effortlessly elegant, Creamy Vanilla Bean Fudge is the answer. This simple yet luxurious treat combines the richness of white chocolate with the deep, aromatic flavor of vanilla bean, creating a melt-in-your-mouth experience that’s perfect for any occasion. Whether you’re serving it at a holiday gathering, gifting it to friends, or simply treating yourself, this fudge will bring a touch of sophistication to your dessert repertoire.
Not only is this fudge absolutely delicious, but it’s also incredibly easy to make. With just a handful of ingredients and minimal prep time, you’ll be amazed at how professional and decadent this treat can look and taste. Let’s dive into the recipe and learn everything you need to know to create the perfect Creamy Vanilla Bean Fudge.
Why You’ll Love Creamy Vanilla Bean Fudge
- Elegant and Luxurious: The specks of vanilla bean give this fudge a gourmet look and flavor.
- Easy to Make: Even if you’re a beginner, this recipe is foolproof and requires no candy thermometer.
- Versatile Dessert: Perfect for gifting, celebrations, or satisfying a sweet craving.
- Customizable: Add decorative sprinkles, a candy drizzle, or even a pinch of sea salt to make it your own.
- Rich and Creamy Texture: Each bite melts in your mouth, delivering a velvety sweetness that’s hard to resist.
Ingredients for Creamy Vanilla Bean Fudge
| Category | Ingredient | Quantity |
|---|---|---|
| Base Ingredients: | White chocolate or white candy melts | 3 cups |
| Sweetened condensed milk | 1 (14-ounce) can | |
| Vanilla bean paste (or 1 scraped vanilla bean) | 1 tablespoon | |
| Optional Decorations: | Additional white melting candy (for drizzle) | As desired |
| Sprinkles (decorative) | As desired |
These simple ingredients combine to create a fudge that’s smooth, sweet, and bursting with vanilla flavor.
How to Make Creamy Vanilla Bean Fudge
1. Prepare the Fudge Mixture
Line the Pan
Begin by lining an 8×8-inch baking dish with parchment paper. Leave some overhang on the sides for easy removal of the fudge later. This step ensures a clean, effortless release and makes slicing much simpler.
Melt the White Chocolate and Milk
In a medium saucepan, combine the white chocolate (or white candy melts) and sweetened condensed milk. Heat the mixture over low heat, stirring frequently to prevent burning. Continue stirring until the chocolate is fully melted and the mixture is smooth and creamy.
Add the Vanilla Bean Paste
Remove the saucepan from the heat and stir in the vanilla bean paste or scraped vanilla bean seeds. Mix thoroughly until the vanilla is evenly incorporated, giving the mixture a fragrant aroma and those signature vanilla bean specks.
2. Pour and Set
Transfer to the Pan
Pour the fudge mixture into the prepared baking dish. Use a spatula to spread it evenly, ensuring a smooth surface. Smooth edges create a professional, polished appearance when slicing the fudge.
Chill the Fudge
Place the pan in the refrigerator and let the fudge chill for 2-3 hours, or until it is firm enough to cut into clean, precise squares.
3. Optional Drizzle and Decorate
Melt Additional Candy (Optional)
For a decorative finish, melt a small amount of white candy melts in a microwave-safe bowl. Microwave in 15-second intervals, stirring between each, until smooth.
Drizzle and Sprinkle
Using a spoon or piping bag, drizzle the melted candy over the chilled fudge in zigzag patterns. If desired, sprinkle decorative sprinkles or edible glitter over the drizzle while it’s still wet for a festive touch.
4. Slice and Serve
Once the fudge has set, use the parchment paper to lift it out of the pan. Place it on a cutting board and use a sharp knife to slice it into small squares or rectangles. Serve chilled, and enjoy each creamy, sweet bite!
Pro Tips for Perfect Vanilla Bean Fudge
- Use High-Quality Chocolate: Opt for good-quality white chocolate or candy melts for the smoothest, creamiest texture.
- Don’t Overheat the Chocolate: Melt the chocolate on low heat and stir continuously to avoid scorching or seizing.
- Line the Pan Properly: Parchment paper is a must for easy removal and clean edges.
- Customize the Vanilla Flavor: If you prefer a stronger vanilla taste, add a few drops of vanilla extract along with the vanilla bean paste.
- Add Texture: For extra crunch, sprinkle chopped nuts, crushed cookies, or sea salt on top of the fudge before it sets.
Nutritional Information
| Nutrient | Amount per Serving (1 square) |
|---|---|
| Calories | ~150 |
| Total Fat | 7g |
| Carbohydrates | 19g |
| Protein | 2g |
| Sugars | 16g |
Note: Nutritional values are approximate and may vary depending on the size of the squares.
Creative Variations
- Vanilla Almond Fudge: Add a handful of slivered almonds or almond extract for a nutty twist.
- Salted Caramel Swirl: Drizzle caramel sauce over the fudge and lightly swirl it in with a toothpick before chilling. Top with a pinch of flaky sea salt.
- Festive Funfetti: Mix colorful sprinkles into the fudge before pouring it into the pan for a party-ready treat.
- Chocolate Vanilla Marble Fudge: Melt some milk or dark chocolate and swirl it into the vanilla fudge for a marbled effect.
- Lemon-Vanilla Fudge: Add a teaspoon of lemon zest for a zesty, refreshing flavor.
Common Mistakes to Avoid
- Skipping the Parchment Paper: Without parchment paper, the fudge may stick to the pan, making it difficult to remove.
- Overheating the Chocolate: Always melt the chocolate slowly on low heat to prevent burning or clumping.
- Not Allowing Enough Chill Time: The fudge needs a full 2-3 hours to set properly for clean slicing.
- Using Imitation Vanilla: High-quality vanilla bean paste or pure vanilla extract is essential for the best flavor.
- Cutting Before It’s Fully Set: Cutting too soon can result in sticky, messy edges. Be patient and let the fudge chill completely.
FAQs About Creamy Vanilla Bean Fudge
1. Can I use milk chocolate or dark chocolate instead of white chocolate?
Yes, you can substitute milk or dark chocolate, but the flavor and color will differ. For the signature vanilla bean fudge, white chocolate is best.
2. How long does this fudge last?
Store the fudge in an airtight container in the refrigerator for up to two weeks. You can also freeze it for up to three months.
3. Can I use vanilla extract instead of vanilla bean paste?
Absolutely! Use 1 teaspoon of pure vanilla extract if you don’t have vanilla bean paste.
4. What if my fudge doesn’t set?
If the fudge doesn’t set, it may need more chill time. Alternatively, ensure you’ve measured the ingredients accurately, especially the sweetened condensed milk.
5. Can I double the recipe?
Yes, you can double the ingredients and use a 9×13-inch pan instead of an 8×8-inch one.
6. Is this fudge suitable for gifting?
Definitely! Package the squares in decorative tins or boxes lined with parchment paper for a thoughtful homemade gift.
Conclusion: A Luxurious Treat for Every Occasion
Creamy Vanilla Bean Fudge is the perfect blend of simplicity and sophistication. Whether you’re looking for a dessert to impress your guests, a festive holiday treat, or a quick yet decadent sweet fix, this fudge delivers on all fronts. Its creamy texture, rich vanilla flavor, and versatile decorations make it an all-time favorite.
So grab your ingredients, roll up your sleeves, and create a batch of this luxurious fudge today. One bite and you’ll see why this recipe is a timeless classic!
Print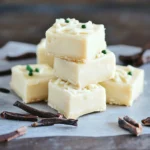
Creamy Vanilla Bean Fudge: A Luxurious, Sweet Treat
- Total Time: 2 hours 15 minutes
- Yield: 16 squares
Description
Indulge in the elegance of Creamy Vanilla Bean Fudge, a velvety smooth dessert bursting with the rich, aromatic flavor of vanilla bean. This no-bake, easy-to-make treat is perfect for any occasion, whether you’re hosting a holiday gathering or looking for a thoughtful homemade gift. Each bite offers the perfect balance of sweetness and creaminess, with a customizable touch for decoration.
Ingredients
- 3 cups white chocolate or white candy melts
- 1 (14-ounce) can sweetened condensed milk
- 1 tablespoon vanilla bean paste (or 1 scraped vanilla bean)
- Optional: Additional white melting candy for drizzling
- Optional: Decorative sprinkles
Instructions
-
Line the Pan: Line an 8×8-inch baking dish with parchment paper, leaving an overhang on the sides for easy removal.
-
Melt the Chocolate and Milk: Combine the white chocolate (or candy melts) and sweetened condensed milk in a medium saucepan. Heat over low heat, stirring frequently, until fully melted and smooth.
-
Incorporate the Vanilla: Remove the saucepan from heat and stir in the vanilla bean paste or scraped vanilla bean seeds. Mix thoroughly for an even distribution of flavor.
-
Pour and Smooth the Mixture: Transfer the fudge mixture into the prepared baking dish. Use a spatula to spread it evenly and smooth the top.
-
Chill the Fudge: Place the dish in the refrigerator and let the fudge chill for 2-3 hours, or until firm.
-
Optional Drizzle and Decorate: Melt additional white candy melts in the microwave in 15-second intervals. Drizzle the melted candy over the set fudge and sprinkle decorative sprinkles while the drizzle is still wet.
-
Slice and Serve: Lift the fudge out of the pan using the parchment paper overhang. Slice it into small squares and serve chilled.
Notes
- Storage: Keep the fudge in an airtight container in the refrigerator for up to two weeks.
- Customization: Add sprinkles, nuts, or crushed cookies to the top for a fun variation.
- Double the Recipe: For larger gatherings, double the ingredients and use a 9×13-inch pan.
- Gift Idea: Wrap pieces in parchment paper and pack them in decorative tins for thoughtful gifts.
- Prep Time: 15 minutes
- Cook Time: 2 hours
- Category: Dessert
- Method: No-Bake
- Cuisine: American


