There’s something about the flavor of pumpkin that instantly reminds you of autumn. Whether it’s the warmth of pumpkin pie spice or the creamy texture of pumpkin filling, it’s a flavor that feels like a cozy hug on a cool fall day. And when it comes to making desserts, few things are as satisfying as a treat that’s not only delicious but also incredibly simple to prepare. That’s why you’re going to love these Easy No-Bake Mini Pumpkin Pies.
With a buttery graham cracker crust, creamy pumpkin filling, and a dollop of whipped topping, these bite-sized desserts are perfect for family dinners, holiday parties, or whenever you’re craving a festive fall treat. And the best part? You don’t even need to turn on your oven! Let’s dive into how you can make these no-bake delights.
Ingredients: Everything You’ll Need
Here’s a complete list of ingredients to make these easy no-bake mini pumpkin pies:
| Ingredient | Quantity |
|---|---|
| Water | ⅓ cup |
| Unflavored gelatin | 1 envelope (1 ounce) |
| Pumpkin puree | 1 cup |
| Sweetened condensed milk | 1 cup |
| Pumpkin pie spice | 1 teaspoon |
| Graham cracker crumbs | 2½ cups |
| Frozen whipped topping (thawed) | 1 cup + extra for garnish |
Why You’ll Love These Easy No-Bake Mini Pumpkin Pies
These mini pumpkin pies are a game-changer for so many reasons:
- No-Bake Convenience: Say goodbye to preheating the oven! These pies are perfect for when you want a quick and easy dessert.
- Individual Portions: Everyone gets their own mini pie, making them ideal for parties, potlucks, or family gatherings.
- Bursting with Pumpkin Flavor: The combination of pumpkin puree and pumpkin pie spice creates the ultimate autumn treat.
- Customizable and Fun: You can add toppings like crushed nuts, caramel drizzle, or even chocolate shavings to make them your own.
- Crowd-Pleaser: Kids and adults alike will fall in love with these creamy, delicious pies.
Step-by-Step Guide to Making Easy No-Bake Mini Pumpkin Pies
1. Prepare the Gelatin
Gelatin is the secret ingredient that gives your pumpkin filling its perfectly firm, sliceable texture.
- Pour ⅓ cup of water into a small saucepan.
- Sprinkle the unflavored gelatin over the water and let it sit for about 5 minutes. This process is called blooming and helps the gelatin dissolve evenly.
- Place the saucepan over low heat and stir the mixture until the gelatin completely dissolves. Remove from heat and set it aside.
2. Make the Pumpkin Filling
The pumpkin filling is where all the magic happens. It’s creamy, fluffy, and full of warm fall flavors.
- In a large mixing bowl, combine the pumpkin puree, sweetened condensed milk, and pumpkin pie spice.
- Whisk the mixture until it’s smooth and well-blended.
- Gradually pour the dissolved gelatin into the pumpkin mixture, stirring as you go to ensure it’s evenly incorporated.
- Gently fold in 1 cup of thawed whipped topping. This step gives the filling a light and airy texture.
3. Create the Graham Cracker Crust
The graham cracker crust provides the perfect buttery base for your mini pies.
- In a separate bowl, mix the graham cracker crumbs with a few tablespoons of melted butter (optional) to add extra moisture and help the crust hold together.
- Divide the crumb mixture evenly among individual serving cups, mini pie tins, or silicone molds.
- Press the crumbs down firmly to create a compact crust layer at the bottom of each serving vessel.
4. Assemble the Mini Pies
Now it’s time to bring everything together!
- Spoon the pumpkin filling on top of the graham cracker crust in each cup or tin.
- Smooth the tops with a spatula for a neat and polished look.
5. Chill the Pies
Chilling is essential to help the filling set properly.
- Transfer the mini pies to the refrigerator and let them chill for at least 2 hours. The longer they chill, the firmer and creamier the filling will be.
6. Garnish and Serve
It’s all about the finishing touches!
- Once the pies are set, top each one with a dollop of whipped topping.
- Sprinkle a pinch of pumpkin pie spice or crushed graham cracker crumbs over the top for extra flavor and a decorative touch.
- Serve the pies chilled and enjoy their creamy, dreamy goodness.
Tips for Success
- Use High-Quality Pumpkin Puree: Opt for 100% pure pumpkin puree, not pumpkin pie filling, for the best flavor.
- Bloom the Gelatin Properly: Letting the gelatin bloom ensures a smooth texture in the filling.
- Customize the Crust: Swap graham cracker crumbs for crushed gingersnaps or vanilla wafers for a unique twist.
- Chill Time Is Key: Don’t rush the chilling process—allowing the pies to set fully ensures the best texture.
- Add Toppings: For a gourmet touch, try caramel drizzle, chopped pecans, or a sprinkle of cinnamon.
Nutritional Information
Here’s an approximate nutritional breakdown for a single mini pie (based on 12 servings):
| Nutrient | Amount Per Serving |
|---|---|
| Calories | 190 |
| Total Fat | 6g |
| Saturated Fat | 4g |
| Carbohydrates | 29g |
| Sugar | 19g |
| Protein | 3g |
FAQs About Easy No-Bake Mini Pumpkin Pies
1. Can I make these mini pies ahead of time?
Yes! These mini pies are perfect for making ahead. Prepare them a day before your event and store them in the refrigerator until you’re ready to serve.
2. Can I use a different crust?
Absolutely! You can substitute graham cracker crumbs with crushed gingersnaps, Oreo cookies, or vanilla wafers for a different flavor profile.
3. How long do these pies last in the refrigerator?
Stored in an airtight container, these mini pies will last for up to 3 days in the refrigerator.
4. Can I freeze the pies?
Yes, you can freeze the mini pies. Place them in an airtight container and freeze for up to 1 month. Thaw them in the refrigerator before serving.
5. Can I use fresh whipped cream instead of frozen?
Of course! Freshly whipped cream works just as well. Beat heavy cream with a little powdered sugar and vanilla extract until soft peaks form.
6. What if I don’t have mini pie tins?
You can use small glass jars, silicone molds, or even cupcake liners in a muffin tin as an alternative.
Conclusion: A Festive Treat You’ll Want to Make Again and Again
These Easy No-Bake Mini Pumpkin Pies are everything you love about pumpkin pie but in a convenient, bite-sized form. They’re creamy, flavorful, and require minimal effort—perfect for busy holiday seasons or whenever you’re craving a quick dessert with a touch of fall flair. Whether you’re hosting a dinner party or enjoying a quiet night in, these no-bake pies are guaranteed to be a hit.
So, grab your ingredients, whip up these little delights, and watch them disappear as soon as they hit the table. You’ll want to make them again and again!
Print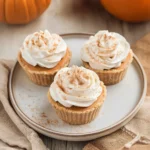
Easy No-Bake Mini Pumpkin Pies: A Perfect Dessert for Fall
- Total Time: 2 hours 20 minutes
- Yield: 12 mini pies
Description
These Easy No-Bake Mini Pumpkin Pies are the ultimate fall dessert. With a buttery graham cracker crust, creamy pumpkin filling, and fluffy whipped topping, these bite-sized pies are perfect for parties, family gatherings, or any time you want a sweet, no-bake treat. They’re quick, simple, and full of festive pumpkin flavor!
Ingredients
- ⅓ cup water
- 1 envelope (1 ounce) unflavored gelatin
- 1 cup pumpkin puree
- 1 cup sweetened condensed milk
- 1 teaspoon pumpkin pie spice
- 2½ cups graham cracker crumbs
- 1 cup frozen whipped topping (thawed) + extra for garnish
Instructions
1. Prepare the Gelatin:
- Pour the water into a small saucepan and sprinkle the unflavored gelatin over it. Let it sit for about 5 minutes to bloom.
- Place the saucepan over low heat and stir until the gelatin completely dissolves. Remove from heat and set aside.
2. Make the Pumpkin Filling:
- In a large mixing bowl, whisk together the pumpkin puree, sweetened condensed milk, and pumpkin pie spice until smooth.
- Gradually add the dissolved gelatin mixture to the pumpkin mixture, stirring to incorporate evenly.
- Fold in 1 cup of thawed whipped topping until the filling becomes light and fluffy.
3. Create the Graham Cracker Crust:
- In a separate bowl, combine the graham cracker crumbs with a few tablespoons of melted butter (optional, for added moisture).
- Divide the mixture evenly among individual serving cups, mini pie tins, or cupcake liners in a muffin tin. Press the crumbs firmly into the bottom to create a solid crust.
4. Assemble the Mini Pies:
- Spoon the pumpkin filling on top of each graham cracker crust, smoothing the tops with a spatula.
5. Chill the Pies:
- Refrigerate the mini pies for at least 2 hours, allowing the filling to set and firm up.
6. Garnish and Serve:
- Top each mini pie with a dollop of whipped topping.
- Sprinkle pumpkin pie spice or crushed graham cracker crumbs over the top for decoration. Serve chilled and enjoy!
Notes
- High-Quality Pumpkin: Use 100% pumpkin puree for the best flavor. Avoid pumpkin pie filling, which contains added sugar and spices.
- Substitute Crusts: You can swap the graham cracker crumbs for crushed gingersnaps, vanilla wafers, or Oreos to change the flavor.
- Make Ahead: These pies can be made up to 1 day in advance. Store them in the refrigerator until ready to serve.
- Add-Ons: Add a caramel drizzle, chopped pecans, or mini chocolate chips for extra flavor and texture.
- Prep Time: 20 minutes
- Cook Time: 2 hours
- Category: Dessert
- Method: No-Bake
- Cuisine: American


