")
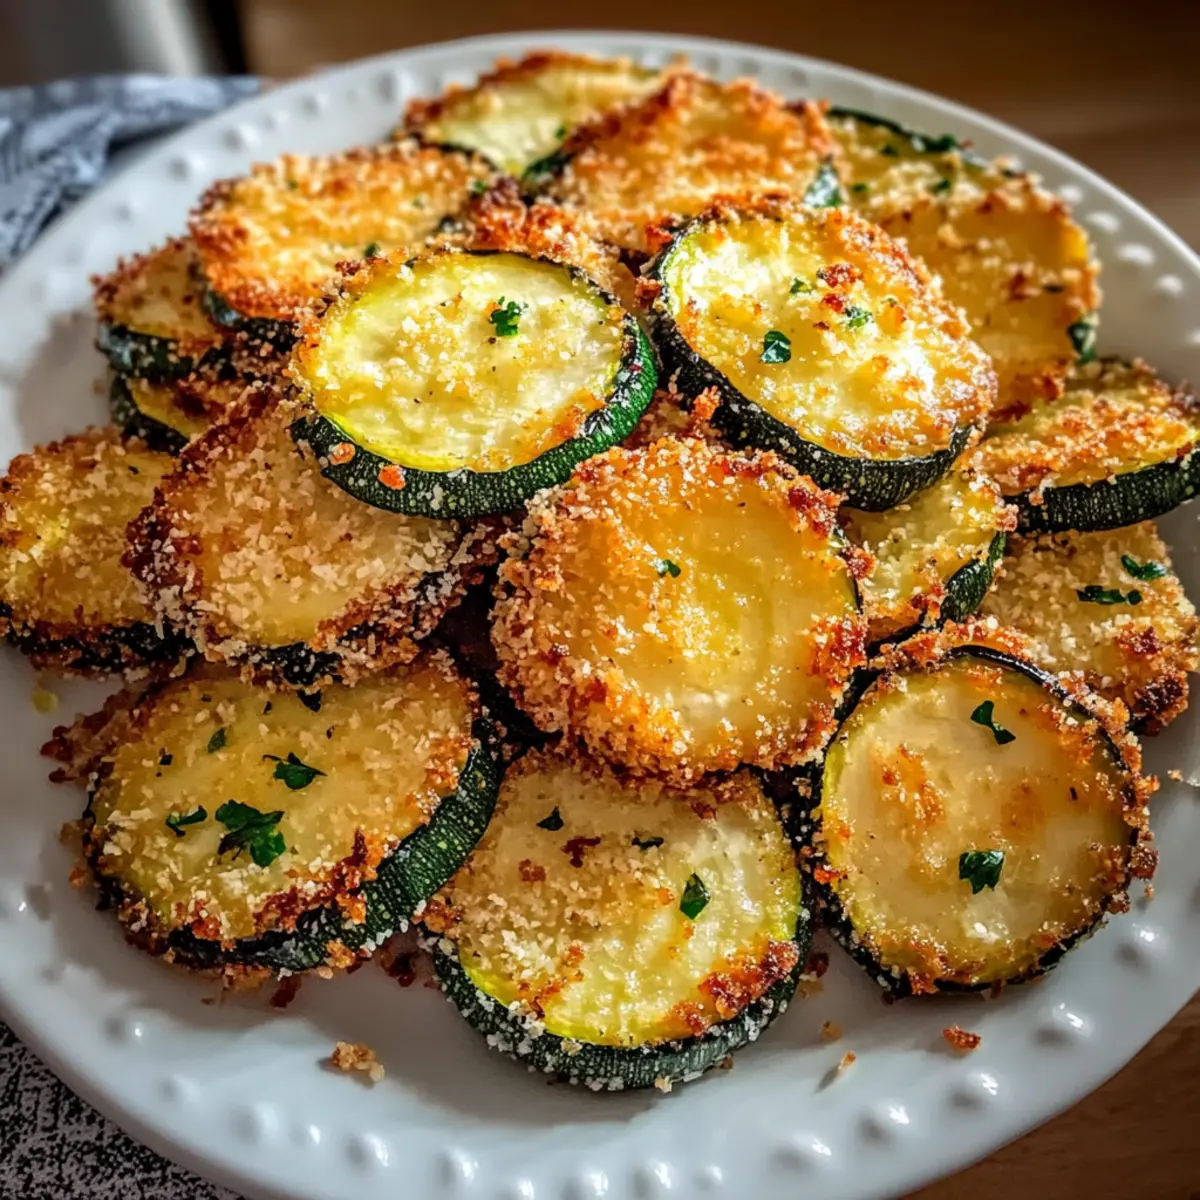
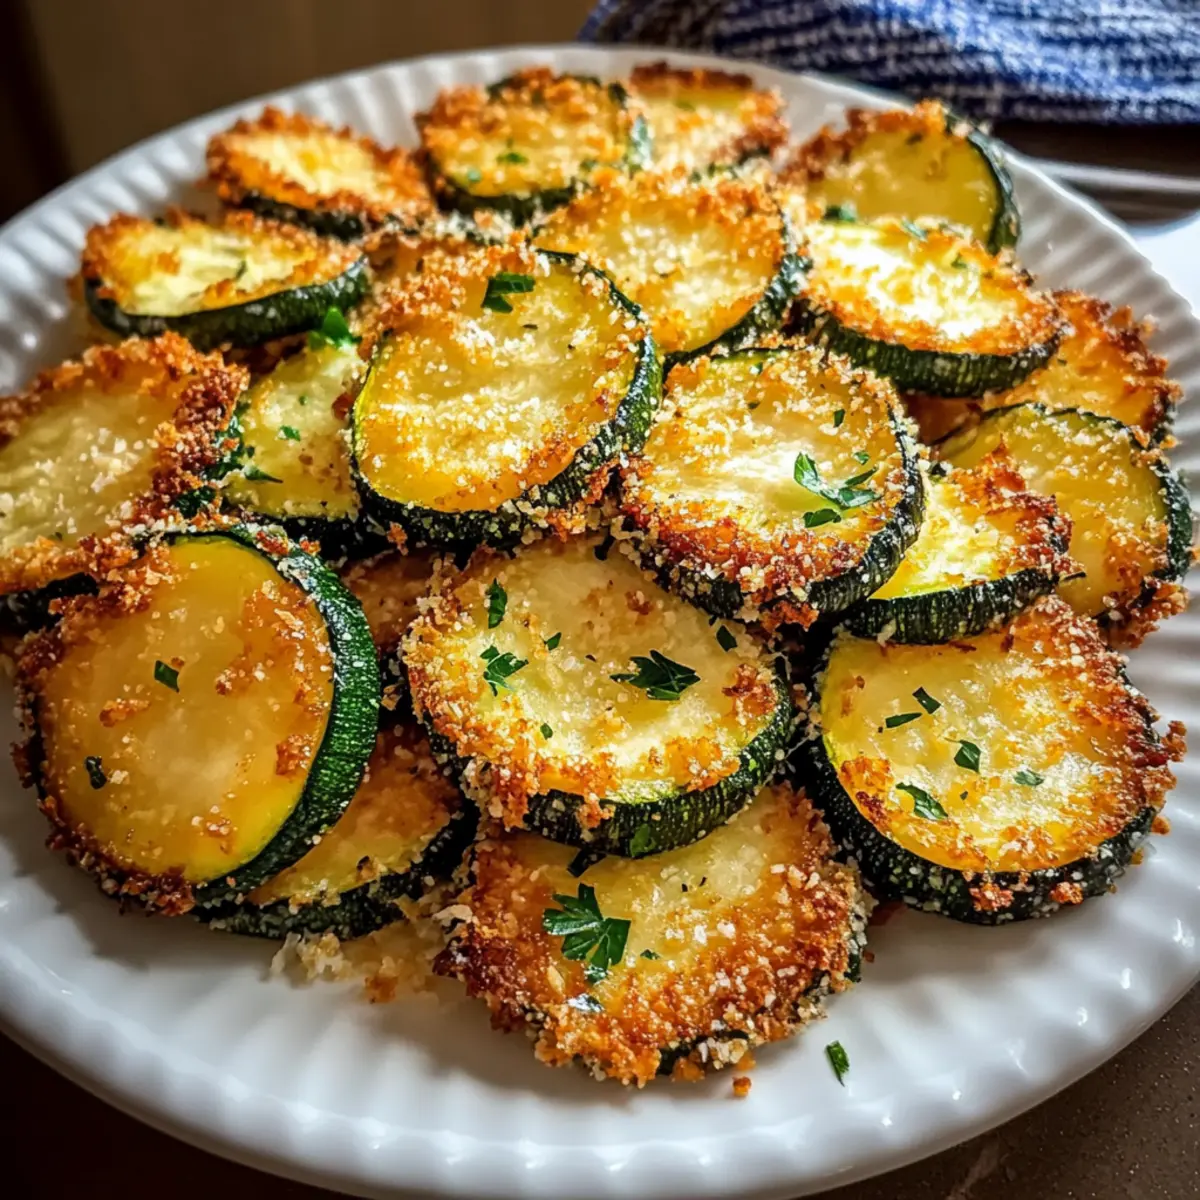
The sizzle of fresh zucchini hitting a hot skillet is a sound that dialed my taste buds to attention! Today, I’m excited to share my Crispy Buttery Fried Zucchini, a recipe that transforms simple zucchini into a crunchy snack or appetizer that’s pure magic. With a golden, crispy coating made from Parmesan and panko, every bite reveals a tender, buttery center that invites you back for more. It’s the perfect solution for those moments when you crave something comforting yet quick to prepare—ideal for gatherings or a cozy night in. Plus, there’s a gluten-free option waiting for you to explore! Are you ready to delve into a delightful world of zucchini goodness that will impress both friends and family? Let’s get started!
Why is This Fried Zucchini Recipe a Must-Try?
Unmatched Crunchiness: The crispy panko coating, enhanced with Parmesan, delivers an irresistible crunch that sets this dish apart from other snacks.
Quick Preparation: Ready in just 30 minutes, this recipe is perfect for busy weekdays or last-minute gatherings.
Versatile Finishing Touches: Serve with zesty lemon wedges or your favorite dipping sauces like marinara or ranch to elevate the experience!
Crowd-Pleasing Flavor: Even zucchini skeptics will be converted by the buttery richness and savory notes from the spices.
Gluten-Free Option: Feel free to switch to gluten-free flour and breadcrumbs, ensuring everyone can enjoy this delightful snack.
Perfect Pairing Ideas: Pair it with grilled meats or a fresh salad for an enjoyable meal—just like you’ll find in our appetizer section for more ideas!
Fried Zucchini Ingredients
For the Coating
- Zucchini – Fresh vegetable providing a tender base; medium-sized zucchinis are best for even cooking.
- All-Purpose Flour – Helps create a dry surface for better adherence of egg and breadcrumbs; gluten-free flour works great for a gluten-free option.
- Eggs – Acts as a binding agent, ensuring breadcrumbs stick; large eggs yield the best results.
- Panko Breadcrumbs – Adds an extra crispy bite due to their light texture; regular breadcrumbs may be used, but panko is preferred for maximum crunchiness.
- Grated Parmesan Cheese – Provides a nutty, salty depth to the breading; substitute with Pecorino Romano for a different flavor.
- Garlic Powder – Infuses warmth and aroma that complements the zucchini; optional based on your taste preferences.
- Onion Powder – Adds a mild sweetness and savory depth; feel free to omit for a simpler flavor.
- Salt – Enhances the overall flavor of the dish; adjust according to dietary needs.
- Black Pepper – Offers a gentle kick and aromatic lift; can be adjusted to your liking.
For Cooking
- Unsalted Butter and Olive Oil – Serve as frying mediums that enhance richness; butter contributes taste, while olive oil raises the smoke point. Use only unsalted butter for better control over saltiness.
For Serving
- Lemon Wedges – Brightens the fried zucchini with a citrus note; optional but recommended for serving.
- Dipping Sauces (optional) – Marinara sauce or ranch dressing elevate the flavor profile—perfect for those crispy fried zucchini bites!
Step‑by‑Step Instructions for Crispy Buttery Fried Zucchini
Step 1: Prepare the Zucchini
Start by washing the zucchinis under cool running water. Slice each zucchini into 1/4-inch thick rounds, aiming for even thickness to ensure they cook uniformly. Arrange the slices on a paper towel to absorb excess moisture while you set up your breading station, allowing the zucchini to stand out in your crispy buttery fried zucchini.
Step 2: Set Up the Breading Station
In three separate bowls, prepare your breading station: place all-purpose flour in the first bowl, beat the eggs until blended in the second, and combine panko breadcrumbs, grated Parmesan, garlic powder, onion powder, salt, and pepper in the third. This organized setup ensures smooth and efficient breading of your zucchini, which is essential for achieving a uniformly crispy coating.
Step 3: Heat the Pan
In a large skillet, heat a generous blend of unsalted butter and olive oil over medium-high heat. Allow the mixture to melt and become bubbly, which should take about 2-3 minutes. You want the butter to sizzle when you add the zucchini slices, ensuring instant crispiness as you begin frying the crispy buttery fried zucchini.
Step 4: Dredge in Flour
Take a slice of zucchini and dredge it lightly in the flour, shaking off any excess. This dry coating creates a barrier that allows the egg to stick. Repeat this process for each slice, ensuring they are coated evenly while transitioning smoothly into the next step of the breading process.
Step 5: Dip in Egg
Next, dip each floured zucchini slice into the beaten eggs, allowing any excess egg to drip back into the bowl. The egg acts as a glue to help the breadcrumb mixture adhere to the zucchini. This step is crucial for locking in all the buttery goodness in your fried zucchini bites.
Step 6: Coat with Breadcrumbs
Toss each egg-dipped zucchini slice into the panko-Parmesan mixture, pressing gently to ensure a thorough coating. Make sure every piece is well-covered for that delightful crunch. As you prepare the zucchini for frying, take a moment to admire how beautiful they look with their golden coating before cooking.
Step 7: Fry the Zucchini
Carefully place the coated zucchini slices in the hot skillet, cooking them in batches to avoid overcrowding. Fry for about 2-3 minutes on each side, turning them when golden brown. The sizzling sound signals that your crispy buttery fried zucchini is well on its way to delicious perfection.
Step 8: Drain Excess Oil
Once golden brown, use a slotted spatula to remove the fried zucchini from the skillet and place them on a plate lined with paper towels. This step allows any excess oil to drain, helping keep your crispy zucchini crunchy. Make sure to keep an eye on the remaining batch as you repeat the frying process.
Step 9: Serve with Lemon and Dips
Finally, arrange the crispy buttery fried zucchini on a serving platter and offer with lemon wedges and your favorite dipping sauces, like marinara or ranch dressing. This presentation not only enhances flavor but also adds a refreshing touch to each bite of your wonderfully crispy zucchini.
What to Serve With Crispy Buttery Fried Zucchini
Looking to create the perfect meal around these irresistible bites? Let’s explore delectable pairings that will elevate your table.
- Creamy Garlic Dip: A rich blend of creamy yogurt and garlic enhances the flavors of crispy fried zucchini, creating a delightful contrast that’s delightful.
- Light Arugula Salad: The peppery freshness of arugula with a lemon vinaigrette cuts through the richness, adding balance and brightness to your meal.
- Grilled Chicken Skewers: Juicy, smoky chicken skewers provide a hearty protein boost, making a satisfying pairing with the crunchy zucchini.
- Zesty Marinara Sauce: A classic dipping sauce that mirrors the crispy texture while adding a tangy element that complements the buttery flavor.
- Chilled White Wine: A crisp Sauvignon Blanc harmonizes beautifully with the zucchini, enhancing the overall experience with every sip and bite.
- Stuffed Bell Peppers: Nutritious and colorful, these can bring a burst of flavor and texture alongside the buttery crunch of the zucchini.
- Lemon Garlic Quinoa: Fluffy quinoa infused with lemon and garlic adds a wholesome, nutty base that pairs wonderfully with the crispy zucchini.
- Homemade Tartar Sauce: This zesty condiment delivers a refreshing, tangy kick that elevates the overall taste profile.
- Fresh Fruit Platter: A selection of sweet seasonal fruits invigorates the palate and rounds out the meal with a light, refreshing closure.
Expert Tips for Crispy Fried Zucchini
Hot Oil Matters: Ensure your butter and olive oil are sizzling before adding the zucchini; this helps avoid sogginess and promotes that crispy texture.
Don’t Overcrowd: Fry in batches rather than crowding the skillet. This maintains the right temperature, allowing each piece of fried zucchini to cook evenly.
Pat Dry: Make sure to thoroughly pat the zucchini slices dry before breading. Excess moisture can prevent the coating from adhering correctly.
Wire Rack Trick: Place fried zucchini on a wire rack instead of paper towels to keep them crispy if you’re not serving them immediately.
Experiment with Cheese: Feel free to swap Parmesan with other cheeses for a unique flavor twist in your crispy fried zucchini, but keep in mind that panko works best for crunch!
Variations for Fried Zucchini
Get ready to spice things up and transform your crispy fried zucchini into something uniquely yours!
- Cheesy Delight: Substitute Parmesan with mozzarella for a gooey, melty center. Perfect for cheese lovers looking for a savory twist!
- Gluten-Free: Use gluten-free flour and breadcrumbs to make this dish accessible for everyone. You won’t even miss the gluten!
- Spicy Kick: Add a pinch of cayenne pepper or paprika to the breadcrumb mix for a delightful heat. This variation brings a fun, fiery element to the dish.
- Herb Infusion: Toss some dried herbs like oregano or thyme into the breadcrumb mixture for an aromatic touch. Fresh herbs can elevate the taste, giving it a garden-fresh vibe.
- Crispy Onion Flakes: Mix in some crispy fried onion flakes with the breadcrumbs for an extra crunch and burst of flavor. It’s like a party for your taste buds!
- Baked Version: Try baking the zucchini instead of frying them for a healthier option. Brush the coated slices with olive oil and bake at 425°F (220°C) until crispy.
- Asian Flair: Dip the zucchini slices in a soy sauce-miso mixture before breading for a unique umami flavor. Pair it with a dipping sauce made for a delightful fusion experience.
- Zesty Lemon Pepper: Add lemon zest and freshly cracked black pepper to the breadcrumb mix for a refreshing zing in each bite. It’s perfect for summer gatherings, especially when served alongside grilled seafood.
Feel free to explore these variations and take your crispy fried zucchini to the next level! And if you’re in the mood for more delicious flavors, don’t forget to check out our appetizer section for extra inspiration.
Make Ahead Options
These Crispy Buttery Fried Zucchini are perfect for meal prep enthusiasts! You can slice the zucchinis and coat them in flour up to 24 hours in advance, which prevents them from browning and keeps them ready for frying when you need a quick snack. Additionally, the egg mixture can be prepped and refrigerated overnight, allowing for seamless assembly when you’re ready to fry. When it’s time to serve, simply dredge the zucchini slices in the breadcrumb mixture and fry them for about 2-3 minutes on each side, ensuring you enjoy that freshly crispy texture just as delicious as if made on the spot. With these make-ahead tips, you can savor delightful zucchini bites with minimal effort during your busy week!
How to Store and Freeze Fried Zucchini
Fridge: Keep your crispy fried zucchini in an airtight container in the fridge for up to 3 days. Layer paper towels between the slices to help maintain their crunchiness.
Freezer: For longer storage, flash-freeze the fried zucchini in a single layer on a baking sheet before transferring them to a freezer-safe bag. They’ll stay good for up to 2 months!
Reheating: To reheat, bake the frozen fried zucchini in a preheated oven at 400°F (200°C) for about 10-15 minutes until crispy again. Avoid microwave reheating, as it may make them soggy.
Cool Completely: Allow the fried zucchini to cool completely before storing to prevent condensation and keep that perfect crispy texture!

Crispy Buttery Fried Zucchini Recipe FAQs
How do I select the best zucchini?
When choosing zucchini, look for medium-sized ones with smooth, blemish-free skin. Avoid those with dark spots or soft patches; they should feel firm to the touch. Buying them fresh not only enhances the taste but also ensures the best texture for frying!
What’s the best method to store leftover fried zucchini?
To keep your crispy fried zucchini fresh, let them cool completely and store them in an airtight container in the fridge for up to 3 days. Layer paper towels between the slices to absorb moisture, which helps to maintain their crunchiness.
Can I freeze fried zucchini for later use?
Absolutely! To freeze, flash-freeze the fried zucchini by placing them in a single layer on a baking sheet. After they are frozen (about 1-2 hours), transfer them to a freezer-safe bag. They will keep well for up to 2 months. When you’re ready to enjoy them, just bake at 400°F (200°C) for 10-15 minutes until crisp!
What if my fried zucchini turns out soggy?
If your fried zucchini turns out soggy, it may be due to overcrowding in the skillet or not having the oil hot enough. Always ensure the oil is bubbling before adding zucchini, and fry in small batches. If you find that your zucchini are too moist, try patting them dry before breading next time!
Is there a gluten-free option for this recipe?
Yes! For a gluten-free version, simply substitute all-purpose flour with gluten-free flour and use gluten-free panko breadcrumbs. This way, everyone can savor the delicious flavor and crispiness of your fried zucchini without worry!
Can my pets enjoy fried zucchini?
While zucchini itself is generally safe for pets in small amounts, the fried version with butter, salt, and spices isn’t recommended. If you want to share, try giving them raw zucchini slices as a healthy treat without added seasoning!

Crispy Fried Zucchini That Will Brighten Your Snack Time
Ingredients
Equipment
Method
- Wash the zucchinis under cool running water and slice each zucchini into 1/4-inch thick rounds. Arrange the slices on paper towels to absorb excess moisture.
- Prepare your breading station: place all-purpose flour in one bowl, beaten eggs in another, and combine panko breadcrumbs, Parmesan, garlic powder, onion powder, salt, and pepper in the third.
- In a large skillet, heat a blend of unsalted butter and olive oil over medium-high heat until bubbly.
- Dredge each zucchini slice lightly in flour, shaking off excess.
- Dip each floured zucchini slice into the beaten eggs, letting excess egg drip back into the bowl.
- Coat each egg-dipped zucchini slice in the panko-Parmesan mixture, pressing gently to ensure thorough coating.
- Place coated zucchini slices in the hot skillet, cooking them in batches for 2-3 minutes on each side until golden brown.
- Remove fried zucchini from the skillet and let them drain on a plate lined with paper towels.
- Serve the crispy fried zucchini on a platter with lemon wedges and your favorite dipping sauces.
")