")
As I carefully layered each cheese and decorative treat on my board, a wave of excitement washed over me. This Halloween Cheese Board is more than just a festive snack; it’s a vibrant celebration of flavors designed to bring a smile to everyone gathered around. With its array of savory cheeses, succulent meats, and seasonal goodies, this eye-catching centerpiece transforms any get-together into a spooky feast. Not only is it a quick and easy option for entertaining, but it also allows for endless customization based on what you and your guests love. With a sprinkle of creativity, this board can easily reflect your style. Are you ready to dive into the hauntingly delicious details of creating your very own Halloween masterpiece?
Why Make a Halloween Cheese Board?
Excitement: Transform your gatherings into unforgettable spooky celebrations with this eye-catching cheese board that’s sure to impress!
Customizable: Mix and match seasonal treats and your favorite cheeses to suit every palate.
Flavorful: Delight in a mouth-watering combination of savory, sweet, and salty components that will have guests coming back for more.
Time-Saving: Quick to prepare and beautifully presented, it’s a hassle-free option for entertaining.
Fun Presentation: The striking colors and festive elements make it not just a treat for the taste buds but for the eyes as well!
Elevate your party with this Halloween Cheese Board, and check out ideas like Making Cheesecake Dip to complement your spooky spread!
Halloween Cheese Board Ingredients
For the Cheeses
- Sharp or Smoked Cheddar – Offers rich flavor and vibrant orange color; any orange cheese can be used.
- Wine Soaked Cheese (e.g., Purple Moon Cheddar) – Adds a unique purple hue and depth of flavor; consider any wine-infused cheese.
- Red Leicester – Provides a nutty, slightly crumbly texture; aged cheddar can be a great substitute.
- Pub Cheese – Creamy and flavorful, perfect for spreading; any flavored spreadable cheese works well too.
- Goat Gouda – Creamy and mild, it balances stronger flavors; swap for any young white cheese.
For the Meats
- Spanish Chorizo – Adds a spicy, rich flavor and deep color; other dry cured sausages can also be used.
- Salami – A must-have for variety in flavor; any type of salami, like Genoa or Soppressata, will do.
- Prosciutto – Infuses a touch of sweetness; capicola or another dry-cured ham can be substituted.
For the Crunch & Sweetness
- Pumpkin Seeds – Seasonal crunch and nutrition; you can roast your own or buy pre-packaged.
- Fresh Fruit (green apples, black or purple grapes) – Offers freshness and sweetness; feel free to use any seasonal fruit.
- Dried Fruit (e.g., apricots) – Adds a chewy texture and color contrast; raisins or figs can work as alternatives.
- Halloween Candy (candy corn, black licorice) – Adds a fun, festive touch; other Halloween-themed treats can be included.
- Pimento Olives – A spooky touch that resembles eyeballs; any stuffed olives can also fit this theme.
- Okra Snacks – Unique, crunchy snacks resembling witch’s fingers; substitute with your favorite crunchy snacks.
For Dipping & Base
- Mini Pretzels or Soft Pretzel Bites – Perfect for dipping into pub cheese; crispy breadsticks can serve as a substitute.
- Crackers – Provide a neutral base and added texture; any favorite dry cracker variety will enhance the board.
With these delightful ingredients for your Halloween Cheese Board, you’re all set to create a memorable spread that will enchant your guests and elevate your festive gathering!
Step‑by‑Step Instructions for Halloween Cheese Board
Step 1: Arrange Cheeses and Meats
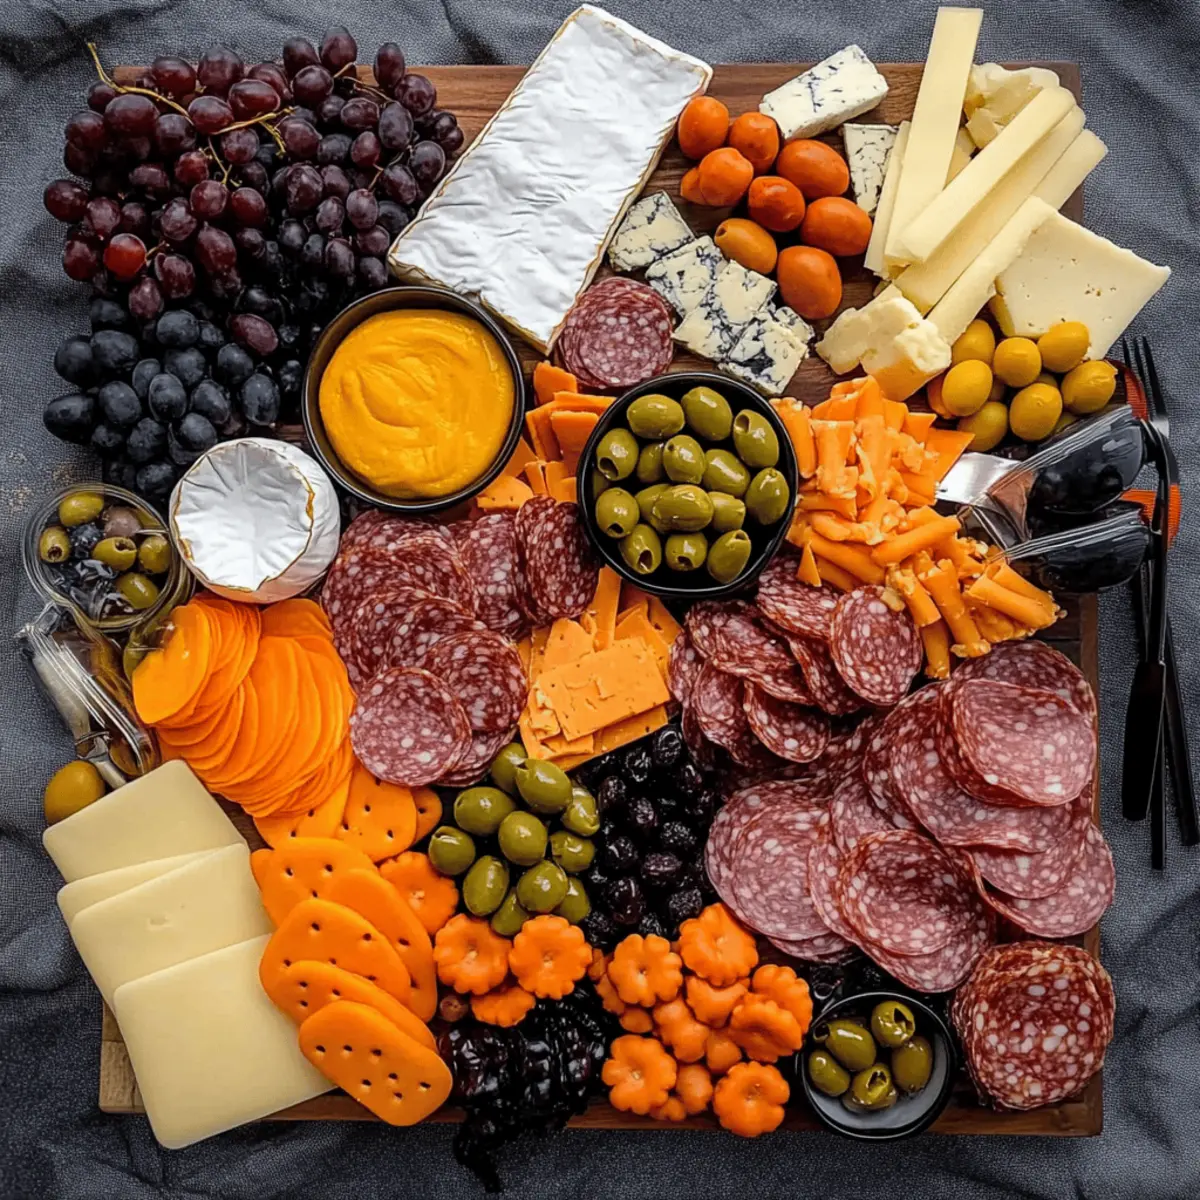
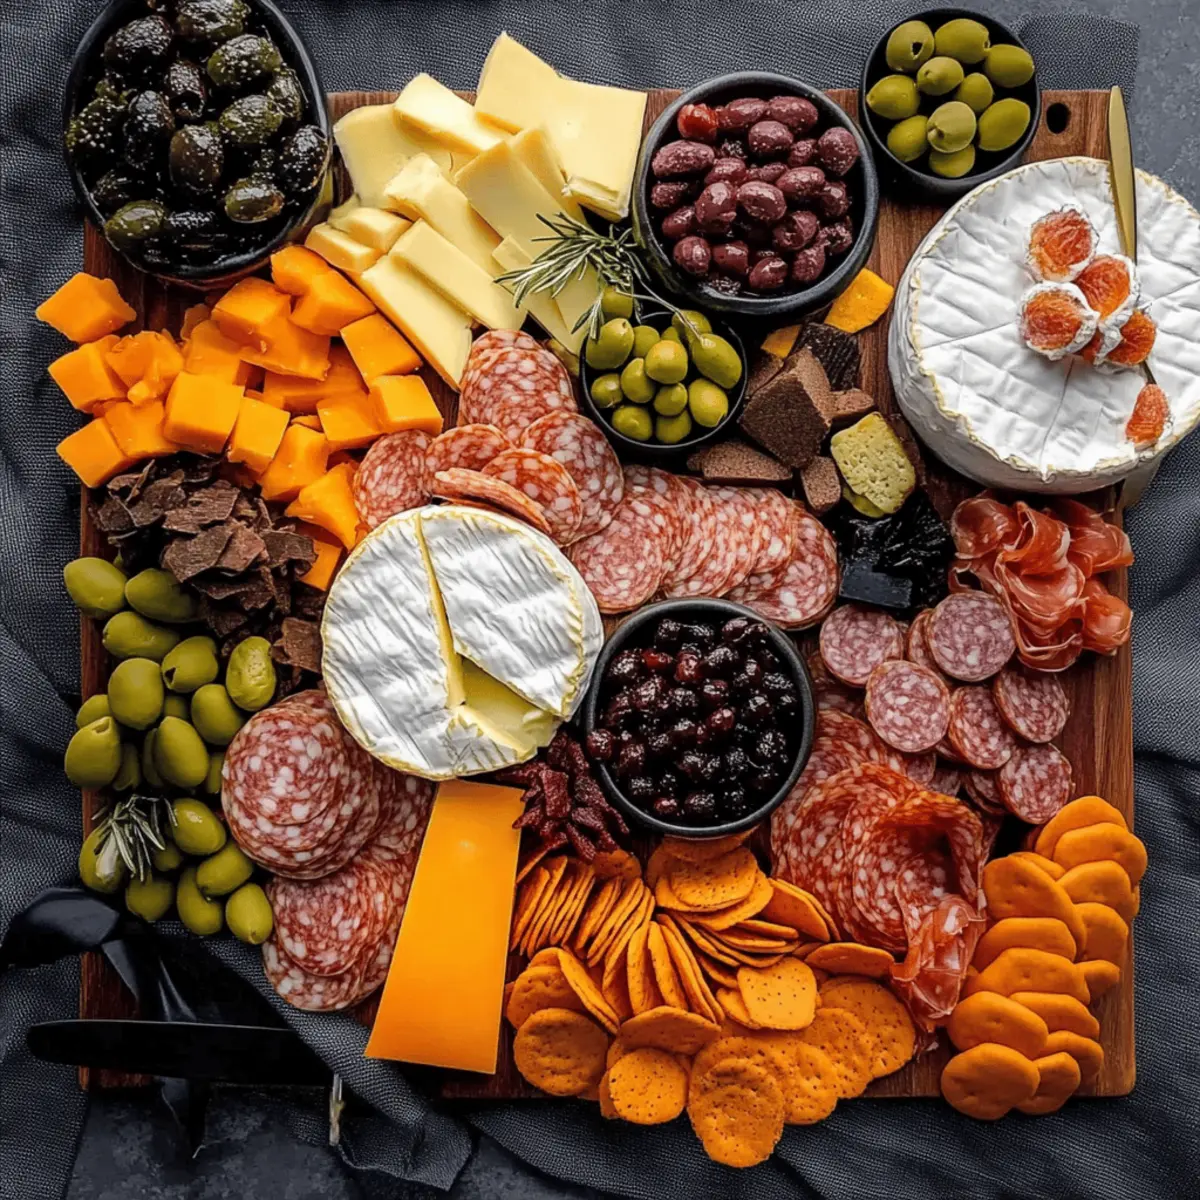
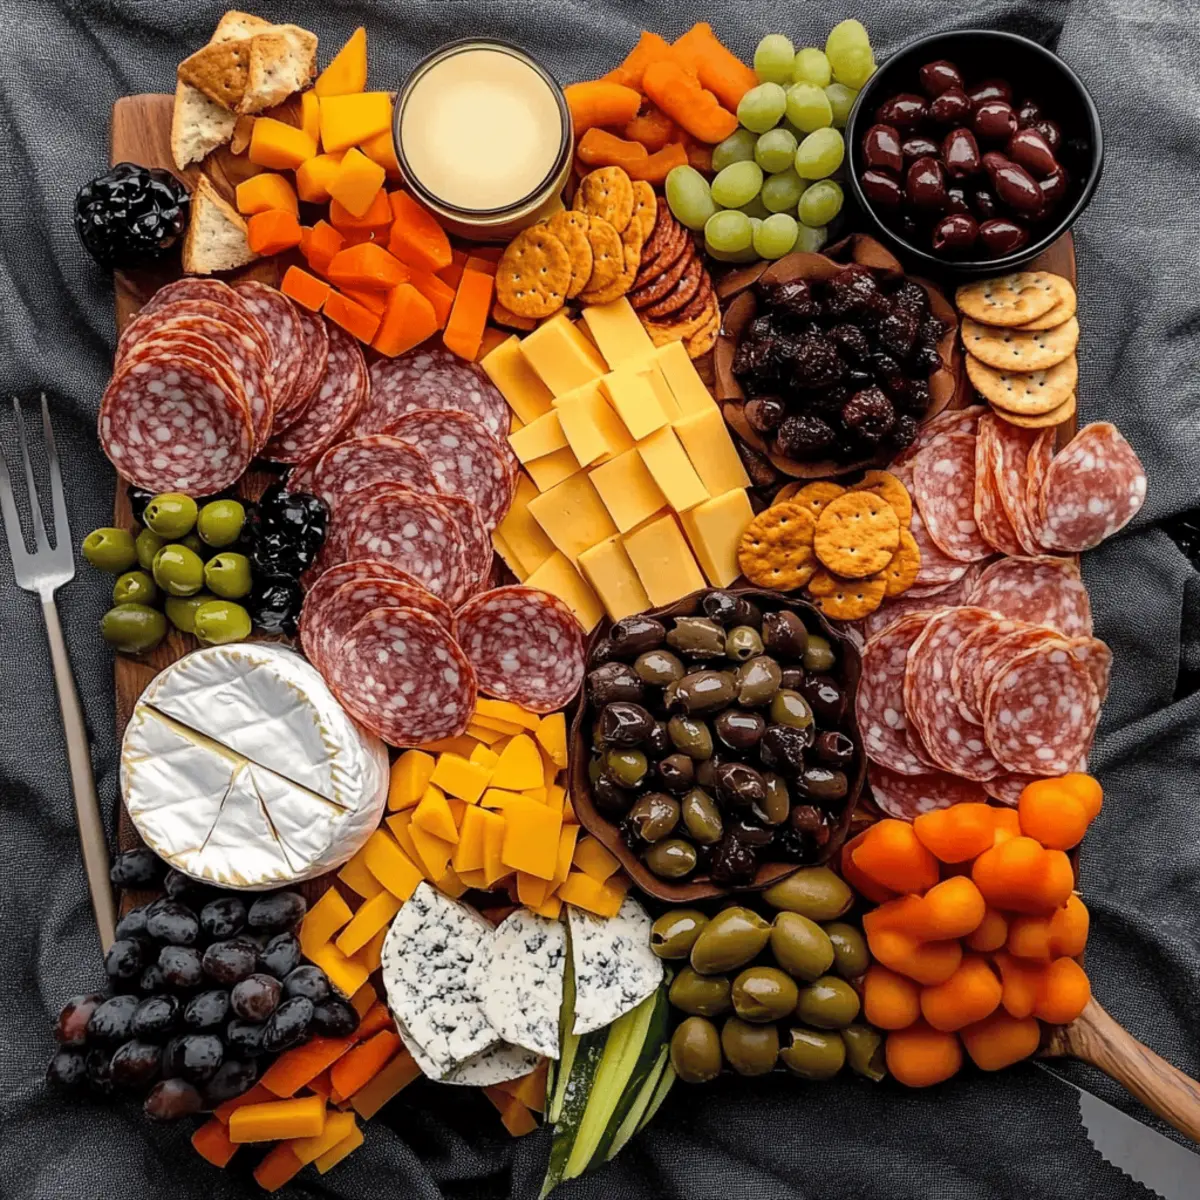
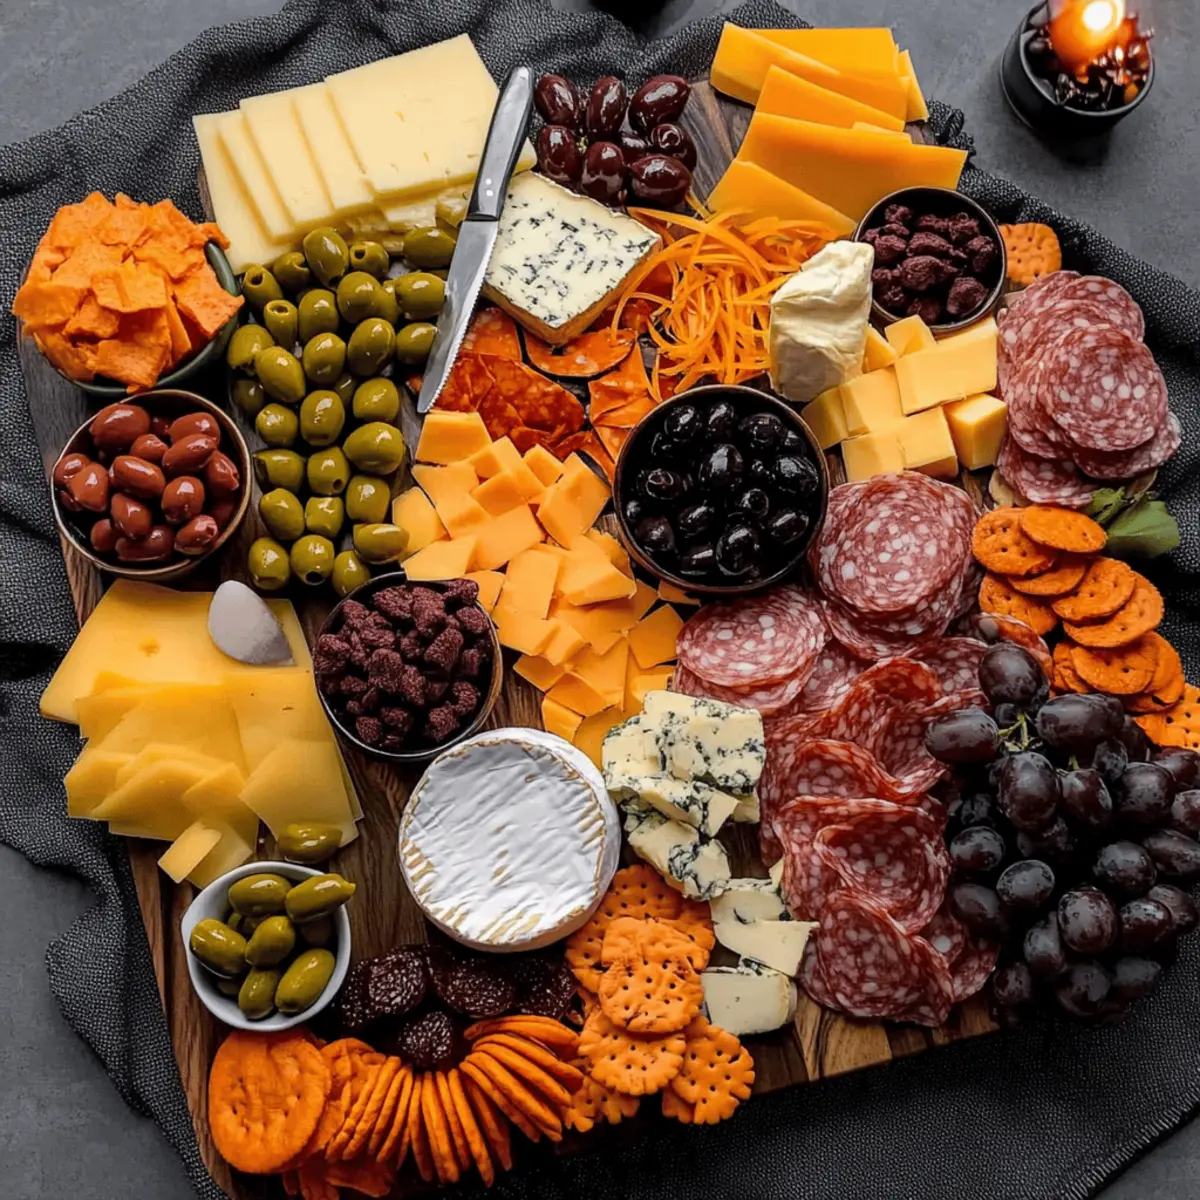
Begin by placing your sharp or smoked cheddar and wine soaked cheese in the center of your serving board, creating an inviting display. Position the red Leicester and goat Gouda nearby, filling in spaces with Spanish chorizo, salami, and prosciutto. Aim for an alternating pattern of colors and textures to make the Halloween Cheese Board visually appealing.
Step 2: Add Fresh Fruits and Crackers
Next, surround the central cheeses and meats with an assortment of fresh fruits like green apples and purple grapes. Scatter a variety of crackers around the board, ensuring there’s ample variety for guests to choose from. This vibrant mix not only enhances the presentation but also adds refreshing bursts of flavor that complement the cheeses.
Step 3: Position the Pub Cheese
In a small bowl, place the pub cheese and set it strategically on the board alongside mini pretzels for dipping. Position it close to the meat selections so that guests can easily enjoy a creamy bite with their savory snacks. This step ties the whole Halloween Cheese Board together, offering a fun dipping option.
Step 4: Distribute Extras
Now it’s time to add the extras that bring festive flair to your board! Use small bowls to hold pumpkin seeds, dried fruits, and Halloween candy for a sweet surprise. Disperse the pimento olives and okra snacks around the board as spooky accents, resembling eyeballs and witch’s fingers, respectively. This mix will delight your guests.
Step 5: Final Touches and Decor
For the finishing touches, consider adding thematic décor such as small Halloween figures or sprigs of herbs for greenery. Place any needed utensils, such as cheese knives or toothpicks, around the board for easy access. Ensure your Halloween Cheese Board is visually captivating and ready to impress guests, evoking the spirit of the season.
Step 6: Serve and Enjoy
Once your Halloween Cheese Board is complete, place it on a central table where guests can gather. Remind everyone to dig in and enjoy the tasty offerings. With its vibrant colors and delicious combinations, it is sure to be the highlight of your gathering, creating memories as sweet as the treats on the board!
Expert Tips for Your Halloween Cheese Board
-
Choose a Dark Base: Use a black pizza stone or dark wooden board to enhance your Halloween Cheese Board’s spooky vibe.
-
Color Coordination: Stick to a Halloween color palette with your cheeses and garnishes to create a visually stunning centerpiece.
-
Festive Containers: Opt for fun and themed bowls for dips and snacks to elevate the overall presentation and add charm.
-
Freshness is Key: Make sure all meats and cheeses are fresh and at room temperature for optimal flavor and enjoyment.
-
Add a Personal Touch: Feel free to swap in your family favorites or seasonal treats to make the Halloween Cheese Board uniquely yours.
How to Store and Freeze Halloween Cheese Board
Fridge: Keep your Halloween Cheese Board tightly covered in plastic wrap or in an airtight container for up to 3 days. This helps maintain freshness and prevents odors from affecting the flavors.
Freezer: While freezing is not ideal for a cheese board, you can freeze leftover cheeses and meats separately for up to 2 months. Thaw in the fridge before using.
Reheating: If you’ve included pub cheese, reheat it gently in the microwave or on the stovetop until warmed through. Enjoy your spooky flavors by making a new board or other dishes with the leftovers!
Room Temperature: For optimal flavor, serve the cheese and meats at room temperature; take them out of the fridge about 30 minutes before serving.
What to Serve with Festive Halloween Cheese Board
Create a deliciously spooky experience by pairing delightful flavors with your Halloween masterpiece.
-
Crispy Breadsticks: Serve alongside the cheese board for a satisfying crunch that complements the creamy textures.
-
Pumpkin Soup: This warm, spiced soup beautifully ties into the Halloween theme while providing a cozy touch to your meal.
-
Candied Apples: These sweet treats offer a fun contrast to the savory elements of the cheese board, perfect for a festive dessert.
-
Fruity Sangria: A refreshing drink with seasonal fruits adds a fruity twist, enhancing your gathering’s lively atmosphere.
-
Spicy Jalapeño Poppers: Their zesty kick elevates the richness of the cheeses, creating an exciting flavor profile on your table.
-
Halloween-Themed Desserts: Incorporating spooky cookies or decorations creates a cohesive festive look, ensuring a delightfully sweet end to the feast.
Each of these pairings beautifully balances the flavors and textures of your Halloween Cheese Board, inviting your guests to indulge in a truly festive atmosphere!
Make Ahead Options
Preparing the Halloween Cheese Board in advance is a fantastic way to save time on party day! You can cut and arrange the cheeses and meats up to 24 hours ahead; simply store them covered in the refrigerator to maintain freshness. Additionally, fruits can be sliced the night before; just sprinkle them with a bit of lemon juice to prevent browning. For extra convenience, portion out pumpkin seeds, dried fruits, and Halloween candy into small bowls and refrigerate them. On the day of your gathering, all you need to do is bring everything together on your serving board and garnish with festive decorations, ensuring a delightful and stress-free presentation!
Halloween Cheese Board Variations
Feel free to unleash your creativity and customize this festive cheese board however you like for a truly personal touch!
-
Local Cheeses: Swap cheeses for local favorites to highlight regional flavors that resonate with your guests. This can make the board even more special!
-
Nutty Crunch: Instead of pumpkin seeds, use a mix of assorted nuts for extra crunch and flavor complexity. Almonds or pecans can add a delightful twist!
-
Seasonal Fruits: Replace fresh fruits with whatever’s in season—think juicy pears or tart cranberries for a delightful change. Different fruits can evoke unique taste experiences.
-
Spicy Kick: Add some jalapeño or spicy pepper jack cheese for a fiery twist. This can elevate the entire board, making it memorable for spice lovers.
-
Herb Infusion: Consider infusing your cheeses with fresh herbs like rosemary or thyme for added fragrance and flavor depth. It’s a gourmet touch that’s truly inviting.
-
Gourmet Spreads: Introduce gourmet spreads like fig jam or honey to pair with your cheeses; they offer a sweet balance to the savory components. These can be showstoppers on their own!
-
Alternative Meats: Use prosciutto or bresaola in place of chorizo for a lighter, yet equally rich flavor profile. These delicate meats can provide a refreshing option on your board.
-
Themed Decor: Incorporate Halloween-themed cheese markers or labels to add a playful touch and keep the festive spirit alive as you gather around your spread.
In your exploration of flavors, don’t forget to check out ideas like Goat Cheese Appetizer or Variations Chopped Cheese for inspired accompaniments!
Halloween Cheese Board Recipe FAQs
How do I select the ripest fruits for my Halloween Cheese Board?
Absolutely! Look for fruits that are firm yet slightly tender—this indicates they are ripe. For grapes, choose those that are plump with a shiny skin; for apples, opt for vibrant colors without any dark spots. Freshness can elevate your board!
What is the best way to store leftover Halloween Cheese Board ingredients?
Make sure to keep your Halloween Cheese Board tightly covered in plastic wrap or transfer the leftover ingredients into an airtight container. They can last in the fridge for up to 3 days. This method helps keep everything fresh and prevents flavor contamination from other foods!
Can I freeze any components of the Halloween Cheese Board?
The more the merrier! You can freeze leftover cheeses and cured meats separately for up to 2 months. However, avoid freezing fresh fruits and crackers, as their texture will change. To freeze, wrap cheeses and meats tightly with plastic wrap, place them in a zip-top bag, and label it with the date. Thaw them in the refrigerator before using.
What should I do if my cheese is too hard or crumbly?
Very! If you find your cheese has hardened, try letting it sit at room temperature for about 30 minutes before serving. This will soften its texture and enhance the flavors. If the cheese appears crumbly, consider using it for a cheese spread mixed with cream cheese or yogurt to create a delightful dip!
Are there any dietary considerations I should be aware of?
Absolutely! Be mindful of your guests’ dietary restrictions. For example, check allergies to dairy or gluten; many cheeses contain these allergens. You can provide gluten-free crackers and ensure no cross-contamination occurs. If you’re serving vegetarian friends, skip the meats or offer plant-based alternatives that’s sure to please.
How can I make my Halloween Cheese Board more visually appealing?
Great question! Focus on creating contrast with colors and textures. Use a dark base like a black platter, and arrange your cheeses, fruits, and meats in a visually appealing layout. Fruits with vibrant colors, nuts, and seasonal treats can bring life to your board, making it not just delicious but also a feast for the eyes!
Spook-tacular Halloween Cheese Board for Festive Gatherings
Ingredients
Equipment
Method
- Begin by placing your sharp or smoked cheddar and wine soaked cheese in the center of your serving board, creating an inviting display. Position the red Leicester and goat Gouda nearby, filling in spaces with Spanish chorizo, salami, and prosciutto.
- Next, surround the central cheeses and meats with an assortment of fresh fruits like green apples and purple grapes. Scatter a variety of crackers around the board.
- In a small bowl, place the pub cheese and set it on the board alongside mini pretzels for dipping, close to the meat selections.
- Add extras that bring festive flair to your board! Use small bowls to hold pumpkin seeds, dried fruits, and Halloween candy. Disperse the pimento olives and okra snacks around the board.
- For the finishing touches, consider adding thematic décor such as small Halloween figures or sprigs of herbs. Place any needed utensils around the board.
- Once your Halloween Cheese Board is complete, place it on a central table and remind guests to dig in and enjoy the offerings.
")