")
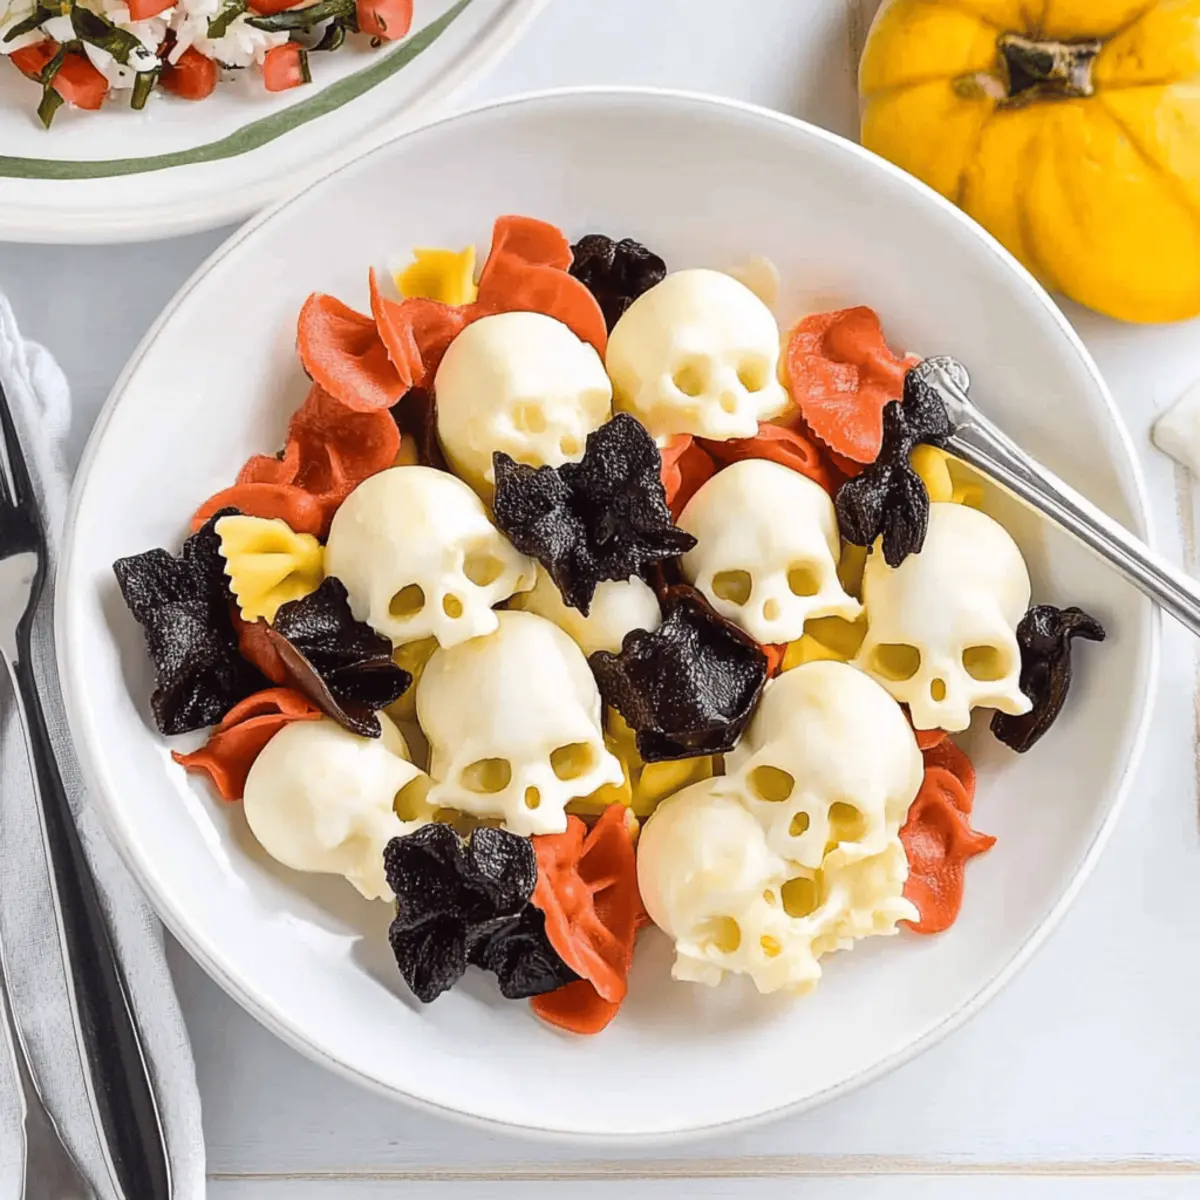
“Is that a spooky skeleton or a delicious snack?” I overheard someone ask at last year’s Halloween gathering. It’s amazing how food can transform the ordinary into something whimsical, and that’s exactly what these Mozzarella Cheese Skulls do! They’re not just adorable; they’re also a breeze to prepare, making them perfect for both novice cooks and seasoned chefs alike. With their unique shape and creamy texture, these delightful bites will add a playful touch to your Halloween parties or charcuterie boards, ensuring smiles all around. Plus, they can be made ahead of time, letting you enjoy the festivities with your guests. Are you ready to get creative and conjure up some culinary magic? Join me as we dive into this fun recipe!
Why Are These Cheese Skulls a Must-Try?
Whimsical Presentation: These spooky mozzarella cheese skulls will steal the show on any table, adding a fun twist to your celebrations.
Easy to Make: No culinary expertise required—just mix, mold, and bake! Perfect for both novice and experienced cooks.
Party Favorite: They’re a guaranteed hit at Halloween gatherings, ensuring your guests will be delighted and entertained.
Versatile Serving Options: Whether part of a charcuterie board with salami and olives or a unique addition to pasta salad, they fit right in! If you love unique appetizers, check out our Goat Cheese Appetizer.
Make Ahead Convenience: Prepare these delicious skulls in advance, allowing you to mingle and enjoy the spooky festivities without a hitch!
Get ready to impress with these delightful treats!
Mozzarella Cheese Skulls Ingredients
• Perfect for Halloween gatherings!
For the Skulls
- Mini Mozzarella Balls (Ciliegine) – Provide a creamy texture and are the base for the adorable skulls; if unavailable, use larger mozzarella balls cut into smaller pieces.
- Silicone Skull Mold – Essential for shaping the mozzarella into spooky skulls; ensure it’s heat-safe for oven use.
Feel the excitement of creating these whimsical Mozzarella Cheese Skulls; your Halloween parties will never be the same!
Step‑by‑Step Instructions for Mozzarella Cheese Skulls
Step 1: Preheat the Oven
Begin by preheating your oven to 350°F (175°C). This temperature is essential for achieving the perfect melt for the mozzarella cheese skulls, ensuring they maintain their shape while still softening nicely. While the oven heats, gather your ingredients and equipment, including the mini mozzarella balls and silicone skull mold.
Step 2: Prepare the Mozzarella
Once the oven is ready, take the mini mozzarella balls and gently blot them with a paper towel to remove any excess moisture. This step is crucial, as too much moisture can prevent the mozzarella from holding its shape in the skull mold. The cheese should feel slightly damp but not wet to the touch.
Step 3: Mold the Cheese Skulls
Next, place one mozzarella ball into each cavity of the silicone skull mold. Ensure that the mold is well-filled, as each cavity should be snugly packed. This process will shape the mozzarella into those charming skulls that will wow your Halloween guests.
Step 4: Bake the Skulls
Carefully transfer the filled skull mold to your preheated oven and bake for 8-10 minutes. Keep an eye on the mozzarella; it should soften just enough to take on the skull shape but not melt completely. You are looking for a slight gloss and a soft texture; the edges should still be intact and not oozing.
Step 5: Shape the Skulls
Once baked, remove the mold from the oven. Using the back of a spoon, gently press down on each mozzarella ball to help it fully take on the skull shape. Be cautious during this step, as the mold will be hot. This is where the fun begins, transforming the simple mozzarella into eerie cheese skulls!
Step 6: Cool the Cheese Skulls
Let the shaped mozzarella skulls cool for about 10 minutes. To speed up this process, you can refrigerate them for a few minutes. Cooling not only firms them up, making the unmolding easier, but also enhances their creamy texture, which pairs perfectly with dips and accompaniments.
Step 7: Unmold and Serve
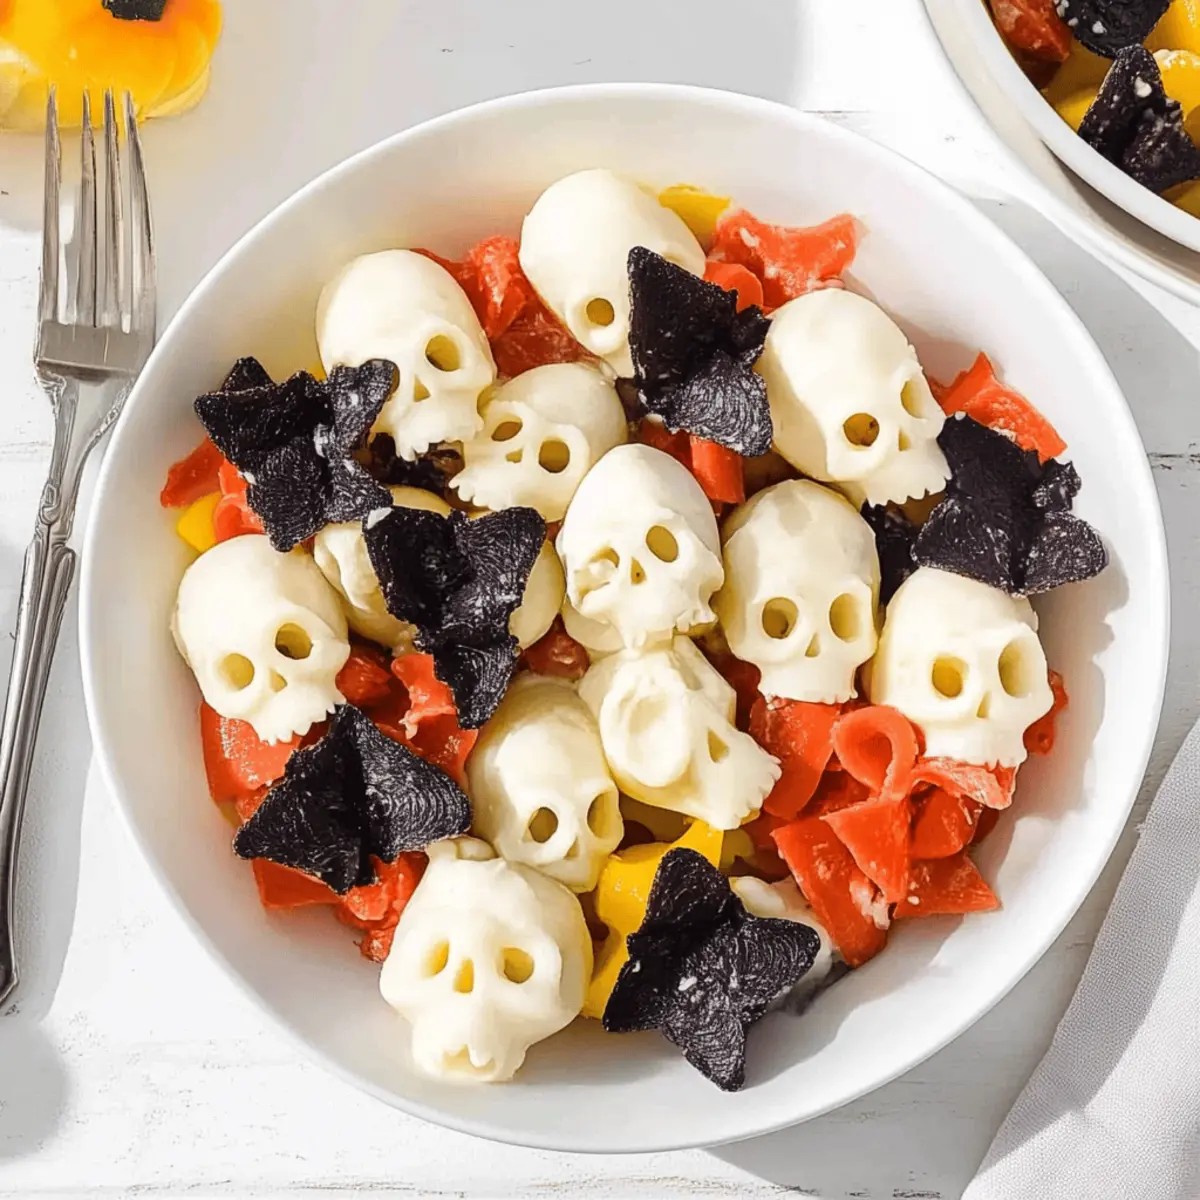
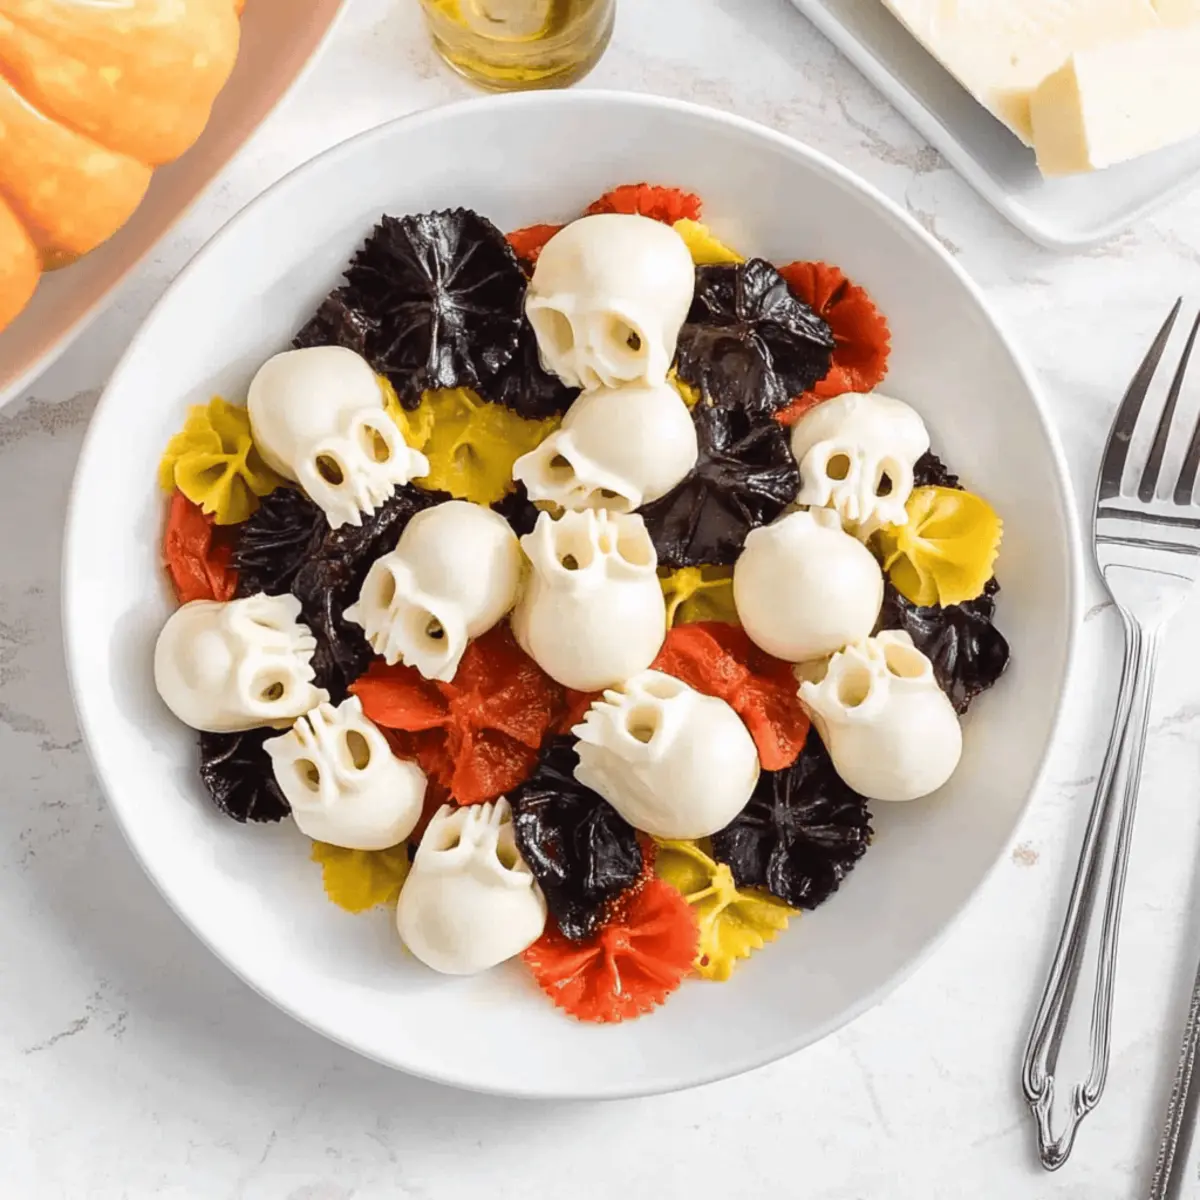
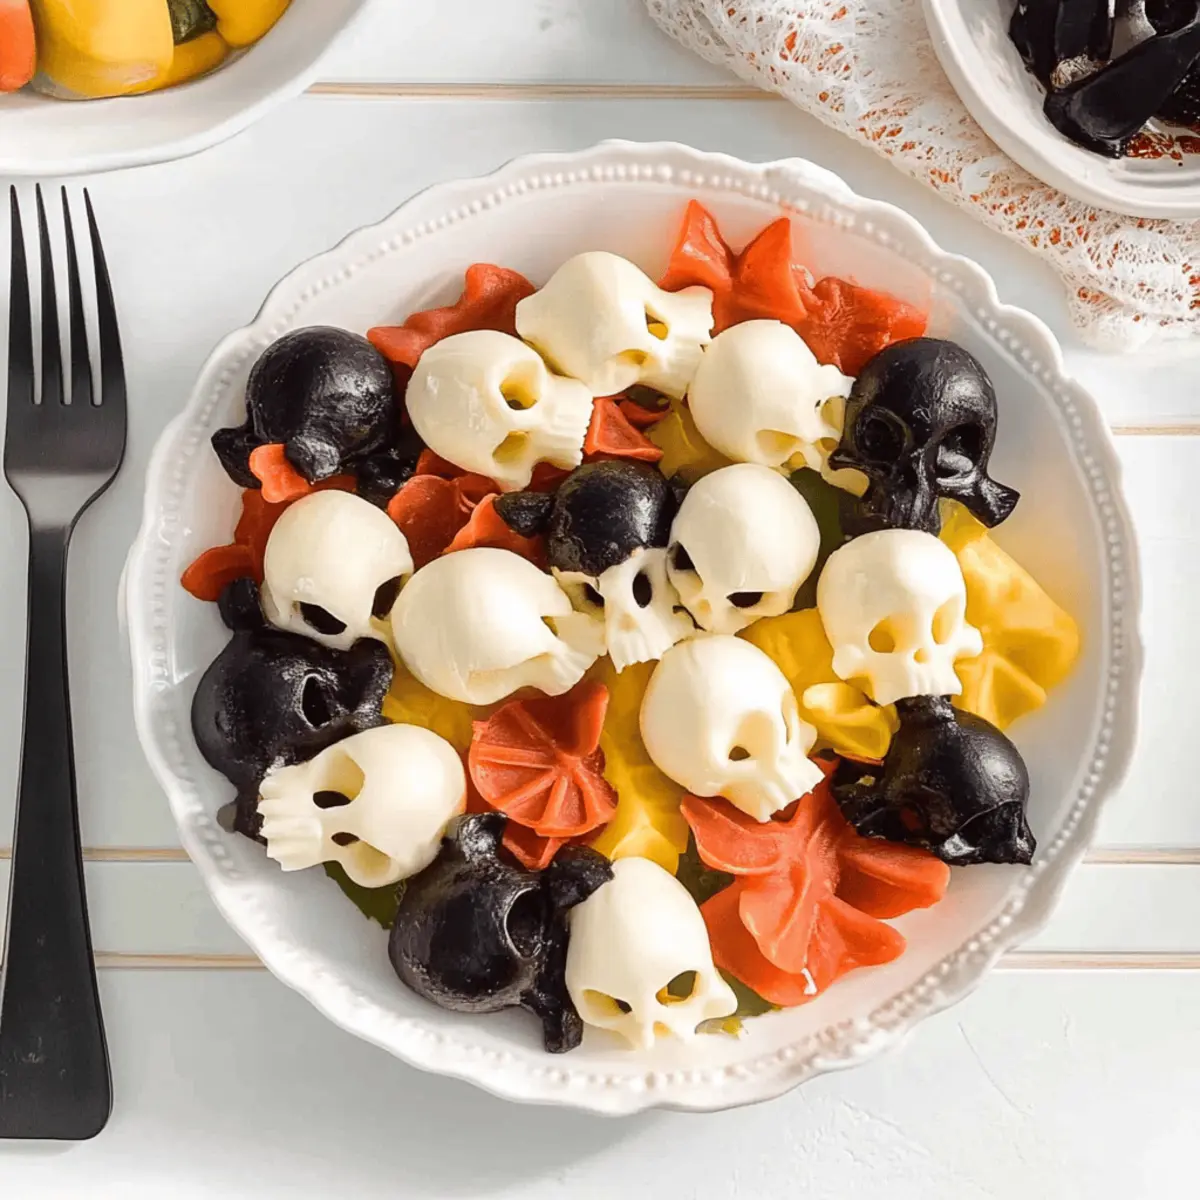
Finally, carefully flip the silicone mold and gently press to release each cheese skull. They should pop out with ease, revealing their spooky shapes. Arrange the mozzarella cheese skulls on your charcuterie board, or incorporate them into Halloween-themed dishes for a haunting presentation that will be the highlight of your celebration!
Expert Tips for Mozzarella Cheese Skulls
-
Blot Moisture Well: Excess moisture can ruin the shape of your mozzarella cheese skulls, so use a paper towel to thoroughly dry them before molding.
-
Choose Quality Molds: Make sure your silicone skull mold is oven-safe to prevent melting or distortion during baking. It makes all the difference in getting those spooky shapes just right!
-
Work While Warm: Shape the mozzarella quickly after baking while it’s soft and warm; this will ensure better adherence to the mold and a neater finish.
-
Experiment with Colors: Consider dyeing mozzarella with herbs or food coloring for a festive twist. This adds visual intrigue to your mozzarella cheese skulls at Halloween parties.
-
Serve Creatively: Present your cheese skulls with a variety of accompaniments such as olives, cured meats, or drizzles of balsamic glaze to enhance their flavor and visual appeal.
Make Ahead Options
These Mozzarella Cheese Skulls are perfect for busy home cooks looking to save time during the Halloween festivities! You can prepare the mini mozzarella balls in the silicone skull mold up to 24 hours in advance. Simply follow the first three steps of the recipe, then cover the filled mold with plastic wrap and refrigerate it overnight. When you’re ready to serve, bake the cheese skulls as directed, ensuring they maintain their delightful shape. To preserve quality, make sure the mozzarella balls are blotted well to prevent excess moisture, which can affect texture. Enjoy the simplicity and fun of these spooky treats with minimal last-minute effort!
What to Serve with Spooky Mozzarella Cheese Skulls
Elevate your Halloween festivities with delightful pairings that will mesmerize both young and old alike.
-
Salami and Olives: The savory flavors complement the creamy mozzarella, providing a nice contrast that excites the palate.
-
Crunchy Vegetables: Think celery sticks, carrots, and bell peppers for a fresh crunch; they cleanse the palate beautifully between bites of cheese.
-
Dark Pasta Salad: Toss with ingredients like sun-dried tomatoes and black olives to create a vibrant yet spooky dish that harmonizes with the cheese skulls.
-
Garlic Bread: The warmth and garlic flavor create an inviting atmosphere, enhancing the cheerful, festive vibe of your gathering.
-
Balsamic Glaze: A drizzle adds a touch of tangy sweetness, elevating the cheese flavor and drawing attention to the spooky presentation.
-
Rich Red Wine: A glass of merlot or a spicy syrah balances the whimsical element of the skulls while enhancing the overall experience.
Embrace the spirit of Halloween with these fitting accompaniments that make your table a feast for the senses!
How to Store and Freeze Mozzarella Cheese Skulls
Fridge: Store leftover mozzarella cheese skulls in an airtight container in the refrigerator for up to 3 days. This keeps their creamy texture and prevents them from drying out.
Freezer: If you wish to freeze them, place the cheese skulls in a single layer on a baking sheet, freeze until solid, then transfer to a freezer-safe bag or container for up to 2 months.
Reheating: To reheat, thaw in the refrigerator overnight, then warm in the oven at 350°F (175°C) for about 5 minutes, just until they’re soft but not melting.
Serving Tips: For an extra touch, consider adding fresh herbs or a drizzle of olive oil on top before serving for enhanced flavor!
Mozzarella Cheese Skulls Variations
Feel free to let your creativity shine by customizing these mozzarella cheese skulls to suit your taste!
-
Herbed Delight: Mix in fresh herbs like basil or oregano with the mozzarella for a fragrant flavor boost. This brings an extra layer of depth that pairs perfectly with a charcuterie spread.
-
Spicy Kick: Add a pinch of red pepper flakes or a dash of hot sauce to the mozzarella mixture for a delightful kick that balances the creaminess beautifully. Spice lovers will appreciate this fun twist!
-
Cheesy Blend: Combine mozzarella with a bit of sharp cheddar or pepper jack for a flavor-packed blend. This variation adds both extra richness and a surprising twist that can be savored with every bite.
-
Colorful Treats: For added festiveness, consider mixing vegetable powders (like beet or spinach) into the mozzarella to give them a colorful hue. Visually striking cheese skulls are sure to impress your guests!
-
Sweet & Savory: Drizzle a little honey or agave over the served mozzarella skulls for a unique sweet and savory pairing. This unexpected combination elevates your snack game to a whole new level.
-
Mini Skewers: Serve the mozzarella skulls on mini skewers with cherry tomatoes and olives for a grab-and-go option. They transform into an interactive appetizer that guests can easily enjoy while mingling.
-
Dipped Delight: Serve with a side of balsamic glaze or pesto for dipping, enhancing the flavor and adding a perfect finishing touch. These sauces not only elevate the dish visually but also enhance the culinary experience.
-
Halloween Spirit: Incorporate other spooky elements like black olives or sliced radishes shaped like bats to accompany your cheese skulls, creating an entire themed spread. Elevate your Halloween festivities by making it a feast for the eyes too!
If you’re searching for more inspiration on delightful snacks, check out our Variations Chopped Cheese for unique ways to enjoy flavorful, hearty bites!
Mozzarella Cheese Skulls Recipe FAQs
What type of mozzarella works best for this recipe?
Absolutely! Mini mozzarella balls, known as ciliegine, are perfect for creating these cheese skulls due to their creamy texture and size. If you can’t find these small ones, larger mozzarella balls work too; simply cut them into smaller pieces to fit into the silicone mold.
How should I store leftovers after making mozzarella cheese skulls?
Very! Store any leftover mozzarella cheese skulls in an airtight container in the refrigerator. They will stay fresh for up to 3 days. Just make sure the container is sealed well to retain their creamy texture!
Can I freeze mozzarella cheese skulls? How?
Certainly! If you want to freeze them, place the assembled cheese skulls in a single layer on a baking sheet and freeze until solid. This should take about 1-2 hours. Once they’re frozen, transfer the skulls to a freezer-safe bag or container. They can be kept in the freezer for up to 2 months. To serve, thaw them in the refrigerator overnight and then warm them in the oven at 350°F (175°C) for about 5 minutes until soft.
What if the mozzarella doesn’t hold its shape?
No worries! If your cheese skulls fall apart or don’t hold their shape, this is often due to excess moisture. Be sure to blot the mozzarella balls thoroughly before molding them. If they do not hold shape after baking, you can gently re-mold them while warm, using the back of a spoon to press them more firmly into the skull shape.
Are mozzarella cheese skulls safe for pets?
Good question! While mozzarella itself isn’t toxic to dogs or cats, it’s high in fat and should only be given in moderation. Always check with your veterinarian before sharing any new foods with your furry friends.
How can I enhance the flavor of my mozzarella cheese skulls?
I recommend! Consider incorporating fresh herbs, such as basil or oregano, into the mozzarella before molding. You can also drizzle the finished skulls with pesto or balsamic glaze, or even add a sprinkle of garlic powder to elevate the flavor profile.
Delicious Mozzarella Cheese Skulls for Spooky Celebrations
Ingredients
Equipment
Method
- Begin by preheating your oven to 350°F (175°C).
- Once the oven is ready, take the mini mozzarella balls and gently blot them with a paper towel to remove any excess moisture.
- Next, place one mozzarella ball into each cavity of the silicone skull mold and ensure that the mold is well-filled.
- Carefully transfer the filled skull mold to your preheated oven and bake for 8-10 minutes.
- Once baked, remove the mold from the oven and gently press down on each mozzarella ball to help it fully take on the skull shape.
- Let the shaped mozzarella skulls cool for about 10 minutes, or refrigerate to speed up the process.
- Finally, carefully flip the silicone mold and gently press to release each cheese skull.
")