")
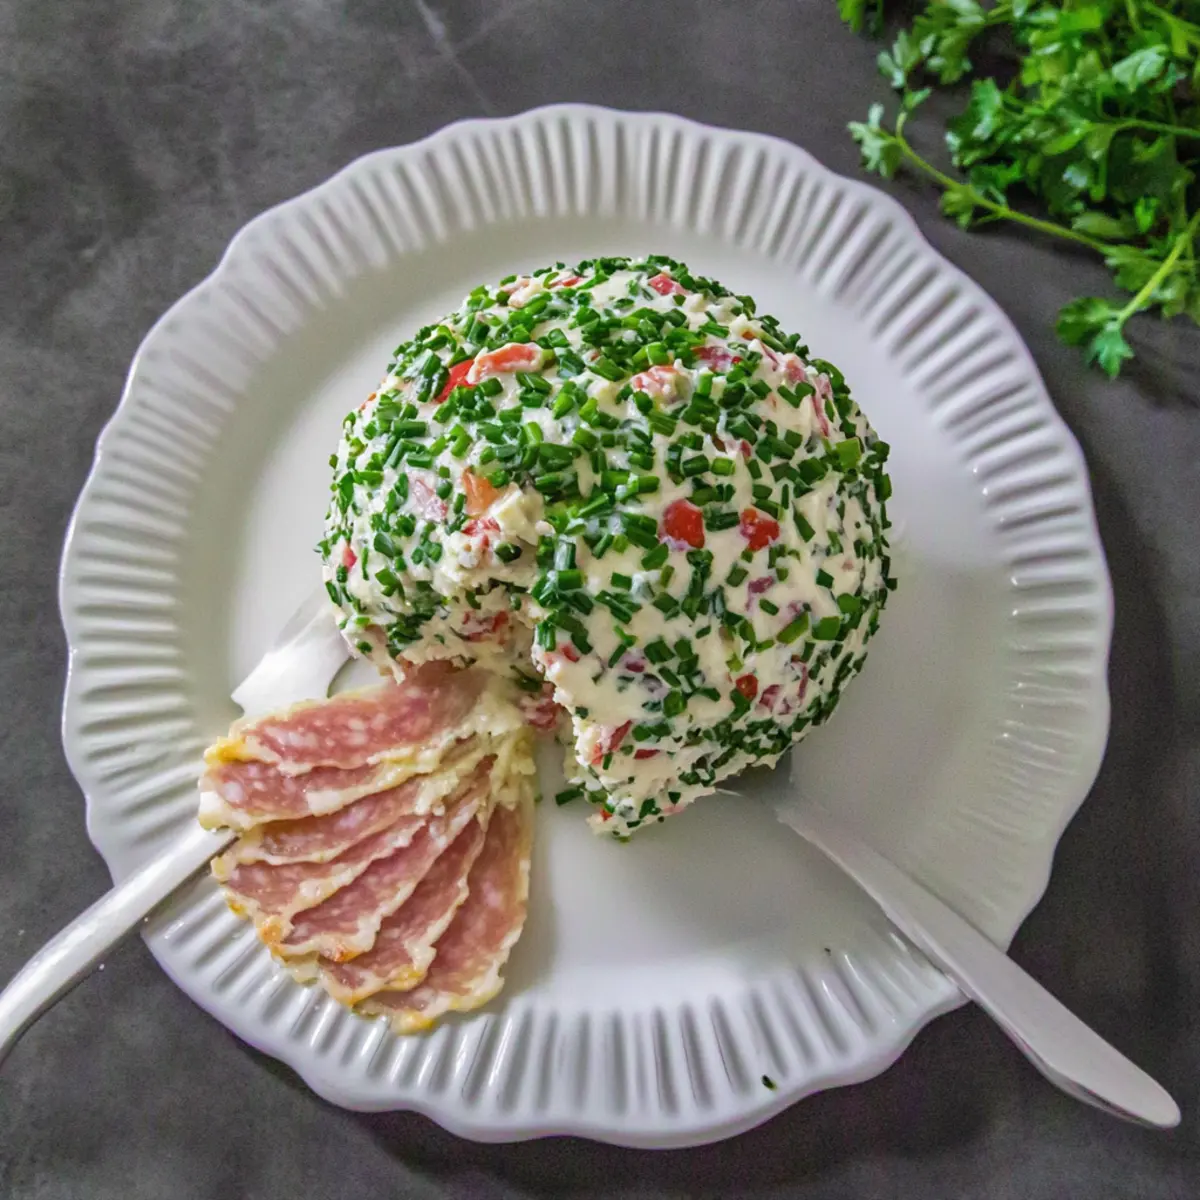
As I unwrapped the creamy goodness nestled in my fridge, the air filled with an irresistible blend of Italian herbs and tangy olives—it immediately took me back to the bustling streets of New Orleans. This Muffuletta Cheese Ball is not just an appetizer; it’s a vibrant nod to the classic muffuletta sandwich that captures the essence of a lively gathering. With its easy preparation and customizable twists, this delightful cheese ball is perfect for impressing guests or enjoying during a cozy night in. Plus, it’s keto-friendly and gluten-free, making it a versatile option for everyone at the table. Are you ready to elevate your snacking game and indulge in the flavors of New Orleans? Let’s dive in!

Why is this cheese ball irresistible?
Unforgettable Flavor: The combination of cream cheese, zesty olives, and savory meats creates a flavor explosion that captures the spirit of New Orleans.
Quick & Easy: This appetizer comes together in minutes! Simply mix, shape, and chill for an effortless crowd-pleaser.
Customizable Crunch: Whether you opt for different cheeses or add roasted peppers, feel free to personalize it to suit your taste.
Diet-Friendly: It caters to various dietary needs by being both keto-friendly and gluten-free when paired with suitable snacks.
Perfect for Any Event: Serve it at parties, picnics, or cozy nights in; it’s a showstopper that will delight friends and family alike. Check out Variations Chopped Cheese for even more inspiration!
Muffuletta Cheese Ball Ingredients
For the Base
• Cream Cheese – Provides the creamy base; use full-fat for the best texture.
• Olive Oil – Enhances creaminess and mouthfeel; can substitute with a light vegetable oil.
For the Flavor
• Salad Olives – Adds salty and tangy flavor; substitute with green olives if desired.
• Dried Italian Seasoning – Contributes herbal flavor; fresh herbs can be used in a pinch.
• Garlic (2 cloves, pressed) – Boosts overall flavor; garlic powder works for a milder taste.
• Red Onion – Adds a slight crunch and sharpness; yellow or white onion can be substituted.
For the Cheesy Goodness
• Provolone Cheese – Provides rich, savory flavor; swap with mozzarella or cheddar if needed.
• Salami (chopped) – Offers a meaty, spicy kick; use an Italian cold cut like capicola or pepperoni as an alternative.
For the Final Touch
• Chives – Adds color and fresh onion flavor; other herbs like parsley can be used as a garnish.
Discover how this Muffuletta Cheese Ball brings the taste of New Orleans to your gathering!
Step‑by‑Step Instructions for Muffuletta Cheese Ball
Step 1: Prepare the Cream Cheese
In a medium mixing bowl, use a hand mixer or stand mixer to beat 8 ounces of softened cream cheese until smooth and creamy, about 2-3 minutes. This forms the luscious base of your Muffuletta Cheese Ball, ensuring a fluffy texture that will hold all the flavors to come.
Step 2: Mix in Flavorful Ingredients
Add 1 cup of chopped salad olives, 2 tablespoons of olive oil, 1 teaspoon of dried Italian seasoning, 2 pressed garlic cloves, and ¼ cup of finely chopped red onion to the bowl. Stir all ingredients together until well combined and evenly distributed. The mixture should be vibrant and colorful, reflecting the delicious blend of flavors.
Step 3: Incorporate the Cheeses and Meats
Next, fold in ½ cup of shredded provolone cheese and ¼ cup of chopped salami. Gently combine everything until the meats and cheese are evenly mixed throughout the creamy base. The salami adds a delightful spicy kick, while the provolone contributes a rich savoriness that truly elevates your Muffuletta Cheese Ball.
Step 4: Shape and Chill
Lay out a large piece of plastic wrap on a clean surface. Spoon the cheese mixture onto the center and use the plastic wrap to shape it into a ball. Wrap it tightly and refrigerate for at least 1 hour. Chilling allows the flavors to meld beautifully and makes it easier to handle once set.
Step 5: Coat with Fresh Herbs
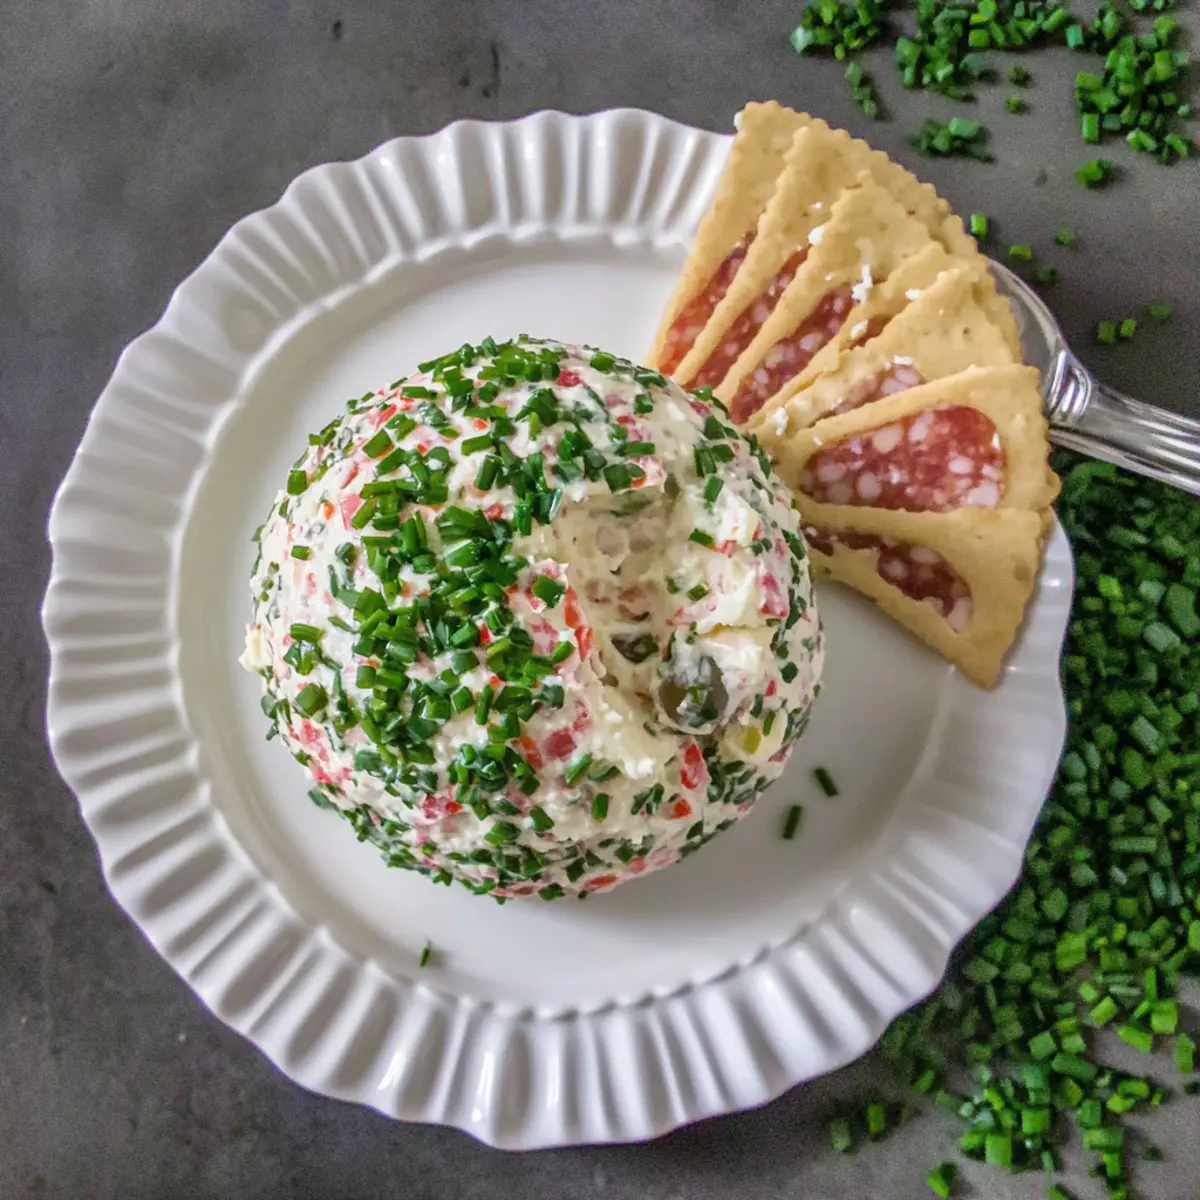
After chilling, remove the cheese ball from the plastic wrap. On a plate, spread ¼ cup of chopped chives to create an herbaceous coating. Roll the cheese ball in the chives until fully covered, adding a fresh, colorful touch. This step not only enhances flavor but also gives a visually appealing finish to your Muffuletta Cheese Ball.
Step 6: Serve and Enjoy
Transfer the finished Muffuletta Cheese Ball to your serving platter, ready to impress your guests! Serve alongside a selection of crispy crackers, sliced baguette, or fresh veggies for dipping. The creamy, savory goodness will have everyone reaching for more, making it a perfect highlight at any gathering.
Expert Tips for the Best Muffuletta Cheese Ball
Chill Time Matters: Make sure to chill your cheese ball for at least one hour; this not only improves flavor but helps it to hold its shape for easier serving.
Quality Counts: Use high-quality ingredients, especially in olives and cheeses, as this greatly enhances the overall taste of your Muffuletta Cheese Ball.
Serving Knife Trick: To avoid mess while serving, use a cheese knife or a sturdy spatula; this makes for easy spreading on crackers or veggies.
Customize Wisely: Feel free to experiment with different types of cheeses or add extra herbs, but remember that each addition will change the overall flavor.
Make-Ahead Convenience: You can prepare this cheese ball up to two days in advance; as it sits, the flavors meld beautifully, intensifying the experience.
What to Serve with Muffuletta Cheese Ball
The perfect appetizer deserves equally delightful accompaniments to create a memorable dining experience.
- Crispy Crackers: These add a satisfying crunch that balances the creamy cheese ball, enhancing each bite with texture.
- Fresh Veggies: Sliced cucumbers and bell peppers provide a refreshing contrast to the rich flavors, perfect for dipping.
- Sliced Baguette: A warm, toasted baguette brings a comforting element that pairs beautifully with the savory notes of the cheese ball.
- Marinated Olives: Adding an extra briny punch enhances the muffuletta experience, bringing out the cheese ball’s olive flavors.
- Chunky Salsa: A zesty, chunky salsa can brighten the dish, providing a fresh touch that plays wonderfully with the cheese’s creaminess.
- Sparkling Wine or Prosecco: These drinks complement the rich textures with their effervescence, making your gathering feel extra festive.
Muffuletta Cheese Ball Variations
Feel free to get creative and customize your Muffuletta Cheese Ball for a unique taste experience!
-
Vegetarian Option:
Omit the salami and add extra olives or roasted bell peppers for a savory twist. The rich blend of flavors creates a satisfying vegetarian delight. -
Nutty Crunch:
Incorporate ½ cup of chopped walnuts or pecans for added crunch and flavor. The nuts provide a delightful textural contrast that enhances the overall experience. -
Different Cheeses:
Swap the provolone for crumbly feta or tangy goat cheese to experiment with new flavors. Each cheese will bring its own character, making each bite an adventure. -
Spicy Kick:
Add a teaspoon of red pepper flakes for heat. This little addition can take your cheese ball from mild to fiery, perfect for those who like a little spice. -
Herb Variation:
Mix in fresh herbs like dill or basil instead of chives for an aromatic twist. These herbs elevate the flavor profile and add freshness that dances on your palate. -
Creamy Alternative:
Use Greek yogurt instead of cream cheese for a tangy, lighter version that maintains creaminess while being a bit healthier. The yogurt also adds a layer of flavor that enhances the dish. -
Smoky Flavor:
Incorporate smoked salami or a touch of smoked paprika for a rich, smoky background. This variation adds depth and makes the cheese ball even more intriguing. -
Italian Twist:
Add sun-dried tomatoes or artichoke hearts for an Italian flair. These ingredients truly amplify the New Orleans inspiration, turning your cheese ball into a vibrant taste sensation.
Discover how a simple Muffuletta Cheese Ball can turn into a delightful experience, and don’t forget to try it with an array of crackers, fresh veggies, or even a lovely baguette. If you’re interested in similar culinary journeys, consider checking out Goat Cheese Appetizer for more delicious ideas!
Make Ahead Options
These Muffuletta Cheese Balls are perfect for meal prep, saving you time when entertaining! You can prepare the cheese ball mixture up to 24 hours in advance; simply follow the instructions to mix the cream cheese, olives, and meats, then shape it into a ball and wrap it tightly in plastic wrap. Refrigerate it until you’re ready to serve, ensuring each flavor has time to meld for an even better taste. To maintain quality, make sure it’s tightly wrapped to prevent drying out. When ready to serve, simply unwrap the cheese ball, coat it with chopped chives, and enjoy your delicious appetizer that’s just as festive as fresh!
How to Store and Freeze Muffuletta Cheese Ball
Fridge: Keep the Muffuletta Cheese Ball wrapped tightly in plastic wrap or an airtight container for up to 5 days. This preserves its fresh flavors and creamy texture.
Freezer: For longer storage, freeze the cheese ball for up to 1 month. Wrap it closely in plastic wrap, then place it in a freezer-safe bag to prevent freezer burn.
Thawing: To enjoy, simply transfer the cheese ball to the fridge for 6-8 hours before serving. Allow it to reach room temperature before serving to enhance its flavors.
Reheating: There’s no need to reheat; serve chilled or at room temperature for the best experience. Enjoy this delightful appetizer with your favorite crackers or veggies!
Muffuletta Cheese Ball Recipe FAQs
What kind of olives should I use for the Muffuletta Cheese Ball?
For the best flavor, use salad olives, which are typically a mix of green and black olives. They provide that perfect salty and tangy kick. If you prefer a milder taste, green olives can be a great substitute.
How long can I store the Muffuletta Cheese Ball in the fridge?
Absolutely! You can store the cheese ball in the refrigerator for up to 5 days. Just make sure it’s tightly wrapped in plastic wrap or placed in an airtight container to keep its creamy texture and flavors fresh.
Can I freeze the Muffuletta Cheese Ball?
Yes, you can freeze the cheese ball for up to 1 month! After shaping it, wrap it tightly in plastic wrap and place it in a freezer-safe bag. When you’re ready to enjoy, thaw it in the fridge for about 6-8 hours before serving to let it reach room temperature.
What if my cheese ball is too soft to handle?
If your Muffuletta Cheese Ball is too soft, it may need a bit more chill time in the refrigerator. I recommend letting it sit for another 30 minutes to an hour. If it’s still too soft, consider adding a little extra shredded cheese to help firm it up when mixing.
Is this cheese ball safe for people with dietary restrictions?
Absolutely! The Muffuletta Cheese Ball can be tailored to meet various dietary needs. It’s keto-friendly and can be gluten-free when served with appropriate accompaniments like gluten-free crackers. If you have nut allergies, just ensure any additional toppings or mix-ins are safe.
How can I add some crunch to the Muffuletta Cheese Ball?
To add a delightful crunch, consider incorporating chopped nuts like walnuts or pecans directly into the cheese mixture. You could also serve the cheese ball with crunchy veggies like carrot sticks or bell pepper slices for dipping. Feel free to modify it according to your taste!

Muffuletta Cheese Ball: A Flavorful Twist on a Classic Appetizer
Ingredients
Equipment
Method
- In a medium mixing bowl, use a hand mixer or stand mixer to beat cream cheese until smooth and creamy, about 2-3 minutes.
- Add chopped salad olives, olive oil, dried Italian seasoning, pressed garlic cloves, and finely chopped red onion. Stir until well combined.
- Fold in shredded provolone cheese and chopped salami. Gently combine until evenly mixed.
- Spoon the cheese mixture onto plastic wrap, shape into a ball, wrap tightly, and refrigerate for at least 1 hour.
- Remove from plastic wrap and roll in chopped chives until fully covered.
- Transfer the finished cheese ball to a serving platter and serve with crispy crackers, sliced baguette, or fresh veggies.
")