Imagine sinking your fork into a creamy, peanut butter-infused cheesecake studded with crunchy Butterfinger candy pieces, all without even turning on your oven. Sounds heavenly, right? This No-Bake Butterfinger Cheesecake Recipe delivers rich, indulgent flavors in an easy-to-make dessert that’s perfect for parties, celebrations, or when you simply want to treat yourself.
The combination of an Oreo crust, creamy peanut butter cheesecake filling, and a topping loaded with Butterfinger pieces, chocolate, and caramel drizzle is pure bliss. Let’s dive into how you can make this show-stopping dessert right in your kitchen!
Why You’ll Love This No-Bake Butterfinger Cheesecake Recipe
This cheesecake is the ultimate crowd-pleaser, and here’s why:
- No Oven Required: Perfect for hot summer days or when you don’t want to bake.
- Rich and Creamy Filling: The combination of cream cheese, peanut butter, and whipped topping creates a light yet decadent texture.
- Butterfinger Crunch: The iconic candy adds bursts of crunchy, peanut-buttery goodness in every bite.
- Easy and Quick: With no baking involved, this recipe comes together in no time.
- Versatile and Beautiful: This dessert looks as good as it tastes, making it ideal for any occasion.
Ingredients for No-Bake Butterfinger Cheesecake
Let’s take a closer look at everything you’ll need for this decadent dessert:
For the Crust
| Ingredient | Quantity |
|---|---|
| Oreo cookies | 36 (crushed into fine crumbs) |
| Unsalted butter | 6 tablespoons (melted) |
For the Filling
| Ingredient | Quantity |
|---|---|
| Cream cheese | 24 ounces (softened) |
| Creamy peanut butter | 1 cup |
| Powdered sugar | 1 cup |
| Whipped topping | 8 ounces |
| Butterfinger candy bar | 4 ounces (chopped) |
For the Topping
| Ingredient | Quantity |
|---|---|
| Butterfinger candy bar | 4 ounces (chopped) |
| Dark chocolate syrup | As needed |
| Caramel syrup | As needed |
Step-by-Step Instructions for No-Bake Butterfinger Cheesecake
Follow these simple steps to make this delicious dessert:
1. Prepare the Crust
- Crush the Oreo Cookies:
- Place the Oreo cookies in a food processor and pulse until they are fine crumbs.
- Alternatively, put the cookies in a resealable bag and crush them with a rolling pin.
- Mix the Ingredients:
- In a medium-sized bowl, combine the Oreo crumbs with the melted butter. Stir until the crumbs are evenly moistened.
- Form the Crust:
- Press the crumb mixture firmly into the bottom of a 9-inch springform pan, creating an even layer.
- Chill the crust in the refrigerator while you prepare the filling.
2. Make the Cheesecake Filling
- Cream the Cheese and Peanut Butter:
- In a large mixing bowl, beat the softened cream cheese and peanut butter together until the mixture is smooth and creamy.
- Add Sugar:
- Mix in the powdered sugar until it is fully incorporated.
- Fold in Whipped Topping:
- Gently fold in the whipped topping to create a light, fluffy filling. Avoid overmixing to maintain the airiness.
- Add Butterfinger Pieces:
- Stir in the chopped Butterfinger candy pieces, ensuring they are evenly distributed throughout the filling.
3. Assemble the Cheesecake
- Fill the Crust:
- Spoon the cheesecake filling onto the prepared Oreo crust. Spread it evenly to the edges and smooth the top with a spatula.
- Chill:
- Cover the cheesecake with plastic wrap or aluminum foil and refrigerate for at least 4 hours, or preferably overnight, to allow it to set completely.
4. Add the Topping
- Decorate with Butterfinger Pieces:
- Once the cheesecake is set, sprinkle the remaining chopped Butterfinger candy bar pieces over the top.
- Drizzle Syrups:
- Drizzle dark chocolate syrup and caramel syrup over the cheesecake in a decorative pattern for a decadent finish.
Tips for Making the Perfect No-Bake Butterfinger Cheesecake
- Room-Temperature Ingredients: Make sure your cream cheese is softened to room temperature for a smooth, lump-free filling.
- Chill for Best Results: Allow the cheesecake to chill for at least 4 hours or overnight to ensure it sets properly.
- Customize the Topping: Swap the Butterfinger pieces for other candies like Reese’s or Snickers for a fun variation.
- Use a Springform Pan: A springform pan makes it easy to remove the cheesecake without damaging the crust or filling.
Nutritional Information (Per Slice)
| Nutrient | Amount |
|---|---|
| Calories | ~450 |
| Total Fat | 29g |
| Saturated Fat | 14g |
| Carbohydrates | 40g |
| Sugar | 32g |
| Protein | 7g |
Note: Nutritional values are approximate and may vary depending on ingredient brands and portion sizes.
Frequently Asked Questions (FAQs)
1. Can I use a different crust for this cheesecake?
Yes! You can use a graham cracker crust or even a pretzel crust for a salty-sweet twist.
2. Can I substitute the whipped topping?
If you prefer, you can use freshly whipped heavy cream as a substitute for the store-bought whipped topping. Whip 1 cup of heavy cream with 2 tablespoons of powdered sugar until stiff peaks form.
3. Can I make this cheesecake ahead of time?
Absolutely! This cheesecake can be made 1–2 days in advance. Just keep it covered and refrigerated until ready to serve.
4. How do I crush the Butterfinger candy bars?
Place the Butterfinger bars in a zip-top bag and gently crush them with a rolling pin. Alternatively, you can chop them with a sharp knife.
5. Can I freeze this cheesecake?
Yes, you can freeze this cheesecake! Wrap it tightly in plastic wrap and aluminum foil, and freeze for up to 1 month. Thaw it overnight in the refrigerator before serving.
6. How do I slice the cheesecake neatly?
For clean slices, dip your knife in hot water, wipe it dry, and slice. Repeat this process between each cut for neat edges.
Conclusion: A No-Bake Dessert Everyone Will Love
This No-Bake Butterfinger Cheesecake Recipe is everything you could want in a dessert: rich, creamy, crunchy, and full of irresistible flavor. Whether you’re a fan of Butterfinger candy or just love no-bake desserts, this cheesecake is guaranteed to impress.
Ready to wow your family and friends? Gather your ingredients, follow the steps, and enjoy every luscious bite of this easy-to-make cheesecake.
Print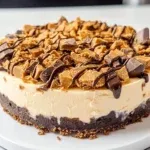
No-Bake Butterfinger Cheesecake Recipe: A Decadent, Easy-to-Make Dessert
- Total Time: 4 hours 25 minutes
- Yield: 12 servings
Description
No-Bake Butterfinger Cheesecake is a creamy, indulgent dessert loaded with the rich flavors of peanut butter, cream cheese, and crunchy Butterfinger candy pieces. With a chocolatey Oreo crust, light and fluffy filling, and a decadent drizzle of chocolate and caramel, this dessert is perfect for any occasion. And the best part? You don’t even need to turn on your oven!
Ingredients
For the Crust:
- 36 Oreo cookies (crushed into fine crumbs)
- 6 tablespoons unsalted butter (melted)
For the Filling:
- 24 ounces cream cheese (softened)
- 1 cup creamy peanut butter
- 1 cup powdered sugar
- 8 ounces whipped topping (thawed)
- 4 ounces Butterfinger candy bar (chopped into small pieces)
For the Topping:
- 4 ounces Butterfinger candy bar (chopped)
- Dark chocolate syrup (for drizzling)
- Caramel syrup (for drizzling)
Instructions
1. Prepare the Crust:
- Crush the Cookies: Using a food processor, crush the Oreo cookies into fine crumbs. Alternatively, place them in a zip-top bag and crush with a rolling pin.
- Mix and Press: In a bowl, combine the Oreo crumbs with melted butter until evenly moistened. Press the mixture firmly into the bottom of a 9-inch springform pan to create an even crust.
- Chill: Place the crust in the refrigerator while you prepare the filling.
2. Make the Filling:
- Cream the Base: In a large mixing bowl, beat the softened cream cheese and peanut butter together until smooth and creamy.
- Add Sweetness: Mix in the powdered sugar until fully incorporated.
- Fold in Whipped Topping: Gently fold in the whipped topping to create a light, fluffy filling.
- Add Butterfinger Pieces: Stir in the chopped Butterfinger candy pieces, ensuring they are evenly distributed throughout the filling.
3. Assemble the Cheesecake:
- Fill the Crust: Spoon the filling onto the chilled crust, spreading it evenly to the edges. Smooth the top with a spatula.
- Chill: Cover the cheesecake with plastic wrap and refrigerate for at least 4 hours, or overnight, to allow it to set completely.
4. Add the Topping:
- Decorate with Butterfinger: Sprinkle the remaining chopped Butterfinger candy pieces over the top of the set cheesecake.
- Drizzle Syrups: Drizzle dark chocolate syrup and caramel syrup in decorative patterns over the cheesecake for an irresistible finish.
Notes
- Room Temperature Ingredients: Ensure the cream cheese is fully softened to avoid lumps in the filling.
- Chill Time: Allow ample time for the cheesecake to chill and set for the best texture.
- Storage: Store leftovers in an airtight container in the refrigerator for up to 5 days.
- Freezing Tip: You can freeze the cheesecake (without syrups) for up to 1 month. Thaw overnight in the refrigerator before serving.
- Prep Time: 25 minutes
- Cook Time: 4 hours
- Category: Dessert
- Method: No-Bake
- Cuisine: American


