")

Introduction to Red Velvet Cake Recipe
Red Velvet Cake Recipe is the perfect choice.
What Makes Red Velvet Cake Unique?
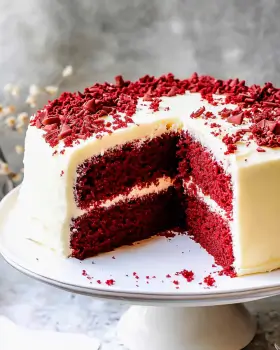
What truly sets red velvet cake apart is its striking appearance and flavor profile. The deep red hue, often enhanced by food coloring, is visually stunning. But it’s not just about looks! The cake has a soft, velvety texture that melts in your mouth. The subtle cocoa flavor, combined with the tanginess from buttermilk, creates a taste that is both familiar and exotic. Additionally, the cream cheese frosting adds a rich, tangy sweetness that complements the cake perfectly. This combination makes red velvet cake a favorite for special occasions and celebrations.
A Brief History of Red Velvet Cake
The history of red velvet cake is as rich as its flavor. It is believed to have originated in the United States during the early 20th century. Some say it was first served in the famous Waldorf-Astoria Hotel in New York City. The cake gained popularity during the 1920s and 1930s, especially in the Southern states. Interestingly, the red color was originally achieved using cocoa powder that reacted with acidic ingredients like buttermilk and vinegar. Over time, the use of red food coloring became common, giving the cake its signature look. Today, red velvet cake is a beloved dessert enjoyed by many, symbolizing love and celebration.
Ingredients for Red Velvet Cake Recipe
Essential Ingredients
To create a delicious red velvet cake, you’ll need a few essential ingredients. These ingredients work together to give the cake its unique flavor and texture. Here’s what you’ll need:
- All-purpose flour: This is the base of your cake, providing structure.
- Cocoa powder: Just a small amount adds a subtle chocolate flavor.
- Granulated sugar: This sweetens the cake and helps it stay moist.
- Vegetable oil: Using oil instead of butter keeps the cake tender and moist.
- Buttermilk: This ingredient adds a tangy flavor and helps the cake rise.
- Eggs: Eggs bind the ingredients together and add richness.
- Red food coloring: This gives the cake its signature red hue.
- Vinegar: A little vinegar enhances the cake’s flavor and reacts with the baking soda.
- Baking soda: This helps the cake rise and become fluffy.
- Salt: A pinch of salt balances the sweetness.
Optional Ingredients for Variations
If you want to get creative with your red velvet cake, consider adding some optional ingredients. These can enhance the flavor or change the texture:
- Chocolate chips: Add some semi-sweet chocolate chips for extra sweetness.
- Walnuts or pecans: Chopped nuts can add a delightful crunch.
- Vanilla extract: A splash of vanilla can enhance the overall flavor.
- Different frostings: While cream cheese frosting is traditional, you can try buttercream or ganache for a twist.
- Fruit puree: Incorporating fruit puree can add a unique flavor and moisture.
With these essential and optional ingredients, you’re well on your way to baking a stunning red velvet cake. Each ingredient plays a vital role in creating the perfect balance of flavor and texture. So, gather your ingredients and get ready to bake!
Step-by-Step Preparation of Red Velvet Cake Recipe
Step 1: Preheat the Oven
Before you start mixing your ingredients, it’s important to preheat your oven. Set it to 350°F (175°C). This ensures that your cake bakes evenly. While the oven heats up, you can prepare your cake batter. Preheating is a crucial step that helps achieve that perfect rise and texture.
Step 2: Prepare the Cake Batter
Now, let’s get to the fun part—making the batter! In a large mixing bowl, combine the dry ingredients first. Whisk together the all-purpose flour, cocoa powder, baking soda, and salt. In another bowl, mix the wet ingredients. Combine the vegetable oil, granulated sugar, eggs, buttermilk, red food coloring, and vinegar. Beat these together until smooth. Gradually add the dry mixture to the wet ingredients, stirring gently. Be careful not to overmix; a few lumps are okay. This step is where the magic begins, as the colors and flavors blend beautifully!
Step 3: Bake the Cake
Once your batter is ready, it’s time to pour it into prepared cake pans. Grease and flour two 9-inch round cake pans to prevent sticking. Divide the batter evenly between the pans. Place them in the preheated oven and bake for about 25 to 30 minutes. You can check for doneness by inserting a toothpick in the center. If it comes out clean, your cake is ready! The aroma of baking cake will fill your kitchen, making it hard to wait!
Step 4: Cool the Cake
After baking, remove the cake pans from the oven. Let them cool in the pans for about 10 minutes. Then, carefully turn them out onto a wire rack to cool completely. Cooling is essential, as frosting a warm cake can lead to a melty mess. Patience is key here; let the cakes cool down to room temperature before moving on to the next step.
Step 5: Prepare the Frosting
While your cakes are cooling, it’s time to whip up the frosting! In a mixing bowl, beat together cream cheese and butter until smooth and creamy. Gradually add powdered sugar and a splash of vanilla extract. Mix until fluffy. This frosting is rich and tangy, perfectly complementing the sweet cake. If you like, you can adjust the sweetness by adding more or less sugar. Once it’s ready, set it aside until the cakes are completely cool.
Step 6: Assemble the Cake
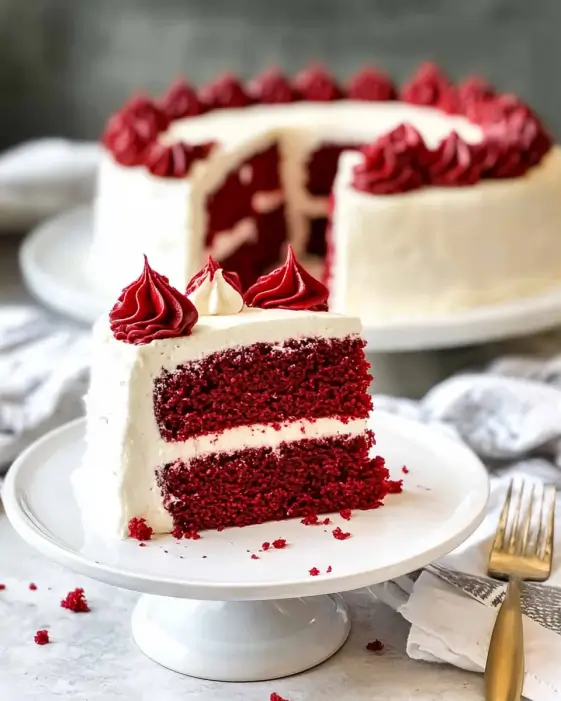
Now comes the exciting part—assembling your red velvet cake! Place one cake layer on a serving plate. Spread a generous amount of frosting on top. Then, carefully place the second layer on top. Frost the top and sides of the cake with the remaining frosting. For a beautiful finish, you can add decorative sprinkles or chocolate shavings. Your cake is now ready to be enjoyed! Slice it up and watch everyone’s faces light up with delight.
Variations of Red Velvet Cake Recipe
Gluten-Free Red Velvet Cake Recipe
If you or your guests are gluten-sensitive, don’t worry! You can still enjoy a delicious red velvet cake. To make a gluten-free version, simply substitute all-purpose flour with a gluten-free flour blend. Look for a blend that contains xanthan gum, as it helps mimic the texture of traditional flour. The rest of the ingredients remain the same. Follow the same steps for mixing and baking. Your gluten-free red velvet cake will be just as moist and flavorful as the classic version. Everyone will love it, and they won’t even notice the difference!
Vegan Red Velvet Cake Recipe
For those following a vegan diet, you can create a scrumptious red velvet cake without any animal products. Start by replacing eggs with flaxseed meal or applesauce. For every egg, mix one tablespoon of flaxseed meal with three tablespoons of water and let it sit until it thickens. Use almond milk or any plant-based milk instead of buttermilk. You can make your own vegan buttermilk by adding one tablespoon of vinegar to a cup of plant-based milk and letting it sit for a few minutes. The rest of the ingredients can stay the same. This vegan red velvet cake will be just as rich and delightful, proving that everyone can enjoy this classic treat!
Cooking Note for Red Velvet Cake Recipe
Common Mistakes to Avoid
Baking a red velvet cake can be a delightful experience, but there are a few common mistakes that can lead to less-than-perfect results. Here are some pitfalls to watch out for:
- Not measuring ingredients accurately: Baking is a science, and precise measurements are crucial. Use measuring cups and spoons for accuracy. Too much flour can make your cake dense, while too little can cause it to collapse.
- Skipping the preheating step: Always preheat your oven before baking. This ensures that your cake rises properly. If you skip this step, your cake may not bake evenly.
- Overmixing the batter: While it’s tempting to mix until smooth, overmixing can lead to a tough cake. Mix just until the ingredients are combined. A few lumps are perfectly fine!
- Using cold ingredients: For the best results, make sure your eggs and buttermilk are at room temperature. Cold ingredients can affect how well the cake rises.
- Not checking for doneness: Every oven is different. Use a toothpick to check if your cake is done. If it comes out clean, it’s ready. If not, give it a few more minutes.
- Frosting a warm cake: Allow your cake to cool completely before frosting. Frosting a warm cake can cause the frosting to melt and slide off, ruining your beautiful creation.
By avoiding these common mistakes, you’ll be well on your way to baking a stunning red velvet cake that will impress everyone. Remember, practice makes perfect, so don’t be discouraged if your first attempt isn’t flawless. Enjoy the process and have fun in the kitchen!
Serving Suggestions for Red Velvet Cake Recipe
Pairing with Beverages
When it comes to enjoying your red velvet cake, the right beverage can elevate the experience. Here are some delightful pairings to consider:
- Coffee: A rich cup of coffee complements the sweetness of the cake beautifully. The bitterness of coffee balances the creamy frosting, making each bite even more enjoyable.
- Tea: A warm cup of black tea or chai can enhance the flavors of the cake. The spices in chai, in particular, add a lovely contrast to the cake’s sweetness.
- Milk: Classic and simple, a glass of cold milk is a perfect match. It helps to cut through the richness of the frosting and keeps things refreshing.
- Red Wine: For an adult twist, consider pairing your cake with a glass of red wine. The fruity notes in the wine can complement the cake’s flavors, creating a sophisticated dessert experience.
- Fruit Juices: Fresh fruit juices, like raspberry or pomegranate, can add a fruity zing that pairs well with the cake’s rich taste. They also add a splash of color to your dessert table!
Presentation Ideas
Presentation is key when serving your red velvet cake. Here are some creative ideas to make your cake look as good as it tastes:
- Layered Display: If you’ve made a multi-layer cake, showcase each layer by slicing it into wedges. This allows guests to see the beautiful red color and creamy frosting.
- Garnish with Fresh Berries: Adding fresh raspberries or strawberries on top of the cake not only enhances the visual appeal but also adds a burst of flavor.
- Use Decorative Plates: Serve your cake on elegant plates or cake stands. A beautiful presentation can make even a simple cake feel special.
- Chocolate Shavings: Sprinkle chocolate shavings or curls on top of the frosting for an extra touch of elegance. This adds texture and a hint of chocolate flavor.
- Edible Flowers: For a whimsical touch, consider using edible flowers as a garnish. They add color and a unique flair to your cake presentation.
With these serving suggestions, your red velvet cake will not only taste amazing but also look stunning on any dessert table. Enjoy sharing this delightful treat with friends and family!
Tips for Perfecting Your Red Velvet Cake Recipe
Storage Tips
Storing your red velvet cake properly is essential to maintain its freshness and flavor. Here are some helpful storage tips:
- Room Temperature: If you plan to eat the cake within a few days, store it at room temperature. Cover it with plastic wrap or place it in an airtight container. This keeps the cake moist and prevents it from drying out.
- Refrigeration: For longer storage, refrigerate the cake. Wrap it tightly in plastic wrap to prevent it from absorbing odors from the fridge. The cream cheese frosting can be sensitive to heat, so refrigeration helps maintain its texture.
- Freezing: If you want to save some cake for later, freezing is a great option. Slice the cake into individual pieces and wrap each slice in plastic wrap. Place the wrapped slices in a freezer-safe bag. When you’re ready to enjoy, simply thaw at room temperature.
- Frosting Storage: If you have leftover frosting, store it in an airtight container in the fridge. It can last for up to a week. Just give it a good stir before using it again.
How to Keep the Cake Moist
Keeping your red velvet cake moist is key to a delightful dessert experience. Here are some tips to ensure your cake stays tender and delicious:
- Use Oil Instead of Butter: As mentioned earlier, using vegetable oil instead of butter helps keep the cake moist. Oil retains moisture better than butter, resulting in a tender crumb.
- Don’t Overbake: Keep a close eye on your cake while it bakes. Overbaking can lead to a dry cake. Check for doneness a few minutes before the recommended baking time.
- Buttermilk Benefits: The buttermilk in the recipe not only adds flavor but also helps keep the cake moist. If you can, use fresh buttermilk for the best results.
- Simple Syrup: If your cake does dry out a bit, you can brush it with a simple syrup. Mix equal parts sugar and water, heat until dissolved, and brush it onto the cake layers before frosting.
- Store Properly: As mentioned in the storage tips, keeping the cake covered and stored correctly will help maintain its moisture. Avoid exposing it to air, which can dry it out.
By following these tips, you’ll ensure that your red velvet cake remains moist and delicious, making every slice a delightful treat. Happy baking!
Breakdown of Time for Red Velvet Cake Recipe
Prep Time
Preparing your red velvet cake is an exciting process! The prep time typically takes about 20 to 30 minutes. This includes gathering your ingredients, measuring them accurately, and mixing the batter. Make sure to take your time during this step. A well-prepared batter is key to a delicious cake. So, enjoy the process and get ready for some baking fun!
Cooking Time
Once your batter is ready, it’s time to bake! The cooking time for your red velvet cake is usually around 25 to 30 minutes. Keep an eye on the clock, but also trust your instincts. Every oven is a little different, so checking for doneness with a toothpick is a great idea. If it comes out clean, your cake is perfectly baked!
Total Time
In total, you can expect to spend about 1 hour to 1 hour and 15 minutes on your red velvet cake recipe. This includes both prep and cooking time. Once the cake is baked, don’t forget to allow it to cool completely before frosting. Patience is key here! After cooling, you can frost and serve your cake, making it a delightful treat for any occasion.
Nutritional Information for Red Velvet Cake Recipe
Calories and Macronutrients
Understanding the nutritional content of your red velvet cake can help you enjoy it mindfully. A typical slice of red velvet cake (about 1/12 of a 9-inch cake) contains approximately 350 to 400 calories. Here’s a breakdown of the macronutrients:
- Calories: 350-400
- Carbohydrates: 50-55 grams
- Protein: 4-6 grams
- Fat: 15-20 grams
- Sugar: 30-35 grams
These values can vary based on the specific ingredients and portion sizes used. For instance, using less sugar or a different frosting can alter the calorie count. It’s always a good idea to check the labels of your ingredients for the most accurate information.
Health Considerations
While red velvet cake is a delightful treat, it’s important to enjoy it in moderation. Here are some health considerations to keep in mind:
- Moderation is Key: Due to its sugar and fat content, indulging in red velvet cake occasionally is best. Enjoying a slice during special occasions can satisfy your sweet tooth without overdoing it.
- Allergies: Be mindful of common allergens in this recipe, such as gluten (from flour) and dairy (from buttermilk and cream cheese). If you have allergies, consider the gluten-free or vegan variations mentioned earlier.
- Balance with Nutrition: Pairing your cake with a healthy meal or snack can help balance your overall diet. Consider enjoying a slice with a side of fresh fruit or a cup of yogurt for added nutrients.
- Homemade vs. Store-Bought: Homemade cakes often have fewer preservatives and artificial ingredients compared to store-bought options. Making your own red velvet cake allows you to control the ingredients and make healthier choices.
By keeping these health considerations in mind, you can enjoy your red velvet cake while maintaining a balanced diet. Remember, it’s all about enjoying treats in moderation and making informed choices!
FAQs about Red Velvet Cake Recipe
What is the origin of red velvet cake?
The origin of red velvet cake is quite fascinating! It is believed to have first appeared in the United States during the early 20th century. Some stories suggest that it was served at the Waldorf-Astoria Hotel in New York City. The cake gained popularity in the Southern states during the 1920s and 1930s. Originally, the red color came from a reaction between cocoa powder and acidic ingredients like buttermilk and vinegar. Over time, the use of red food coloring became common, giving the cake its signature hue. Today, red velvet cake is a beloved dessert, often associated with love and celebration.
Can I use cocoa powder instead of red food coloring?
While cocoa powder is a key ingredient in red velvet cake, it does not replace red food coloring. Cocoa powder adds a subtle chocolate flavor but does not provide the vibrant red color. If you prefer a more natural approach, you can use beet juice or beet powder as a coloring alternative. However, keep in mind that the cake may not achieve the same bright red hue. For the classic look and taste, using red food coloring is recommended. It’s what gives red velvet cake its iconic appearance!
How do I make red velvet cake without buttermilk?
If you don’t have buttermilk on hand, you can easily make a substitute! To create a homemade buttermilk, simply add one tablespoon of vinegar or lemon juice to a cup of milk. Let it sit for about 5 to 10 minutes until it thickens slightly. This mixture mimics the acidity of buttermilk, helping the cake rise and adding a tangy flavor. You can also use plain yogurt or sour cream mixed with a little water as a substitute. These alternatives will work well in your red velvet cake recipe!
What is the best frosting for red velvet cake?
The traditional frosting for red velvet cake is cream cheese frosting. Its rich, tangy flavor perfectly complements the sweetness of the cake. The creamy texture adds a delightful contrast to the soft cake layers. However, if you want to try something different, buttercream frosting is another popular option. You can also experiment with chocolate ganache for a decadent twist. Ultimately, the best frosting depends on your personal preference. Whichever you choose, make sure it’s delicious and enhances the overall experience of your red velvet cake!
Conclusion on Red Velvet Cake Recipe
Final Thoughts on Baking Red Velvet Cake
Baking a red velvet cake is not just about following a recipe; it’s about creating a memorable experience. This delightful dessert brings joy to any occasion, whether it’s a birthday, anniversary, or simply a treat for yourself. The vibrant color and rich flavor make it a showstopper that’s sure to impress your guests.
As you embark on your baking journey, remember that practice makes perfect. Don’t be afraid to experiment with variations and make the recipe your own. Whether you choose to stick with the classic cream cheese frosting or try a new twist, the key is to enjoy the process. Baking should be fun and rewarding!
With the tips and tricks shared in this article, you’re well-equipped to create a stunning red velvet cake. From ensuring the right texture to avoiding common mistakes, you have all the tools you need for success. So, gather your ingredients, preheat that oven, and let the magic happen!
In the end, the joy of sharing a homemade red velvet cake with friends and family is what truly makes it special. Each slice is a celebration of love, creativity, and deliciousness. Happy baking, and may your red velvet cake be as delightful as the memories it creates!
")


