Introduction to Sopaipillas
There’s something magical about the aroma of freshly fried dough wafting through the kitchen. Sopaipillas, those delightful fluffy pastries, have a way of bringing back memories of family gatherings and cozy evenings. Whether you’re looking for a quick solution for a busy day or a dish to impress your loved ones, these treats are perfect. They’re versatile, too—great for dipping in honey or pairing with savory dishes. Trust me, once you make these sopaipillas, they’ll become a staple in your home, bringing smiles and satisfaction to every meal.
Why You’ll Love This Sopaipillas
These sopaipillas are not just easy to make; they’re a delightful treat that can elevate any meal. In just 45 minutes, you can whip up a batch that’s perfect for sharing. The fluffy texture and golden-brown exterior are irresistible, especially when paired with honey. Plus, they’re versatile enough to complement both sweet and savory dishes, making them a fantastic addition to your culinary repertoire.
Ingredients for Sopaipillas
Gathering the right ingredients is the first step to creating these fluffy delights. Here’s what you’ll need:
- All-purpose flour: The backbone of your sopaipillas, providing structure and fluffiness.
- Baking powder: This little leavening agent is key for that perfect puff when frying.
- Salt: Just a pinch enhances the flavors, balancing the sweetness.
- Sugar: A touch of sweetness to complement the honey you’ll serve them with.
- Vegetable shortening: This adds richness and helps create that tender texture.
- Warm water: Essential for bringing the dough together; it should feel cozy, not hot.
- Vegetable oil: For frying, choose a neutral oil that can handle high heat.
- Honey: The perfect dipping companion, adding a sweet finish to your sopaipillas.
For those looking to mix things up, consider adding a pinch of garlic powder for a savory twist or sprinkling cinnamon sugar on top for a sweeter treat. You can find all the exact measurements at the bottom of the article, ready for printing!
How to Make Sopaipillas
Making sopaipillas is a straightforward process that yields delicious results. Follow these simple steps, and you’ll be enjoying fluffy pastries in no time!
Step 1: Prepare the Dry Ingredients
Start by grabbing a large mixing bowl. Combine the all-purpose flour, baking powder, salt, and sugar. Mix them well to ensure everything is evenly distributed. This step is crucial for achieving that perfect fluffy texture.
Step 2: Incorporate the Shortening
Next, add the vegetable shortening to your dry mixture. Use your fingers or a pastry cutter to blend it in. You want the mixture to resemble coarse crumbs. This will help create that tender, flaky texture we all love in sopaipillas.
Step 3: Form the Dough
Now, it’s time to bring it all together. Gradually add warm water to the mixture, stirring until a soft dough forms. If it feels too sticky, don’t hesitate to sprinkle in a bit more flour. The goal is a dough that’s soft but manageable.
Step 4: Knead and Rest
Turn the dough onto a floured surface and knead it gently for about 2-3 minutes. You want it smooth but not overworked. Once done, cover the dough with a clean kitchen towel and let it rest for 30 minutes. This resting period is essential for the dough to relax, making it easier to roll out later.
Step 5: Roll and Cut
After the dough has rested, roll it out to about 1/4 inch thick. Use a sharp knife or a pizza cutter to cut it into squares or triangles, about 3 inches in size. The shapes don’t have to be perfect; just aim for uniformity to ensure even cooking.
Step 6: Heat the Oil
In a deep skillet or pot, heat about 2 inches of vegetable oil over medium-high heat. You want the oil to reach around 350°F. A good test is to drop a small piece of dough in; if it sizzles, you’re ready to fry!
Step 7: Fry the Sopaipillas
Carefully drop the cut dough pieces into the hot oil, a few at a time. Fry them until they puff up and turn golden brown, about 1-2 minutes per side. Use a slotted spoon to remove them from the oil, letting the excess oil drain on paper towels.
Step 8: Serve and Enjoy
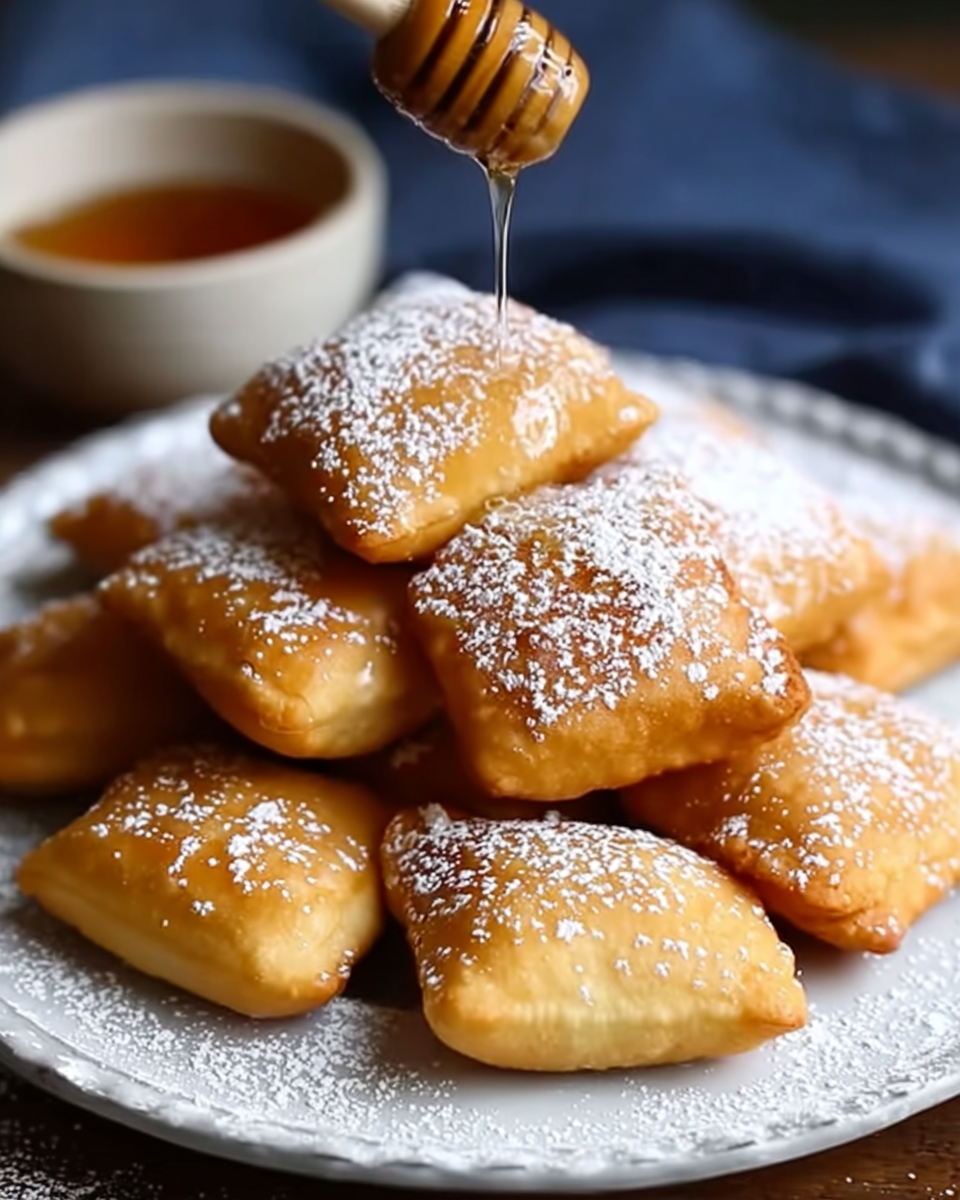
Finally, serve your sopaipillas warm, drizzled with honey or on the side for dipping. They’re best enjoyed fresh, so gather your friends and family to share in the deliciousness. Trust me, these fluffy pastries will be a hit!
Tips for Success
- Make sure your oil is hot enough before frying; this ensures a perfect puff.
- Don’t overcrowd the pan; fry in batches for even cooking.
- For extra flavor, experiment with spices like cinnamon or garlic powder in the dough.
- Keep the dough covered while resting to prevent it from drying out.
- Serve immediately for the best texture; they’re fluffiest when fresh!
Equipment Needed
- Mixing bowl: A large bowl for combining ingredients; any size will do.
- Rolling pin: For rolling out the dough; a wine bottle works in a pinch.
- Deep skillet or pot: Essential for frying; a Dutch oven is a great alternative.
- Slotted spoon: For removing sopaipillas from oil; a regular spoon can work too.
Variations
- Sweet Sopaipillas: Add a teaspoon of vanilla extract to the dough for a hint of sweetness.
- Cinnamon Sugar Coating: After frying, toss the sopaipillas in a mixture of cinnamon and sugar for a delightful twist.
- Herbed Sopaipillas: Incorporate dried herbs like oregano or thyme into the dough for a savory flavor.
- Gluten-Free Option: Substitute all-purpose flour with a gluten-free flour blend for a gluten-free version.
- Cheesy Sopaipillas: Mix in shredded cheese into the dough for a cheesy, savory treat.
Serving Suggestions
- Pair sopaipillas with a side of spicy salsa for a savory kick.
- Serve them alongside a fresh salad for a balanced meal.
- For drinks, consider a chilled horchata or a refreshing iced tea.
- Presentation tip: Stack them on a colorful plate and drizzle honey on top for a stunning display.
FAQs about Sopaipillas
What are sopaipillas?
Sopaipillas are fluffy pastries, often enjoyed as a sweet treat or a savory side. They’re typically fried until golden brown and can be served with honey or alongside savory dishes.
Can I make sopaipillas ahead of time?
While sopaipillas are best enjoyed fresh, you can prepare the dough in advance. Just keep it covered in the fridge for up to 24 hours. When you’re ready, roll, cut, and fry them!
What can I serve with sopaipillas?
These delightful pastries pair wonderfully with honey for dipping. You can also serve them with spicy salsa, fresh salads, or even as a side to your favorite Mexican dishes.
Are sopaipillas gluten-free?
Traditional sopaipillas are made with all-purpose flour, but you can easily make a gluten-free version by substituting with a gluten-free flour blend. Just ensure the other ingredients are also gluten-free.
How do I store leftover sopaipillas?
If you have any leftovers, store them in an airtight container at room temperature for up to two days. Reheat them in the oven for a few minutes to regain their fluffiness.
Final Thoughts
Making sopaipillas is more than just a cooking task; it’s an experience filled with joy and warmth. The process of mixing, kneading, and frying brings a sense of accomplishment, while the delightful aroma fills your home with comfort. Each fluffy bite, whether dipped in honey or enjoyed with savory dishes, creates moments of happiness shared with family and friends. These pastries are not just food; they’re a way to connect, celebrate, and create lasting memories. So, roll up your sleeves, gather your loved ones, and dive into the delicious world of sopaipillas. You won’t regret it!
PrintSopaipillas: Discover How to Make These Fluffy Treats!
- Total Time: 45 minutes
- Yield: Serves 4
- Diet: Vegetarian
Description
Sopaipillas are delightful, fluffy pastries that are perfect for dipping in honey or enjoying with savory dishes.
Ingredients
- 2 cups all-purpose flour
- 1 teaspoon baking powder
- 1/2 teaspoon salt
- 1 tablespoon sugar
- 1/4 cup vegetable shortening
- 3/4 cup warm water
- Vegetable oil (for frying)
- Honey (for serving)
Instructions
- In a large mixing bowl, combine the flour, baking powder, salt, and sugar. Mix well to ensure all dry ingredients are evenly distributed.
- Add the vegetable shortening to the dry ingredients and mix with your fingers or a pastry cutter until the mixture resembles coarse crumbs.
- Gradually add the warm water to the mixture, stirring until a soft dough forms. If the dough is too sticky, add a little more flour as needed.
- Turn the dough onto a floured surface and knead gently for about 2-3 minutes until smooth. Cover the dough with a clean kitchen towel and let it rest for 30 minutes.
- After resting, roll out the dough to about 1/4 inch thick. Cut into squares or triangles, about 3 inches in size.
- In a deep skillet or pot, heat about 2 inches of vegetable oil over medium-high heat until hot (around 350°F).
- Carefully drop the cut dough pieces into the hot oil, a few at a time, and fry until they puff up and turn golden brown, about 1-2 minutes per side.
- Use a slotted spoon to remove the sopaipillas from the oil and drain on paper towels.
- Serve warm with honey drizzled on top or on the side for dipping.
Notes
- For a sweeter twist, sprinkle cinnamon sugar on the sopaipillas right after frying.
- To make them savory, try adding a pinch of garlic powder to the dough for a unique flavor.
- Prep Time: 30 minutes
- Cook Time: 15 minutes
- Category: Dessert
- Method: Frying
- Cuisine: Mexican
Nutrition
- Serving Size: 1 sopaipilla
- Calories: 220
- Sugar: 1g
- Sodium: 200mg
- Fat: 10g
- Saturated Fat: 2g
- Unsaturated Fat: 8g
- Trans Fat: 0g
- Carbohydrates: 30g
- Fiber: 1g
- Protein: 3g
- Cholesterol: 0mg


