")
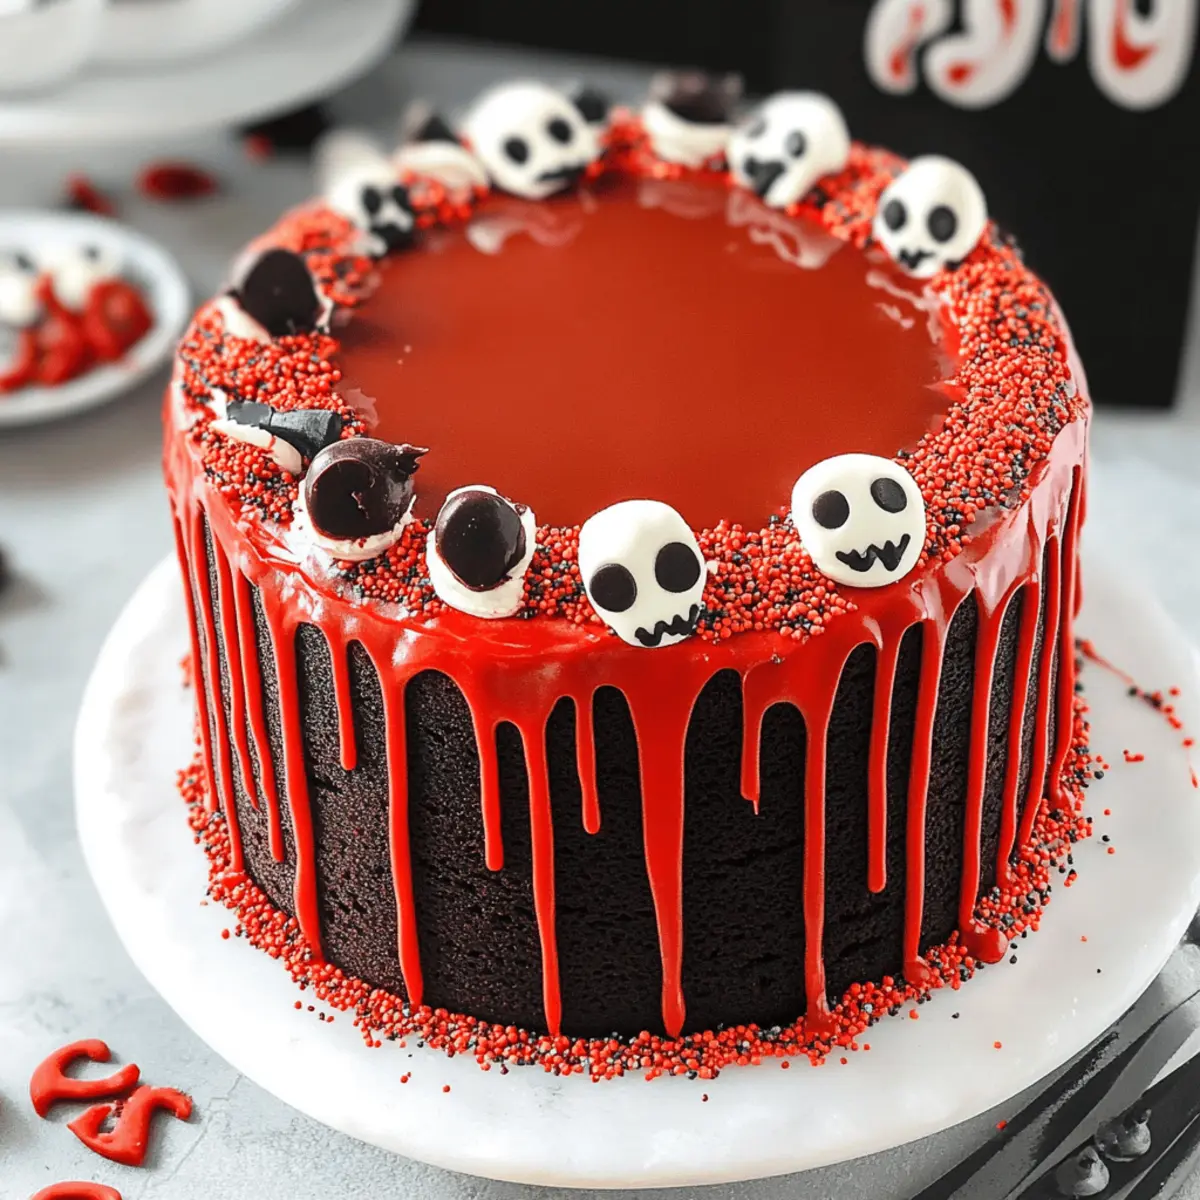
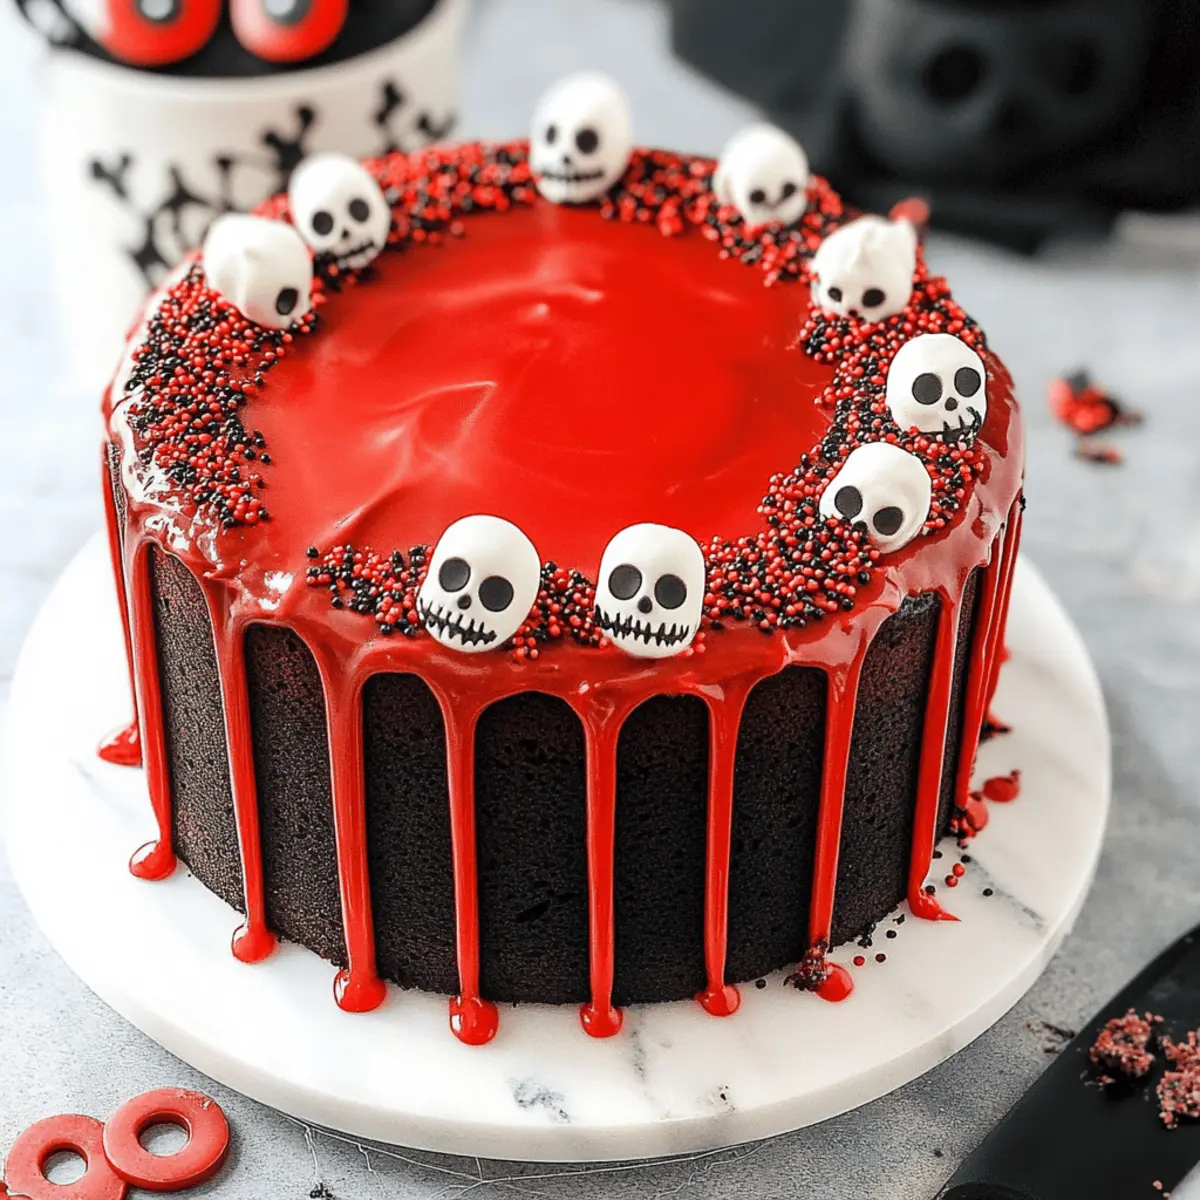
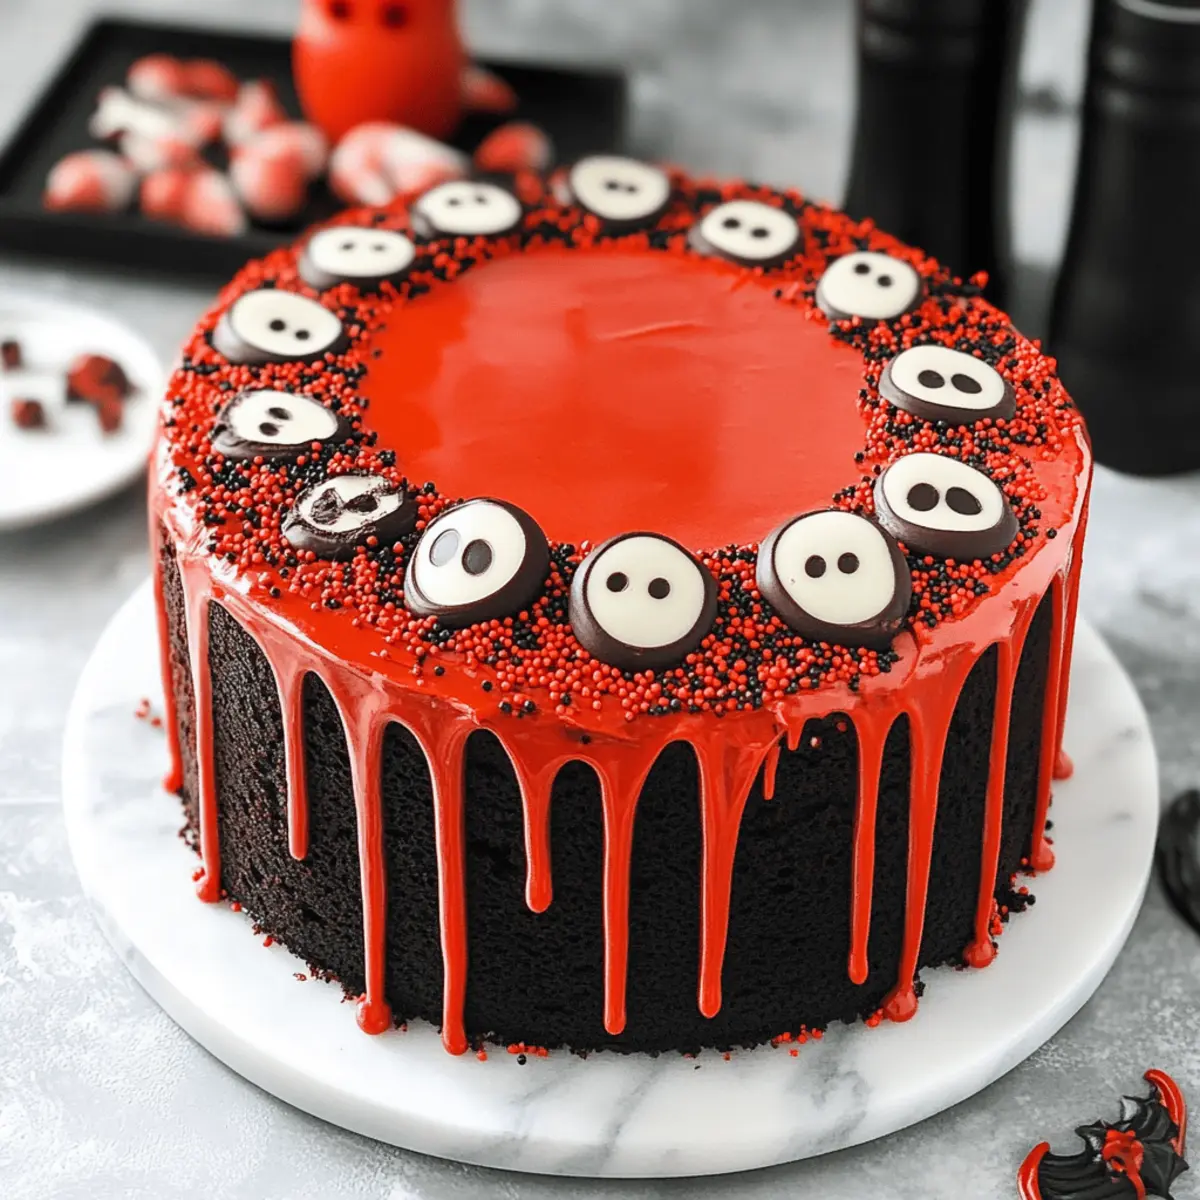
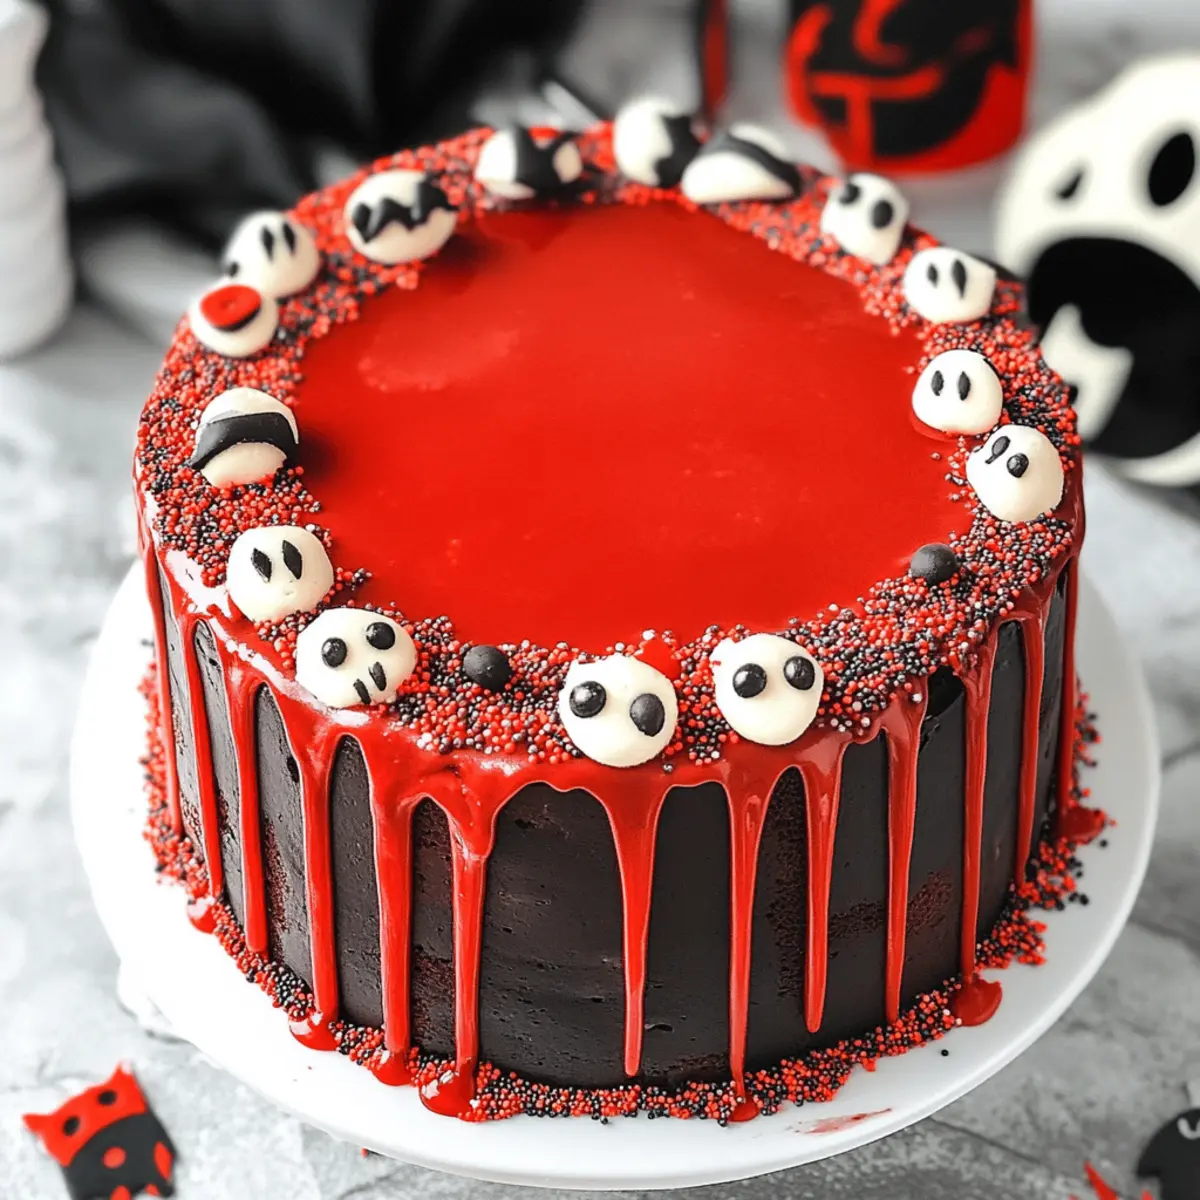
As the sun sets and shadows dance, it’s time to conjure up a treat that will both delight and spook your guests. Enter the Spooky Halloween Marble Cake—a stunning blend of chocolate and vanilla swirled into a masterful creation that looks as good as it tastes. With each slice, you’ll serve up not just moist, tender cake made possible by buttermilk, but also a festive centerpiece that’s sure to spark conversations. Whether it’s a Halloween party or a cozy gathering, this cake boasts a ghoulishly fun red “blood” drizzle and eerie sprinkles that make it a crowd-pleaser. Are you ready to unleash your inner pastry wizard and make this magical dessert? Stick around to discover how to whip up your very own Halloween masterpiece!
Why is this cake a Halloween must-try?
Festive Presentation: This Spooky Halloween Marble Cake is a true showstopper, boasting vibrant red and black colors that scream Halloween fun!
Deliciously Moist: Thanks to the use of buttermilk, every slice is not just gorgeous but incredibly tender and moist, making it irresistible.
Easy to Create: You don’t need to be a professional baker; this cake’s simple steps allow you to impress your guests without the fuss.
Customizable Flavors: Feel free to swap ingredients, like using chocolate chips or cream cheese frosting, to fit your taste. Check out our recipe on Coconut Cake Vape for more flavor ideas!
Crowd-Pleasing Decor: With creepy sprinkles and a drippy red topping, it’s perfect for both kids and adults, sparking smiles all around.
Make-Ahead Friendly: Bake it a day in advance and add the finishing touches closer to your party for ultimate efficiency!
Spooky Halloween Marble Cake Ingredients
For the Cake Batter
• All-purpose flour – Provides structure and texture; substitute with gluten-free flour for a gluten-free version.
• Granulated sugar – Adds sweetness and tenderizes the cake; consider using brown sugar for a richer flavor.
• Cocoa powder – Infuses the cake with a robust chocolate flavor; use unsweetened cocoa powder for the best results.
• Baking soda and baking powder – Essential leavening agents that ensure your cake rises properly; make sure they’re fresh for maximum effectiveness.
• Salt – Enhances all the flavors in the cake.
• Buttermilk – Moisture and acidity ensure tenderness; regular milk can be used as a substitute, but buttermilk is preferred for this Spooky Halloween Marble Cake.
• Vegetable oil – Imparts moisture and richness; melted butter is a suitable alternative.
• Vanilla extract – Elevates the overall flavor profile.
• Eggs – Provide structure and moisture; using room temperature eggs yields better incorporation.
For the Chocolate Component
• Bittersweet chocolate – Enriches the chocolatey taste; opt for high-quality chocolate for the best results.
For the Decoration
• Red candy melts – Create a spooky red drip effect; regular chocolate with red food coloring can also be used.
• Black gel icing color – Used to color the buttercream for a haunting touch; food coloring can substitute, though it may require more quantity for intensity.
• Sprinkles – Themed decorations like bone and eyeball sprinkles make it extra festive; these add fun flair to your Halloween centerpiece.
Step‑by‑Step Instructions for Spooky Halloween Marble Cake
Step 1: Prepare Cake Batter
Begin by preheating your oven to 350°F (175°C) and greasing two 9-inch round cake pans. In a large mixing bowl, whisk together the dry ingredients: all-purpose flour, granulated sugar, cocoa powder, baking soda, baking powder, and salt. In another bowl, mix the wet ingredients: vegetable oil, eggs, buttermilk, and vanilla extract until well combined.
Step 2: Combine Mixtures
Gradually add the wet mixture to the dry ingredients, stirring gently until just combined. Take care not to overmix, as this could affect the texture of your Spooky Halloween Marble Cake. Once combined, divide the batter evenly into two bowls; leave one bowl as is and color the other with black gel icing color until you achieve a deep shade.
Step 3: Create Marble Effect
Spoon alternating dollops of black and plain batter into the prepared cake pans. Start with a large spoonful of one color, then add a spoonful of the other directly on top. Continue layering until both batters are used up. Use a knife or a skewer to gently swirl the two colors together, creating a marbled pattern that resembles spooky shadows.
Step 4: Bake
Place the filled pans in your preheated oven and bake for 20-25 minutes, or until a toothpick inserted into the center comes out clean. Keep an eye on the cakes; they should spring back when lightly touched, indicating they’re perfectly baked. Once done, remove them from the oven and let them cool in the pans for about 10 minutes.
Step 5: Cool Cakes
Carefully turn the cakes out onto wire racks to cool completely. Ensure they are completely cooled before frosting to prevent the buttercream from melting. This allows your Spooky Halloween Marble Cake to maintain its beautiful shape and design while you prepare the frosting.
Step 6: Prepare Buttercream
In a mixing bowl, beat room temperature butter with an electric mixer until smooth and creamy. Gradually add powdered sugar and cocoa powder, mixing on low speed to avoid a sugar cloud. Once incorporated, add black gel icing color until your desired spooky hue is achieved. Beat until fluffy and light, creating a perfect frosting for your cake.
Step 7: Assemble Cake
Level the cooled cake layers with a serrated knife if necessary to ensure an even stack. Place the first layer on a serving plate and spread a generous amount of black buttercream frosting on top. Gently place the second layer on top, pressing down lightly, and then frost the top and sides of the cake with an even layer of the black buttercream.
Step 8: Decorate
Melt red candy melts in a microwave-safe bowl, stirring until smooth. Let them cool slightly, then drizzle over the top of your frosted cake for a blood-like effect. Finish off by adorning your Spooky Halloween Marble Cake with themed sprinkles like eyeballs and bones for that perfect haunting touch that will enchant your guests.
Make Ahead Options
These Spooky Halloween Marble Cakes are perfect for meal prep, allowing you to save precious time as Halloween approaches! You can bake the cake layers up to 24 hours in advance; once cooled, wrap them tightly in plastic wrap and refrigerate to maintain their moisture. The frosting can also be prepared in advance and stored in an airtight container, so it’s ready to go when you are. Just before serving, assemble and decorate your cake with the red drizzle and sprinkles for a fresh, spooky effect. This way, you’ll have a stunning centerpiece that’s just as delicious and festive, without the last-minute chaos!
Storage Tips for Spooky Halloween Marble Cake
Room Temperature: Keep the cake at room temperature for up to 3 days. Store it in a cake dome or cover it with plastic wrap to maintain its moisture.
Fridge: If you want to extend freshness, refrigerate the cake for up to 5 days. Just make sure it’s well-covered to prevent it from drying out.
Freezer: You can freeze your Spooky Halloween Marble Cake for up to 2 months. Wrap it tightly in plastic wrap and aluminum foil before freezing.
Reheating: To enjoy it warm, gently reheat individual slices in the microwave for about 10-15 seconds. Avoid reheating the whole cake to preserve its texture.
Spooky Halloween Marble Cake Variations
Feel free to unleash your creativity and make this cake uniquely yours with a few simple tweaks!
- Gluten-Free: Swap in a gluten-free flour blend to make this cake accessible for everyone at your gathering.
- Chocolate Chip Surprise: Fold in chocolate chips for added texture and decadent bursts of chocolate throughout the cake.
- Cream Cheese Frosting: Use cream cheese frosting instead of buttercream for a tangy twist that beautifully complements the rich flavors.
- Festive Color Palette: Experiment with pastel colors like purple and green for a whimsical Halloween twist. The right color can set the mood!
- Cupcake Creation: Transform this cake into delightful cupcakes, baking them for 15-18 minutes, perfect for portion control and easy serving.
- Baileys Drizzle: Add a splash of Baileys or Irish cream liqueur into your frosting for an adult twist that will impress!
Each of these variations adds a unique flavor or aesthetic to your cake, ensuring that your Spooky Halloween Marble Cake is the talk of the party. Plus, for extra inspiration, why not check out our Enchanting Barbie Cake or the magical Crafting Heart Cake ideas?
What to Serve with Spooky Halloween Marble Cake
Let your culinary imagination run wild as you create a spooktacular feast that pairs perfectly with this festive dessert!
- Vanilla Ice Cream: The creamy coolness of vanilla ice cream perfectly contrasts the rich chocolate and red drizzle, enhancing every delightful bite.
- Pumpkin Spice Latte: Serve this autumn-inspired beverage for a warm, spicy balance that complements the sweet, festive flavors of your cake.
- Hot Apple Cider: This warm, spiced drink creates a cozy atmosphere, enhancing the cake’s flavors while embracing the spirit of the season.
- Chocolate-Covered Strawberries: Their sweetness and slight acidity contrast really well with the richness of the cake, offering a delightful pop of color and flavor.
- Caramel Drizzle: A drizzle of warm caramel adds another layer of indulgence, creating a sweet harmony with both vanilla and chocolate.
- Ginger Snap Cookies: Their crunchy texture and spicy warmth make a great pairing with the cake, adding an extra festive note to your Halloween gathering.
- Mixed Berry Compote: This tart and refreshing addition provides a bright contrast to the cake’s richness, elevating your dessert experience.
- Cheese Platter: Include soft cheeses like Brie or creamy goat cheese for a savory touch that complements the sweet cake.
- Sparkling Apple Cider: This bubbly drink adds a festive vibe, perfect for toasting during your Halloween celebrations alongside the cake.
Expert Tips for Spooky Halloween Marble Cake
Room Temperature Ingredients: Ensure all ingredients, especially eggs and buttermilk, are at room temperature for the best mixing and texture in your Spooky Halloween Marble Cake.
Don’t Overmix: When combining wet and dry ingredients, mix until just blended to avoid a dense cake. The secret to fluffiness is to stop mixing as soon as you see no dry flour!
Cool Completely: Allow your cakes to cool completely before frosting. If they’re warm, the frosting will melt, ruining the spooky aesthetic.
Color Intensity: For a deep black frosting, let your black gel icing sit for a few minutes after coloring; it may darken over time, giving a richer look.
Swirling Techniques: When creating the marble effect, use a gentle hand to avoid over-swirl that can blend the colors too much; stick to a few swirls for clear separation.
Spooky Halloween Marble Cake Recipe FAQs
What type of flour should I use for the Spooky Halloween Marble Cake?
All-purpose flour is ideal for this recipe, providing the perfect structure and texture. If you’re looking for a gluten-free alternative, feel free to substitute it with gluten-free all-purpose flour. Just ensure it’s a blend that contains xanthan gum to achieve a similar texture to traditional flour.
How do I store the Spooky Halloween Marble Cake?
You can keep your cake at room temperature for up to 3 days. Simply cover it with a cake dome or wrap it loosely in plastic wrap to prevent it from drying out. If you want to extend its freshness, refrigerate it for up to 5 days, ensuring it’s well-covered.
Can I freeze the Spooky Halloween Marble Cake?
Absolutely! You can freeze your cake for up to 2 months. To do this, wrap it tightly in plastic wrap and then cover it with aluminum foil. This double-layer will protect it from freezer burn. When you’re ready to enjoy it, simply thaw overnight in the refrigerator and bring it to room temperature before serving.
How can I fix a dense or heavy cake if mine doesn’t rise?
If your cake has turned out dense, it’s possible that you may have overmixed the batter or used old leavening agents. To prevent this, mix your ingredients just until they are combined, and ensure your baking soda and baking powder are fresh. If you find yourself with a dense cake, I recommend slicing it into layers and adding a rich filling in between to boost moisture and flavor!
Can I use different types of decorations or fillings?
Absolutely! The decorations can be as creative as you want. Consider using themed sprinkles like ghosts or pumpkins for a different look. If you’d like to enhance the flavor, you can add cream cheese frosting between the layers for a tangy kick, or even fill it with chocolate ganache for extra indulgence.
Is the Spooky Halloween Marble Cake safe for pets?
It’s important to note that this cake contains ingredients like chocolate and sugar, which can be harmful to pets. Therefore, it’s best to keep this delightful treat away from our furry friends and consider making a dog-friendly version if you want to include them in your festivities!
Indulge in Spooky Halloween Marble Cake for Festive Fun
Ingredients
Equipment
Method
- Preheat your oven to 350°F (175°C) and grease two 9-inch round cake pans. In a large bowl, whisk together the dry ingredients: all-purpose flour, granulated sugar, cocoa powder, baking soda, baking powder, and salt.
- In another bowl, mix the wet ingredients: vegetable oil, eggs, buttermilk, and vanilla extract until well combined.
- Gradually add the wet mixture to the dry ingredients, stirring gently until just combined. Divide the batter into two bowls; color one with black gel icing color.
- Spoon alternating dollops of black and plain batter into the prepared pans, creating a marble effect with a knife or skewer.
- Bake for 20-25 minutes or until a toothpick comes out clean. Let them cool in the pans for 10 minutes.
- Turn the cakes out onto wire racks to cool completely.
- Beat room temperature butter until smooth and creamy. Gradually add powdered sugar and cocoa powder, mixing on low, until fluffy.
- Level the cooled cake layers as needed. Spread black buttercream on the first layer, add the second layer, and frost the top and sides.
- Melt red candy melts, drizzle over the cake, and decorate with themed sprinkles.
")


