Have you ever opened a can of tuna and wondered, “What else can I do with this besides a sandwich?” Well, you’re not alone! Tuna cakes, also known as tuna patties, are a delicious and simple way to transform canned tuna into a mouthwatering dish. Crispy on the outside, tender on the inside, these patties are quick to make and loaded with flavor. Whether you’re short on time or want to whip up something impressive with pantry staples, this recipe is a winner.
In this guide, we’ll walk you through how to make the most delectable tuna cakes with easy-to-follow steps, tips for perfection, and creative ideas for serving. Ready? Let’s get started!
Why You’ll Love Tuna Cakes
Tuna cakes are perfect for those busy evenings when you need a quick and healthy meal. They’re:
- Affordable: Made with budget-friendly canned tuna and a few basic ingredients.
- Versatile: Great as a snack, appetizer, or main course.
- Customizable: You can adjust the flavors to suit your preferences, from spicy to herby.
- Nutritious: Packed with protein and omega-3 fatty acids from the tuna, making it a healthy option for you and your family.
This dish is ideal for anyone looking to upgrade their weeknight meals without spending hours in the kitchen.
Ingredients for Tuna Cakes
Here’s everything you’ll need to make these flavorful tuna patties:
| Ingredient | Quantity |
|---|---|
| Canned tuna (5 oz each) | 2 cans, drained |
| Breadcrumbs | 1/2 cup |
| Mayonnaise | 1/4 cup |
| Egg, beaten | 1 |
| Finely chopped onion | 2 tablespoons |
| Lemon juice | 1 tablespoon |
| Fresh parsley, chopped | 1 tablespoon (or 1 tsp dried) |
| Salt and pepper | To taste |
| Oil for frying | As needed |
These ingredients come together beautifully to create crispy, golden tuna cakes that are brimming with flavor.
Step-by-Step Instructions
1. Prepare the Tuna Mixture
The base of your tuna patties starts with a well-seasoned and cohesive mixture.
- Drain and Flake the Tuna: Open the cans of tuna, drain them thoroughly, and place the tuna in a large mixing bowl. Flake it with a fork to break up any large chunks.
- Add Ingredients: To the bowl, add breadcrumbs, mayonnaise, the beaten egg, finely chopped onion, lemon juice, and parsley.
- Season to Taste: Sprinkle in salt and pepper to suit your taste preferences.
- Mix Thoroughly: Using a spoon (or your hands), mix everything together until the ingredients are fully combined. The mixture should feel slightly damp but firm enough to shape into patties. If it feels too wet, add a little more breadcrumbs.
2. Form the Patties
- Shape the Mixture: Scoop a handful of the tuna mixture and shape it into a round patty about 1/2 inch thick. Repeat until all the mixture is used. You should end up with 4-6 patties, depending on their size.
3. Fry the Patties
The frying step is where your tuna cakes get their signature golden-brown crust.
- Heat the Oil: Pour enough oil into a large skillet to coat the bottom of the pan. Heat it over medium heat until the oil shimmers.
- Cook the Patties: Carefully place the tuna patties in the skillet. Pan-fry them for 3-4 minutes on each side or until they’re golden brown and crispy. Avoid overcrowding the skillet—cook in batches if necessary.
4. Drain and Serve
- Drain Excess Oil: Transfer the cooked patties to a plate lined with paper towels to soak up any extra oil.
- Serve Immediately: Plate your tuna cakes while they’re still warm and crispy. Garnish with lemon wedges and a sprinkle of parsley for a fresh, vibrant finish.
Creative Ways to Serve Tuna Cakes
Tuna cakes are incredibly versatile. Here are some ideas to elevate your serving game:
- As a Main Dish: Pair your tuna patties with a fresh green salad, roasted vegetables, or steamed rice for a balanced meal.
- In a Sandwich: Place the patties between burger buns with lettuce, tomato, and a dollop of tartar sauce for a quick tuna burger.
- With a Dip: Serve alongside dips like tzatziki, sriracha mayo, or a creamy garlic aioli for extra flavor.
- On a Platter: Arrange the patties on a serving tray with assorted sides like pickles, olives, and crackers for a party-friendly appetizer.
Tips for Perfect Tuna Cakes
To ensure your tuna cakes come out flawless every time, keep these tips in mind:
- Drain the Tuna Well: Excess moisture can make the patties fall apart during frying. Make sure to drain the tuna thoroughly.
- Adjust the Consistency: If the mixture feels too wet, add more breadcrumbs. If it’s too dry, mix in a little more mayonnaise.
- Don’t Overcrowd the Pan: Fry the patties in batches so they cook evenly and develop a crispy crust.
- Use Fresh Lemon Juice: Freshly squeezed lemon juice adds a bright, tangy flavor that enhances the tuna.
- Experiment with Flavors: Add a pinch of garlic powder, smoked paprika, or chili flakes for a unique twist.
Nutritional Benefits of Tuna
Tuna isn’t just delicious—it’s packed with health benefits! Here’s why you’ll love incorporating it into your diet:
- High in Protein: Tuna is an excellent source of lean protein, which supports muscle growth and repair.
- Rich in Omega-3s: These healthy fats promote heart health and reduce inflammation.
- Low in Calories: Tuna is low in calories and saturated fat, making it a great choice for a balanced diet.
- Packed with Nutrients: It’s loaded with essential nutrients like vitamin D, selenium, and potassium.
FAQs About Tuna Cakes
1. Can I bake tuna cakes instead of frying them?
Yes! Preheat your oven to 400°F (200°C). Place the patties on a greased baking sheet and bake for 15-20 minutes, flipping halfway through, until golden brown.
2. Can I use fresh tuna instead of canned tuna?
Absolutely. Cook and flake fresh tuna, then proceed with the recipe as usual.
3. How do I store leftover tuna cakes?
Store cooked patties in an airtight container in the refrigerator for up to 3 days. Reheat in a skillet or oven to restore their crispiness.
4. Can I freeze tuna cakes?
Yes, you can freeze uncooked patties. Place them on a baking sheet to freeze individually, then transfer to a freezer-safe bag. Cook directly from frozen or thaw before frying.
5. Can I make this recipe gluten-free?
Simply replace the breadcrumbs with gluten-free breadcrumbs or crushed rice crackers.
6. What can I substitute for mayonnaise?
Greek yogurt or sour cream can be used as a lighter alternative to mayonnaise.
Conclusion: Try This Recipe Today!
Tuna cakes are a delightful, budget-friendly recipe that you can whip up in no time. They’re packed with flavor, easy to customize, and versatile enough for any occasion. So, why wait? Grab those cans of tuna, gather the rest of your ingredients, and create something truly delicious.
These golden, crispy patties are sure to become a favorite in your household. Happy cooking!
Print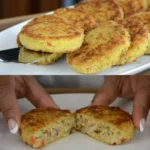
Tuna Cakes: How To Make Tuna Patties
- Total Time: 20 minutes
- Yield: 4-6 patties
Description
Crispy on the outside, tender on the inside, these tuna cakes are a quick and delicious way to transform canned tuna into a satisfying meal. Perfect as a snack, appetizer, or main dish, they’re loaded with flavor and made with simple pantry ingredients.
Ingredients
- 2 cans (5 oz each) of tuna, drained and flaked
- 1/2 cup breadcrumbs
- 1/4 cup mayonnaise
- 1 egg, beaten
- 2 tablespoons finely chopped onion
- 1 tablespoon lemon juice
- 1 tablespoon chopped fresh parsley (or 1 teaspoon dried parsley)
- Salt and pepper, to taste
- Oil for frying
Instructions
1. Prepare the Tuna Mixture
- Drain the canned tuna thoroughly and place it in a large mixing bowl. Flake it with a fork to break up any large pieces.
- Add the breadcrumbs, mayonnaise, beaten egg, finely chopped onion, lemon juice, and parsley to the bowl.
- Season with salt and pepper to taste.
- Mix everything thoroughly until well combined. The mixture should feel slightly damp but cohesive enough to form patties. Add more breadcrumbs if the mixture feels too wet.
2. Shape the Patties
- Scoop a portion of the mixture into your hands and form it into a patty about 1/2 inch thick.
- Repeat until all the mixture is used, making 4-6 patties depending on size.
3. Fry the Patties
- Heat enough oil in a large skillet over medium heat to coat the bottom of the pan.
- Place the patties carefully into the skillet once the oil is hot.
- Pan-fry for 3-4 minutes on each side, or until golden brown and crispy.
- Fry in batches if necessary to avoid overcrowding the pan.
4. Serve
- Remove the patties from the skillet and place them on a plate lined with paper towels to drain any excess oil.
- Serve immediately, garnished with lemon wedges and extra parsley if desired.
Notes
- Draining the Tuna: Ensure the tuna is drained thoroughly to prevent the patties from becoming soggy.
- Custom Flavors: Add garlic powder, paprika, or chili flakes for an extra layer of flavor.
- Make It Gluten-Free: Use gluten-free breadcrumbs as a substitute.
- Alternative Cooking Methods: These patties can also be baked in the oven at 400°F (200°C) for 15-20 minutes, flipping halfway through.
- Prep Time: 10 minutes
- Cook Time: 10 minutes
- Category: Appetizer
- Method: Pan-Fried
- Cuisine: American


