")
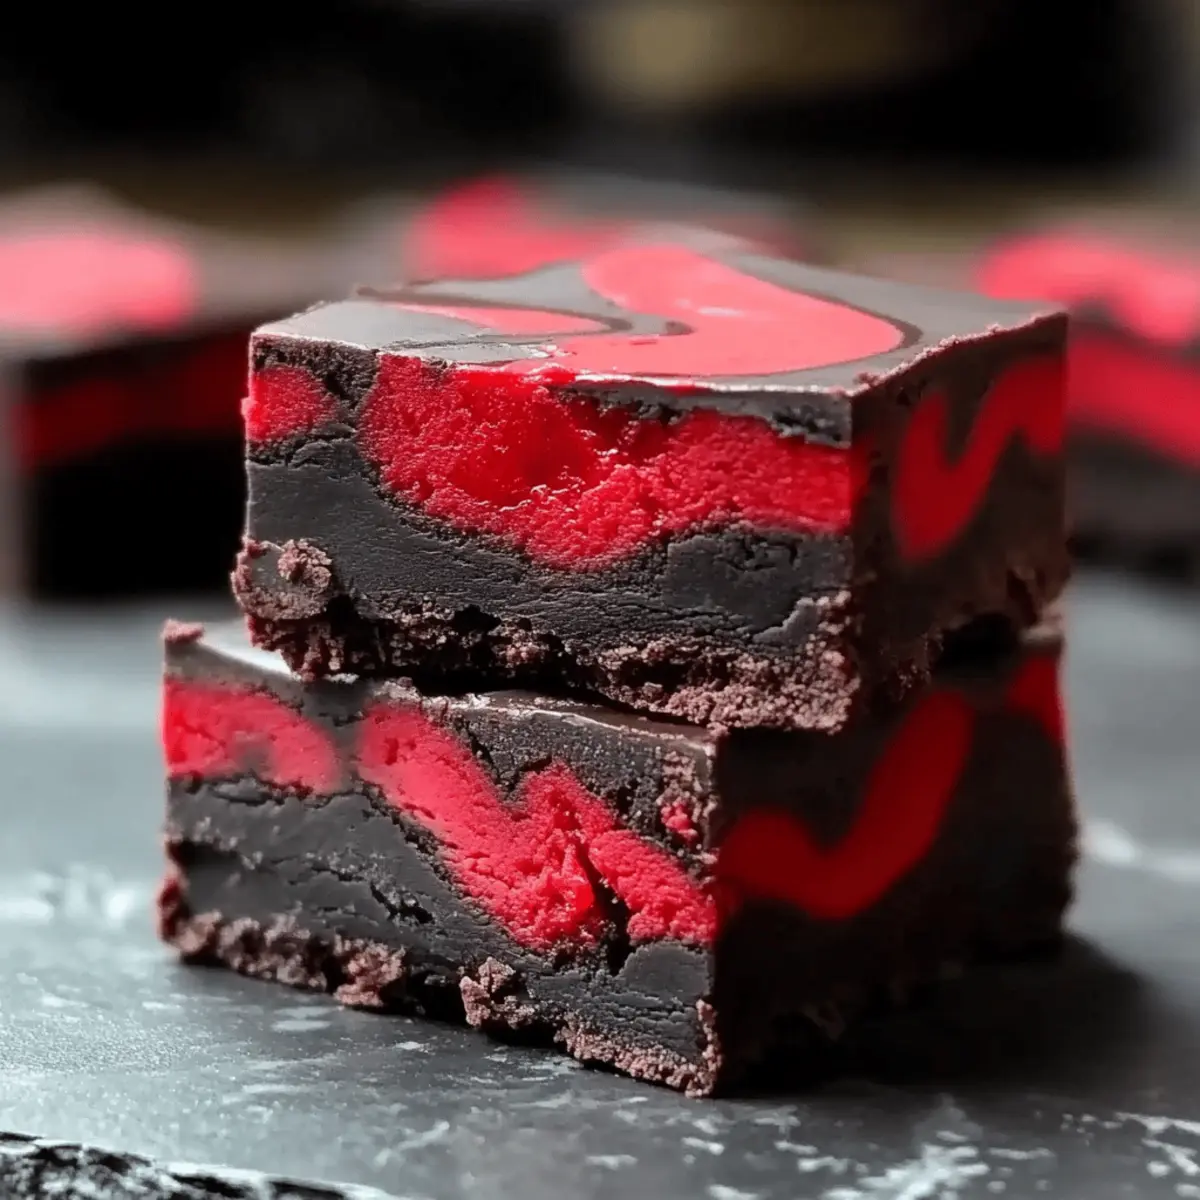
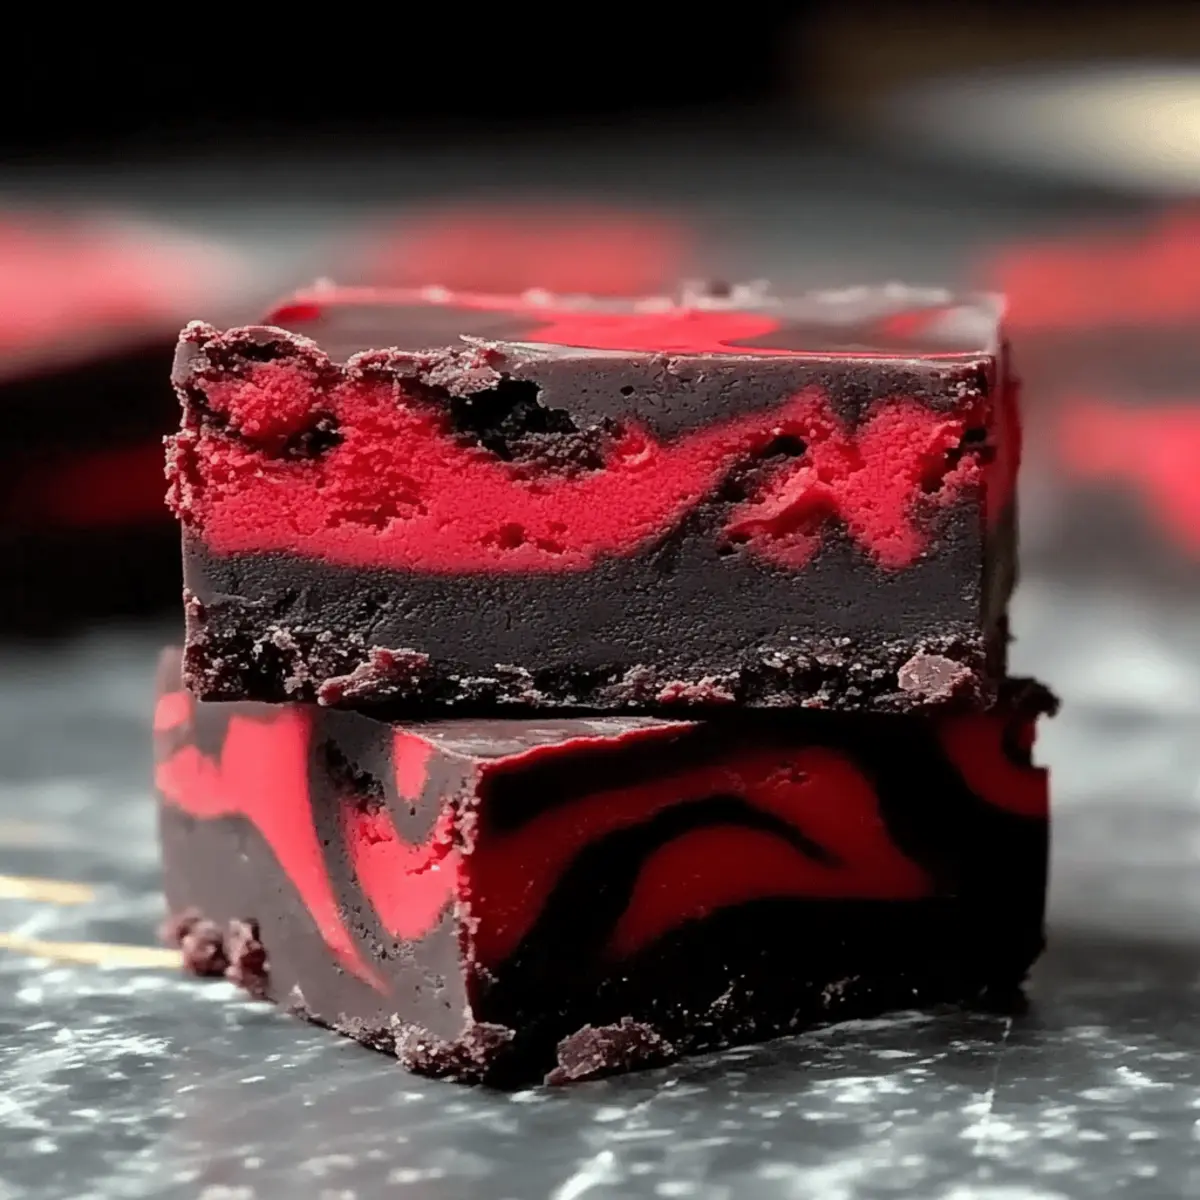
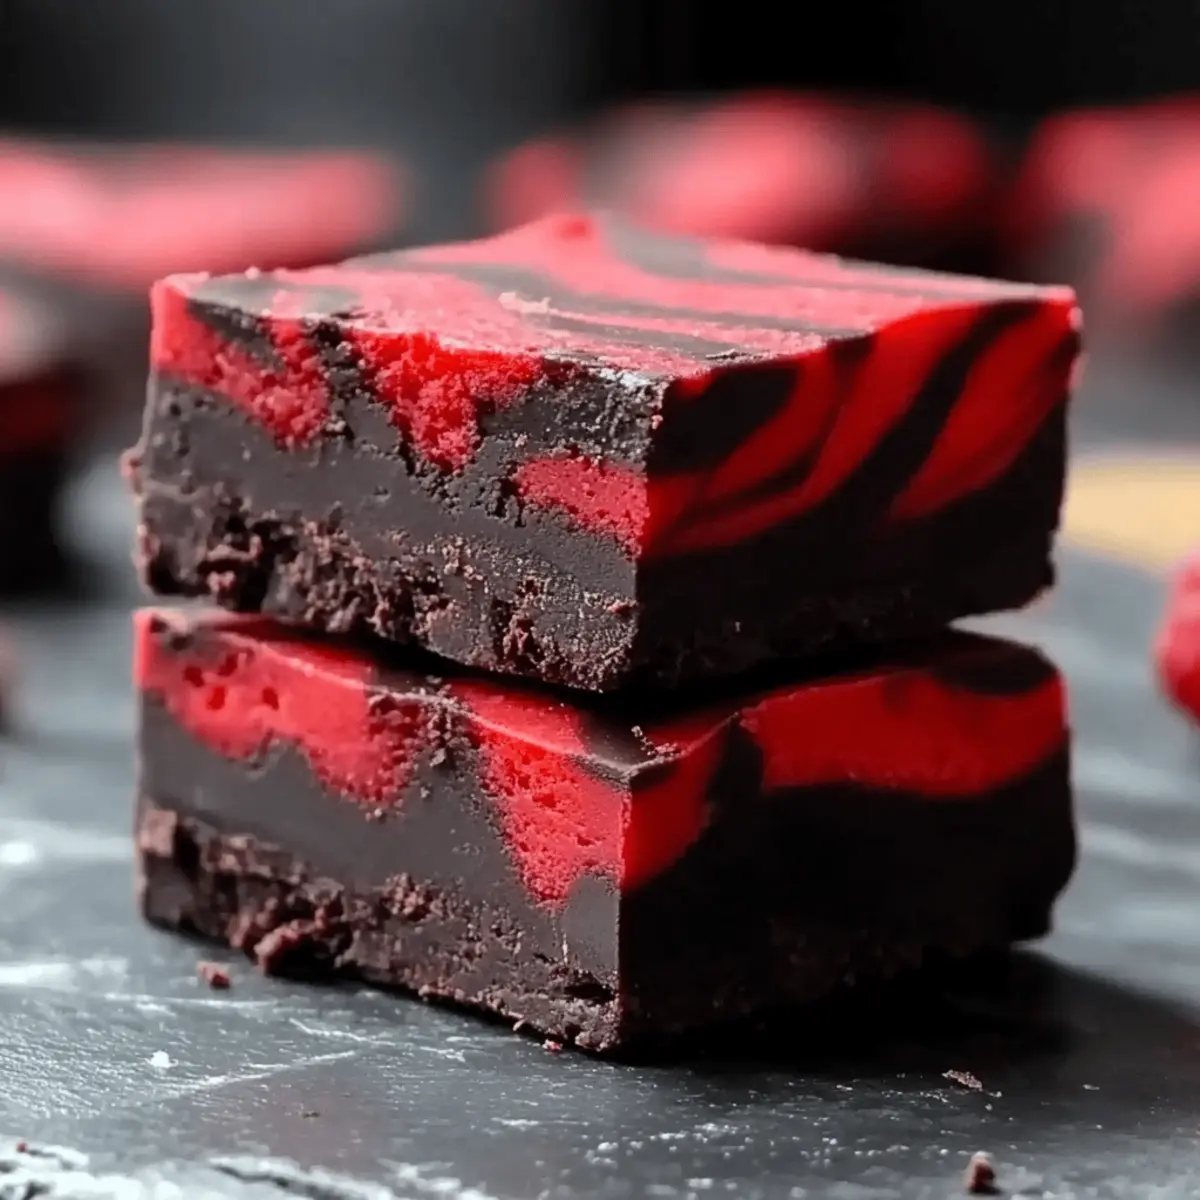
As the autumn leaves crunch beneath my boots, I feel the excitement in the air for all things spooky. One of my absolute favorite treats to whip up for Halloween is Vampire Fudge—this lustrous, no-bake dessert is not only a showstopper with its dark chocolate base but also features a playful raspberry swirl that looks like it’s straight out of a haunted tale. With just three simple ingredients, this recipe promises a quick and easy approach to festive indulgence that anyone can master. Whether you’re throwing a Halloween bash, participating in a bake sale, or just looking for a treat to enjoy while cozying up with a classic horror flick, this Vampire Fudge is sure to satisfy your sweet tooth and wow your friends. Are you ready to get a little spooky in the kitchen?
Why Is Vampire Fudge a Must-Try?
Easy Prep: With just three ingredients, this no-bake fudge is perfect for beginners and busy bakers alike.
Stunning Appearance: Its dark chocolate base and vibrant raspberry swirls create a visually captivating treat that’s bound to impress at any gathering.
Versatile Treat: Whether for Halloween parties or cozy nights, this fudge fits any occasion. Pair it with snack ideas like Crescent Roll Mummy Hot Dogs for a complete spooky feast.
Deliciously Sweet: The blend of rich chocolate and sweet raspberry provides a luxurious dessert that satisfies any sweet tooth.
Family Fun: Involve the kids in the process! Making Vampire Fudge is an enjoyable and educational activity that brings your family together in the kitchen.
Vampire Fudge Ingredients
• A simple delight awaits you!
For the Fudge
- Semi-Sweet Chocolate Chips – Provide the rich chocolate flavor; substitute with dark chocolate for a more intense taste.
- Sweetened Condensed Milk – Creates a creamy texture and sweetness; use evaporated milk for a lighter version, but adjust sugar accordingly.
For the Raspberry Swirl
- Raspberry Jam (Seedless Preferred) – Adds its “bloody” aesthetic and sweetness; substitute with any seedless fruit preserve for a different flavor in your Vampire Fudge.
Step‑by‑Step Instructions for Vampire Fudge
Step 1: Prepare the Pan
Begin by prepping an 8×8-inch square pan for your Vampire Fudge. Line it with parchment paper, ensuring that you have an overhang on two sides. This will make it easy to lift the fudge out later. Set the prepared pan aside as you gather your ingredients and equipment for melting.
Step 2: Melt Chocolate and Milk
In a medium saucepan over low heat, combine semi-sweet chocolate chips and sweetened condensed milk, stirring frequently. Allow the mixture to melt gradually, taking approximately 5-7 minutes until it becomes smooth and glossy. Be careful not to overheat, as this can cause graininess in your fudge. Once melted, remove it from heat.
Step 3: Spread the Chocolate Mixture
Pour the luscious chocolate mixture into the prepared pan, using a spatula to spread it evenly across the bottom. Take a moment to appreciate the rich color and consistency. Gently tap the pan against the counter to remove any air bubbles, ensuring a uniform texture for your Vampire Fudge.
Step 4: Warm the Raspberry Jam
To create the striking “blood” effect for your fudge, warm the raspberry jam in a small microwave-safe bowl. Heat it in short bursts of about 15 seconds, stirring in between, until it’s easily drizzled. This should take no more than 30-45 seconds total. Strongly avoid overheating to maintain its vibrant color and sweetness.
Step 5: Drizzle and Swirl
Using a spoon, drizzle the warmed raspberry jam over the chocolate layer in the pan. Then, take a knife or skewer and swirl it gently through the jam and chocolate, creating a playful, bloody design. Be careful not to over-mix; you want to maintain the contrast and beauty of your Vampire Fudge.
Step 6: Chill to Set
Transfer the pan to the refrigerator, allowing your creation to chill for at least 2 hours. This step is vital as it helps the fudge firm up, resulting in that perfectly sliceable goodness. When it’s ready, the fudge should feel solid to the touch yet slightly soft in texture when you press down gently.
Step 7: Cut and Serve
Once your Vampire Fudge has chilled and set, lift it out of the pan using the parchment overhang. Place it on a cutting board and slice it into neat square pieces. Each bite should reveal the beautiful swirls of raspberry, making it look as appealing as it tastes. Serve the fudge cold for the best texture and presentation.
Vampire Fudge Variations & Substitutions
Feel free to get creative and make this delicious Vampire Fudge your own with these fun variations!
-
White Chocolate: Swap semi-sweet chocolate for white chocolate and reduce sweetened condensed milk slightly for balance. The result is a sweeter, ghostly version!
-
Nutty Crunch: Mix in chopped nuts like walnuts or pecans for a delightful texture. Not only does it add crunch, but it also brings a lovely earthy flavor to the fudge.
-
Spicy Kick: Add a pinch of cayenne or chili powder to the melted chocolate for a surprising hint of heat that beautifully contrasts the sweetness. It’s a bold twist that adventurous eaters will love!
-
Fruit Jam Twist: Use different seedless fruit jams like strawberry or blackberry for varied flavors. This opens up a new spectrum of delicious options while keeping that fun raspberry swirl look.
-
Cookies & Cream: Crush some chocolate sandwich cookies and blend them into the fudge mixture before chilling. This will give your fudge a cookies-and-cream flavor that’s irresistible!
-
Adding Sprinkles: Just before the fudge sets, sprinkle Halloween-themed candy or sprinkles on top for an extra decorative and festive touch. Kids will love the fun addition!
-
Vegan Option: Substitute semi-sweet chocolate with vegan chocolate chips and replace sweetened condensed milk with coconut cream for a plant-based version that’s equally yummy.
Let your imagination run wild and enjoy these modifications! Pair your fudge with delightful snacks like Crescent Roll Mummy Hot Dogs for a complete Halloween experience.
Expert Tips for Making Vampire Fudge
-
Perfect Chocolate Texture: Keep the heat low when melting the chocolate to prevent graininess and achieve that smooth fudge texture.
-
Jam Warming Technique: Heat the raspberry jam in short bursts to avoid overheating. You want it liquid enough to drizzle but still vibrant in color.
-
Swirl with Care: When creating the raspberry swirl, incorporate gentle movements with a knife. Over-stirring can muddle the colors and beauty of your Vampire Fudge.
-
Chill Time Matters: Make sure to chill the fudge for at least 2 hours to allow it to set properly. This ensures clean cuts and a firm yet creamy texture.
-
Customize Your Flavors: Feel free to experiment with different jams or even add crushed cookies for a unique twist on Vampire Fudge.
What to Serve with Vampire Fudge?
When you’re indulging in a slice of this decadent delight, why not elevate your Halloween celebration with some tasty accompaniments?
-
Ghost Fruit Skewers: Bright and refreshing, these whimsical fruit skewers add a playful touch and a burst of freshness alongside the rich fudge.
-
Crescent Roll Mummy Hot Dogs: Savory, warm, and surprisingly easy to make, these mummy hot dogs are reminiscent of Halloween fun and balance the sweetness of your Vampire Fudge.
-
Pumpkin Soup: Silky and creamy, a scoop of pumpkin soup serves as the perfect warm starter to contrast with the cool, sweet fudge.
-
Monster Marshmallows: Dressed up with edible googly eyes, these plush marshmallows make for a fun and thematic sweet treat that pairs nicely with the fudgy richness.
-
Spiced Apple Cider: Warm, aromatic, and bursting with fall flavors, this beverage is the perfect complement to the sweetness while enhancing the Halloween ambiance.
-
Chocolate-Covered Pretzels: A salty and sweet combination, these pretzels offer a crisp texture that beautifully contrasts the softness of your Vampire Fudge.
Storage Tips for Vampire Fudge
Room Temperature: Store your Vampire Fudge in an airtight container at room temperature for up to 5 days to keep it fresh and maintain its delicious flavor.
Fridge: For longer storage, refrigerate the fudge in an airtight container. It will stay good for about 1-2 weeks, giving you that delectable treat anytime you crave a sweet fix.
Freezer: Wrap the fudge tightly in plastic wrap and place it in a freezer-safe container to freeze for up to 2 months. Thaw it overnight in the fridge before serving for the best texture.
Reheating: If the fudge feels too firm after refrigeration, let it sit at room temperature for a bit to soften before slicing. Enjoy that rich chocolate and raspberry goodness!
Make Ahead Options
These Vampire Fudge treats are perfect for meal prep enthusiasts! You can prepare the fudge base up to 24 hours in advance by melting the chocolate and sweetened condensed milk, then pouring it into the lined pan. Allow it to cool, then cover it tightly with plastic wrap and refrigerate. For the raspberry swirl, you can also warm the jam ahead of time and store it in a separate airtight container in the refrigerator, ready to drizzle when you’re set to serve. When it’s time to enjoy your spooky creation, simply swirl the jam over the chilled fudge, let it firm up a bit more if necessary, slice into squares, and you’ll have a delightful dessert ready in no time—just as delicious as freshly made!
Vampire Fudge Recipe FAQs
What type of chocolate should I use for the Vampire Fudge?
Absolutely! For the fudgy texture and rich flavor, semi-sweet chocolate chips are best, but feel free to substitute with dark chocolate for a deeper flavor profile. Just ensure it’s high-quality to avoid any graininess.
How should I store my Vampire Fudge?
You can keep your Vampire Fudge in an airtight container at room temperature for up to 5 days. For longer-lasting freshness, store it in the refrigerator where it can last about 1-2 weeks. Just be sure to keep it tightly sealed to avoid any drying out!
Can I freeze Vampire Fudge?
Yes! To freeze your Vampire Fudge, wrap it tightly in plastic wrap and place it into a freezer-safe container. It can be frozen for up to 2 months. When you’re ready to enjoy, simply thaw it overnight in the fridge for the best texture.
What should I do if the fudge becomes grainy?
Very! If you find your Vampire Fudge has turned grainy, this usually means it was overheated during the melting process. To fix this, next time, melt the chocolate and condensed milk on low heat, stirring constantly; avoid exceeding 5-7 minutes to ensure a smooth mix.
Is this recipe suitable for anyone with dietary restrictions?
Of course! This Vampire Fudge is vegetarian-friendly, but if you’re catering to specific dietary needs, consider opting for dairy-free chocolate chips and a substituting the sweetened condensed milk with a plant-based alternative. Always double-check labels for allergens!

Vampire Fudge: Easy No-Bake Halloween Treat for Fun Celebrations
Ingredients
Equipment
Method
- Prepare the Pan: Line an 8x8-inch square pan with parchment paper for easy lifting later.
- Melt Chocolate and Milk: In a medium saucepan over low heat, combine chocolate chips and sweetened condensed milk, stirring frequently until smooth and glossy, about 5-7 minutes.
- Spread the Chocolate Mixture: Pour the chocolate mixture into the prepared pan and spread evenly. Tap the pan to remove air bubbles.
- Warm the Raspberry Jam: Warm raspberry jam in a microwave-safe bowl in short bursts of 15 seconds, stirring in between, until easily drizzled.
- Drizzle and Swirl: Drizzle the warmed raspberry jam over the chocolate layer and swirl it gently with a knife or skewer.
- Chill to Set: Transfer the pan to the refrigerator and chill for at least 2 hours until firm.
- Cut and Serve: Lift the fudge out using the parchment overhang, cut into squares, and serve cold.
")