")
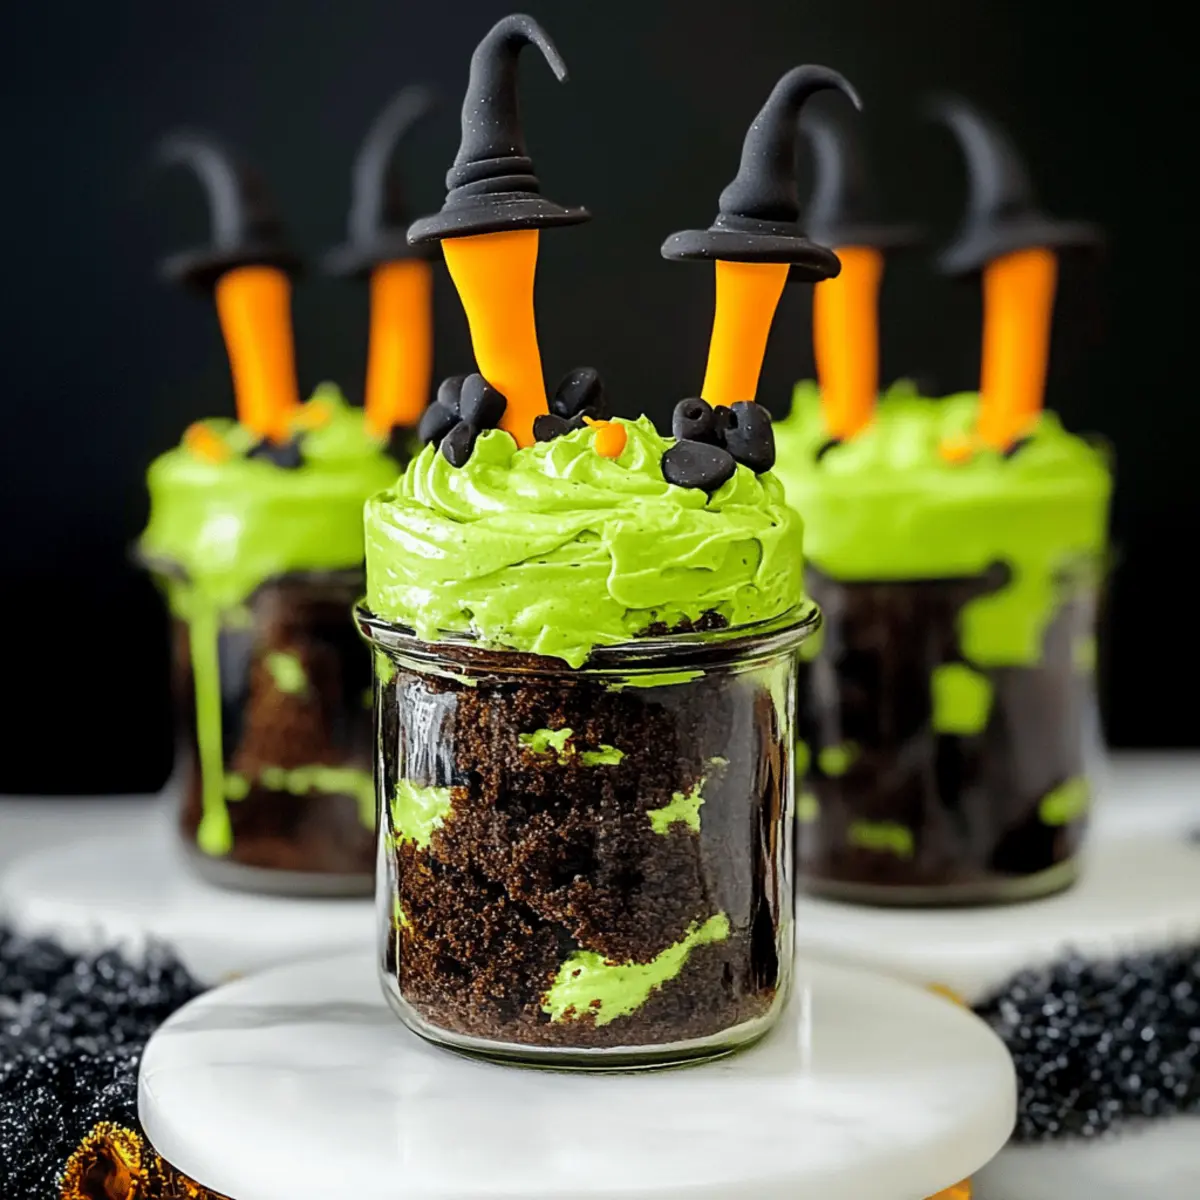
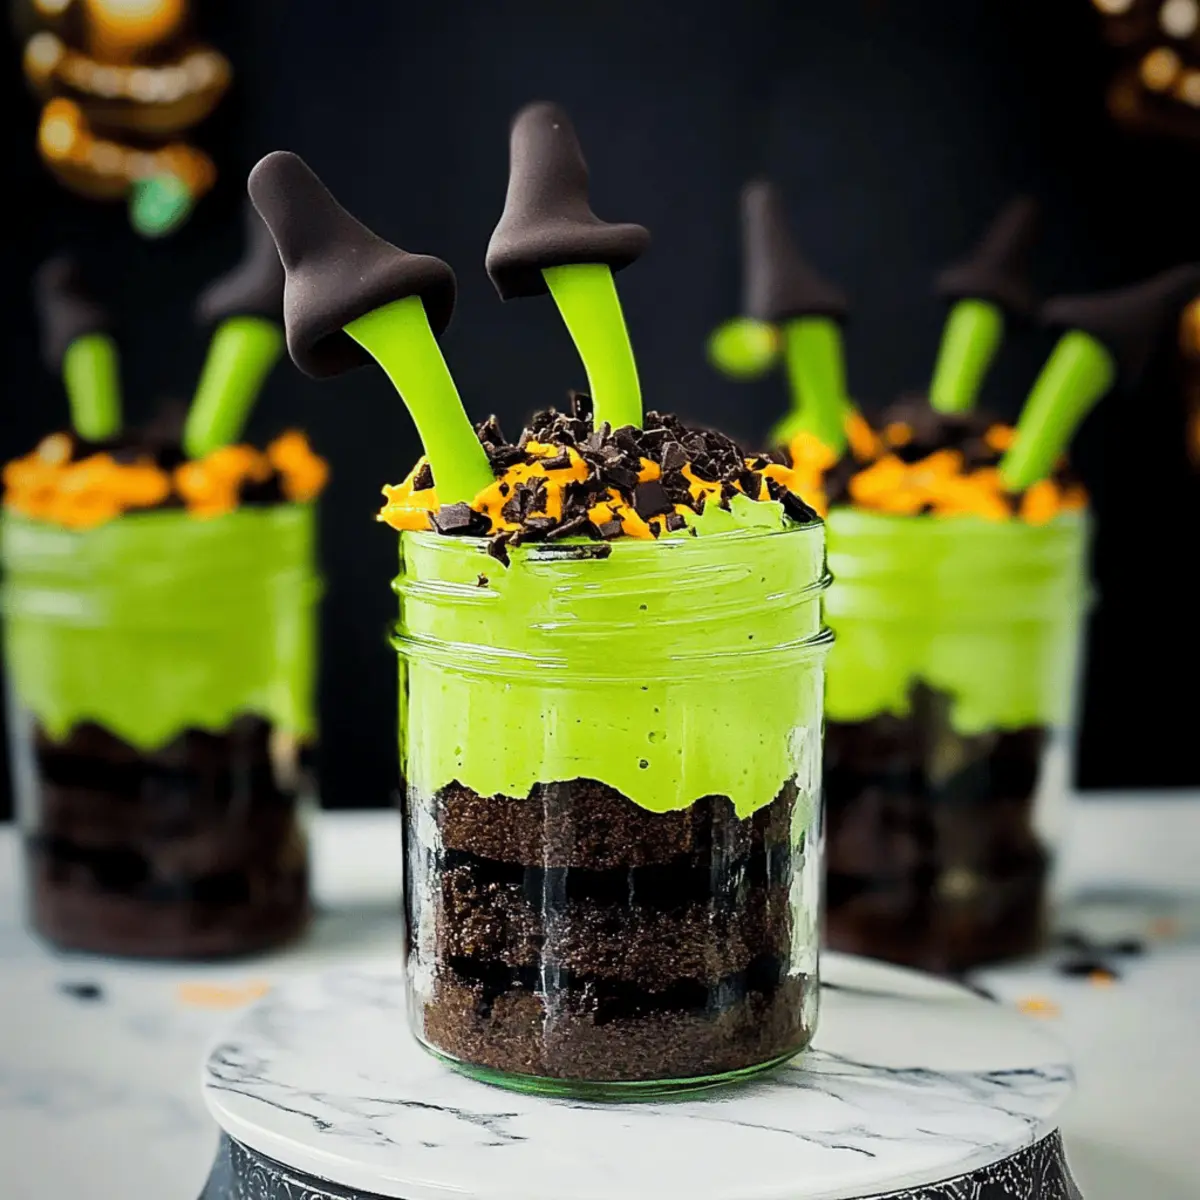
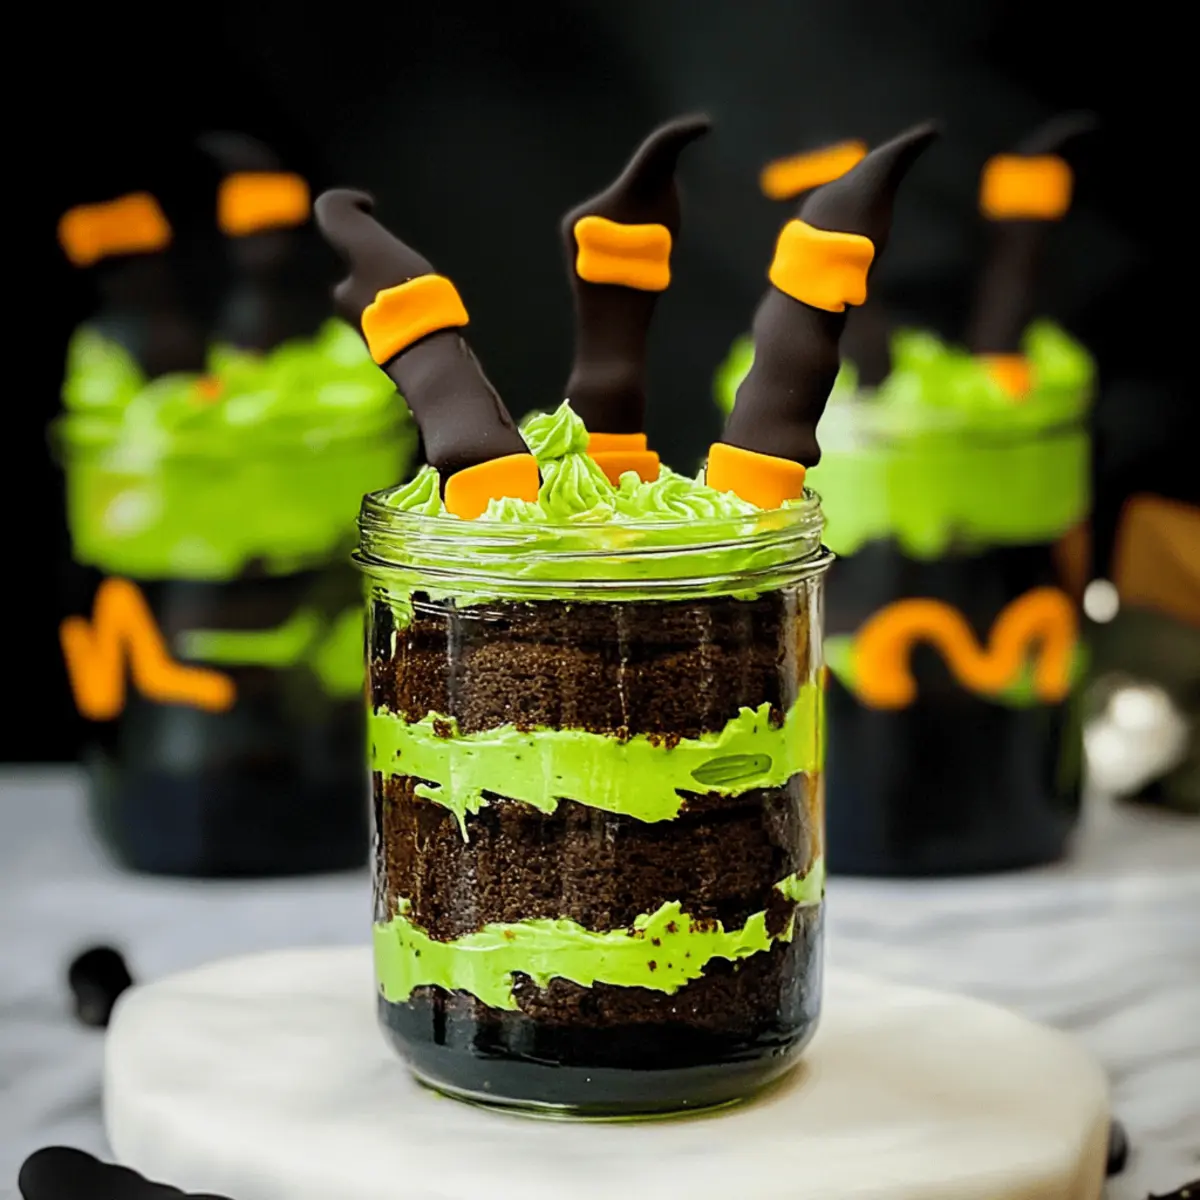
As the crisp autumn leaves begin to swirl around us, the season of spooky delight arrives! I’m thrilled to share my Witches’ Brew Halloween Cake Jars, an enchanting treat that combines mouthwatering layers of rich chocolate cake with a playful twist. Not only are these jars eye-catching with their vibrant green buttercream and whimsical fondant witch legs, but they also make an easy, fun-filled dessert for Halloween gatherings or cozy nights in. The best part? They’re quick to assemble and perfect for any home-chef looking to impress. Are you ready to mix up some Halloween magic in your kitchen? Let’s dive into this delightful recipe!
Why You’ll Adore This Halloween Treat?
Visual Delight: Each jar is a stunning presentation, with layers of rich chocolate cake and bright green buttercream, guaranteed to wow guests at your Halloween gatherings!
Easy Assembly: With simple steps from baking to layering, you’ll have these festive desserts ready without a fuss.
Customizable Fun: Swap out flavors or fondant designs to create unique treats for different spooky themes.
Perfectly Portable: Cake jars are ideal for on-the-go parties—a delightful sweet you can take anywhere!
Crowd-Pleasing Flavor: The combination of moist chocolate cake and creamy buttercream makes these jars a hit with everyone, from kids to adults.
For a refreshing variation, consider swapping the chocolate for a Fricassee Cake Global twist!
Witches’ Brew Halloween Cake Jars Ingredients
For the Chocolate Cake
• Self-Raising Flour (330g) – Provides structure and lightness to the cake; substitute with all-purpose flour plus baking powder if needed.
• Granulated Sugar (360g) – Adds sweetness and moisture; no substitutions suggested for the perfect balance.
• Butter (360g) – Acts as a key fat for flavor and texture; unsalted butter gives you more control over salt levels.
• Eggs (6) – Binds ingredients and adds moisture; for an egg-free option, try flax eggs (1 tablespoon flaxseed meal + 3 tablespoons water per egg).
• Unsweetened Black Cocoa Powder (30g) – Deepens the chocolate flavor; regular cocoa can be used but will change the cake’s hue and taste.
• Baking Powder (1½ tsp) – Helps the cake rise; baking soda can be used as a substitute.
• Salt (½ tsp) – Enhances overall flavor; don’t skip this step!
• Milk (90ml) – Moistens the batter; can use non-dairy milk for a dairy-free version.
• Vanilla Extract (2 tsp) – Provides flavor complexity; opt for pure extract for the best outcome.
For the Buttercream
• Unsalted Butter (400g) – Big flavor base for the buttercream; feel free to use salted butter if you prefer.
• Powdered Sugar (800g) – Sweetens and thickens the buttercream; no substitutions here for the right texture.
• Food Coloring (Electric green) – Adds a festive twist to your buttercream; gel coloring works best for vibrant results.
For the Fondant Decorations
• Orange Fondant (250g) – Used for crafting witch legs; modeling chocolate can be a fun alternative if you like.
• Black Fondant (200g) – Creates the witch leg details and shoes; also replaceable with modeling chocolate as desired.
• CMC Powder (1 tbsp) – Enhances fondant structure; optional but helps create sturdy decorations.
• Sprinkles – Top your jars with festive flair using any type you prefer for a fun finish!
With these Witches’ Brew Halloween Cake Jars ingredients, you’re all set to create a magical Halloween treat that will delight everyone!
Step‑by‑Step Instructions for Witches’ Brew Halloween Cake Jars
Step 1: Prepare Fondant Legs
Begin by kneading 1 tablespoon of CMC powder into 250g of orange fondant until it’s well combined. Roll the fondant into long strips, cutting them to your desired length for witch legs. Shape small pieces of black fondant to create stripes and shoes, then attach them to the legs. Allow the legs to dry completely while you prepare the cake, as this will help them hold their shape.
Step 2: Bake Cake
Preheat your oven to 170°C (340°F) to ensure even baking. In a large mixing bowl, cream together 360g of unsalted butter and 360g of granulated sugar until light and fluffy, which usually takes about 3–5 minutes. Add in 6 eggs one at a time, mixing well after each addition. Gradually incorporate the dry ingredients mixed with 90ml of milk, alternating between the two, and blend until the batter is smooth. Pour the mixture into a greased and floured cake tin and bake for 45–50 minutes, or until a skewer inserted comes out clean. Allow the cake to cool completely before frosting.
Step 3: Make Buttercream
While the cake cools, prepare the vibrant buttercream. In a mixing bowl, cream 400g of unsalted butter until it’s smooth and fluffy, which takes about 5 minutes. Gradually add in 800g of powdered sugar, mixing on low speed to avoid a sugary cloud. If the buttercream becomes too thick, add a splash of milk for the desired consistency. Finally, mix in electric green food coloring until you achieve a bright, festive hue that resembles a bubbling potion.
Step 4: Assemble Jars
Once your cake has cooled, use a round cutter to create circles from the cake. In each jar, layer pieces of the chocolate cake, followed by a generous dollop of buttercream, and sprinkle in your favorite festive sprinkles for a touch of magic. Continue layering until the jars are filled to the top, ensuring your last layer is buttercream. For the final touch, gently place the fondant witch legs atop the buttercream, creating an enchanting display that’s sure to delight!
Step 5: Final Presentation
After assembling the jars, give each one a light dusting of colorful sprinkles to enhance the whimsical theme of the Witches’ Brew Halloween Cake Jars. When arranging them for presentation, consider adding creepy Halloween-themed decor around the jars for added spookiness. Serve immediately at your Halloween gathering or seal with lids for a magical treat that can be enjoyed later!
How to Store and Freeze Witches’ Brew Halloween Cake Jars
- Room Temperature: These delightful cake jars are best enjoyed within 2-3 days when kept at room temperature. Seal with a lid to maintain freshness.
- Fridge: Store in the refrigerator for up to one week. Make sure to keep the jars airtight to prevent the buttercream from drying out and losing its creamy texture.
- Freezer: Witches’ Brew Halloween Cake Jars can be frozen for up to 2 months. To freeze, remove the lid, wrap each jar tightly in plastic wrap, and place in a freezer-safe container.
- Reheating: If you desire to serve them warm, let them thaw in the fridge overnight and then enjoy as is or pop them in the microwave for a few seconds, but be careful not to overheat!
Witches’ Brew Halloween Cake Jars Variations
Feel free to get creative with these delicious cake jars—there’s no limit to the spooky fun you can have!
- Vanilla Cake: Swap the chocolate cake for a delectable vanilla base for a lighter flavor that pairs beautifully with the green buttercream.
- Red Velvet Twist: For a festive flair, substitute chocolate cake with red velvet; it adds a fantastic color contrast to the green buttercream.
- Dairy-Free Delight: Use non-dairy butter and your favorite plant-based milk to make the buttercream and cake dairy-free, ensuring everyone can indulge.
- Fondant Alternatives: For ease, replace fondant with modeling chocolate; it’s easier to work with and offers a different taste and texture.
- Flavor Infusion: Try adding a splash of orange or almond extract into your buttercream for an unexpected burst of flavor that elevates your witches’ brew.
- Choco Chips Surprise: Fold in chocolate chips into the batter for extra chocolatey bursts throughout each jar, making these even more delightful.
- Spicy Kick: For those who love a little heat, add a pinch of cayenne pepper to your buttercream for a surprising spicy finish contrasting with the sweetness.
- Homemade Sprinkles: Get crafty by making your own Halloween-themed sprinkles using melted chocolate and various molds, adding a personal touch to your jars!
Feel free to experiment as you whip up your own batch of these magical Witches’ Brew Halloween Cake Jars! Additionally, for something sweet and easy, consider trying a delightful lemon cake mix cookies recipe! You won’t regret adding a twist to your baking collection.
Make Ahead Options
These Witches’ Brew Halloween Cake Jars are fantastic for meal prep, allowing you to save time for festive activities! You can prepare the cake and buttercream up to 3 days in advance. Simply bake the cake, let it cool completely, then wrap it tightly in plastic wrap to prevent it from drying out in the refrigerator. The buttercream can be stored in an airtight container in the fridge as well. When you’re ready to assemble, cut the cake into circles and layer it with the buttercream in jars, adding festive sprinkles and fondant legs just before serving for that fresh, vibrant finish. By prepping ahead, you’ll ensure delicious treats with minimal last-minute stress!
What to Serve with Witches’ Brew Halloween Cake Jars
Transform your Halloween gathering into a culinary adventure with delightful pairings that complement these enchanting cake jars.
- Spooky Punch: A fizzy fruit punch infused with orange and lemon flavors adds a refreshing contrast to the rich cake.
- Ghostly Meringues: Light and airy meringue ghosts create a fun element, balancing the density of the Witches’ Brew Halloween Cake Jars.
- Crispy Apple Slices: Serve tart apple slices for a crunchy, refreshing bite that perfectly offsets the sweetness of the dessert.
- Chocolate-Dipped Pretzels: The salty-sweet combo of pretzels adds a delightful crunch, enhancing the overall flavor experience.
For a cozy touch, consider offering warm apple cider as a perfect drink option. This raises the comfort level while still keeping the spooky theme alive!
- Halloween Themed Cookies: Brightly decorated cookies add an extra festive touch, proving they’re as fun to look at as they are to eat.
- Mini Pumpkin Pies: Rich and spiced, these mini treats echo the fall flavors and make for a lovely dessert contrast.
- Candy Corn Popcorn: A sweet and salty treat, this vibrant addition is visually appealing and adds a fun crunch.
With these thoughtful pairings, your dessert table will turn into a magical feast that guests will remember long after the last bite!
Expert Tips for Witches’ Brew Halloween Cake Jars
-
Measure Accurately: Use a digital scale for precise measurements, especially for the cake and fondant, to ensure your Witches’ Brew Halloween Cake Jars come out perfectly every time.
-
Fondant Care: Keep fondant covered when not in use to prevent it from drying out. This is crucial for creating the perfect witch legs that stand tall!
-
Baking Uniformity: Rotate your cake tin halfway through baking to achieve an even rise. This helps avoid a dome shape and ensures flatter layers for better assembly.
-
Cooling Time Matters: Allow the cake to cool completely for at least an hour before frosting. This ensures that the buttercream doesn’t melt and makes layering neat.
-
Coloring Techniques: For vibrant green buttercream, opt for gel coloring rather than liquid. It delivers maximum color without altering the buttercream’s texture.
-
Let Creativity Flow: Don’t hesitate to experiment with different flavored cakes, such as vanilla or red velvet, to switch up your Witches’ Brew Halloween Cake Jars while keeping the festive spirit alive.
Witches’ Brew Halloween Cake Jars Recipe FAQs
What type of flour should I use for the cake?
For the Witches’ Brew Halloween Cake Jars, I suggest using self-raising flour for a light and fluffy texture. If you don’t have that on hand, you can substitute with all-purpose flour plus 1½ teaspoons of baking powder to achieve similar results.
How long can I store the cake jars?
You can enjoy these enchanting cake jars for up to 2-3 days at room temperature if sealed properly with a lid. If you’d like to keep them longer, refrigerate for up to one week. Just make sure to store them in airtight containers to maintain the moistness of the buttercream!
Can I freeze the Witches’ Brew Halloween Cake Jars?
Absolutely! You can freeze these delightful jars for up to 2 months. To do so, remove the lid, wrap each jar tightly in plastic wrap, and place them in a freezer-safe container. When you’re ready to enjoy, thaw them in the fridge overnight before serving.
What if my cake doesn’t rise properly?
If your cake doesn’t rise, it could be due to expired baking powder or not properly mixing in the dry ingredients. Make sure to check your leavening agents for freshness and mix your dry ingredients gradually with the wet ingredients to ensure a well-blended batter. A good rule of thumb is to use the “skewer test” to confirm doneness; if it comes out moist but clean, that’s perfect!
Are there any dietary considerations I should be aware of?
Yes! If you or your guests have allergies, please note that this recipe contains gluten (in the flour) and dairy (in the butter and milk). For a gluten-free option, consider using a gluten-free flour blend. To make it dairy-free, substitute the butter with a vegan alternative and use non-dairy milk instead.
How can I make these jars kid-friendly?
To make the Witches’ Brew Halloween Cake Jars perfect for kids, consider reducing the amount of cocoa powder slightly to make it less intense in flavor, or use vanilla or red velvet cake for a different yet fun twist! Additionally, involving kids in decorating the jars can make it an exciting activity—let them get creative with the sprinkles and fondant!

Witches' Brew Halloween Cake Jars – Spooktacularly Delicious Treats
Ingredients
Equipment
Method
- Begin by kneading 1 tablespoon of CMC powder into 250g of orange fondant until well combined and shape into witch legs.
- Preheat your oven to 170°C (340°F). Cream together unsalted butter and granulated sugar until light and fluffy. Add eggs one at a time, mixing well after each addition.
- Gradually incorporate the dry ingredients mixed with milk, alternating between the two, and blend until smooth. Pour into prepared cake tin and bake for 45-50 minutes.
- In a mixing bowl, cream unsalted butter for buttercream until smooth, gradually add powdered sugar, and mix in electric green food coloring.
- Layer cooled chocolate cake with buttercream in jars, topping with sprinkles and placing fondant witch legs on top.
- Dust with colorful sprinkles and serve immediately or seal with lids for later enjoyment.
")


