")
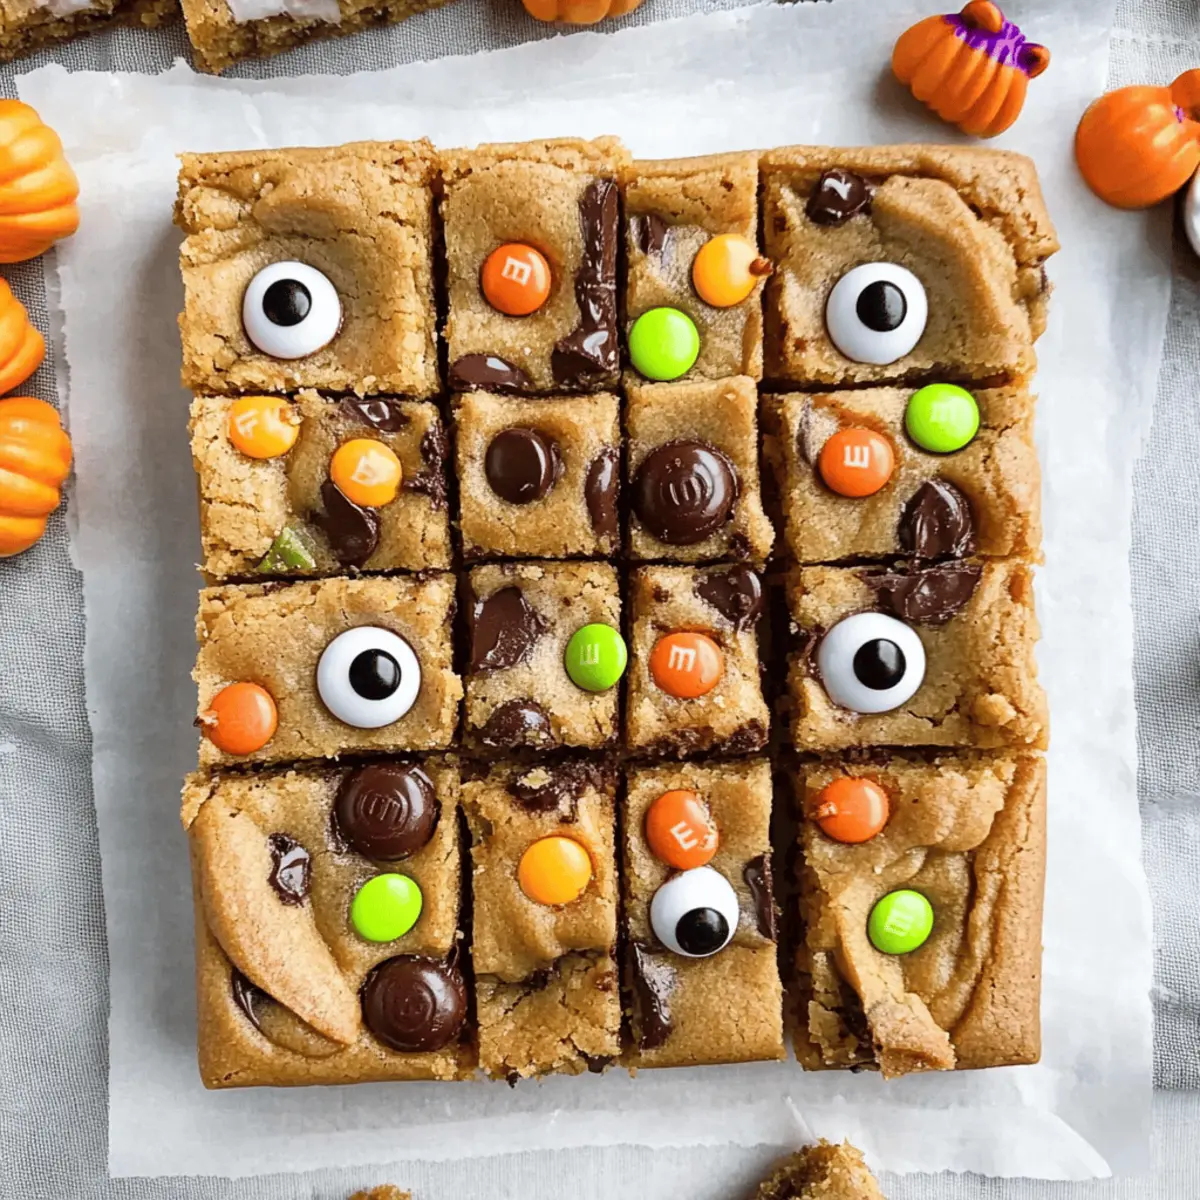
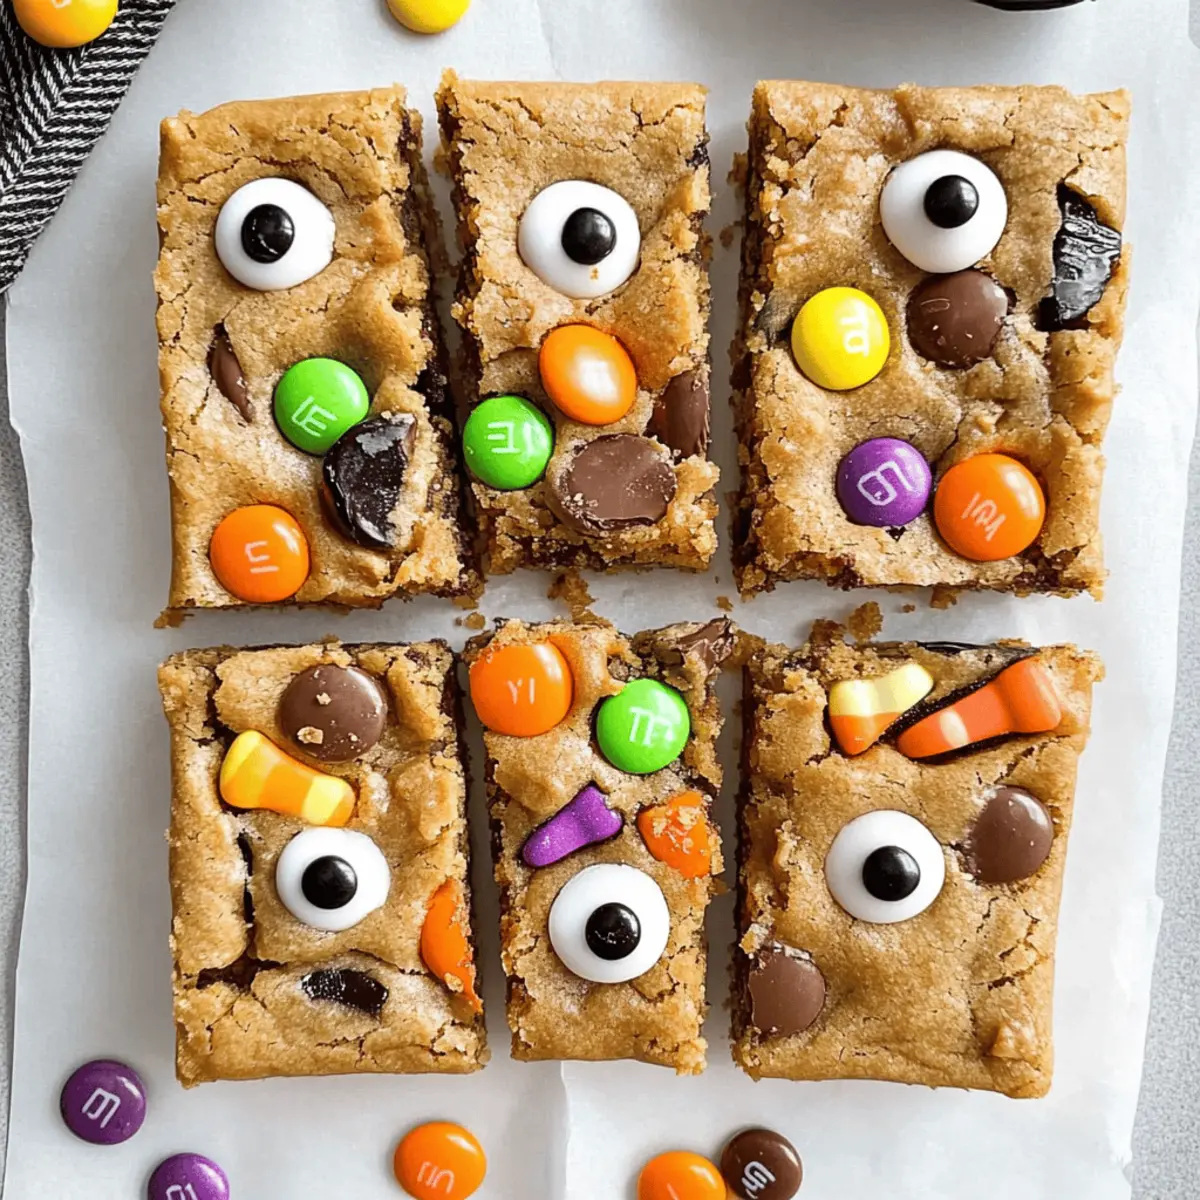
As the breeze turns chilly and the leaves fall in hues of orange and gold, it’s hard not to feel the excitement of Halloween creeping in. This year, why not channel that festive spirit into something deliciously fun? Enter my Halloween Candy Cookie Bars! Not only do they come together in a snap, but they’re also a fabulous way to use up leftover candies from the trick-or-treating stash. With a chewy texture and a colorful topping of your favorite Halloween treats—including spooky candy eyes—they’re sure to bring joy to both kids and adults alike. The best part? They make for a perfect dessert at any Halloween gathering or cozy movie night in. So, are you ready to get your bake on and create these delightful bars? Let’s dive in!
Why Are These Cookie Bars a Must-Try?
Simplicity at its Best: You’ll be amazed at how quickly these bars come together, making them perfect for both novice bakers and seasoned pros.
Customizable Goodness: Use up those leftover Halloween treats, ensuring no candy goes uneaten. Mix Reese’s Pieces, M&M’s, or any chocolate candy for a personalized twist.
Crowd-Pleasing Delight: These bars are perfect for Halloween gatherings, guaranteed to impress kids and adults alike with their festive flair.
Irresistible Texture: Soft, chewy cookie base topped with a delightful crunch from the assorted candies creates a scrumptious balance.
Effortless Storage: They can be stored easily for a week or frozen for later, making snacking a breeze! Don’t forget to check out the Mastering Nestle Cookie for other cookie inspiration!
Halloween Candy Cookie Bars Ingredients
Use your favorite leftover candies!
For the Dough
- Unbleached All-Purpose Flour – Provides structure and body to the cookie bars. Substitution: Whole wheat flour can be used for a slightly nuttier flavor.
- Baking Soda – Acts as a leavening agent, contributing to the bars’ lightness. No substitutions; essential for the recipe.
- Kosher Salt – Enhances flavor and balances sweetness. Substitution: Sea salt can be used.
- Unsalted Butter – Adds richness and moisture. Substitution: Can use margarine, but flavor will differ.
- Dark Brown Sugar – Contributes moisture and a deep, caramel-like flavor. Substitution: Light brown sugar can work, though flavor will be less rich.
- Granulated Sugar – Sweetens and aids in browning. No substitutions recommended for best results.
- Large Eggs – Binds ingredients together and provides moisture. No substitutions; ensure they are at room temperature for optimal incorporation.
- Real Vanilla Extract – Adds depth of flavor. Substitution: Imitation vanilla or other extracts (like almond) can be used for a different flavor profile.
- Reese’s Pieces (½ cup) – Provide chocolate-peanut butter flavor throughout the dough. Substitution: Any similar candy can be used, like peanut butter M&Ms.
- Chocolate M&M’s (½ cup) – Add texture and sweetness. Substitution: Use any chocolate candies you prefer.
For the Topping
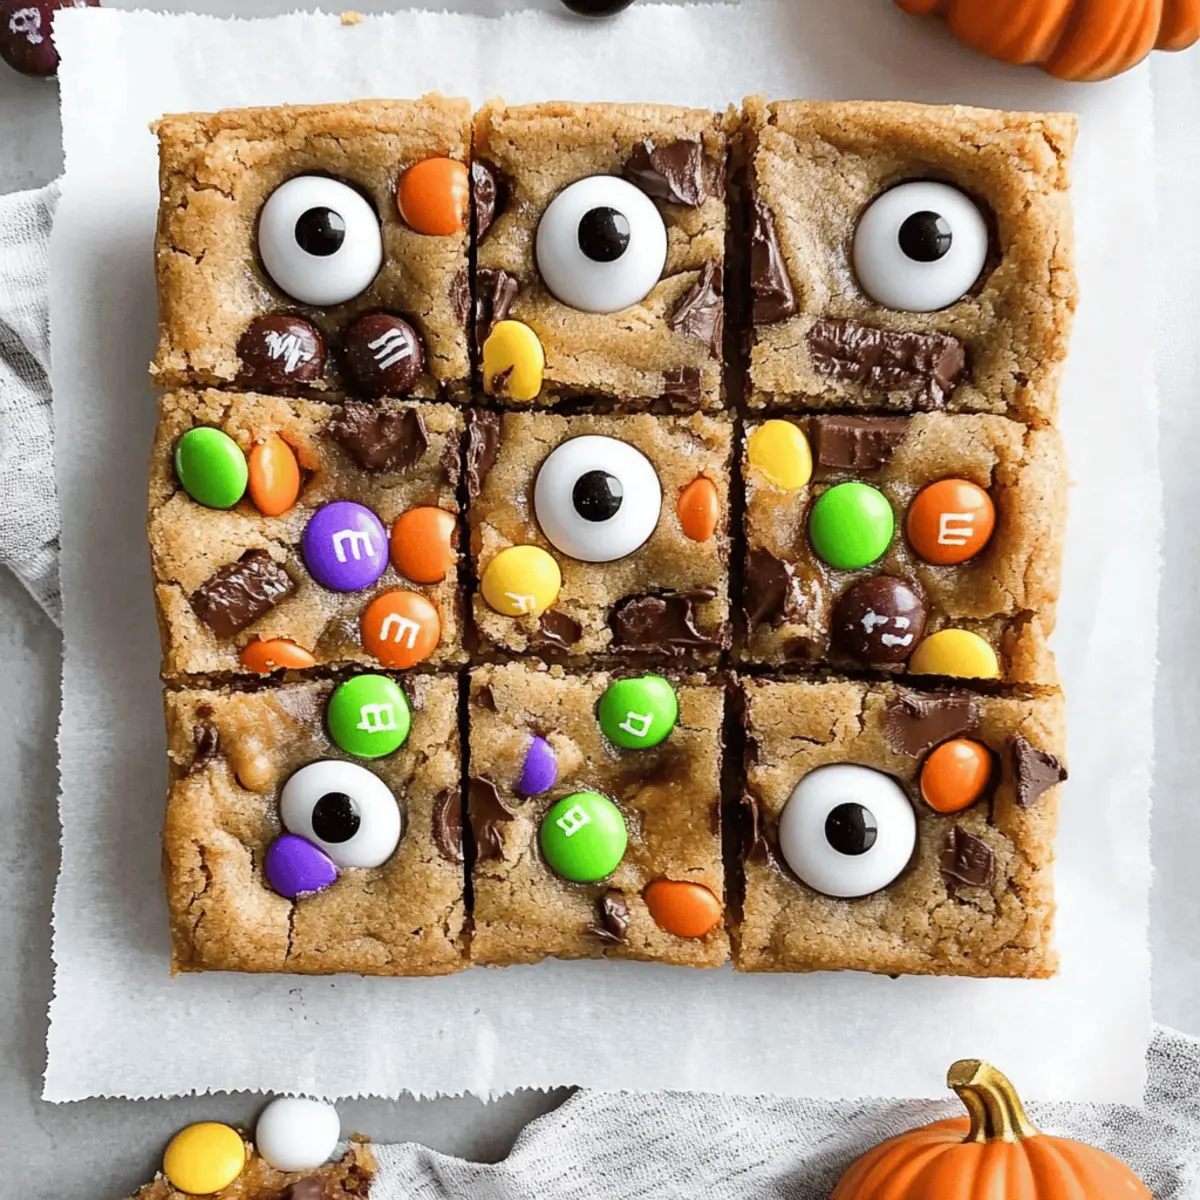
- Leftover Halloween Candy – Customizes the bars; can include any variety such as Snickers, Twix, etc. Notes: Ensure candies are chopped to ensure even distribution.
- Candy Eyes – Serve as a fun decorative element that enhances the Halloween theme. Optional but recommended for festive appeal.
Step‑by‑Step Instructions for Halloween Candy Cookie Bars
Step 1: Preheat the Oven
Begin by preheating your oven to 350°F (180°C). This ensures the Halloween Candy Cookie Bars bake evenly. While the oven is warming, line a 9x13x2 inch baking pan with parchment paper, lightly greasing it to prevent sticking. Having everything ready will make the next steps a breeze!
Step 2: Mix Dry Ingredients
In a medium-sized bowl, whisk together 2 cups of unbleached all-purpose flour, 1 teaspoon of baking soda, and ½ teaspoon of kosher salt. This mixture provides the foundation for your cookie bars, ensuring they have the right texture. Set this aside, allowing the flavors to meld while you work on the wet ingredients.
Step 3: Cream Butter and Sugars
In a large mixing bowl, beat together ½ cup of unsalted butter with ¾ cup of dark brown sugar and ½ cup of granulated sugar until the mixture is creamy and light. This process typically takes about 2-3 minutes. Next, add 2 large eggs, one at a time, mixing well after each addition, then stir in 2 teaspoons of real vanilla extract to infuse delightfully rich flavor.
Step 4: Combine Wet and Dry Mixtures
Gradually add the dry flour mixture to the wet ingredients, mixing until just combined. Be careful not to overmix, as this can affect the texture. Once combined, fold in ½ cup each of Reese’s Pieces and chocolate M&M’s by hand. This adds bursts of flavor throughout your Halloween Candy Cookie Bars.
Step 5: Spread the Dough
Using a spatula, spread the dough evenly into the prepared baking pan. Ensure it reaches all corners for uniform thickness. Bake in your preheated oven for 18-20 minutes. Look for a golden edge while the center should remain soft, indicating that the cookie bars are perfectly baked.
Step 6: Add Toppings
As soon as you pull the baking pan from the oven, immediately press your chopped leftover Halloween candies and candy eyes into the surface of the warm cookie bars. This step allows the candies to slightly melt into the bars, creating a delightful topping that enhances both flavor and visual appeal.
Step 7: Cool and Slice
Allow the Halloween Candy Cookie Bars to cool completely in the pan. This typically takes about 30-45 minutes. Once cooled, remove the bars using the parchment paper, placing them on a cutting board. Slice into squares for easy serving and enjoy these festive treats at your next gathering!
What to Serve with Halloween Candy Cookie Bars
These delightful cookie bars make a perfect centerpiece for your festive table, inviting joy and sweet indulgence into your celebrations.
- Pumpkin Spice Latte: The warm spices of this classic drink harmonize beautifully with the sweetness of your cookie bars, making for an autumnal treat.
- Apple Cider: A chilled or warm glass of apple cider’s sweet and tangy essence perfectly complements the richness of the bars.
- Vanilla Ice Cream: The creamy, cool texture of vanilla ice cream balances the chewy cookie bars wonderfully, making each bite a heavenly experience.
- Chocolate Milkshake: A thick, rich shake pairs well with the candy-filled bars, turning your dessert into a fantastical event for the taste buds!
- Spooky Fruit Skewers: Skewers of strawberries, grapes, and melons bring a bright, refreshing contrast to the rich flavors of the cookie bars. They also add a touch of health to balance indulgence.
- Ghostly Marshmallow Pops: Simple to make, these fun treats are perfect for adding to your dessert table and match the Halloween theme beautifully; kids will love them!
- Caramel Sauce: Drizzling warm caramel over the cookie bars will create tempting layers of sweetness that add a delightful richness to every bite.
- Peanut Butter Dip: A creamy peanut butter dip served alongside can enhance the flavors in the bars and provides a wonderful twist that kids will adore.
- Cinnamon Sugar Donut Holes: These sweet snacks provide a delightful crunchy element that pairs harmoniously with the soft chewy texture of the cookie bars.
- Hot Chocolate: A cup of steam rising hot chocolate, topped with marshmallows or whipped cream, rounds out your Halloween-themed treat experience perfectly!
Expert Tips for Halloween Candy Cookie Bars
-
Baking Temperature: Make sure your oven is fully preheated at 350°F (180°C) to ensure even baking of your Halloween Candy Cookie Bars.
-
Mixing Technique: Avoid overmixing after adding the flour mixture for a tender texture. Just mix until combined for perfect chewy bars.
-
Candy Placement: For beautiful toppings, press the chopped leftover Halloween candies into the warm bars as soon as they come out of the oven.
-
Cooling Time: Let the bars cool completely before slicing to achieve neat, clean squares without crumbling or falling apart.
-
Flavor Variations: Don’t hesitate to mix and match candies, but be mindful of balance in sweetness. Too much chocolate can overpower the cookie flavor!
Halloween Candy Cookie Bars: Creative Twists
Feel free to let your imagination run wild as you customize these delightful cookie bars with your favorite flavors and textures!
-
Peanut Butter Lovers: Swap Reese’s Pieces for chunks of Peanut Butter Cups to create an even richer, nutty flavor in each bite.
Adding peanut butter candies gives it that creamy goodness everyone loves! -
Fruit Fusion: Incorporate dried cranberries or cherries for a tart contrast that balances out the sweetness of the chocolate.
These fruity additions add a delightful chewiness and a pop of color that brightens your bars! -
Nutty Crunch: Add chopped walnuts or pecans to the dough for an extra crunch that complements the chewy texture perfectly.
A sprinkle of nuts can elevate the flavor profile and provide a satisfying mouthfeel. -
Chocolate Gourmet: Replace M&M’s with gourmet chocolate chunks or homemade chocolate bark for a premium twist.
This twist brings in melted chocolate pools that are oh-so-decadent, perfect for any chocolate fan! -
Spiced Up: Mix in a teaspoon of cinnamon or pumpkin spice to your dough for an aromatic seasonal twist.
These warm spices awaken the senses and give a cozy feel to your Halloween treats! -
Gluten-Free Option: Use a gluten-free all-purpose flour blend to make these cookie bars suitable for gluten-sensitive guests.
This way, everyone can enjoy these bars without missing out on that yummy taste! -
Heat It Up: Add a pinch of cayenne pepper or chopped jalapeños for a surprising spicy kick.
This unexpected heat creates a delightful contrast with the sweetness, making your bars unforgettable!
Don’t forget to try these variations when you whip up your Halloween Candy Cookie Bars! And if you’re looking for more sweet treats, check out our guide on Millies Cookies Bake for some scrumptious inspiration!
How to Store and Freeze Halloween Candy Cookie Bars
Room Temperature: Store cookie bars in an airtight container at room temperature for up to 1 week, maintaining their chewy texture and delicious flavor.
Fridge: If you prefer a chilled treat, keep the cookie bars in the fridge for up to 2 weeks in an airtight container, but allow them to reach room temperature before enjoying.
Freezer: For longer storage, wrap the bars tightly in plastic wrap and freeze for up to 3 months. Thaw overnight in the fridge and enjoy them whenever you’re craving Halloween Candy Cookie Bars!
Reheating: If you like warm bars, microwave for about 10-15 seconds before serving, just to bring back that fresh-baked goodness.
Make Ahead Options
These Halloween Candy Cookie Bars are perfect for meal prep, saving you time during the busy Halloween season! You can prepare the dough up to 24 hours in advance by mixing it and refrigerating it in an airtight container. This way, the flavors meld beautifully, making them just as delicious when baked. Additionally, you can chop and refrigerate your leftover Halloween candies (like Snickers or Twix) separately up to 3 days ahead, ensuring optimal freshness. When you’re ready to bake, simply spread the chilled dough into the pan, add the candies on top, and pop them in the oven for freshly baked bars that bring festive joy with minimal effort!

Halloween Candy Cookie Bars Recipe FAQs
How should I select leftover candies for the bars?
Absolutely! When choosing leftover Halloween candies, look for candies that are still fresh and not overly sticky or melted. Avoid candies that have dark spots or seem overly soft, as these can affect the texture of your bars. A fun mix combines chocolates, gummies, and any crunchy varieties you might have!
What’s the best way to store Halloween Candy Cookie Bars?
Store your Halloween Candy Cookie Bars in an airtight container at room temperature for up to 1 week. If you want to keep them fresher for longer, you can refrigerate them for up to 2 weeks. Just remember to let them come back to room temperature before enjoying to preserve their chewy goodness!
Can I freeze Halloween Candy Cookie Bars?
Yes, you can! For freezing, wrap your cookie bars tightly in plastic wrap or aluminum foil and place them in a freezer-safe container. They can be frozen for up to 3 months. To thaw, simply leave them in the fridge overnight, and when you’re ready to serve, microwave them for 10-15 seconds for that fresh-baked feel!
What should I do if my cookie bars turn out too dry?
If your cookie bars end up a bit dry, it could be due to overbaking or not measuring the flour precisely. For future batches, ensure you’re using the fluff-and-level method to measure flour, and keep an eye on the baking time—remove them from the oven once the edges are golden and the center is still soft.
Are there any allergy considerations with this recipe?
Definitely! This recipe contains common allergens such as flour, butter, eggs, and peanuts (from Reese’s Pieces). If you’re baking for someone with a nut allergy, you can substitute with nut-free candies like Skittles or mini chocolate bars, and consider using a dairy-free butter alternative if needed. Always check specific candy packaging for allergen information.
How long do the cookie bars need to cool before slicing?
Let your Halloween Candy Cookie Bars cool completely in the pan, which typically takes around 30-45 minutes. This cooling time is essential for achieving neat and clean slices. If you’re eager to dive in, you can chill them in the refrigerator to speed up the process!
Delicious Halloween Candy Cookie Bars for Festive Fun
Ingredients
Equipment
Method
- Preheat your oven to 350°F (180°C) and line a 9x13x2 inch baking pan with parchment paper, lightly greasing it.
- In a medium-sized bowl, whisk together the flour, baking soda, and kosher salt.
- In a large mixing bowl, beat together butter, dark brown sugar, and granulated sugar until creamy. Add eggs and vanilla extract, mixing well.
- Gradually add the dry flour mixture to the wet ingredients, mixing until just combined. Fold in Reese's Pieces and chocolate M&M's.
- Spread the dough evenly into the prepared baking pan and bake for 18-20 minutes.
- Immediately press the chopped leftover Halloween candies and candy eyes into the surface of the warm cookie bars.
- Allow to cool completely in the pan for 30-45 minutes, then slice into squares.
")