")
As the spooky season approaches, the idea of crafting something fun and festive has me reminiscing about the joy of making homemade treats. That’s why I’m excited to share my Halloween Rocky Road Slices, a no-bake delight that captures the spirit of Halloween while being perfectly easy to make. This recipe not only satisfies a sweet tooth but also offers the flexibility to adapt with your favorite candies—think of it as a canvas for your Halloween imagination! These slices are a fantastic, kid-friendly dessert that can easily become the star of your Halloween gatherings, leaving your friends and family wanting more. Are you ready to dive into a world of colorful, crunchy goodness with me?

Why Are Halloween Rocky Road Slices a Must-Make?
Packed with fun: These Halloween Rocky Road Slices are a lively mix of flavors and textures that everyone will adore. Effortless preparation: Since they’re no-bake, you can whip them up in no time, perfect for busy schedules. Versatile creativity: Customize them with your favorite candies or swap ingredients based on dietary needs—trust me, your guests will be wowed with your unique takes! Adding festive touches like candy eyes and sprinkles not only makes them eye-catching but also amps up the fun factor. These crowd-pleasing treats are sure to become a tradition at your Halloween celebrations!
Halloween Rocky Road Slices Ingredients
For the Base
- Semi-Sweet Chocolate Chips – Provides sweetness and a rich chocolate flavor; dark chocolate can be used for a less sweet option.
- Butter – Adds richness and helps bind the ingredients; coconut oil is a great dairy-free substitute.
For the Mix-Ins
- Roasted Peanuts – Offers crunch and a salty flavor contrast; omit for nut-free versions or swap with puffed rice.
- Mini Marshmallows – Contributes a soft texture and sweetness; feel free to use colored or vanilla-flavored marshmallows.
- Candy Bars (Mini Kit Kat) – Adds additional chocolate and crunch; substitute with your favorite chocolate bars.
For Decoration
- Candy Melts (purple, green, or orange) – Adds vibrant color and is used for decoration; can be replaced with colored chocolate chips for a similar effect.
- Gummy Worms – Add a fun chewy element; optional but delightful for extra Halloween flair!
- M&M Candy – Enhances sweetness and brings color; substitute with any preferred candy variety.
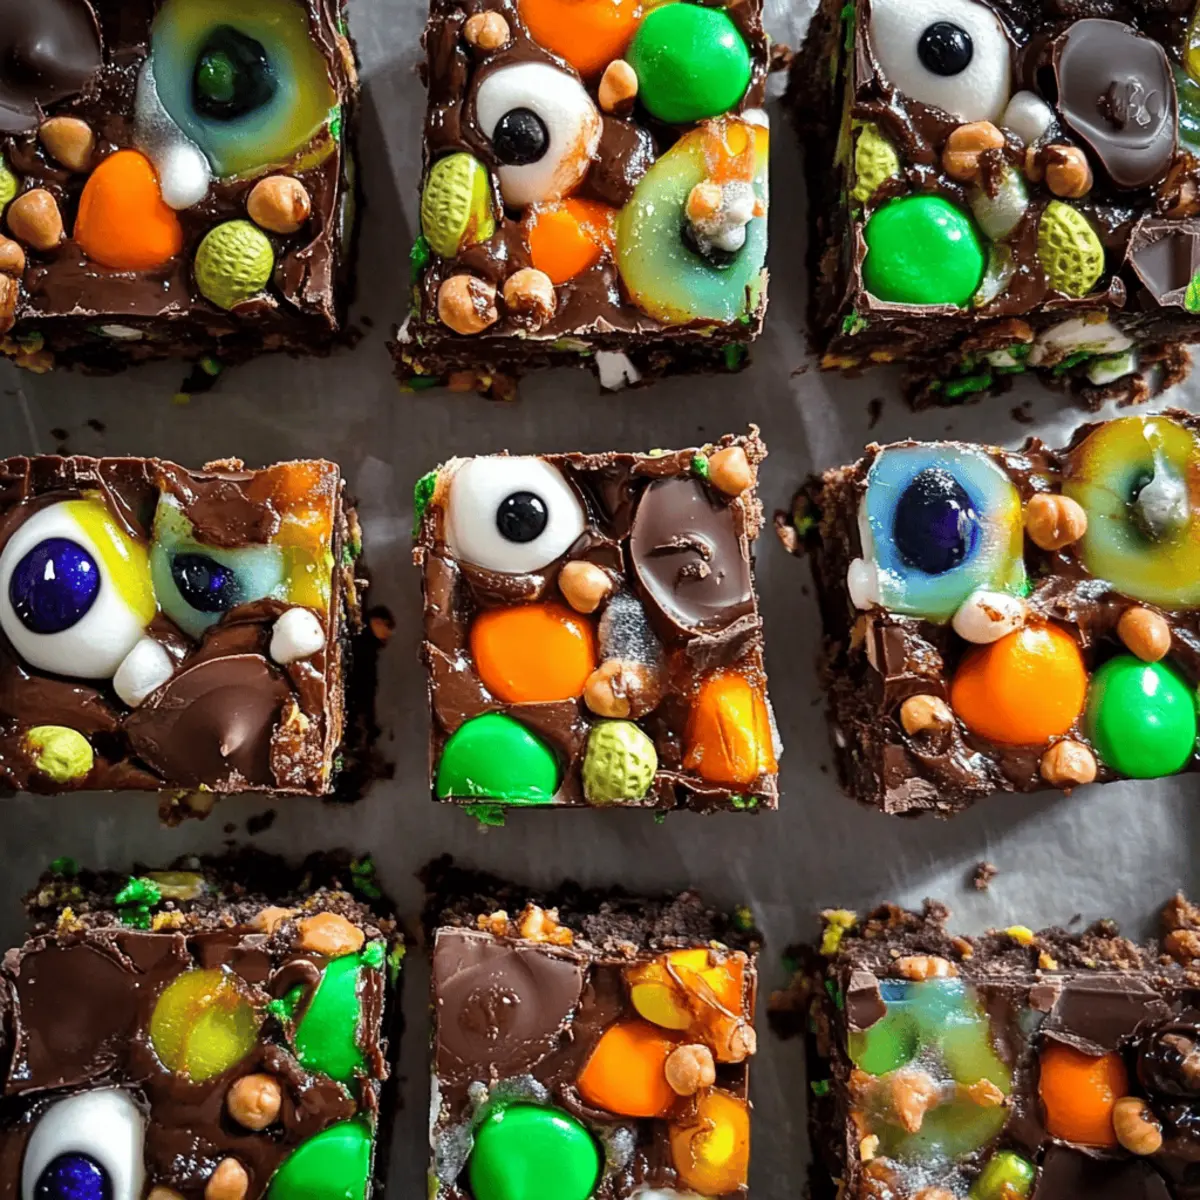
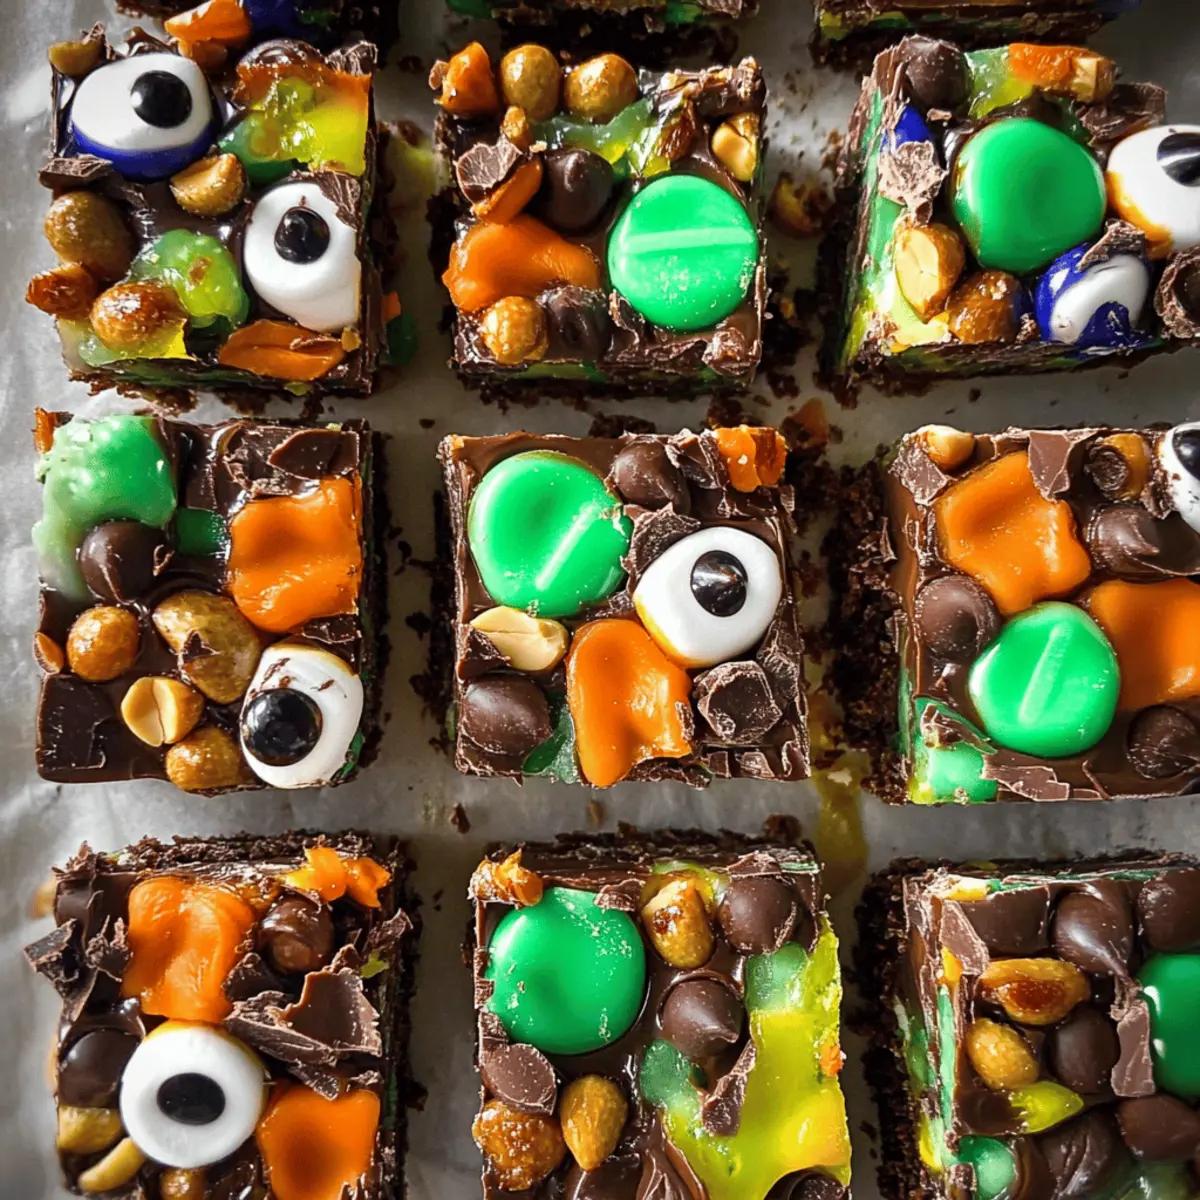
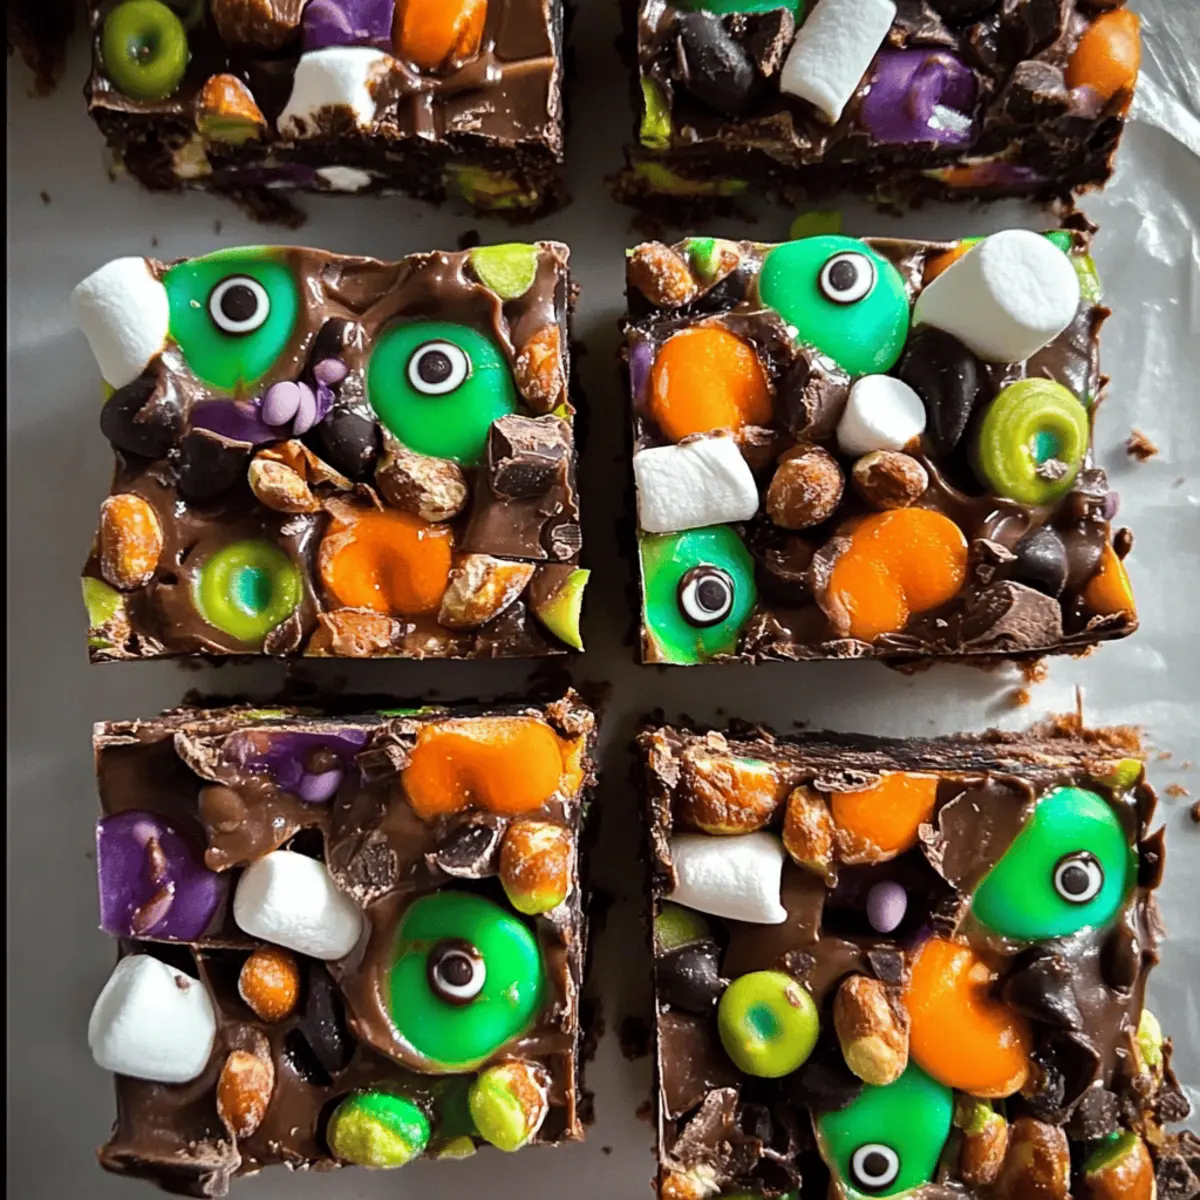
- Candy Eyes and Halloween Sprinkles – Perfect for decoration; these add a festive touch that’s highly recommended to WOW your guests!
Feel free to experiment with these Halloween Rocky Road Slices ingredients to craft a treat that suits every taste!
Step‑by‑Step Instructions for Halloween Rocky Road Slices
Step 1: Prepare Your Pan
Start by lining an 8 or 9-inch square pan with parchment paper, allowing some overhang for easy removal later. This will prevent sticking and help you lift your Halloween Rocky Road Slices out when they’re set. Ensure the parchment is smooth against the bottom and sides of the pan for a clean finish.
Step 2: Melt the Chocolate Mixture
In a large microwave-safe bowl, combine the semi-sweet chocolate chips and butter with a pinch of salt. Microwave in 30-second intervals, stirring well in between, until the mixture is fully melted and smooth—about 1 to 1.5 minutes total. This rich chocolaty base is the heart of your Halloween Rocky Road Slices, so ensure there are no lumps.
Step 3: Melt the Candy Coating
While the chocolate mixture cools slightly, melt the candy melts in separate bowls. Use the microwave, heating them in 30-second intervals and stirring until they are fully melted and glossy, which should take around 1 minute. The vibrant colors of the melted candy will add a festive touch to your slices, so choose shades that suit your Halloween theme!
Step 4: Combine the Ingredients
Once the chocolate mixture has cooled, cut the Mini Kit Kat bars into pieces and fold them into the melted chocolate along with the roasted peanuts. Stir until evenly coated. This combination brings delightful crunch to your Halloween Rocky Road Slices, making each bite a wonderful surprise with various textures.
Step 5: Add the Marshmallows
Gently fold in the mini marshmallows, taking care not to melt them. This step gives your treats a soft, chewy texture that contrasts beautifully with the crunchy ingredients. Make sure they are evenly distributed throughout the mixture for that classic rocky road feel!
Step 6: Transfer to the Pan
Scrape the mixture into the prepared pan, pressing it down gently to create an even layer. Use a spatula to smooth the surface, and then add dollops of your melted candy melts on top. Swirl them lightly into the chocolate mixture using a toothpick or knife for a fun, marbled effect that enhances the visual appeal.
Step 7: Decorate Before Setting
Before your mixture begins to set, sprinkle gummy worms, M&Ms, and Halloween sprinkles on top. Press them down slightly to ensure they stick, adding a fun and festive touch. This step not only enhances the flavor but also makes your Halloween Rocky Road Slices irresistibly attractive to both kids and adults.
Step 8: Chill to Set
Refrigerate the slices for several hours, or ideally overnight, until they are fully set and firm to the touch. This chilling period allows the chocolate base to fully harden, making it easier to cut into squares later. Once chilled, you’ll be ready to unveil your delicious creations!
Step 9: Slice and Serve
Once the slices are set, lift them out of the pan using the overhanging parchment paper. Place on a cutting board and use a warm knife—dipped in hot water—to cut through the chocolate mixture easily. This will help you achieve neat squares, ready for serving and sharing with eager guests at your Halloween festivities!
What to Serve with Halloween Rocky Road Slices?
As you prepare these cheerful treats, let’s explore delightful companions that enhance your Halloween dessert experience.
-
Vanilla Ice Cream: Creamy and cool, it beautifully complements the rich chocolate and crunchy textures of the slices. The combination is pure bliss!
-
Hot Apple Cider: The warm spice of apple cider adds a comforting touch to the fun sweetness of the Rocky Road Slices, perfect for a cozy Halloween night.
-
Pumpkin Spice Latte: This seasonal favorite pairs wonderfully with the rich chocolate, bringing a festive flavor that dances delightfully on the palate.
-
Chocolate Dipped Fruit: Fresh strawberries or bananas dipped in chocolate provide a refreshing contrast to the dense, sweet slices. They add a touch of brightness to your dessert table.
-
Nutty Trail Mix: A crunchy blend of nuts and dried fruits adds an excellent textural contrast, while the salty notes balance the sweetness of the slices.
-
Spooky Themed Cookies: Ghost or pumpkin-shaped cookies bring a festive flair to your spread and create a wonderfully playful atmosphere for the Halloween gathering.
-
Whipped Cream Topping: A dollop of whipped cream on top of each slice enhances the presentation and provides a light, airy counterpoint to the chocolaty richness.
-
Candy Corn: Incorporating this Halloween classic as a side treat not only adds color but also provides a sweet, chewy contrast to the crunchy Rocky Road Slices.
-
Sparkling Grape Juice: For a festive, non-alcoholic drink option, sparkling grape juice adds a bubbly, celebratory touch that kids and adults alike will enjoy!
Make Ahead Options
These Halloween Rocky Road Slices are perfect for meal prepping, making your busy Halloween week much smoother! You can prepare the mixture up to 24 hours in advance by following the first six steps and then refrigerating it until you’re ready to serve. Simply chill the mixture in the pan, and once it’s firm, decorate it with gummy worms and M&Ms before cutting it into squares. This prevents the toppings from becoming soggy, ensuring that your slices remain just as delicious as if they were made fresh that day. When it’s time to serve, just slice them up and watch the smiles appear—easy as pie!
How to Store and Freeze Halloween Rocky Road Slices
Airtight Container: Store your Halloween Rocky Road Slices in an airtight container in the refrigerator for up to 1 week to maintain their freshness and texture.
Freezer: For longer storage, these slices can be frozen for up to 3 months. Cut them into squares, layer between parchment paper, and place in a freezer-safe container.
Thawing: When ready to enjoy, thaw the slices in the refrigerator for several hours before serving. Avoid microwave thawing to keep the texture intact.
Reheating: If you’d like to warm a slice, do so in the microwave for about 10-15 seconds or until slightly soft; this brings the gooey marshmallows back to life!
Expert Tips for Halloween Rocky Road Slices
• Use Quality Chocolate: Always opt for high-quality chocolate chips for the best flavor in your Halloween Rocky Road Slices—cheap chocolate can taste waxy.
• Chill Properly: For best results, allow the slices to chill overnight. Rushing this step may cause them to crumble when cut.
• Experiment with Candy: Don’t be afraid to try different candies or combinations. The beauty of Halloween Rocky Road Slices lies in their adaptability to your favorite sweets!
• Cutting Technique: Warm your knife in hot water before slicing. This trick helps achieve clean cuts in the chocolate mixture, making your presentation look professional.
• Eye-Catching Decor: Decorate while the chocolate is still slightly warm to ensure candies adhere properly. This helps create that fun festive look your guests will love!
Halloween Rocky Road Slices Variations
Feel free to unleash your creativity and make these treats truly your own with these fun twists!
-
Nut-Free: Omit the roasted peanuts entirely or swap them with puffed rice for a delightful crunch without allergens.
-
Dairy-Free: Substitute butter with coconut oil and use dairy-free chocolate chips for a tasty vegan-friendly option that everyone can enjoy.
-
Colorful Marshmallows: Try using flavored or holiday-themed marshmallows to add a pop of color and extra sweetness, making each slice uniquely festive!
-
Candy Bar Swap: Use your favorite candy bars—think Snickers, Reese’s, or Twix—to mix things up. Each option will create a different surprise in every bite.
-
Spicy Kick: Add a sprinkle of cayenne pepper or a dash of chili powder to the chocolate for a surprising, spicy twist that takes these slices to the next level!
-
Gummy Variety: Switch gummy worms for gummy bears, sour candies, or even chocolate-covered gummy treats for a different chewy experience.
-
Mini S’mores: Introduce crushed graham crackers into the mix for a s’mores-inspired version of these Rocky Road Slices. The added crunch brings a delightful new texture!
-
Chocolate Drizzle: After fully setting, drizzle melted chocolate over the squares for a touch of elegance. It’s a sweet visual treat that everyone will love!
Feel free to play around with these ideas while making your Halloween Rocky Road Slices. With every bite, you’ll create your signature festive treat! For more delicious options, don’t miss out on these No-Bake Halloween Dessert Ideas and check out our guide on How to Choose the Best Chocolate for Baking!
Halloween Rocky Road Slices Recipe FAQs
How do I choose the right chocolate for my Halloween Rocky Road Slices?
Absolutely! For the best flavor, opt for high-quality semi-sweet chocolate chips. You can also use dark chocolate for a richer taste or milk chocolate for a sweeter profile. The key is to select chocolate that you enjoy eating, as it greatly influences the final result!
What’s the best way to store leftover Halloween Rocky Road Slices?
Very! Store your Halloween Rocky Road Slices in an airtight container in the refrigerator for up to 1 week. Be sure to layer them with parchment paper if you’re stacking to prevent sticking. For longer storage, they can be frozen for up to 3 months, just make sure to place them between layers of parchment paper in a freezer-safe container.
Can I freeze Halloween Rocky Road Slices? How do I do that?
You can indeed! To freeze your Halloween Rocky Road Slices, first cut them into squares. Then, layer each square with parchment paper in between to avoid sticking and place them in a freezer-safe container or bag. Label with the date, and they should be good for up to 3 months. To thaw, simply place them in the refrigerator for a few hours before serving.
What should I do if my chocolate mixture separates or doesn’t melt properly?
If that happens, don’t panic! Start by ensuring your microwave doesn’t overheat the chocolate. If you notice it separating, try adding a teaspoon of vegetable oil or coconut oil to the mixture to help bind it. Stir continuously until smooth. For a more even melt, use a double boiler on the stove instead of the microwave.
Are these Halloween Rocky Road Slices suitable for kids with nut allergies?
Definitely! To make your Halloween Rocky Road Slices nut-free, simply omit the roasted peanuts and consider substituting them with puffed rice for crunch. Always double-check your chocolate chips and any candies you choose to use to ensure they’re nut-free and safe for your little ones to enjoy!
Can I make these slices dairy-free?
Absolutely! Substitute the butter with coconut oil for a dairy-free option. Also, look for dairy-free chocolate chips when making your Halloween Rocky Road Slices. Many brands offer a variety of options that maintain delicious taste and texture while accommodating dietary needs!
Halloween Rocky Road Slices That'll Wow Your Guests
Ingredients
Equipment
Method
- Prepare your pan by lining an 8 or 9-inch square pan with parchment paper to prevent sticking.
- In a large bowl, melt the semi-sweet chocolate chips and butter in the microwave for 1 to 1.5 minutes, stirring until smooth.
- Melt the candy melts in separate bowls using the microwave until fully melted and glossy, about 1 minute.
- Once the chocolate mixture has cooled, fold in the cut Mini Kit Kat bars and roasted peanuts until evenly coated.
- Gently fold in the mini marshmallows, ensuring they are evenly distributed.
- Transfer the mixture into the prepared pan, smooth it down, and swirl dollops of melted candy melts on top for a marbled effect.
- Before the mixture sets, sprinkle gummy worms, M&Ms, and Halloween sprinkles on top and press down slightly.
- Refrigerate for several hours or overnight until fully set and easy to cut into squares.
- Use the overhanging parchment paper to lift the slices out and cut into squares with a warm knife for neat edges.
")