")
As I flitted through the aisles of my local market, the vibrant colors of seasonal ingredients caught my eye, igniting a creative spark. This Halloween, I’m thrilled to share my recipe for Creepy Witch Finger Cookies, an enchanting treat that promises more than just a sugary snack. With a soft, buttery texture and the ability to be naturally colored, these cookies provide a fun baking experience that the whole family will love—perfect for channeling your inner witch! Not only are they a fantastic way to engage kids in the kitchen, but they also showcase how you can create delightful bites without any artificial ingredients. Ready to conjure up some kitchen magic? Let’s get baking!
Why are Creepy Witch Finger Cookies a must-try?
Spooktacular Fun: These Creepy Witch Finger Cookies are not just treats; they’re an adventure in baking! Perfect for involving little helpers in the kitchen, they bring laughter and joy to any Halloween celebration.
Naturally Vibrant Colors: You’ll love how simple it is to make these cookies colorful using natural ingredients like matcha or sweet potato powder, allowing you to avoid artificial dyes while delighting the family.
Buttery Goodness: The soft, buttery texture is irresistible and will leave your guests haunted by their delicious flavors long after the party ends.
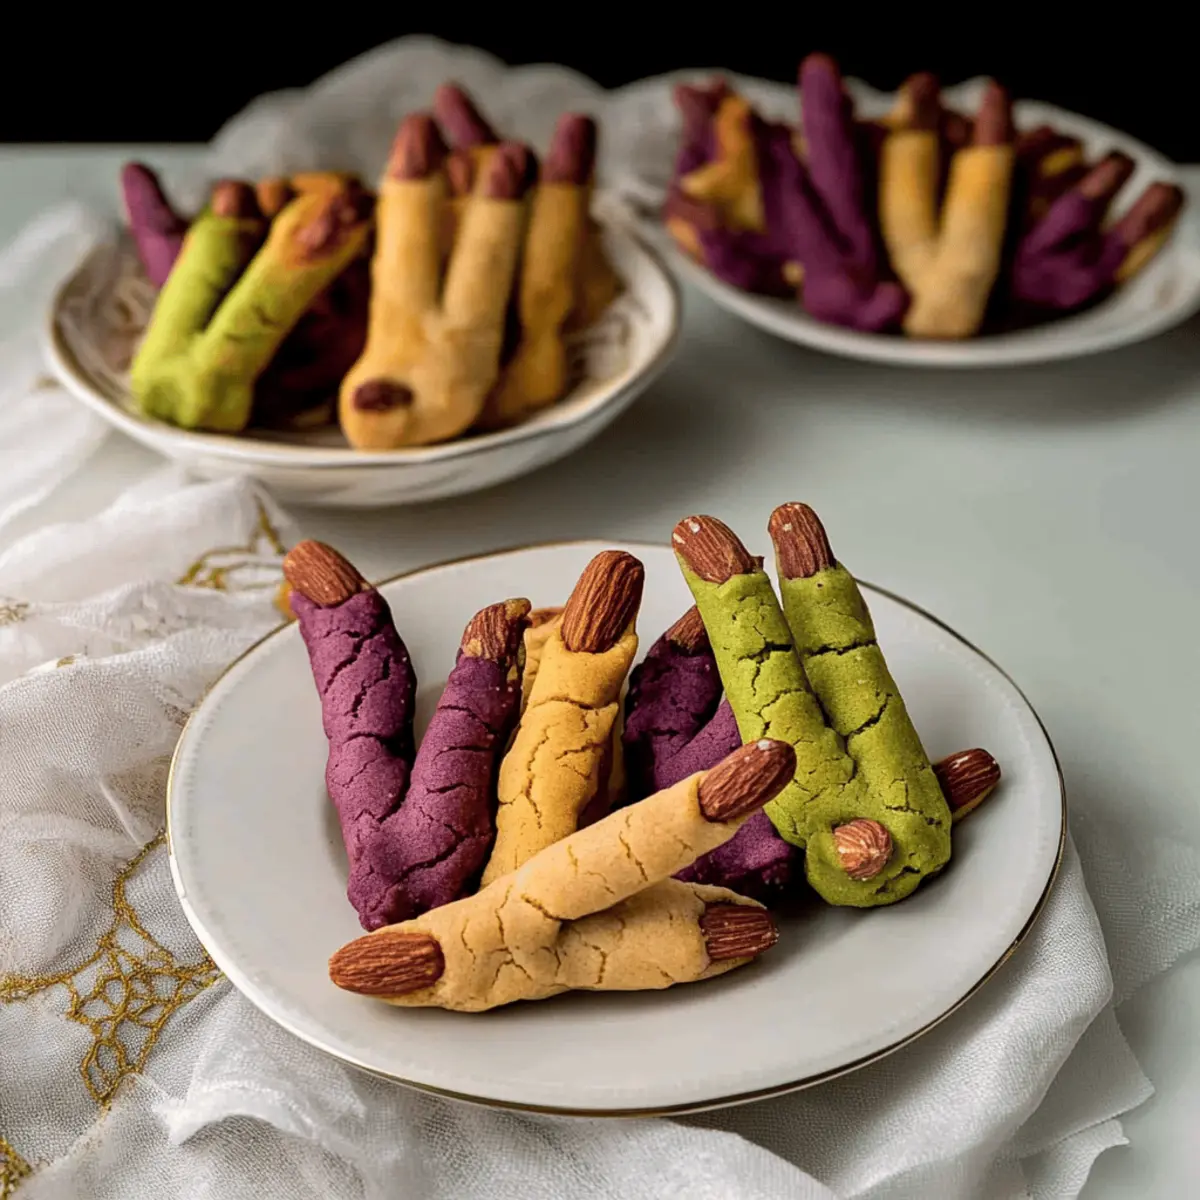
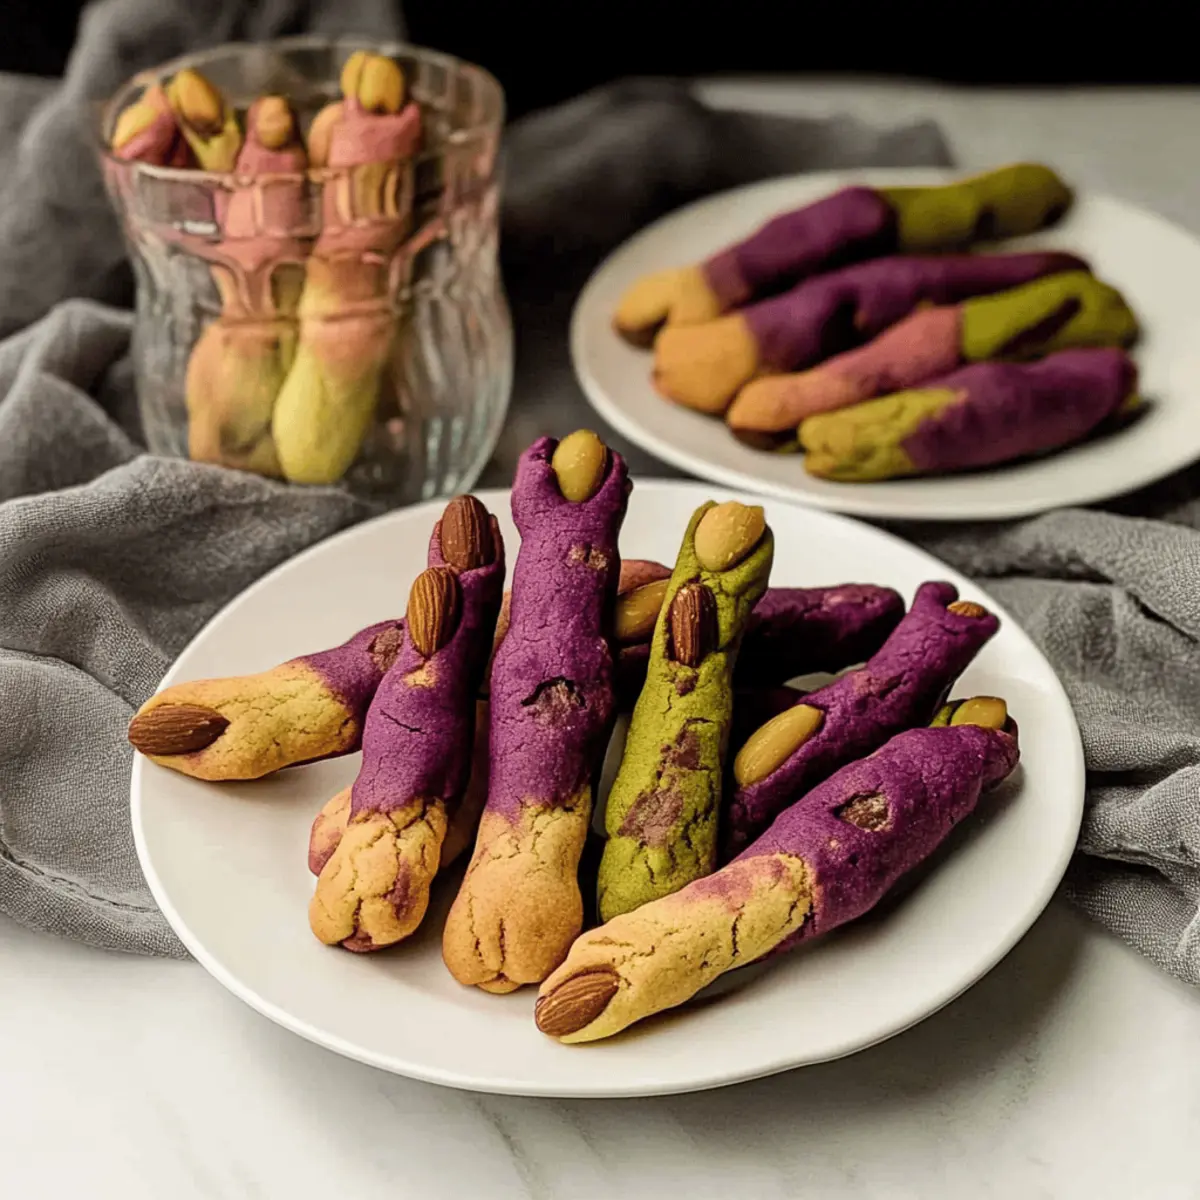
Simple Yet Eye-Catching: The unique shape and almond nails create an unforgettable visual that’s sure to be a hit on dessert tables. Pair them with Chocolate Chips Cookies for even more spooky snacking options!
Versatile Treat: You can easily customize these cookies with different colors and flavors, ensuring every batch can be a cheerful new creation! Whether for a party or just for fun, these cookies are bound to leave a lasting impression.
Creepy Witch Finger Cookies Ingredients
For the Cookie Dough
• Unsalted Butter (226g) – Adds richness and moisture to the cookie dough; use salted butter if necessary, but reduce added salt.
• Confectioner’s Sugar (140g) – Provides sweetness and a delicate texture; no substitutes are suggested for this essential ingredient.
• Sea Salt (1 tsp) – Enhances flavor and balances sweetness; omit if using salted butter.
• Egg Yolks (4) – Contributes to the cookie’s richness and helps bind ingredients; avoid using egg whites for this recipe.
• Vanilla Extract (5 mL) – Adds depth of flavor; try substituting with almond extract for a delightful twist.
• All-Purpose Flour (454g) – Forms the structure of the cookies; ensure accurate measurement for the best results.
• Baking Powder (¼ tsp) – Provides slight lift and softness; make sure it’s fresh for effective leavening.
For Decoration
• Whole Blanched Almonds (50) – Used as “fingernails” for decoration; can be substituted with candy or chocolate if nuts are a concern.
For Natural Coloring
• Matcha Powder (4-6g) – Creates a vibrant green hue; adjust the amount based on desired intensity.
• Purple Sweet Potato Powder (20-30g) – Offers a beautiful purple color; a fantastic alternative to artificial dyes.
• Cocoa Powder (5-15g) – Provides a rich brown coloring; use less for lighter shades.
Indulge in crafting these Creepy Witch Finger Cookies, and watch as they become an exciting highlight at your Halloween celebrations!
Step‑by‑Step Instructions for Creepy Witch Finger Cookies
Step 1: Prepare Dough
Begin by creaming 226g of unsalted butter with 140g of confectioner’s sugar and 1 tsp of sea salt in a large mixing bowl. Use an electric mixer on medium speed until the mixture is light and fluffy, about 3–5 minutes. Next, add 4 egg yolks and 5mL of vanilla extract, mixing until fully combined and smooth, creating a rich, buttery base for your Creepy Witch Finger Cookies.
Step 2: Color Dough
Divide the dough into separate bowls if you’d like to make colorful cookies. To create vibrant shades, add natural coloring: for green, use 4-6g of matcha powder; for purple, blend in 20-30g of purple sweet potato powder; and for brown, incorporate 5-15g of cocoa powder. Mix each portion of dough thoroughly until the colors are evenly distributed, giving your cookies a spooky appearance.
Step 3: Mix Flour
In a separate bowl, whisk together 454g of all-purpose flour and ¼ tsp of baking powder. Gradually add the flour mixture to the colored dough, mixing on low speed until just combined. Be careful not to overmix, as this could affect the texture of your Creepy Witch Finger Cookies. The dough should be soft and slightly sticky, perfect for shaping.
Step 4: Chill Dough
Once combined, shape the dough into flat discs and wrap each tightly in plastic wrap. Place the disks in the refrigerator for about 30 minutes. Chilling the dough helps it firm up, which is vital for shaping the fingers and ensures your cookies will hold their shape during baking.
Step 5: Shape Fingers
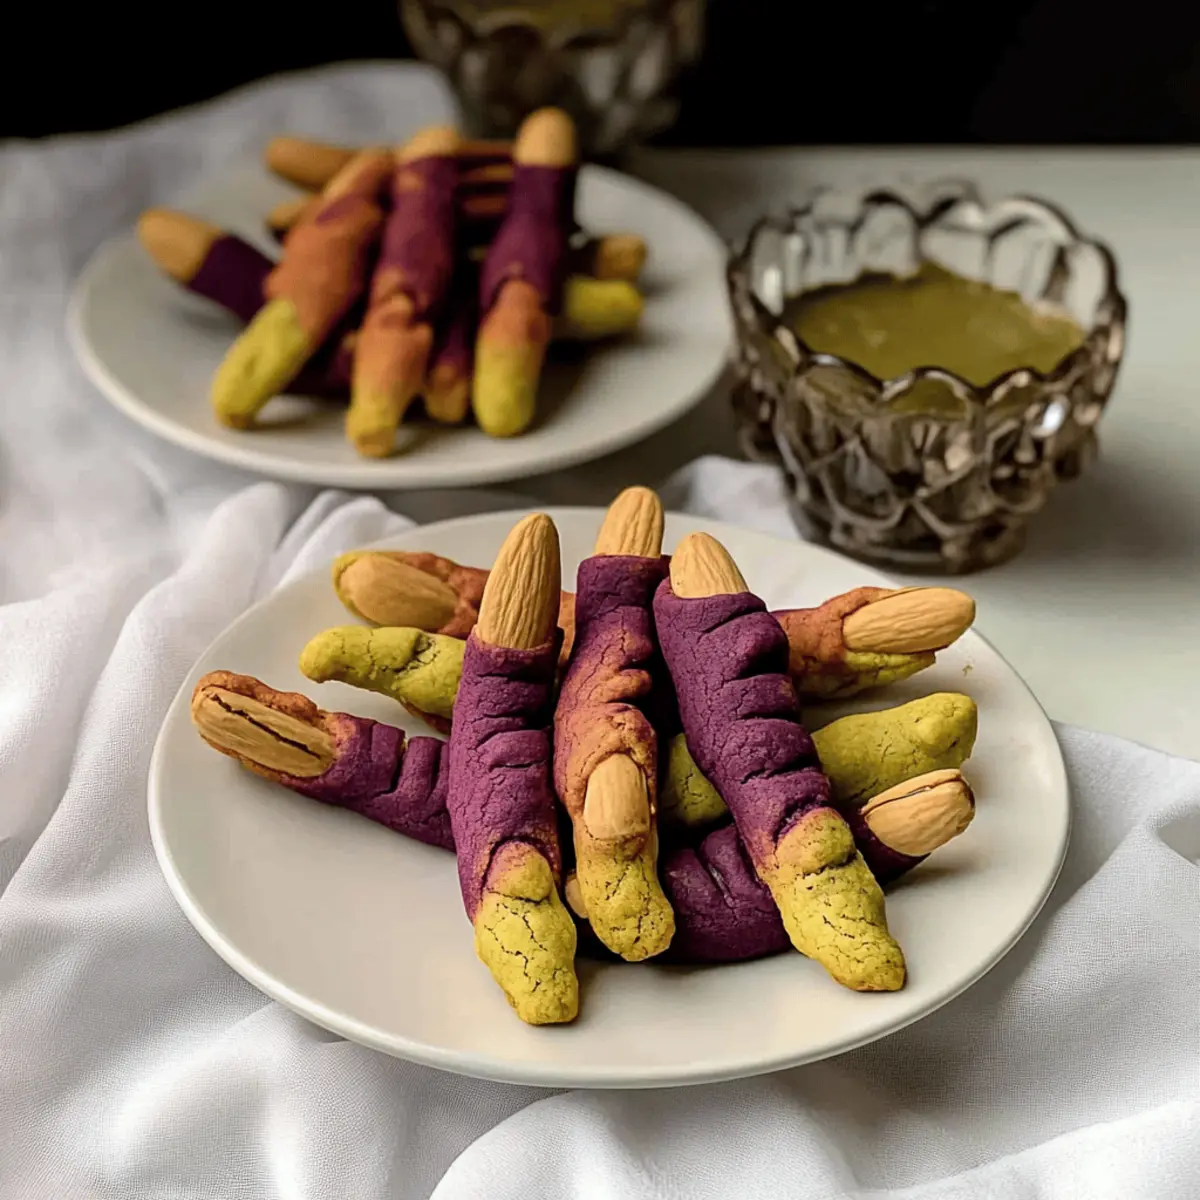
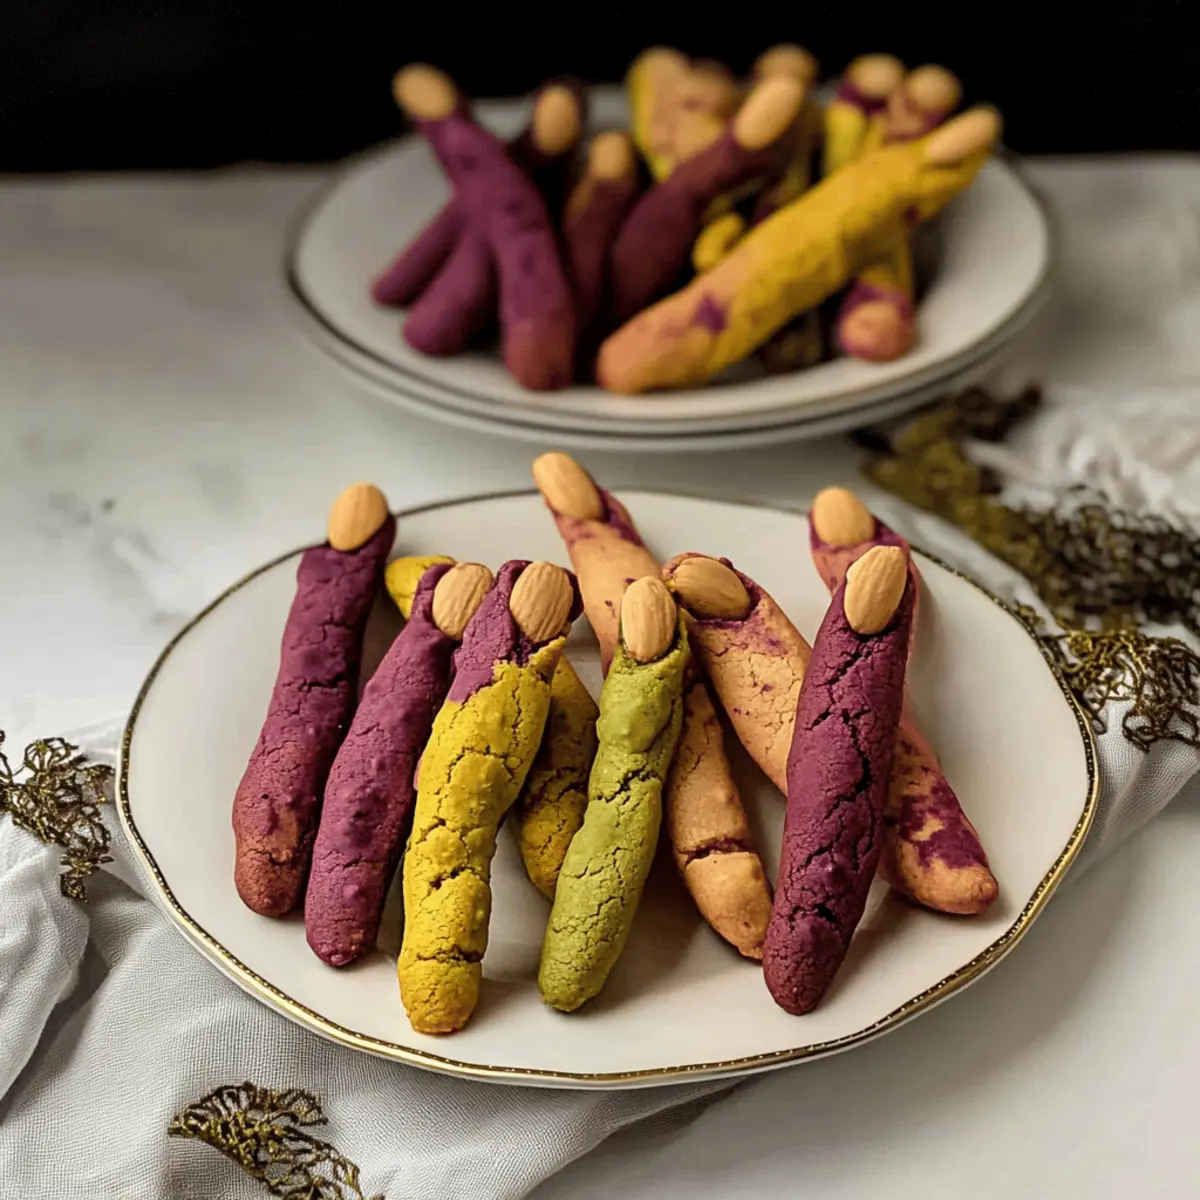
After chilling, preheat your oven to 325°F (163°C). Take portions of the dough (approximately 20g each) and roll them into finger shapes, forming knuckles by gently pinching around the middle. Press a whole blanched almond into one end to create the “fingernail,” ensuring each Creepy Witch Finger Cookie looks ghastly yet delightful.
Step 6: Freeze
Line a baking tray with parchment paper and arrange your shaped cookies on it without touching each other. Place them in the freezer for at least one hour. Freezing the cookies before baking guarantees that they hold their shape and enhances the texture, making your spooky treats even more appealing.
Step 7: Bake
Take the frozen cookies out of the freezer and place them directly into the preheated oven. Bake for 20–25 minutes, or until the bottoms are lightly browned. Keep an eye on them to prevent over-baking; they should remain soft and lightly golden, perfect for your Halloween festivities.
Step 8: Decorate
Once baked, allow the Creepy Witch Finger Cookies to cool on a wire rack. After they’ve reached room temperature, replace the almond nails if necessary, and for a ghoulish touch, drizzle with jam or melted chocolate to create a “bloody” effect. These unique cookies are now ready to spook your guests!
What to Serve with Creepy Witch Finger Cookies
As the aroma of buttery cookies fills your kitchen, it’s the perfect moment to think about pairings that will elevate your Halloween festivities!
- Witch’s Brew Hot Chocolate: A rich, velvety hot chocolate topped with whipped cream. This delightful drink balances the sweetness of the cookies.
- Spooky Apple Cider: Warm spiced apple cider infused with cinnamon and cloves. Its comforting flavors complement the soft texture of the cookies.
- Mummy Dogs: Mini hot dogs wrapped in crescent dough and baked to perfection. They provide a fun savory contrast to your sweet treats at Halloween gatherings.
- Pumpkin Cheesecake Bites: Bite-sized, creamy pumpkin cheesecake on a graham cracker crust. Their rich flavors harmonize beautifully with the buttery cookies.
- Ghostly Cupcakes: Vanilla cupcakes with ghostly meringue frosting offer a light, airy texture that pairs well with the dense cookies.
- Creepy Green Smoothie: Packed with spinach, banana, and almond milk. This fresh drink adds a colorful and nutritious element to your Halloween spread.
- Chilling Cherry Pie: A tart cherry pie with a crispy crust that brings a delightful contrast against the sweetness of the cookies.
- Spider Web Dip: A rich spinach and artichoke dip topped with sour cream webs. Serve it with crackers, creating a fun spooky platter.
Get creative with your pairings, and let the Halloween magic flow!
Make Ahead Options
These Creepy Witch Finger Cookies are perfect for busy home cooks looking to save time during the Halloween rush! You can prepare the dough up to 24 hours in advance; simply follow the recipe until you’ve mixed and chilled the dough, then wrap it tightly in plastic and refrigerate. Alternatively, you can shape the cookies and freeze them for up to 3 months—just place the shaped cookies on a baking tray and freeze before transferring them to an airtight container. When you’re ready to bake, simply pop the frozen cookies directly into the preheated oven, adding an extra 5 minutes to the baking time for consistently spooktacular results. Enjoy effortless Halloween baking with these make-ahead cookies!
Creepy Witch Finger Cookies Variations
Ready to put your own spin on these delightfully spooky treats? Customize your Creepy Witch Finger Cookies for added fun and flavor!
-
Nut-Free: Substitute whole blanched almonds with chocolate chips or colored candy melts to create “fingernails” without the nuts, ensuring everyone can enjoy these cookies.
-
Zesty Twist: Add a teaspoon of lemon or orange zest to the dough for a bright, citrusy flavor that complements the sweetness, bringing a refreshing surprise to your bite.
-
Spicy Option: Mix in a pinch of cayenne pepper or cinnamon for a warm, spicy kick. This unexpected twist will tantalize taste buds and intrigue your Halloween guests!
-
Chocolate Lovers: Blend in chocolate chips with the dough for a rich, chocolate-infused take on these creepy cookies, balancing sweetness with a deep, chocolatey flavor.
-
Different Colors: Use other natural colorings like beet powder for a vibrant red, or turmeric for a sunny yellow to create a more colorful “witchy” palette in your cookie creations.
-
Reduced Sugar: Substitute a portion of the confectioner’s sugar with a sugar alternative like erythritol or monk fruit sweetener for a lighter version, without sacrificing taste.
-
Fun Cookie Shapes: Feel free to use spooky cookie cutters instead of shaping fingers; bat or skull shapes can add a playful twist to your Halloween cookie platter.
-
Decorative Drizzle: Instead of just using jam or melted chocolate for the bloody effect, add a drizzle of caramel sauce for a sweet twist that adds both beauty and flavor to the spooky presentation.
For more delicious ideas, check out Cool Whip Cookies or dive into the world of Cake Mix Cookies for even more exciting flavors and textures!
Expert Tips for Creepy Witch Finger Cookies
-
Chill the Dough: Ensuring your dough is well-chilled helps maintain the shape of these creepy cookies as they bake. This step is crucial for achieving that perfect “finger” look.
-
Don’t Overmix: When combining the flour with the wet ingredients, mix only until incorporated. Overmixing can lead to tougher cookies, detracting from their delightful soft texture.
-
Natural Color Caution: Use natural coloring agents like matcha or sweet potato powder in moderation. Too much can affect both the texture and flavor of your Creepy Witch Finger Cookies.
-
Almond Placement: Press the almond nails firmly into the dough but not too deep to ensure they stay put during baking. This keeps your cookies looking spooky and intact!
-
Freeze Before Baking: Placing your shaped cookies in the freezer not only helps them hold their shape but also improves the overall texture. Don’t skip this essential step!
Storage Tips for Creepy Witch Finger Cookies
Room Temperature: Store baked cookies in an airtight container at room temperature for up to 4 days to maintain their soft, buttery texture.
Fridge: If you want to keep them fresher longer, keep the cookies in the fridge for up to a week. Make sure they are well-wrapped to avoid drying out.
Freezer: For long-term storage, you can freeze both baked or unbaked Creepy Witch Finger Cookies in a freezer-safe bag or container for up to 2 months.
Reheating: To enjoy your frozen cookies, bake them directly from the freezer or let them thaw at room temperature for about 30 minutes before reheating in a warm oven for 5–10 minutes.
Creepy Witch Finger Cookies Recipe FAQs
How do I choose ripe ingredients for my Creepy Witch Finger Cookies?
Absolutely! When selecting ingredients, particularly for natural colorings, I recommend looking for fresh matcha powder that is bright green without any browning, and for purple sweet potato powder, choose finely milled versions that have a vibrant color without clumps. Fresh, high-quality eggs will contribute to the richness of your cookies, so pick eggs that are clean and uncracked.
What is the best way to store Creepy Witch Finger Cookies?
To maintain their delightful flavor and texture, store your baked cookies in an airtight container at room temperature for up to 4 days. Alternatively, if you wish to keep them fresher for longer, wrap them tightly in plastic wrap and store them in the refrigerator for up to a week.
Can I freeze Creepy Witch Finger Cookies? If so, how?
Very! You can freeze both baked and unbaked Creepy Witch Finger Cookies. To freeze baked cookies, let them cool completely, then place them in a freezer-safe bag and store for up to 2 months. For unbaked dough, shape your cookies as instructed, freeze them on a tray until solid, and then transfer to a freezer bag. This will help maintain their spooky shape! When ready to bake, simply preheat your oven and bake the cookies straight from the freezer, adding a couple of extra minutes to the baking time.
What should I do if my cookie dough is too sticky?
If your dough is too sticky, it may need a bit more flour. Start by adding a tablespoon of all-purpose flour at a time until it reaches a manageable consistency. Also, ensure that the dough is well-chilled before shaping. This step can significantly reduce stickiness and give you better handling, helping to create those perfect witch finger shapes.
Are there any dietary considerations for Creepy Witch Finger Cookies?
Absolutely! For nut allergies, consider substituting the whole blanched almonds with chocolate chips or colorful candy melts to mimic fingernails. Additionally, if you’re preparing these cookies for young children, you might want to use less food coloring to keep the cookies less intense in flavor and appearance. Always label your treats clearly for those who might have allergies.
Creepy Witch Finger Cookies that Will Haunt Your Halloween Treats
Ingredients
Equipment
Method
- Begin by creaming 226g of unsalted butter with 140g of confectioner’s sugar and 1 tsp of sea salt in a large mixing bowl. Use an electric mixer on medium speed until the mixture is light and fluffy, about 3–5 minutes.
- Next, add 4 egg yolks and 5mL of vanilla extract, mixing until fully combined and smooth, creating a rich, buttery base for your Creepy Witch Finger Cookies.
- Divide the dough into separate bowls if you’d like to make colorful cookies. To create vibrant shades, add natural coloring: for green, use 4-6g of matcha powder; for purple, blend in 20-30g of purple sweet potato powder; and for brown, incorporate 5-15g of cocoa powder.
- Mix each portion of dough thoroughly until the colors are evenly distributed, giving your cookies a spooky appearance.
- In a separate bowl, whisk together 454g of all-purpose flour and ¼ tsp of baking powder. Gradually add the flour mixture to the colored dough, mixing on low speed until just combined.
- Shape the dough into flat discs and wrap each tightly in plastic wrap. Place the disks in the refrigerator for about 30 minutes.
- After chilling, preheat your oven to 325°F (163°C). Take portions of the dough (approximately 20g each) and roll them into finger shapes, forming knuckles by gently pinching around the middle.
- Press a whole blanched almond into one end to create the 'fingernail,' ensuring each Creepy Witch Finger Cookie looks ghastly yet delightful.
- Line a baking tray with parchment paper and arrange your shaped cookies on it without touching each other. Place them in the freezer for at least one hour.
- Bake for 20–25 minutes, or until the bottoms are lightly browned. Keep an eye on them to prevent over-baking; they should remain soft and lightly golden.
- Once baked, allow the cookies to cool on a wire rack. After they’ve reached room temperature, replace the almond nails if necessary, and for a ghoulish touch, drizzle with jam or melted chocolate to create a 'bloody' effect.
")