")
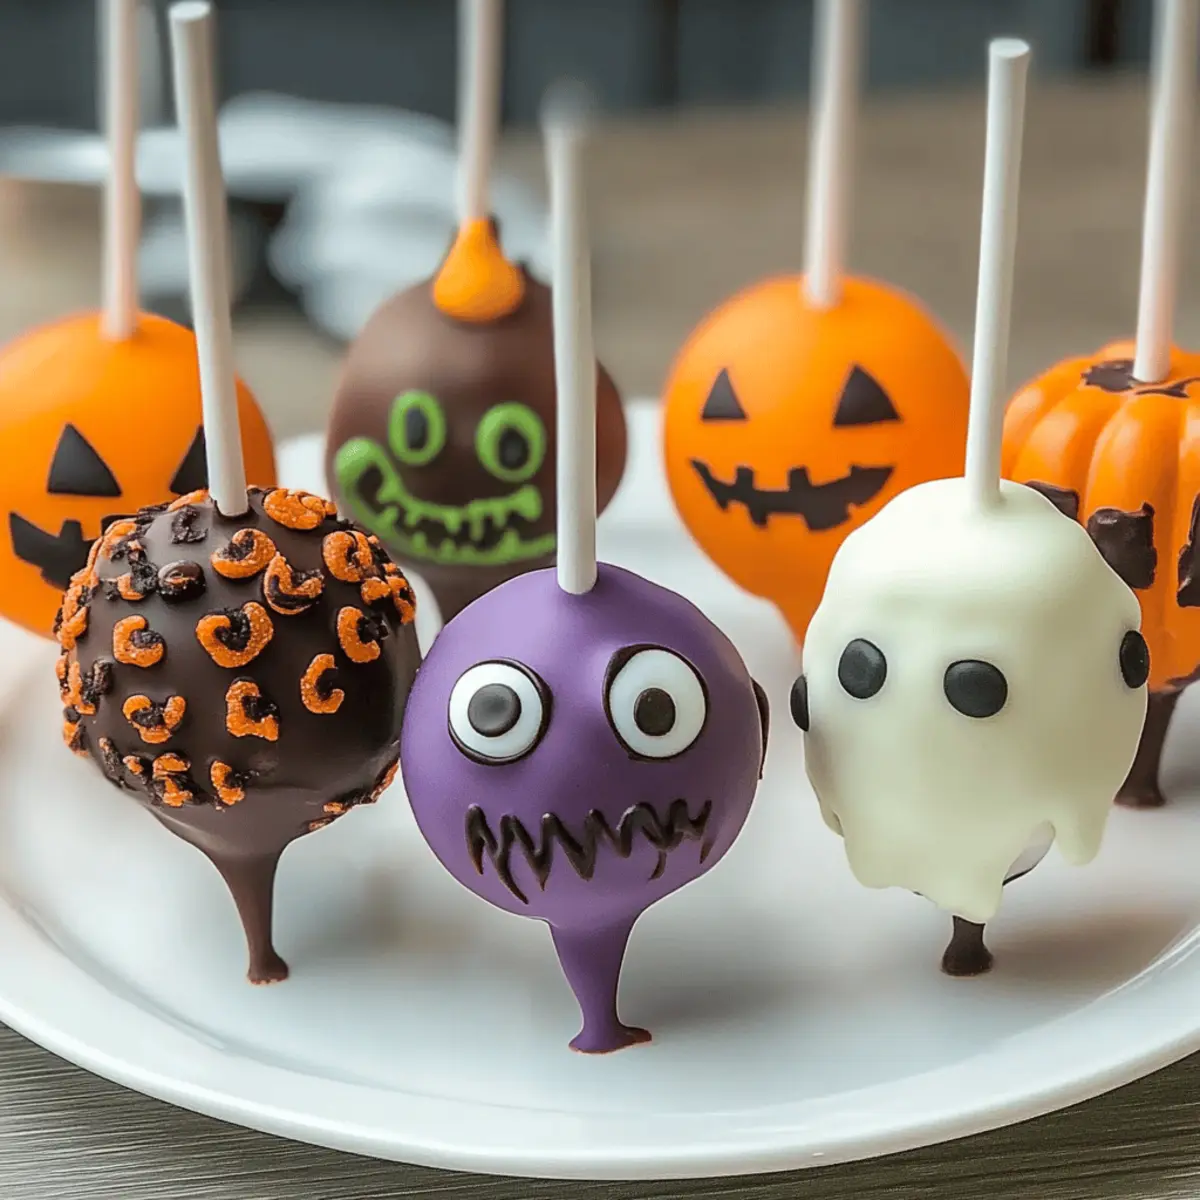
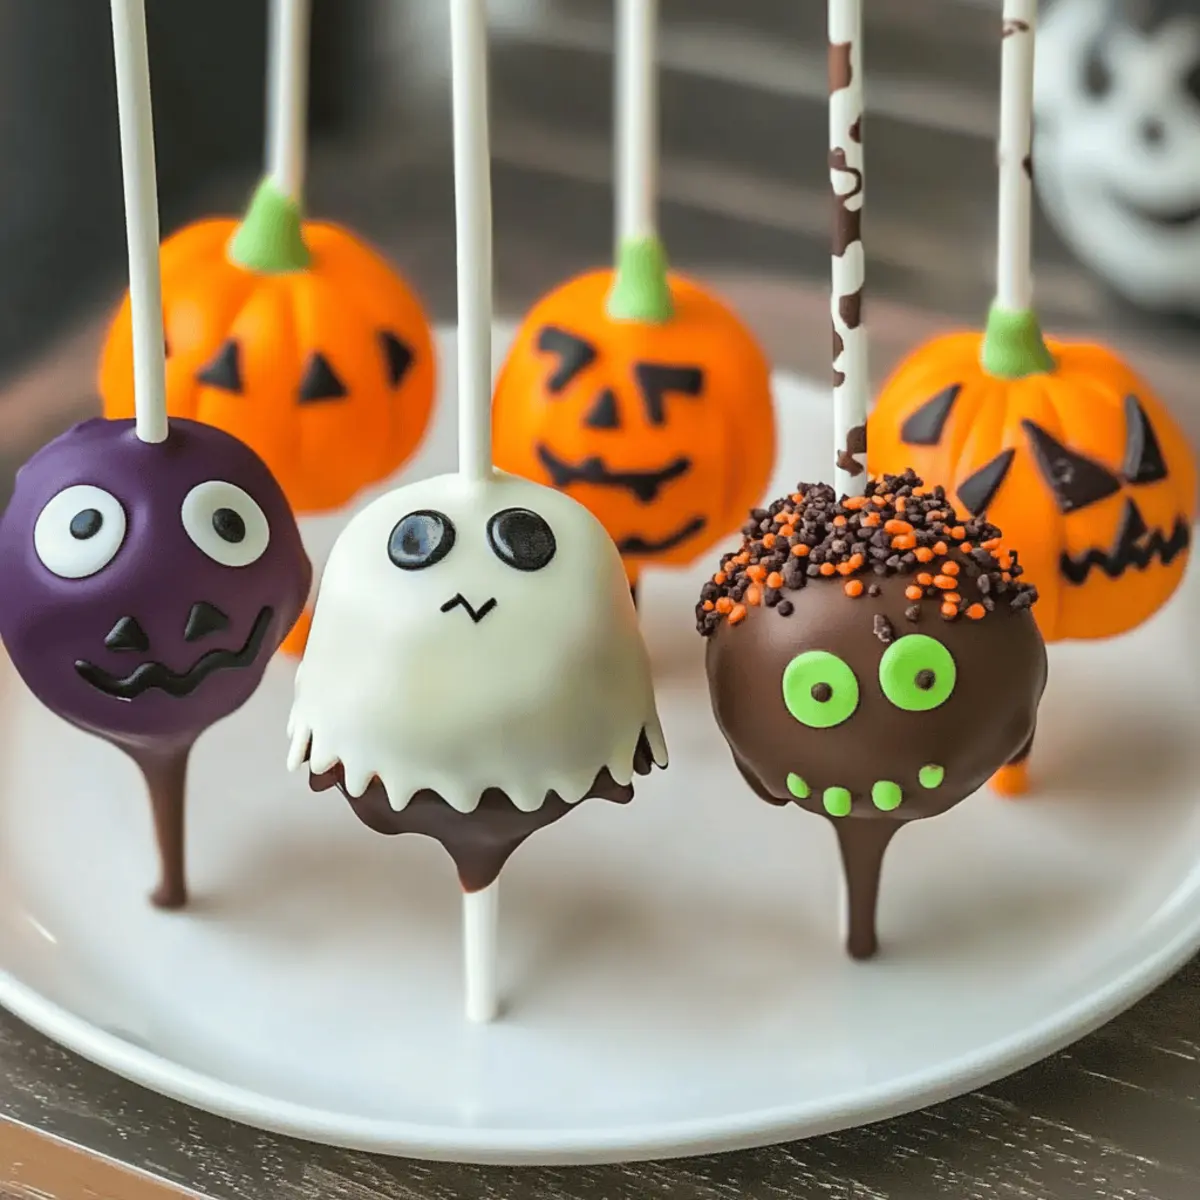
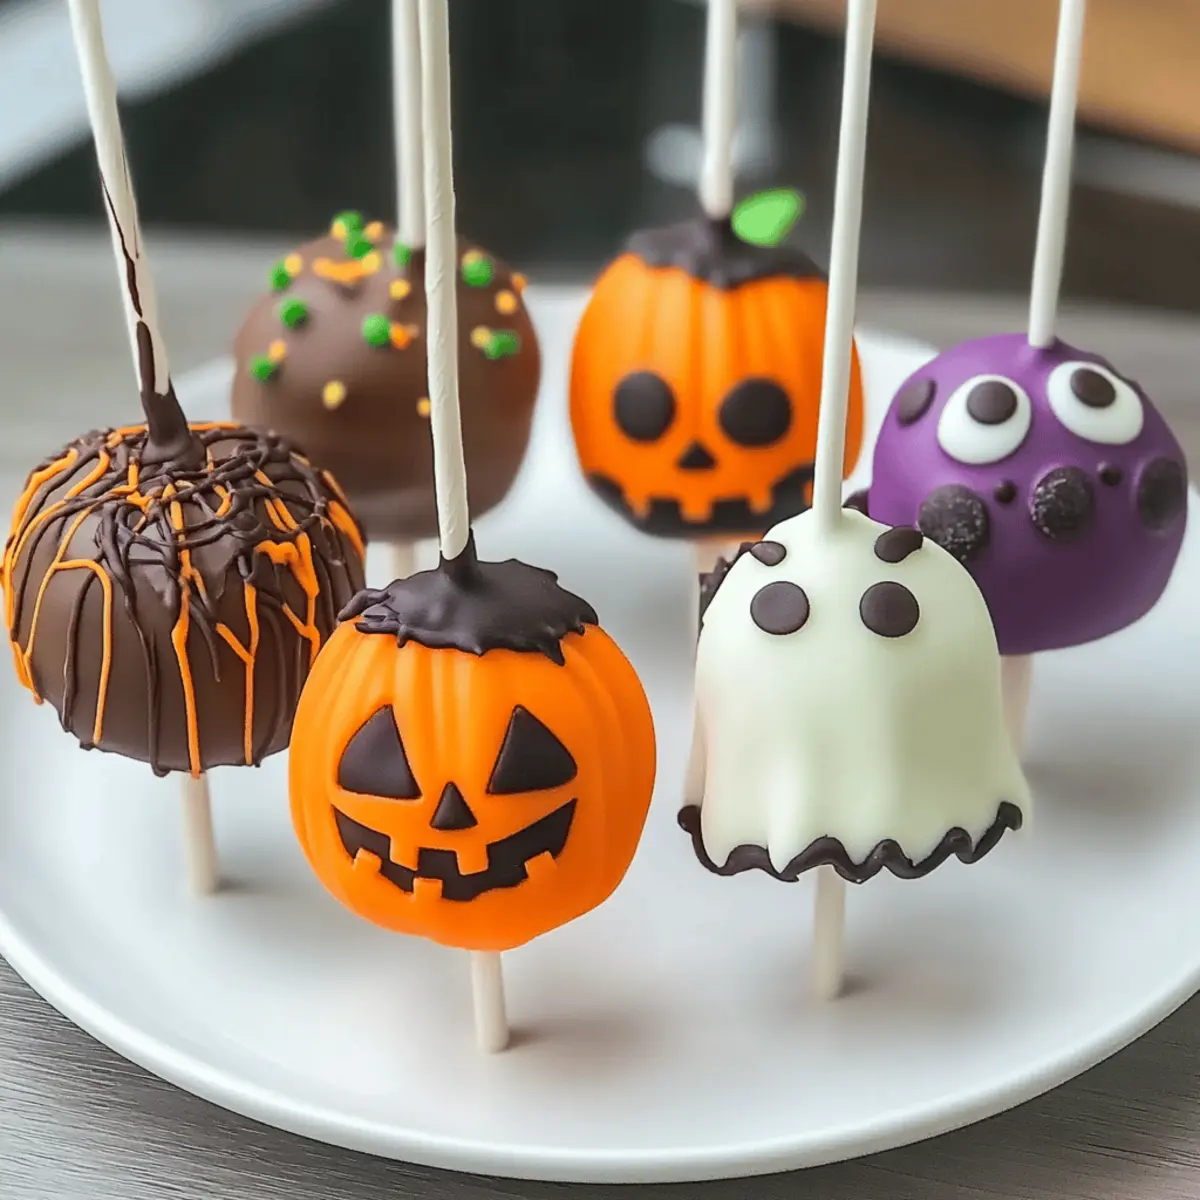
As the air turns crisp and leaves begin to dance along the sidewalk, it’s clear that Halloween is just around the corner. I love transforming ordinary moments into festive fun, and this year, I can’t wait to whip up a batch of Halloween Cake Pops! These delightful, bite-sized treats not only invite creativity through their customizable designs—think eyeballs, ghosts, and pumpkins—but they’re also incredibly beginner-friendly. Perfect for a fun family activity or a spooktacular party centerpiece, these cake pops can be made with either boxed cake mix or your favorite homemade recipe. Just imagine the joy of decorating with your loved ones as you craft these sweet sensations together! What will you conjure up first?
Why Are Halloween Cake Pops So Fun?
Festive Appeal: Halloween Cake Pops are not just treats; they are an invitation to unleash your creativity! With various themes like eyeballs and ghosts, you can craft a spooky edible masterpiece.
Beginner-Friendly: Even if you’re new to baking, this recipe is straightforward and quick, making it a perfect project for families or novice bakers.
Customizable Treats: Use any cake flavor, frosting, or candy melts to create a unique spin, ensuring there’s something for everyone.
Perfect for Parties: These pops are ideal for Halloween parties, serving as both a delicious treat and a captivating decoration. Their eye-catching designs will delight both kids and adults alike.
If you’re interested in making other themed desserts, check out these amazing ideas: Enchanting Barbie Cake for a whimsical twist or Crafting Heart Cake for romance!
Halloween Cake Pops Ingredients
For the Cake
• Cake – Use any flavored cake, like vanilla, chocolate, or spice, for delightful Halloween Cake Pops.
• Boxed Cake Mix – A quick and convenient option for hassle-free baking.
For the Frosting
• Frosting – Helps bind the cake crumbs together, making shaping easier; any flavor works wonders!
For the Coating
• Chocolate or Candy Melts – Choose colors that match your theme; they enhance both taste and visual appeal.
• White Chocolate – Great for a ghostly touch; perfect for spooky designs!
For the Decorations
• Sprinkles – Add a festive flair to your pops; mix colors for a captivating effect.
• Candy Eyes – Essential for creating eerie eyeball pops, making them both creepy and fun!
• Icing – Use to draw details and personalize your pops; a simple gel icing creates spectacular designs.
Customize your Halloween Cake Pops with these ingredients and make your spooky celebration truly unforgettable!
Step‑by‑Step Instructions for Halloween Cake Pops
Step 1: Prepare the Cake
Begin by preheating your oven to the temperature specified in your cake recipe or on the boxed cake mix. Bake the cake according to the instructions until a toothpick inserted in the center comes out clean, usually around 25 to 30 minutes. Once baked, allow the cake to cool completely in the pan; this will ensure the best texture for your Halloween Cake Pops.
Step 2: Crumble the Cake
Once the cake has cooled, gently remove it from the pan and transfer it to a large mixing bowl. Using your hands or a fork, crumble the entire cake into fine crumbs, aiming for a texture similar to wet sand. This step is crucial for achieving the right consistency in your Halloween Cake Pops, as the crumb mixture will need to combine beautifully with the frosting.
Step 3: Mix with Frosting
Gradually add your favorite frosting to the cake crumbs, using a spatula to mix thoroughly. Start with a small amount and continue adding until the mixture holds together firmly when pressed into a ball; there should be no dry crumbs. This should take about 2 to 3 minutes. The goal is a dough-like consistency that will easily shape into pops.
Step 4: Shape the Cake Pops
Take small portions of the mixture and roll them into balls about 1 inch in diameter. Make sure to apply enough pressure while forming each ball to prevent cracks. Place the shaped balls on a baking sheet lined with parchment paper. Once all pops are formed, refrigerate them for about 30 minutes to help them firm up, which will make them easier to dip later.
Step 5: Insert Sticks
While the cake balls chill, melt a handful of chocolate or candy melts in a microwave-safe bowl, following package instructions (about 30 seconds to start). Dip the tip of each lollipop stick into the melted candy; this will help adhere it to the cake ball. Gently insert the stick into the center of each cake ball and let them set back on the baking sheet while you prepare for the coating.
Step 6: Coat Cake Pops
Reheat your melted chocolate or candy melts if needed to ensure a smooth dipping consistency. Dip each cake pop into the melted coating, allowing any excess to drip back into the bowl. Ensure the entire surface is evenly coated for a delightful finish. This process should take about 2 minutes for each pop, so work quickly to prevent the coating from hardening prematurely.
Step 7: Decorate
Before the coating sets, add your fun decorations to personalize each pop according to your Halloween theme. Use sprinkles, candy eyes, or icing to create spooky faces or vibrant designs. Take this time to express creativity; place each decorated cake pop back on the parchment-lined sheet and allow them to set completely, which usually takes around 15 to 30 minutes.
Halloween Cake Pops Variations & Substitutions
Feel free to unleash your creativity and customize these delightful Halloween Cake Pops to match your festive spirit!
- Flavor Swap: Use red velvet cake for a luxurious twist that adds richness and a stunning color.
- Gluten-Free: Opt for a gluten-free cake mix to ensure everyone can join in the fun without worry.
- Dairy-Free: Try coconut cream frosting and non-dairy chocolate or candy melts for a dairy-free delight.
- Nutty Twist: Add a hint of almond extract to your frosting for an unexpected flavor boost.
- Spicy Kick: Incorporate pumpkin spice into the cake mix for a seasonal warming touch that’s oh-so-autumnal.
- Crispy Texture: Roll your cake pops in crushed nuts or cookie crumbs after coating for added crunch and flavor contrast.
- Chocolate Variations: Use white chocolate or dark chocolate for the coating, creating depth and variety in flavor.
- Thematic Shapes: Shape your cake pops into pumpkin or ghost forms to up the spooky factor and impress guests at your Halloween bash!
These variations not only enhance the flavor and texture but also create a captivating feast for the eyes. If you’re looking for more inspiration, consider trying your hand at a delicious Coconut Cake Vape or experience the delightful playfulness of an Enchanting Barbie Cake!
Make Ahead Options
These Halloween Cake Pops are absolutely perfect for meal prep, saving you time on those busy festive nights! You can prepare the cake balls up to 24 hours in advance; simply shape them, place them on a baking sheet, and refrigerate until ready to coat. This not only helps firm them up for easy dipping but also allows the flavors to meld beautifully. When you’re ready to finish your spooky treats, just follow the coating and decorating steps as directed. For the best quality, keep the cake balls tightly covered in the refrigerator to maintain their moisture, ensuring they stay just as delicious as if made fresh!
Expert Tips for Halloween Cake Pops
-
Cool Completely: Ensure your cake is entirely cooled before crumbling. This prevents melted frosting and helps achieve the perfect mixture for your Halloween Cake Pops.
-
Frosting Balance: Add frosting gradually; too much can make the cake pop overly wet. Aim for a dough-like consistency that holds its shape beautifully.
-
Chill Time: Don’t skip the chilling step after shaping! Refrigerating the cake balls for 30 minutes makes coating easier and helps prevent cracks.
-
Smooth Coating: For a lovely finish, dip quickly and allow excess coating to drip off. Work in batches to avoid the coating hardening before you’re done.
-
Creative Decorations: Let your imagination run wild! Use different decorations like colored sprinkles, candy eyes, or spooky icing designs to personalize your Halloween Cake Pops.
What to Serve with Halloween Cake Pops?
Elevate your Halloween gathering with delightful pairings that complement these sweet, spooky treats and bring smiles to your table!
- Spooky Punch: A vibrant, fruity punch adds cheer to your festivities and pairs perfectly with the sweetness of cake pops.
- Ghoulish Cheese Platter: Offer an assortment of creamy cheeses and crunchy crackers, creating a savory contrast to the sweet treats.
- Candy Corn Cupcakes: These colorful cupcakes will echo the fun of Halloween Cake Pops while adding a burst of seasonal flavor.
- Pumpkin Spice Cookies: Delight in these warm and aromatic cookies, evoking autumn flavors that harmonize beautifully with the cake pops.
- Ghostly Fruit Salad: A refreshing mix of seasonal fruits with yogurt ghosts adds a healthy touch that balances indulgence.
- Hot Chocolate Bar: Set up a cozy station with various mix-ins, creating a delightful warm drink option alongside your cake pops.
- Mystical Meringues: Light and airy, these decorated meringue treats add a touch of whimsy and are perfect for any Halloween spread.
- Caramel Apple Slices: These crunchy treats provide a sweet, tart alternative and are fun to enjoy alongside your cake pops.
Storage Tips for Halloween Cake Pops
Room Temperature: Store your Halloween Cake Pops in an airtight container at room temperature for up to 5 days to maintain their fresh taste and texture.
Fridge: If you’d like to prolong their freshness, refrigerate the cake pops for up to a week. Make sure they’re in an airtight container to prevent any moisture from affecting them.
Freezer: To keep them longer, freeze the cake pops for up to 2 months. Arrange them in a single layer on a baking sheet until firm, then transfer to an airtight container.
Reheating: If you prefer serving them warm, allow them to thaw in the fridge overnight and then let them sit at room temperature for about 15 minutes before enjoying.

Halloween Cake Pops Recipe FAQs
Which cake flavor works best for Halloween Cake Pops?
Absolutely! You can use any flavored cake for your Halloween Cake Pops. Classic choices like chocolate or vanilla are always beloved, but don’t hesitate to experiment with spice cake or even red velvet for a festive look. The possibilities are deliciously endless!
How should I store my Halloween Cake Pops?
For the best freshness, store your Halloween Cake Pops in an airtight container at room temperature for up to 5 days. If you want to keep them around a bit longer, popping them in the fridge extends their life to about a week, just ensure they remain sealed tight!
Can Halloween Cake Pops be frozen?
Yes, they can! To freeze your Halloween Cake Pops, first, arrange them in a single layer on a baking sheet and place them in the freezer for about 1 hour, until firm. Once frozen, transfer them to an airtight container or a freezer-safe bag. They can be enjoyed for up to 2 months! When you’re ready to enjoy, thaw them in the fridge overnight for the best texture.
What if my cake pop mixture is too dry or too wet?
The balance is key! If your mixture is too dry, you can add more frosting a little at a time until it holds together without crumbling. On the flip side, if it’s too wet, consider mixing in a bit of cake crumb until it reaches the ideal dough-like consistency. Just remember, the goal is to form small balls that hold shape without cracking.
Are there any dietary considerations with Halloween Cake Pops?
Absolutely! You can make your Halloween Cake Pops pet-friendly by leaving out the chocolate or using carob chips instead. For guests with food allergies, you can opt for gluten-free cake and dairy-free frosting options. Just be sure to clearly label any treats to keep everyone safe and happy.
Delightful Halloween Cake Pops: Fun Treats for Spooky Celebrations
Ingredients
Equipment
Method
- Prepare the Cake: Preheat your oven and bake the cake according to instructions until a toothpick comes out clean. Allow to cool completely.
- Crumble the Cake: Remove from pan and crumble the cooled cake into fine crumbs.
- Mix with Frosting: Gradually add frosting to cake crumbs until the mixture holds together firmly.
- Shape the Cake Pops: Roll mixture into balls about 1 inch in diameter and refrigerate for 30 minutes.
- Insert Sticks: Melt candy melts, dip stick tips, and insert into each cake ball before chilling again.
- Coat Cake Pops: Dip each chilled cake pop in melted coating, allowing excess to drip off.
- Decorate: Before coating sets, personalize with sprinkles, candy eyes, or icing.
")