")
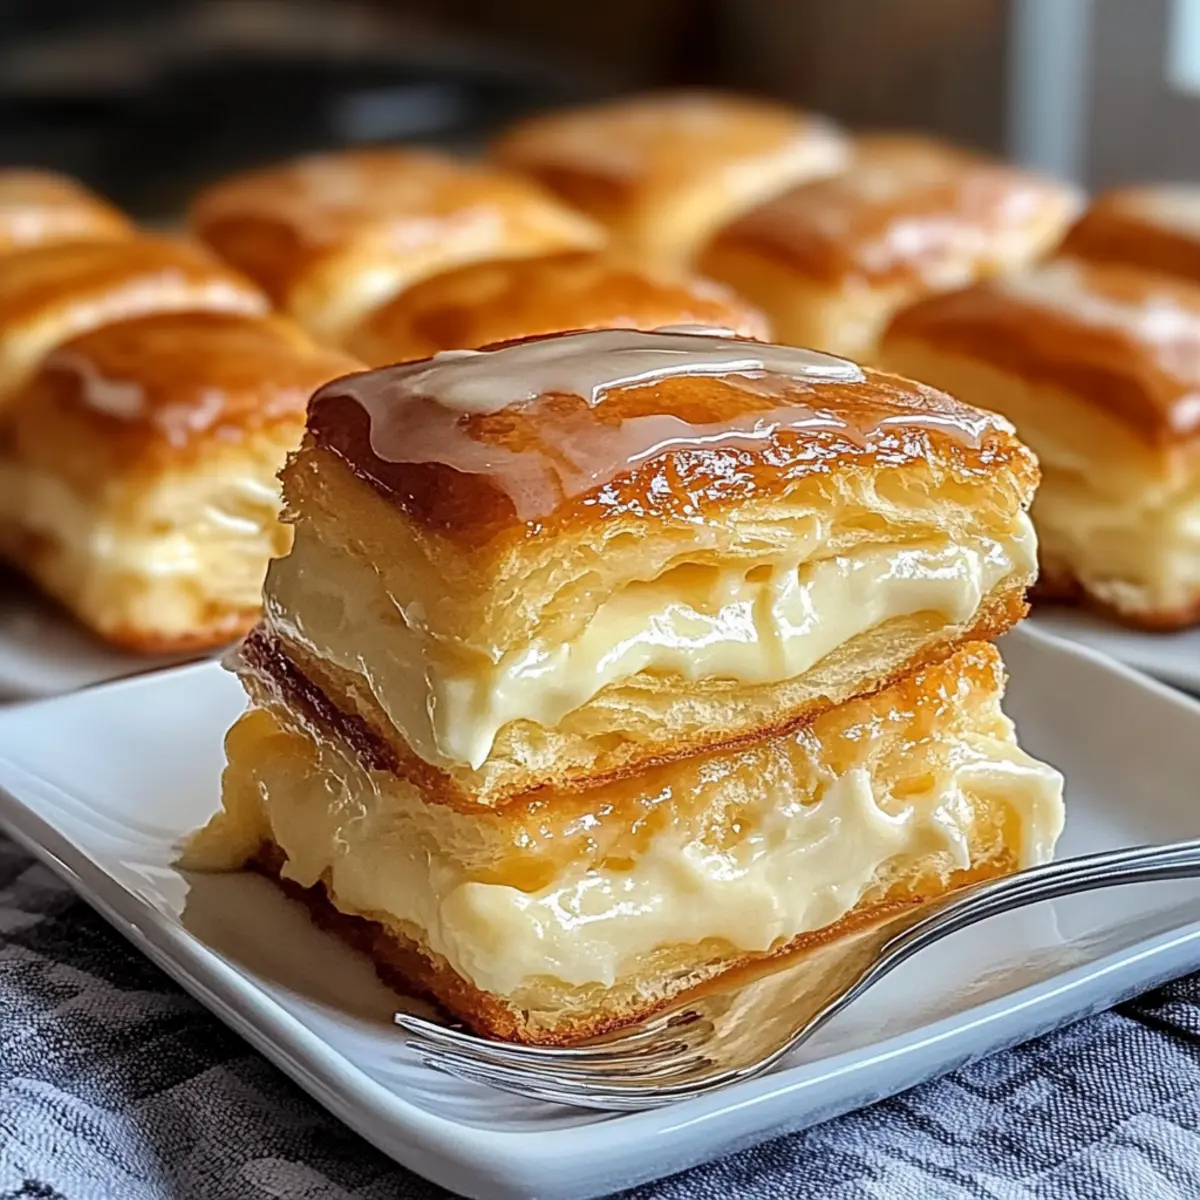
Walking through the kitchen, the sweet aroma of freshly baked goodies wafts through the air—a sure sign that something special is on the way. Today, I’m excited to share my take on a delightful treat: the King’s Hawaiian Cheesecake Danish. This easy recipe combines the fluffy sweetness of King’s Hawaiian Rolls with a creamy cheesecake filling, creating a mouthwatering dessert that’s perfect for brunch or a cozy family gathering. One of the best parts? It’s quick to whip up, making it ideal for those busy mornings when you want to impress without the fuss. Plus, the silky vanilla glaze on top adds a sweet finish that will have everyone reaching for seconds. Are you ready to elevate your brunch game and wow your loved ones with this delicious twist?
Why is this cheesecake danish a must-try?
Indulgent Flavor: This King’s Hawaiian Cheesecake Danish perfectly balances the fluffy sweetness of the rolls with a rich, creamy filling that will leave you wanting more.
Effortless Preparation: The straightforward steps mean you’ll spend less time in the kitchen and more time enjoying brunch with your loved ones.
Crowd-Pleasing Delight: Ideal for gatherings, this dessert is bound to impress, leaving everyone raving about its deliciousness.
Versatile Options: Feel free to mix in chocolate chips or swap the cream cheese for ricotta for a lighter twist— it’s your creation!
Perfect Pairing: Serve warm with fresh fruit or a dollop of whipped cream for an elevated experience that complements the danish beautifully. For a similarly tasty treat, check out my guide on Making Cheesecake Dip for some delicious ideas.
King’s Hawaiian Cheesecake Danish Ingredients
• Elevate your brunch with these ingredients!
For the Danish
- King’s Hawaiian Rolls – Adds a delightful sweetness and soft texture, creating the perfect base for this cheesecake.
- Cream Cheese – Provides that rich, creamy cheesecake flavor; it should be softened for easy blending.
- Sugar – Sweetens the filling; adjust to your taste for the ideal sweetness balance.
- Eggs – Binds the mixture together and helps set the filling as it bakes.
- Vanilla Extract – Enhances the overall flavor with a gorgeous, warm aroma; opt for pure vanilla for the best taste.
- Milk – Adjusts the filling’s consistency; swapping in cream can give it an even richer texture.
For the Glaze
- Powdered Sugar – The main ingredient for sweetness in your glaze; sifted for a smooth finish.
- Milk – Helps achieve the right drizzle consistency; add gradually for the best texture.
Step‑by‑Step Instructions for King’s Hawaiian Cheesecake Danish
Step 1: Preheat the Oven
Begin by preheating your oven to 350°F (175°C). This step is crucial as it ensures that your King’s Hawaiian Cheesecake Danish bakes evenly. While the oven heats up, you can focus on preparing the baking dish, making everything more efficient.
Step 2: Prepare the Baking Dish
Next, generously grease a 9×13 inch baking dish with butter or non-stick spray. A well-greased dish prevents sticking and makes it easier to serve the creamy, delicious cheesecake danish once it’s baked. Make sure to cover the entire bottom and sides of the dish.
Step 3: Mix the Filling
In a medium-sized bowl, combine softened cream cheese, sugar, eggs, and vanilla extract. Using an electric mixer, beat the mixture on medium speed until it reaches a smooth and creamy consistency, about 3-4 minutes. Scrape the sides of the bowl to ensure all ingredients are thoroughly mixed for your King’s Hawaiian Cheesecake Danish filling.
Step 4: Prepare the Rolls
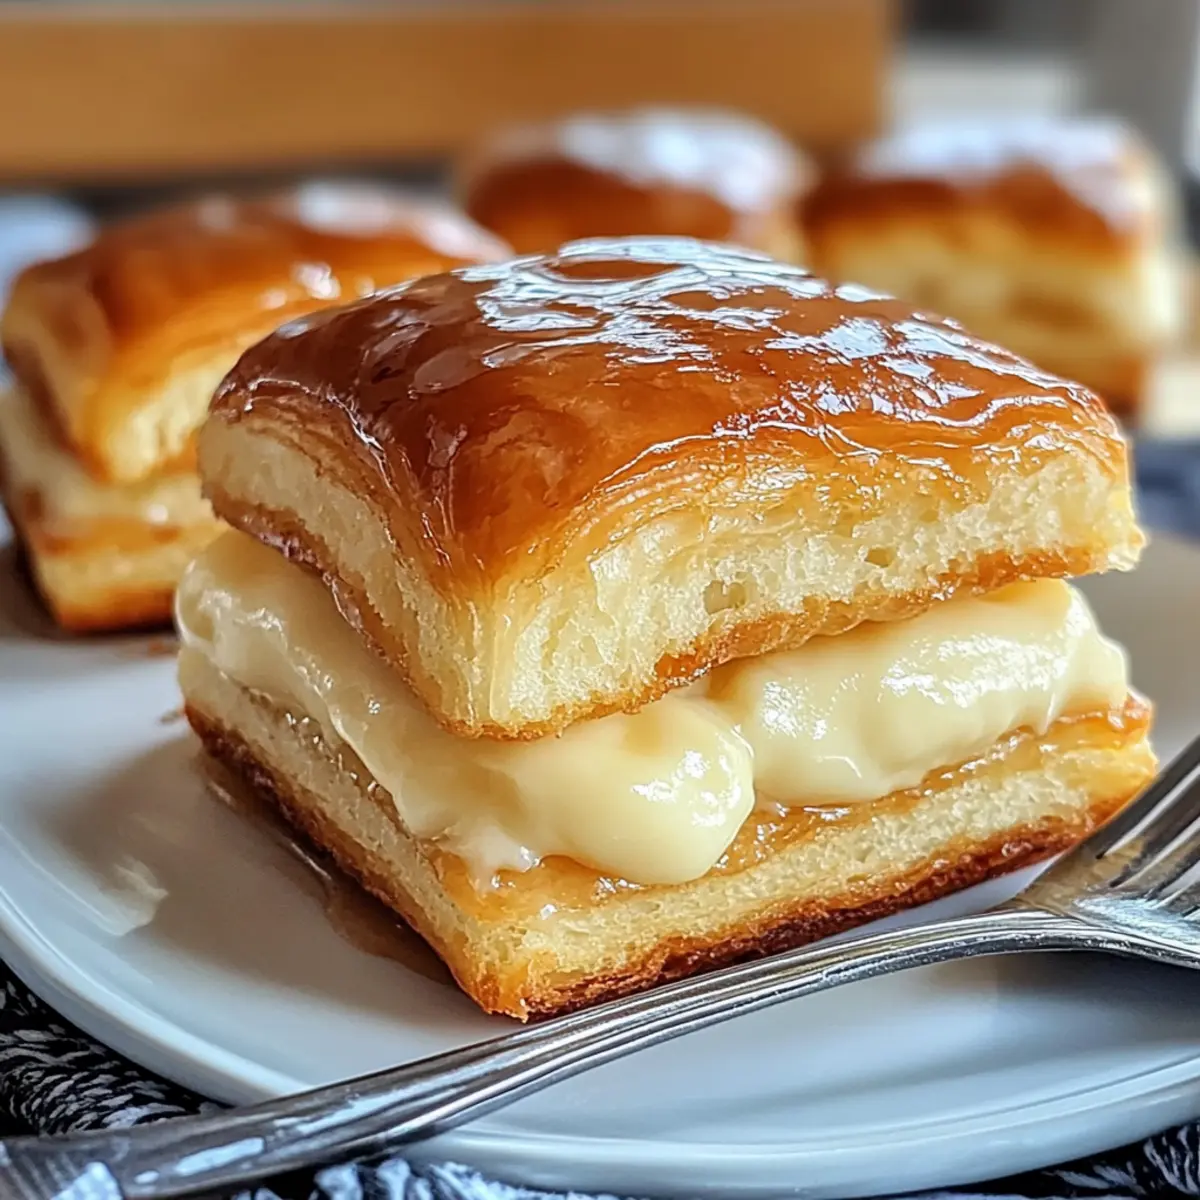
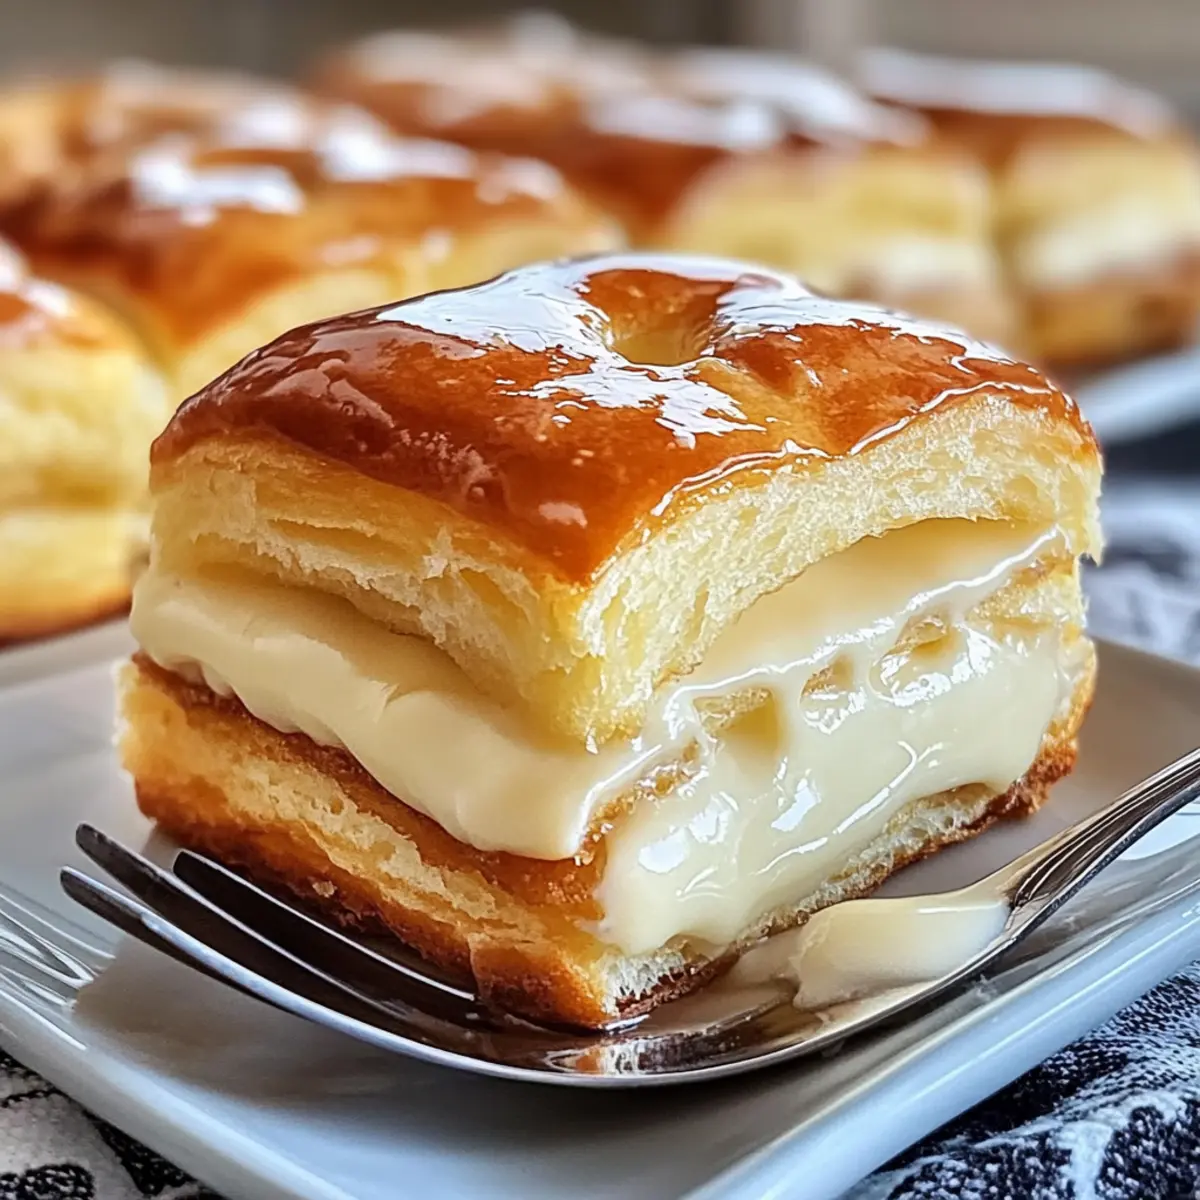
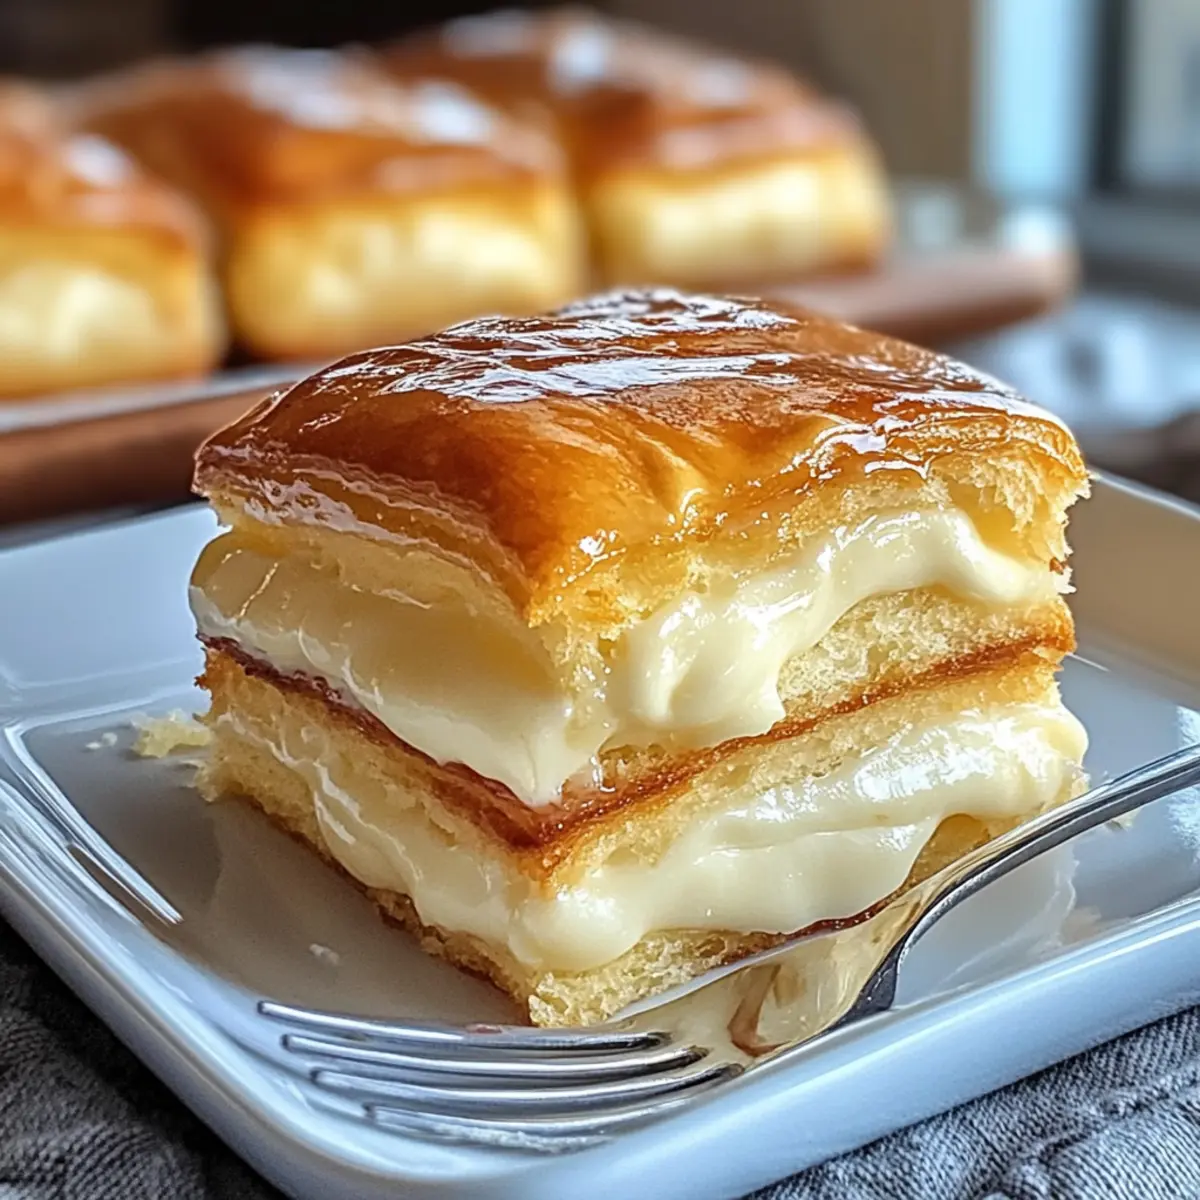
Carefully cut the King’s Hawaiian Rolls in half, creating a top and bottom for each roll. Layer the bottom halves evenly in the greased baking dish, ensuring they fit snugly together. This forms a soft base that will hold the rich filling beautifully during baking.
Step 5: Add the Cheesecake Filling
Once your filling is ready, spread it evenly over the layer of rolls in the baking dish. Use a spatula to ensure an even distribution, allowing the creamy mixture to seep down between the rolls, enhancing flavor and texture in your King’s Hawaiian Cheesecake Danish.
Step 6: Top with Remaining Rolls
Place the top halves of the rolls over the cheesecake filling, ensuring a snug fit. This layer will create a delightful crust as it bakes, giving the danish its signature fluffy texture. Gently press down to help the filling settle between the rolls.
Step 7: Bake the Danish
Place the baking dish in your preheated oven and bake for 25 minutes. Keep an eye on it, and look for a lightly golden top and set filling. The center should have a slight jiggle, indicating that the cheesecake is perfectly creamy and not overbaked.
Step 8: Cool and Glaze
After baking, remove the King’s Hawaiian Cheesecake Danish from the oven and allow it to cool for about 10-15 minutes. This slight cooling period will make the danish easier to glaze without the icing melting away. Drizzle the silky vanilla glaze over the top before serving for a sweet finish.
King’s Hawaiian Cheesecake Danish Variations
Feel free to get creative with this recipe and make it your own with these delightful twists!
- Dairy-Free: Substitute cream cheese with a dairy-free alternative like cashew cheese for a creamy, plant-based filling.
- Fruit-Infused: Add fresh fruit like blueberries or sliced strawberries to the cheesecake filling for a burst of color and flavor. This variation can brighten each bite, making it even more delicious!
- Nutty Crunch: Fold in some chopped nuts, like pecans or almonds, to add a delightful crunch and enhance the richness of the cheesecake. A textural contrast can be such a treat!
- Chocolate Lovers: Mix in chocolate chips with the filling or drizzle melted chocolate over the glaze for a heavenly chocolate twist. This decadent addition will satisfy any sweet tooth!
- Almond Flavor: Swap vanilla extract with almond extract for a unique, nutty aroma that’ll elevate the flavor profile. It adds a lovely depth that pairs beautifully with sweet rolls.
- Spiced Up: Add a pinch of cinnamon or nutmeg to the cream cheese mixture for a warm spiced touch that works wonders, especially during the fall season. It’s like a cozy hug in dessert form!
- Zesty Citrus: Incorporate lemon or orange zest into the filling for a refreshing citrusy kick, balancing out the sweetness beautifully. This twist is bright and invigorating!
- Tropical Delight: Top the finished dish with shredded coconut for a taste of the tropics; it’ll make your King’s Hawaiian Cheesecake Danish feel like a little vacation on a plate!
No matter how you choose to customize, this beautiful treat will surely impress your family and friends. For more delightful cheesecake ideas, don’t miss my guide on Making Cheesecake Dip.
Expert Tips for King’s Hawaiian Cheesecake Danish
-
Softened Cream Cheese: Ensure your cream cheese is fully softened to prevent lumps in the filling. It’s key for a smooth texture.
-
Don’t Overbake: Keep an eye on your cheesecake danish; the center should jiggle slightly to maintain that creamy consistency.
-
Cool Before Glazing: Allow the danish to cool slightly before applying the glaze to prevent it from melting into the filling.
-
Use Fresh Ingredients: Fresh vanilla extract and quality cream cheese elevate the flavors, ensuring your King’s Hawaiian Cheesecake Danish shines in taste.
-
Add a Twist: Don’t hesitate to mix in chocolate chips or fruit, creating a delightful variation of flavors in your cheesecake danish!
How to Store and Freeze King’s Hawaiian Cheesecake Danish
Fridge: Store leftovers in an airtight container in the refrigerator for up to 3 days. This helps retain the creamy texture of the filling.
Freezer: If you have extra danish, wrap it tightly in plastic wrap and store it in the freezer for up to 2 months. Thaw in the fridge before reheating.
Reheating: To enjoy your King’s Hawaiian Cheesecake Danish warm, microwave individual servings for 15-30 seconds, or until warmed through. You can also reheat in the oven at 350°F (175°C) for about 10 minutes.
Make Ahead Options
These King’s Hawaiian Cheesecake Danishes are perfect for meal prep enthusiasts! You can prepare the creamy filling and assemble the dish up to 24 hours in advance—simply mix the cream cheese, sugar, eggs, and vanilla until smooth, then layer the bottom halves of the rolls in a greased baking dish, followed by the filling. Cover tightly with plastic wrap and refrigerate overnight to keep everything fresh. On baking day, simply place the top halves of the rolls over the filling and bake according to the original instructions. This approach saves you time in the morning while ensuring your cheesecake danish is just as delicious as if prepared fresh!
What to Serve with King’s Hawaiian Cheesecake Danish
Elevate your meal experience with these delicious pairings that enhance the flavors of your cheesecake danish.
- Fresh Berries: The tartness of strawberries or blueberries balances the sweetness of the danish, adding a refreshing element to each bite.
- Whipped Cream: A dollop of this fluffy topping adds an airy texture, enhancing your dessert’s creaminess for a heavenly combination.
- Crispy Bacon: The salty crunch brings an unexpected contrast, making for a delightful savory-sweet experience that is simply irresistible.
- Coffee or Espresso: The rich, bold flavors of coffee complement the sweetness beautifully, making it a perfect morning or brunch pairing.
- Minty Fruit Salad: A medley of melons, citrus, and refreshing mint creates a bright side that revitalizes the palate while emphasizing the danish’s sweetness.
- Vanilla Ice Cream: Scoop a heaping tablespoon next to the warm danish—you’ll experience a luscious melt-in-your-mouth delight that’s pure bliss.
- Caramel Sauce: Drizzle over the top for an added touch of sweetness and decadence, creating layers of flavor that will have everyone asking for more.
King’s Hawaiian Cheesecake Danish Recipe FAQs
What kind of King’s Hawaiian Rolls should I use?
Absolutely, I recommend using the original King’s Hawaiian Rolls for the best sweetness and fluffiness. These rolls are soft and have a mild sweet flavor that pairs beautifully with the creamy cheesecake filling. Look for rolls that are fresh and without dark spots or damage to ensure the best texture in your final dish.
How should I store leftovers of the King’s Hawaiian Cheesecake Danish?
Store any leftovers in an airtight container in the refrigerator, where they will stay fresh for up to 3 days. If you want to keep them longer, you can wrap them in plastic wrap and place them in a freezer-safe bag, storing them in the freezer for up to 2 months.
Can I freeze the King’s Hawaiian Cheesecake Danish?
Certainly! To freeze, wrap the cooled cheesecake danish tightly in plastic wrap and foil to prevent freezer burn. When you’re ready to enjoy it, simply transfer it to the fridge to thaw overnight before reheating in the microwave or oven at 350°F (175°C) for about 10 minutes.
What should I do if my cheesecake filling is lumpy?
If your filling turns out lumpy, it likely means the cream cheese wasn’t softened enough. For the best texture, make sure the cream cheese is at room temperature and softened completely before mixing. If lumps remain, you can blend the mixture again with an electric mixer until it’s smooth.
Can I make the King’s Hawaiian Cheesecake Danish ahead of time?
Yes, you can prepare the filling and assemble the dish the night before! Simply cover the assembled danish with plastic wrap and refrigerate it overnight. Then, bake it the next day as instructed, adding about 5 extra minutes to the baking time to account for chill from the fridge.
Is this recipe safe for people with allergies?
Be cautious! This King’s Hawaiian Cheesecake Danish contains common allergens like dairy (cream cheese and milk) and eggs. For dairy-free alternatives, you could try using dairy-free cream cheese or almond milk. Always ensure that your substitutions are suitable for your specific dietary needs or allergies.
Indulge in King’s Hawaiian Cheesecake Danish Bliss
Ingredients
Equipment
Method
- Preheat your oven to 350°F (175°C).
- Grease a 9x13 inch baking dish with butter or non-stick spray.
- In a bowl, combine softened cream cheese, sugar, eggs, and vanilla extract. Blend until smooth, about 3-4 minutes.
- Cut the King’s Hawaiian Rolls in half and layer the bottom halves in the greased baking dish.
- Spread the cheesecake filling evenly over the rolls.
- Top with the remaining halves of the rolls.
- Bake in the preheated oven for 25 minutes or until golden and set.
- Allow to cool for 10-15 minutes, then drizzle with glaze before serving.
")