")
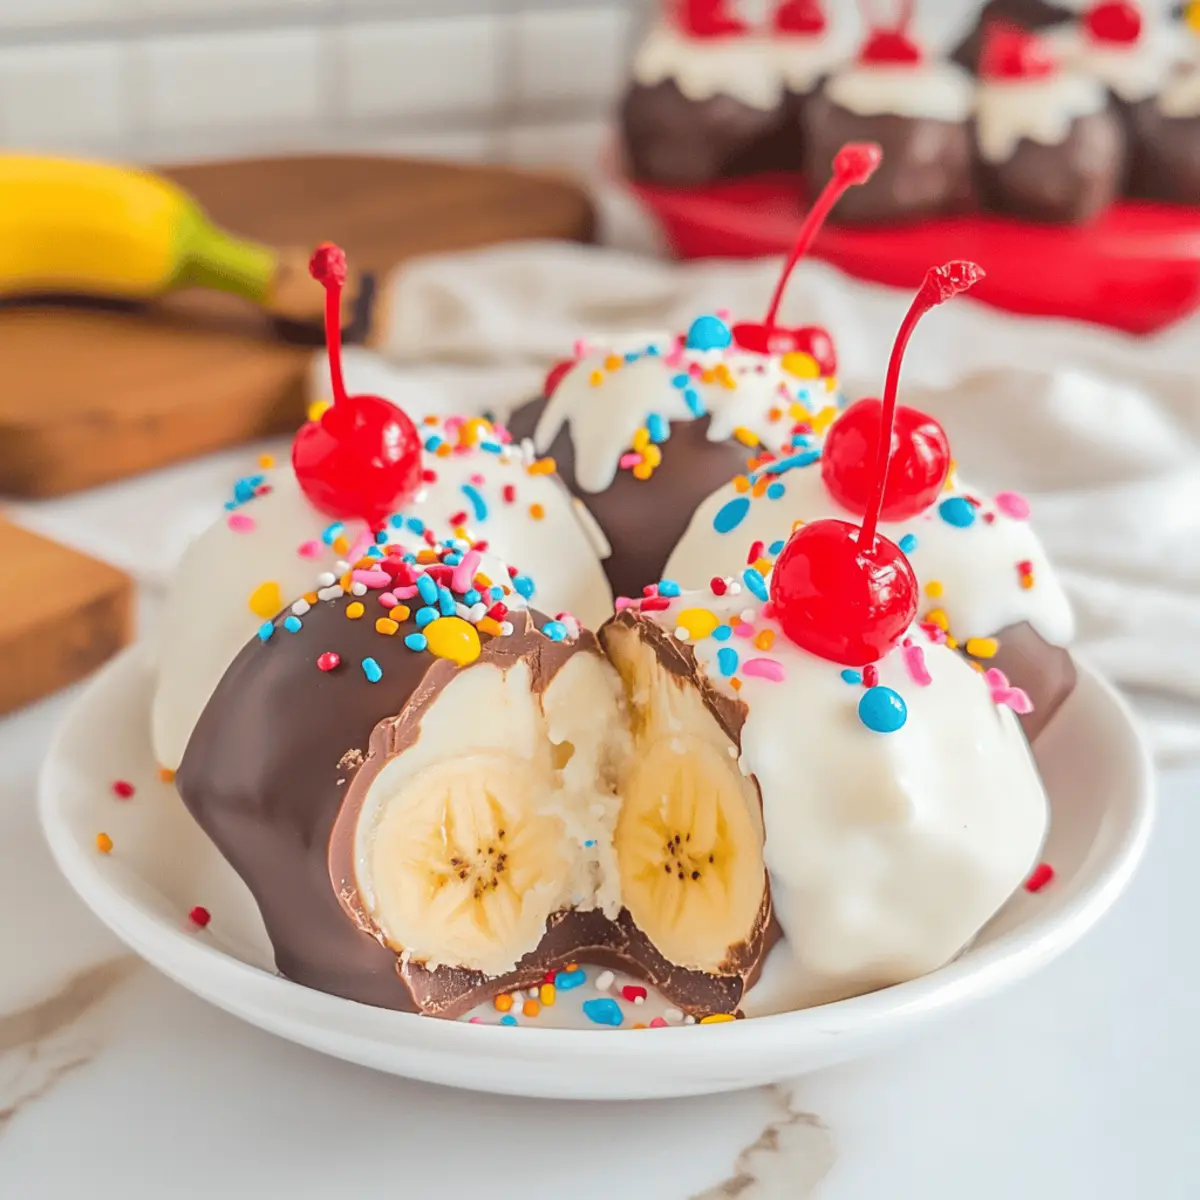
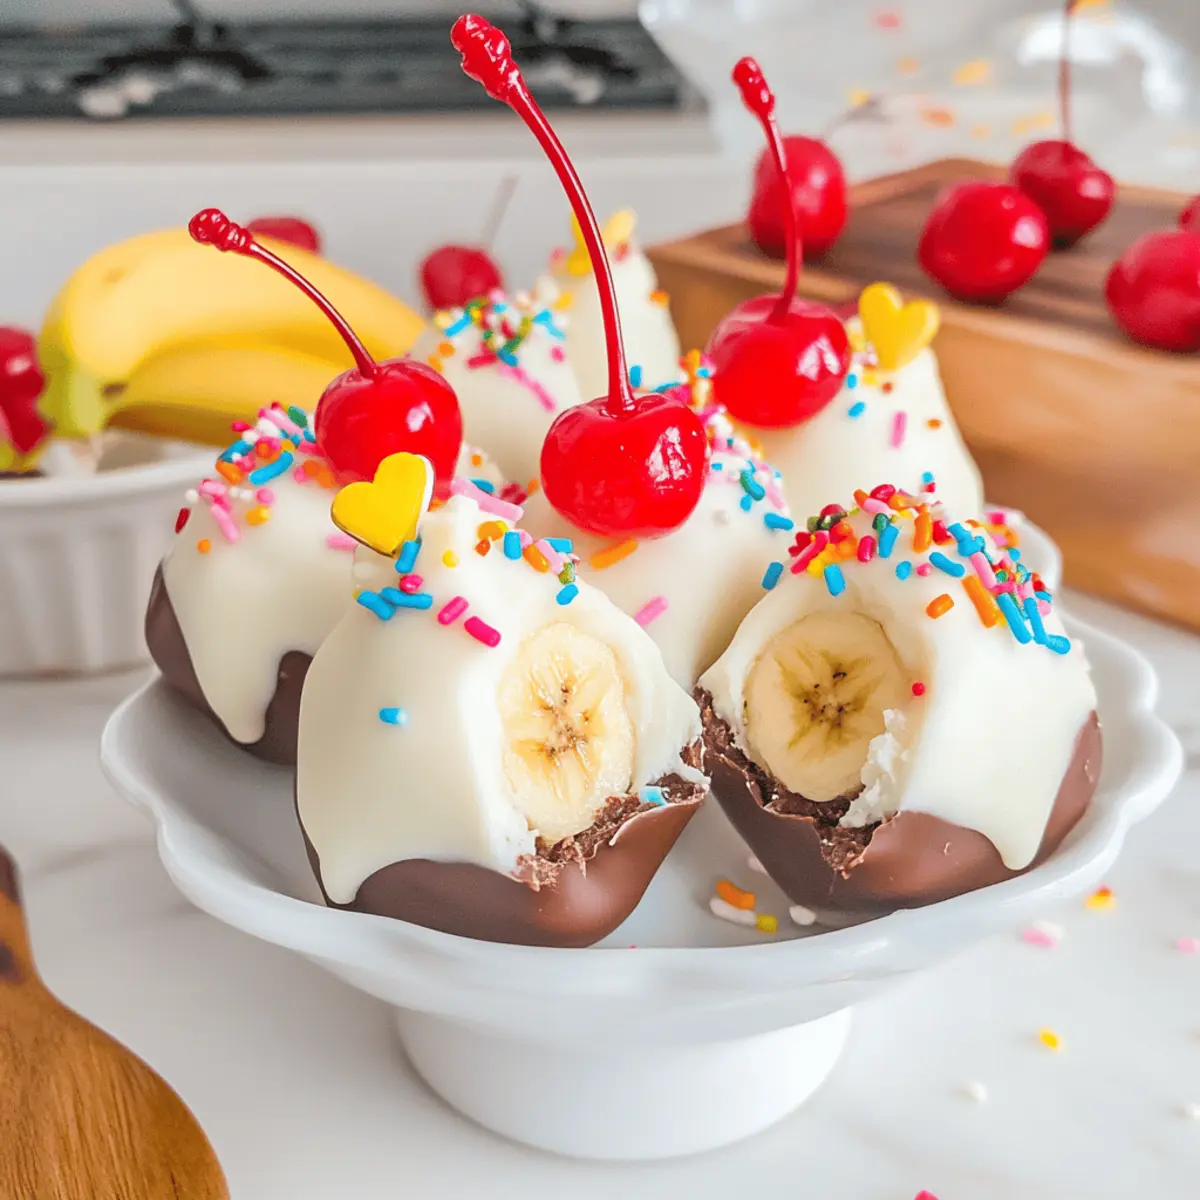
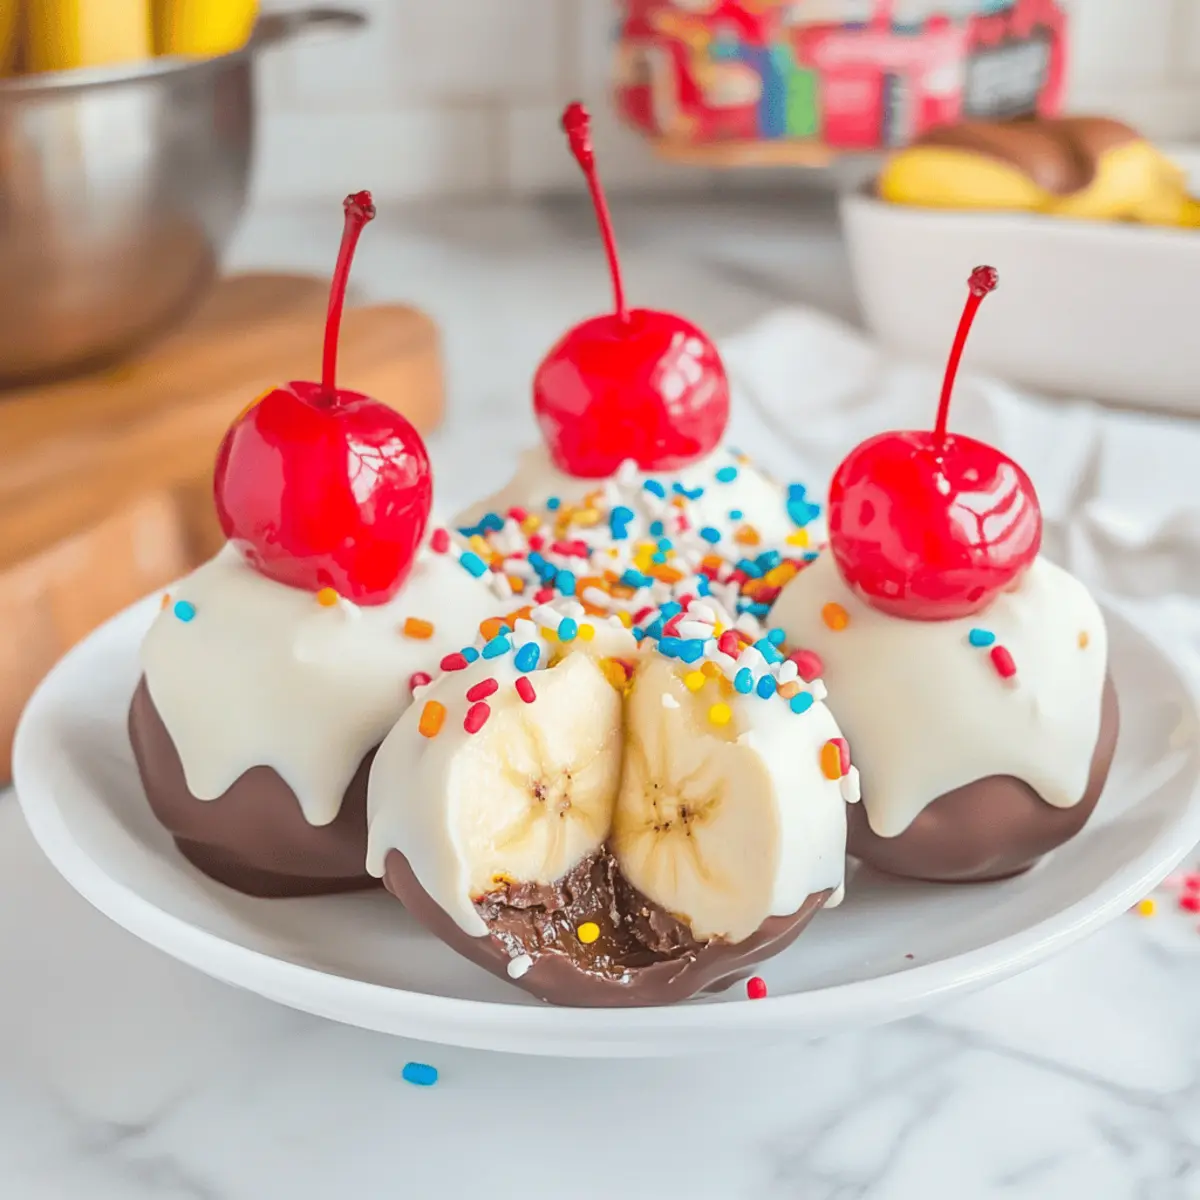
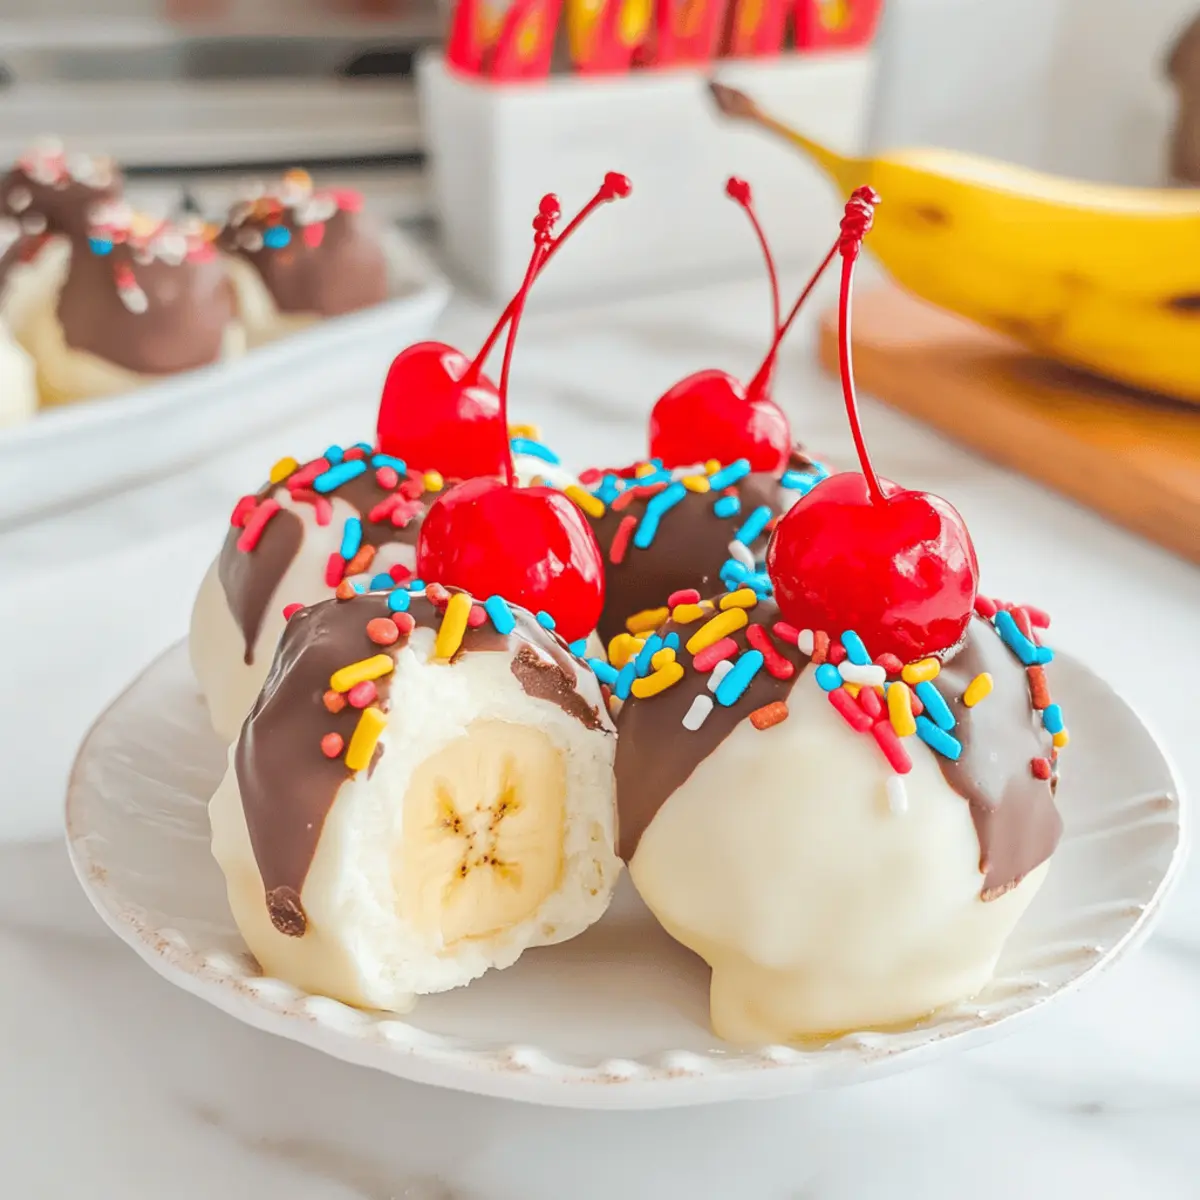
As I sifted through my memories of childhood ice cream adventures, the essence of a classic banana split came flooding back, but this time, in the form of luscious no-bake treats. These No-Bake Banana Split Truffles combine the joyful flavors of ripe banana, creamy textures, and a stunning coating of white chocolate, making them an absolute crowd-pleaser. What I love most is how simple they are to whip up—perfect for last-minute gatherings or a fun afternoon project with the kids. Not only do they offer a creative twist on an old favorite, but they’re also a delightful, portable dessert option. Ready to indulge your inner child and impress your family and friends? Let’s dive into making these delightful truffles together!
Why Are These Truffles a Must-Try?
Simplicity: These No-Bake Banana Split Truffles are incredibly easy to make, requiring just a handful of everyday ingredients.
Rich Flavor: The combination of banana, cream cheese, and white chocolate creates a creamy explosion of flavor that perfectly captures the joy of a classic banana split.
Versatile Treat: Customize your truffles with your favorite nuts or even a splash of coconut for added flair!
Fun for Everyone: They’re perfect for parties or gatherings—great as a snack that kids will love helping to create!
Quick and Convenient: Whip these up in just a few minutes and chill while you prepare for your guests, saving valuable time without sacrificing taste!
Banana Split Truffles Ingredients
For the Truffle Base
• White Cake Mix – Provides the foundation for the truffles; use heat-treated cake mix for safety!
• Cream Cheese – Adds a rich, creamy texture; ensure it’s softened for easy mixing.
• Vanilla Extract – Brings out the flavors beautifully; opt for pure vanilla for superior taste.
For the Fruity Goodness
• Crushed Pineapple – Infuses the truffles with a fruity zing; make sure it’s well-drained to avoid excess moisture.
• Chopped Walnuts – Adds a delightful crunch; feel free to substitute with your favorite nuts or leave them out for nut-free options.
• Banana – The star of the show for authentic banana split flavor; choose ripe bananas for maximum sweetness.
For Coating and Decoration
• White Candy Coating – Envelops the truffles in a delicious layer; try using dark or milk chocolate for a different twist!
• Chocolate Melting Wafers – Perfect for that signature “chocolate syrup” look on your truffles.
• Rainbow Sprinkles – Brightens up the truffles and adds a touch of fun; essential for that banana split theme!
• Maraschino Cherries – A classic garnish that completes the look and taste of a banana split!
Step‑by‑Step Instructions for Banana Split Truffles
Step 1: Prepare Baking Sheet
Line a large cookie sheet with parchment paper, creating a non-stick surface to place your truffles after shaping. This will help maintain their integrity as they chill and set. Having this ready will streamline the process, ensuring a smooth transition once your truffle mixture is ready to be scooped.
Step 2: Mix Ingredients
In a medium mixing bowl, combine the heat-treated white cake mix, softened cream cheese, and vanilla extract. Use a spatula to blend these ingredients until they form a dough-like consistency, about 3-5 minutes. This mixture is the base for your Banana Split Truffles and should be smooth and well combined before moving on.
Step 3: Add Fill-Ins
Gently fold in the drained crushed pineapple, chopped walnuts, and diced banana slices into your mixture. Make sure everything is evenly distributed, as this will infuse your truffles with delightful fruity flavors and texture. The combination should resemble a yummy, chunky dough that embodies the essence of a classic banana split.
Step 4: Shape Truffles
Using a cookie scoop or your hands, portion out 1 to 1.5-inch pieces of the dough, rolling them into smooth balls. Place each ball onto the prepared cookie sheet, making sure they have enough space between them to allow for any slight expansion as they chill. Visualize the soft, rounded form of the truffles coming together!
Step 5: Chill
Refrigerate the shaped truffle balls for at least 1 hour, allowing them to firm up and become easier to handle. This chilling step is crucial as it ensures a perfect coating later on and enhances the flavors as they meld together. You’ll know they’re ready when they feel firmer to the touch.
Step 6: Melt Coating
In a microwave-safe bowl, melt the white candy coating by heating it in 30-second intervals, stirring in between until smooth and fully melted. Be cautious not to overheat, as it can scorch. This bubbly, creamy coating will envelop your truffles in a sweet, dreamy layer that signifies their delightful transformation into Banana Split Truffles.
Step 7: Coat Truffles
Using forks, dip each chilled truffle into the melted candy coating, ensuring they are thoroughly covered. Return each coated truffle to the parchment-lined baking sheet, shaking off any excess coating. Visualize each truffle gleaming in its sweet, white attire, ready for the finishing touches!
Step 8: Decorate
Melt the chocolate melting wafers in a microwave-safe bowl and drizzle over the coated truffles to mimic the “chocolate syrup” effect. While the chocolate is still warm, gently place a maraschino cherry on each truffle and sprinkle with colorful rainbow sprinkles for that classic banana split appeal. This playful step adds a festive touch that’s impossible to resist.
Step 9: Final Chill
Place the decorated Banana Split Truffles back in the refrigerator for another 30 minutes, allowing everything to set beautifully. By the end of this ordeal, your truffles should feel firm and ready for a delightful reveal. Once chilled, they’re ready to be served and enjoyed by family and friends!
What to Serve with No-Bake Banana Split Truffles
Indulging in these delightful truffles opens the door to a world of complementary flavors that can elevate your dessert experience.
- Creamy Vanilla Ice Cream: A scoop alongside these truffles enhances the creamy richness and echoes the classic banana split experience.
- Fresh Fruit Salad: A vibrant medley of berries and citrus offers a refreshing contrast, balancing out the sweetness of the truffles beautifully.
- Chocolate-Covered Strawberries: The contrasting textures and flavors create a delightful pairing that amplifies the indulgence of your dessert platter.
- Whipped Cream: Light and airy, a dollop of whipped cream adds a luxurious touch while enhancing the overall sweetness and texture.
- Nutty Granola: For a satisfying crunch, sprinkle some nutty granola on top of the truffles or serve on the side; this adds a delicious complexity.
- Coffee or Espresso: The rich, bold flavors of coffee provide a lovely counterbalance to the sweetness, creating a harmonious indulgence.
- Sparkling Water with Lime: Refreshing and light, this drink adds a zesty touch that cleanses the palate between bites.
- Chocolate Milkshake: Blend up a milkshake for a nostalgic pairing; the creaminess and chocolate flavor meld perfectly with the truffles’ essence.
- Peanut Butter Dip: A nutty, creamy dip complements the truffles’ flavors and adds an exciting element to your dessert spread.
Expert Tips for Banana Split Truffles
• Quality Ingredients: Use high-quality chocolate for the coating to elevate the flavor of your Banana Split Truffles.
• Even Sizing: Roll truffles into uniform sizes while they’re still semi-chilled for an attractive, smooth finish that’s pleasing to the eye.
• Chill Time: Don’t skip the refrigeration steps! Chilling ensures the truffles hold their shape during coating and helps meld the delightful flavors.
• Customization Station: Consider creating a toppings bar with various options like nuts, sprinkles, and coconut for guests to personalize their truffles.
• Draining Pineapple: Ensure that your crushed pineapple is well-drained to avoid excess moisture, which can make the truffle mixture too wet.
Banana Split Truffles Variations
Feel free to let your creativity shine and customize these truffles to fit your taste preferences or dietary needs!
-
Nut-Free: Omit the walnuts altogether for a nut-free version, or replace them with sunflower seeds for a delightful crunch.
-
Chocolate Lovers: Swap the white candy coating for dark or milk chocolate to give a decadent twist to your truffles. The richness will elevate each bite!
-
Tropical Vibes: Add shredded coconut into the truffle mixture for a tropical flair that pairs beautifully with the banana and pineapple.
-
Dairy-Free: Use non-dairy cream cheese and dark chocolate coatings to transform these into a dairy-free dessert everyone can enjoy!
-
Banana Boost: Enhance your banana flavor by adding a splash of banana extract to the mix. This will deepen the taste and make every bite even more decadent.
-
Spicy Kick: Add a pinch of cayenne pepper to the melted chocolate for an unexpected spicy note that beautifully contrasts the sweetness.
-
Fruit Fusion: Incorporate dried fruits like cranberries or raisins into the truffle mix for an extra layer of sweetness and texture.
-
Serving Flair: Drizzle caramel sauce over the truffles before adding sprinkles to give them an extra special finishing touch.
For more inspiration, check out suggestions to create an easy last-minute dessert or explore how to put together an engaging dessert bar for your next gathering. Enjoy experimenting with these delightful variations!
Storage Tips for Banana Split Truffles
Fridge: Keep Banana Split Truffles in an airtight container in the refrigerator for up to 5 days to maintain their freshness and flavor.
Freezer: For longer storage, freeze the truffles in a single layer on a baking sheet before transferring them to an airtight freezer-safe container. They can last up to 2 months.
Thawing: When ready to enjoy, simply thaw the truffles at room temperature for about 30 minutes before serving, allowing their creamy texture to return.
Reheating: There’s no need to reheat these truffles, as they are best enjoyed chilled or at room temperature, preserving their delightful flavors!
Make Ahead Options
These No-Bake Banana Split Truffles are perfect for busy home cooks who want to enjoy delicious desserts without the last-minute rush! You can complete the initial steps—mixing the ingredients, shaping the truffles, and chilling them—up to 24 hours ahead. Simply follow steps 1 through 5 and refrigerate the truffle balls in an airtight container. To maintain their quality, be sure to keep them well-separated to prevent sticking. When you’re ready to serve, just melt the coating and decorate your truffles as directed in steps 6 through 9. This way, you’ll have a stunning and indulgent dessert ready with minimal effort, allowing you to focus on enjoying your time with loved ones!
Banana Split Truffles Recipe FAQs
What kind of bananas should I use?
I recommend using ripe bananas for the best flavor and sweetness. Look for bananas with a few brown spots; they’ll be perfectly soft and easy to mash into your truffle mixture.
How should I store leftover truffles?
Absolutely! Store your Banana Split Truffles in an airtight container in the refrigerator for up to 5 days. This keeps them fresh and ready for snacking. Just be sure they are cool to avoid condensation inside the container.
Can I freeze Banana Split Truffles?
Yes, you can! Lay the truffles out in a single layer on a baking sheet and freeze them for about 1-2 hours until solid. Then, transfer them to an airtight, freezer-safe container, where they’ll keep well for up to 2 months. When you’re ready to enjoy, let them thaw at room temperature for about 30 minutes.
What if my truffle mixture is too wet?
No worries! If your mixture feels too wet, it may be due to excess moisture from the pineapple. To fix this, try adding a little more heat-treated cake mix a tablespoon at a time until you reach a manageable consistency. You want a dough-like texture that’s easy to shape!
Can I make these truffles nut-free?
Very! To make these Banana Split Truffles nut-free, simply omit the chopped walnuts and consider using seeds or other nut-free alternatives for added texture, like crushed graham crackers or toffee bits. Enjoy every bite worry-free!
Irresistible Banana Split Truffles You Can Make in Minutes
Ingredients
Equipment
Method
- Line a large cookie sheet with parchment paper, creating a non-stick surface to place your truffles after shaping.
- In a medium mixing bowl, combine the heat-treated white cake mix, softened cream cheese, and vanilla extract. Mix until dough-like consistency, about 3-5 minutes.
- Gently fold in the drained crushed pineapple, chopped walnuts, and diced banana slices into your mixture.
- Using a cookie scoop, portion out 1 to 1.5-inch pieces of the dough, rolling them into smooth balls.
- Refrigerate the shaped truffle balls for at least 1 hour, allowing them to firm up.
- In a microwave-safe bowl, melt the white candy coating in 30-second intervals, stirring until smooth.
- Dip each chilled truffle into the melted candy coating, ensuring they are thoroughly covered.
- Melt the chocolate melting wafers and drizzle over the coated truffles. Place a maraschino cherry on each truffle and sprinkle with rainbow sprinkles.
- Place the decorated Banana Split Truffles back in the refrigerator for another 30 minutes to set.
")