")
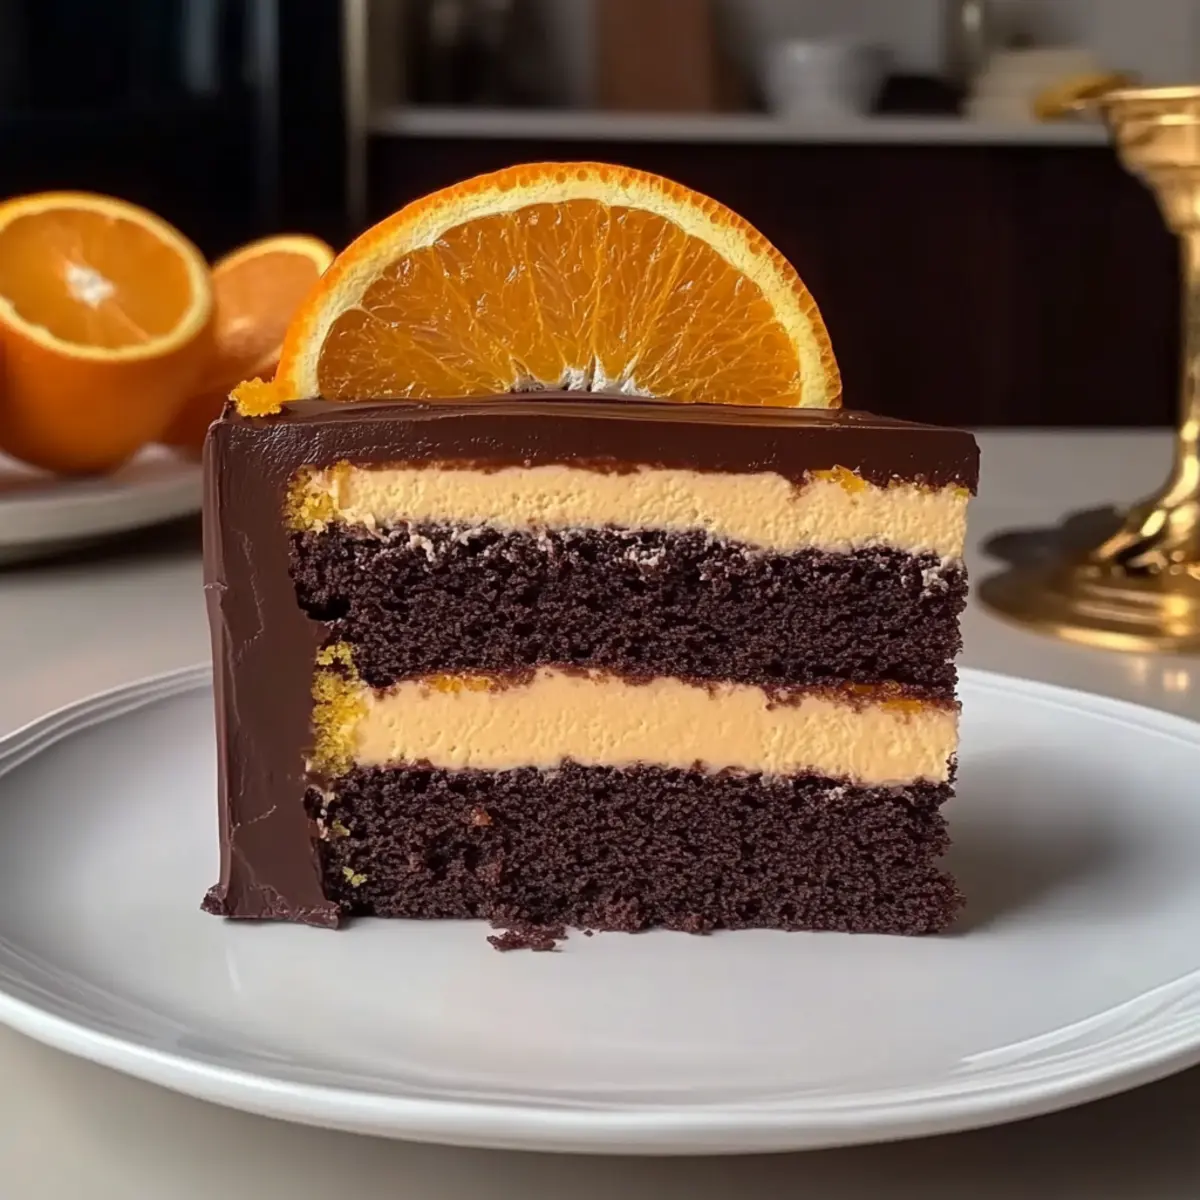
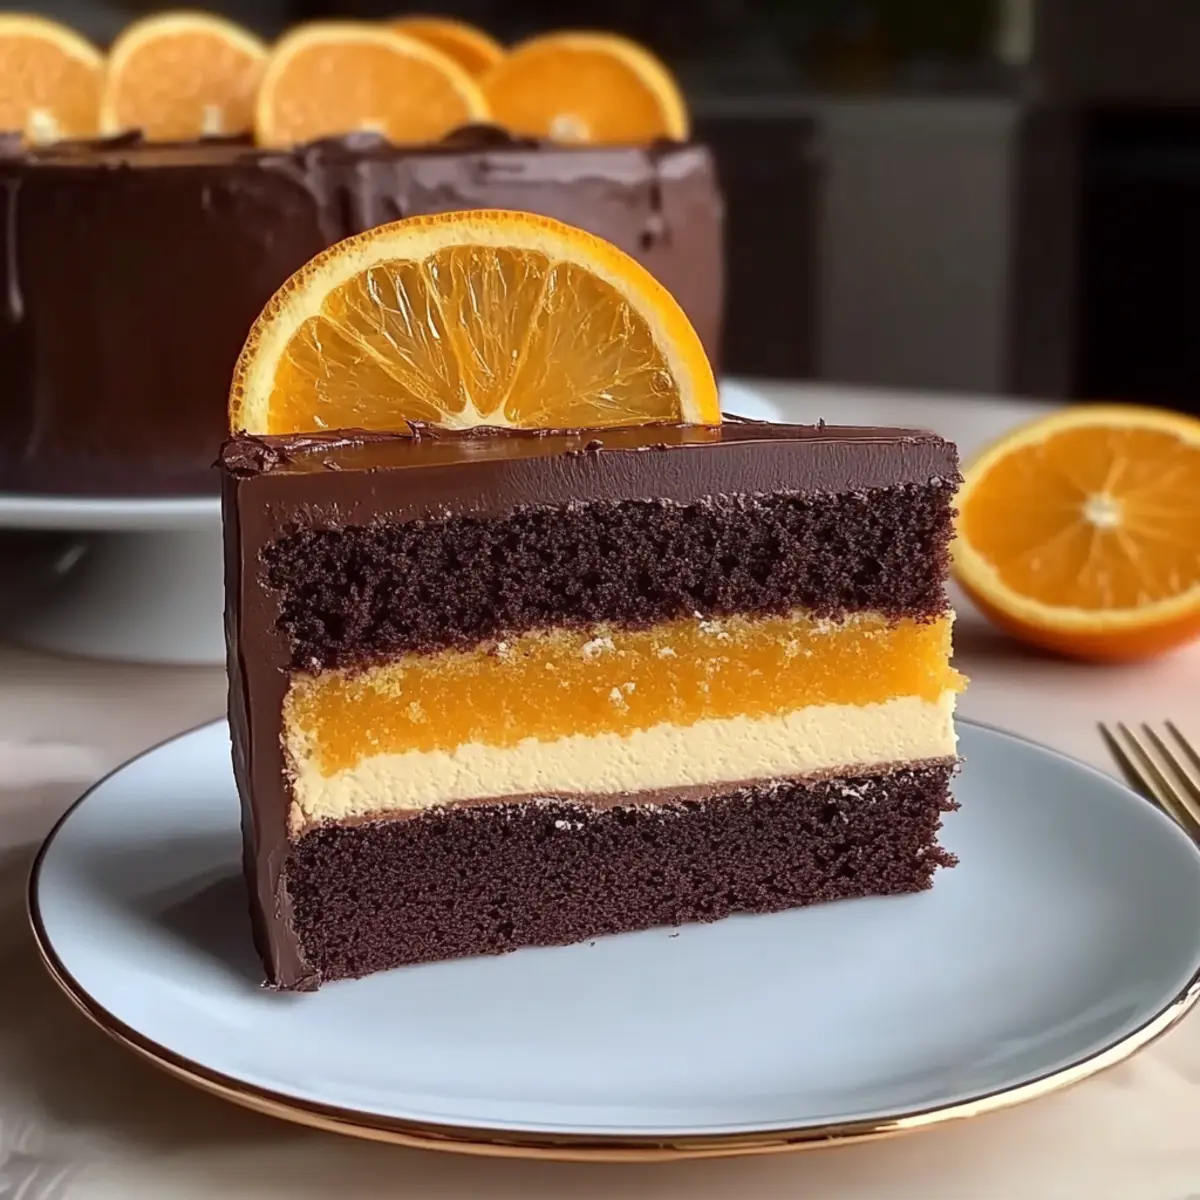
As I strolled through the vibrant farmer’s market, the scent of citrus mingled with chocolate wafted through the air, stirring my curiosity. That moment sparked the inspiration for my Chocolate & Orange Punchcake, a delightful fusion that combines two classics into a show-stopping dessert. Perfect for everything from festive gatherings to intimate family dinners, this moist cake delivers an enchanting balance of rich chocolate and refreshing orange. Not only is it visually stunning, but it also boasts a surprisingly quick prep time, making it a go-to for any occasion. Imagine the joy on your loved ones’ faces as you serve this beauty, elevating your dessert table like never before. Ready to bring this unforgettable flavor combination to life? Let’s dive into the recipe!

Why is this Punchcake a Must-Try?
Uniqueness: The Chocolate & Orange Punchcake brings together rich chocolate and zesty orange for a truly unforgettable flavor experience.
Quick Prep Time: Whip it up in no time! With simple steps, you’ll have a stunning cake ready to impress.
Visual Appeal: The beautiful layers and vibrant orange slices make it a centerpiece at any gathering, sure to wow your guests.
Versatility: Whether it’s a birthday celebration or a cozy family gathering, this cake fits every occasion, bringing joy to all.
Crowd-Pleasing Flavor: The combination of creamy chocolate and citrus brightness means no one can resist a second slice! Pair it with a light dessert like Chocolate Chips Cookies for a complete treat experience!
Chocolate & Orange Punchcake Ingredients
For the Cake
• All-purpose flour – Builds the cake structure; ensure it’s sifted for perfect lightness.
• Granulated sugar – Adds sweetness and moisture; can substitute with brown sugar for a deeper flavor.
• Unsweetened cocoa powder – Provides that rich chocolate flavor; Dutch-processed is great for a milder taste.
• Baking powder – Helps the cake rise; always check expiration for maximum effectiveness.
• Baking soda – Works with acidic ingredients for leavening; ensure it’s fresh for best results.
• Salt – Essential for enhancing flavors; balances the sweetness perfectly.
• Large eggs – Adds moisture and binds ingredients; aquafaba can replace it for a vegan twist.
• Whole milk – Contributes to the cake’s richness; substitute with almond or oat milk for dairy-free options.
• Vegetable oil – Keeps the cake moist; melted coconut oil works well as an alternative.
• Vanilla extract – Enhances the overall flavor; can be swapped with almond extract for a unique touch.
• Boiling water – Activates cocoa and ensures smooth batter; essential for the perfect texture.
For the Citrus Flavor
• Orange zest – Infuses the cake with fresh citrus aroma; always prefer fresh zest for maximum flavor.
• Orange juice – Provides necessary acidity and moisture; freshly squeezed juice yields the brightest taste.
For the Chocolate
• Semisweet chocolate chips – Adds delightful chocolate chunks; dark chocolate can deepen the flavor profile.
Indulge in making this Chocolate & Orange Punchcake, and discover a luscious balance that will dazzle your taste buds!
Step‑by‑Step Instructions for Chocolate & Orange Punchcake
Step 1: Preheat and Prepare
Begin by preheating your oven to 350°F (175°C). Grease and flour two 9-inch round cake pans thoroughly to prevent sticking. You’ll want the flour to cling to the grease, creating a perfect non-stick surface. Set the pans aside while you gather and measure the rest of your ingredients—organization is key to a smooth baking experience with your Chocolate & Orange Punchcake.
Step 2: Mix the Dry Ingredients
In a large mixing bowl, sift together the all-purpose flour, granulated sugar, unsweetened cocoa powder, baking powder, baking soda, and salt. This process aerates the flour and eliminates any lumps, ensuring a light and fluffy cake. Once sifted, use a whisk to combine these dry ingredients evenly; they should be well blended before you introduce any wet elements.
Step 3: Combine the Wet Ingredients
In a separate bowl, whisk together the large eggs, whole milk, vegetable oil, and vanilla extract until smooth and creamy. This step is essential for creating a silky batter. The mixture should appear pale and slightly frothy, indicating that the ingredients are well combined. Set this aside momentarily while you prepare to integrate it into the dry ingredients.
Step 4: Blend the Mixtures
Gradually incorporate the wet ingredients into the dry mixture, mixing on medium speed with a hand mixer or stand mixer. Continue to mix until just combined, being careful not to overmix; the batter should remain thick and slightly lumpy for the best texture in your Chocolate & Orange Punchcake.
Step 5: Add Boiling Water
Carefully add the boiling water to the batter, mixing until the ingredients are fully integrated and the batter is smooth. This step activates the cocoa powder and creates a cake that’s both moist and rich. The batter will be thinner than typical cake batter, but this is exactly what you want for achieving that delightful consistency.
Step 6: Infuse with Citrus
Fold in the freshly zest and orange juice gently using a spatula, providing that zesty brightness to the Chocolate & Orange Punchcake. Make sure not to overmix, as you want to preserve the air incorporated earlier. This step adds a fresh, vibrant aroma that will make your kitchen smell irresistible while the cake bakes.
Step 7: Prepare for Baking
Divide the batter evenly between the two prepared cake pans. Smooth the tops with a spatula for an even bake, ensuring the batter reaches the edges of the pans. Bake in the preheated oven for 30-35 minutes. To check for doneness, insert a toothpick into the center; it should come out clean or with a few moist crumbs attached.
Step 8: Cooling Phase
Once baked, remove the pans from the oven and let them cool in the pans for about 10 minutes. This allows the cake to set, making it easier to transfer without breaking. Afterward, carefully turn the cakes out onto wire racks to cool completely. This cooling step is crucial for maintaining the cake’s integrity before frosting.
Step 9: Assemble and Decorate
Once your cakes are completely cool, place one layer on a serving plate and spread a generous amount of chocolate ganache between the layers, then top with the second cake. Cover the top and sides of the cake with ganache, ensuring it’s smooth and even. Finally, adorn your Chocolate & Orange Punchcake with fresh orange slices for a beautiful presentation that’s sure to impress!
Make Ahead Options
These Chocolate & Orange Punchcake layers are perfect for busy weeknights or celebrations when you want to save time! You can bake the cake up to 24 hours in advance—simply cool it completely, then wrap each layer tightly in plastic wrap and refrigerate. This method prevents drying out while maintaining that moist, tender crumb. When you’re ready to serve, prepare the chocolate ganache and frost the cake just before serving for that fresh, beautiful finish. This way, you’ll have a stunning dessert ready to delight your guests with minimal last-minute effort. Enjoy the satisfaction of homemade perfection without the stress!
What to Serve with Chocolate & Orange Punchcake
Imagine indulging in a sumptuous cake, then complementing it with flavors that elevate the experience even further.
-
Whipped Cream: Light and airy, whipped cream adds a silky texture that beautifully balances the rich chocolate and citrus zests. A dollop on the side invites you to savor each bite.
-
Vanilla Ice Cream: The creamy ice cream melts slightly against the warm cake, enhancing every mouthful with its richness. Each spoonful creates a delightful contrast that keeps you coming back for more.
-
Fresh Berries: Mixed fresh berries offer a juicy, tart flavor that cuts through the sweetness, providing a refreshing bite. Their vibrant colors add visual appeal to your dessert presentation.
-
Chocolate Ganache Drizzle: For chocolate lovers, an extra drizzle of chocolate ganache amplifies the rich chocolate notes, making it a decadent treat that’s pleasing to the eyes and the palate.
-
Mint Infusion: Garnish with fresh mint leaves to introduce a crisp, refreshing aroma that brightens up the rich flavors of the cake. This touch brings sophistication to your dessert table.
-
Coffee Pairing: A hot cup of coffee enhances the chocolate flavor while its warmth rounds out the overall dessert experience. The bitter notes provide a perfect balance to the sweet and citrusy tones of the punchcake.
Expert Tips for Chocolate & Orange Punchcake
-
Room Temperature Ingredients: Ensure all ingredients are at room temperature for even mixing and a better rise in your Chocolate & Orange Punchcake.
-
Avoid Oven Door: Do not open the oven door during baking as it can cause the cake to sink. Wait until the baking time is complete!
-
Sifting Matters: Always sift your dry ingredients to ensure a light and airy texture. This prevents any lumps from forming in your batter.
-
Ganache Timing: Let the cakes cool completely before frosting with ganache to prevent melting and ensure a neat finish on your Chocolate & Orange Punchcake.
-
Zest Freshness: Use fresh orange zest for the best flavor. It’s a simple step that elevates the entire cake experience!
How to Store and Freeze Chocolate & Orange Punchcake
Room Temperature: Keep the cake wrapped in plastic wrap or stored in an airtight container at room temperature for up to 3 days for optimal freshness.
Fridge: If you prefer to store it longer, place it in the refrigerator for up to 5 days. Make sure to cover it well to prevent it from drying out.
Freezer: For long-term storage, freeze the Chocolate & Orange Punchcake by wrapping it tightly in plastic wrap and then in foil for up to 2 months. Thaw in the fridge before serving.
Reheating: If desired, gently warm individual slices in the microwave for about 10-15 seconds to restore its delightful moisture before enjoying!
Chocolate & Orange Punchcake Variations
Feel free to get creative with your Chocolate & Orange Punchcake—there are so many delicious ways to make it your own!
-
Milk Chocolate: Swap semisweet chocolate chips for milk chocolate for a sweeter, creamier texture. This variation is perfect if you want a softer chocolate flavor that still delights!
-
Nutty Delight: Add chopped walnuts or hazelnuts to the batter for a satisfying crunch. The combination of nuts with rich chocolate and zesty orange brings in a delightful texture variation.
-
Citrus Fusion: Experiment with lemon or lime zest instead of orange for a fresh twist. Each citrus varietal brings its unique brightness that can uplift the cake in a surprising way.
-
Spicy Heat: A sprinkle of cayenne pepper can be added to the dry ingredients for those who like a spicy kick. The subtle heat contrasts beautifully with the sweetness of the cake, creating an exciting flavor explosion.
-
Dessert Duo: Serve with a dollop of whipped cream paired with orange zest for that perfect finishing touch! It enhances the cake while echoing its citrus notes.
-
Gluten-Free Option: Substitute all-purpose flour with a 1:1 gluten-free baking blend for a gluten-free version without compromising flavor or texture.
-
Layer It Up: For a show-stopping dessert, bake an extra layer and add a tangy cream cheese frosting. This brings even more richness and personality—perfect for special occasions.
-
Orange Liqueur: Drizzle a bit of orange liqueur over the cake for an adult twist. Just a hint will add depth and an elegant touch to your Chocolate & Orange Punchcake.
Remember, there’s no wrong way to enjoy this recipe! If you’re looking for more delightful dessert options, you might enjoy making a savory side like Chocolate Chips Cookies for a complete treat experience or check out the luxurious Swiss Chocolate Chalet for another layer of chocolatey goodness!

Chocolate & Orange Punchcake Recipe FAQs
How do I select the right oranges for zesting and juicing?
Absolutely! When selecting oranges, look for ones that are firm, with a bright color and no soft spots. The skin should be smooth and fragrant. Fresh oranges will yield the best zest and juice, adding that lovely citrus flavor to your Chocolate & Orange Punchcake.
What storage method is best for keeping the cake fresh?
The Chocolate & Orange Punchcake can be kept at room temperature, wrapped tightly in plastic wrap or in an airtight container for up to 3 days. If you want to extend its freshness, refrigerate it for up to 5 days. Just be sure to cover it well to prevent it from drying out!
Can I freeze the Chocolate & Orange Punchcake?
Yes, you can freeze it! Wrap the cake tightly in plastic wrap followed by foil to prevent freezer burn, and it will keep well for up to 2 months. When you’re ready to enjoy it, simply thaw it in the fridge overnight. Enjoy individual slices slightly warmed in the microwave for about 10-15 seconds.
What should I do if my cake sinks in the middle?
Very common! If your Chocolate & Orange Punchcake sinks, it may be due to overmixing or opening the oven door too soon while baking. To avoid this, mix until just combined and never open the oven until the baking time is up. If it does sink, you can always top it with a layer of ganache to disguise the imperfection!
Are there any dietary concerns I should consider while making this cake?
Yes, the Chocolate & Orange Punchcake contains common allergens such as eggs and dairy. For a vegan version, substitute the eggs with aquafaba (the liquid from canned chickpeas) and use almond or oat milk instead of whole milk. Always be sure to double-check ingredient labels for allergies, especially for any guests with known sensitivities.
Irresistible Chocolate & Orange Punchcake for Ultimate Indulgence
Ingredients
Equipment
Method
- Preheat your oven to 350°F (175°C). Grease and flour two 9-inch round cake pans.
- In a large mixing bowl, sift together the flour, sugar, cocoa powder, baking powder, baking soda, and salt.
- In a separate bowl, whisk together the eggs, milk, oil, and vanilla until smooth.
- Gradually incorporate the wet ingredients into the dry mixture and mix until just combined.
- Add the boiling water to the batter, mixing until smooth.
- Fold in the orange zest and juice gently using a spatula.
- Divide the batter between the prepared cake pans and smooth the tops.
- Bake for 30-35 minutes. Insert a toothpick to check doneness.
- Allow cakes to cool in pans for 10 minutes, then turn out onto wire racks to cool completely.
- Assemble by spreading ganache between layers and frosting the top and sides, garnishing with orange slices.
")