")
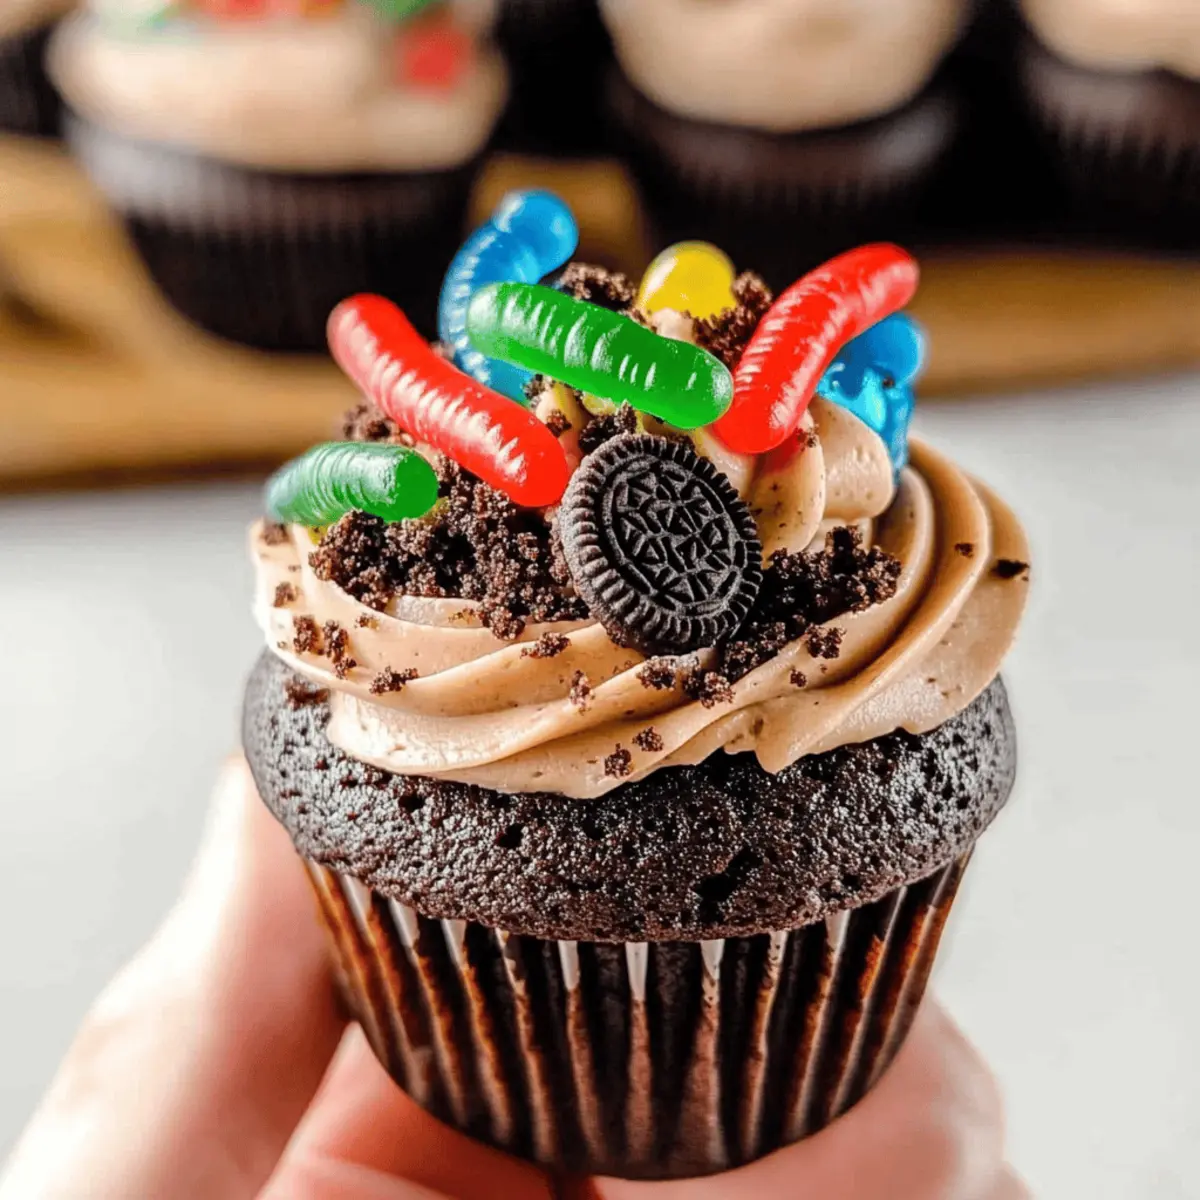
As I rummaged through my pantry one afternoon, searching for something to ignite my Halloween spirit, a box of cocoa powder caught my eye. That moment sparked the creation of these Halloween Dirt Cupcakes — rich, chocolatey delights that make the perfect spooky treat! Not only are these cupcakes a fun way to engage kids in the kitchen, but they also offer a deliciously simple homemade option that’s a delightful alternative to store-bought sweets. With playful decorations, including gummy worms and crumbly Oreo “dirt,” these cupcakes bring a whimsical twist to your Halloween festivities. Trust me, when you share these treats at your next gathering, they’ll fly off the table faster than you can say “trick or treat!” Ready to dig into the fun? Let’s get baking!
Why Are Halloween Dirt Cupcakes So Fun?
Whimsical Decorations: The vibrant gummy worms and Oreo crumbs make these cupcakes visually exciting, perfect for captivating kids and adults alike.
Easy to Make: With straightforward instructions, even novice bakers can whip up these delightful treats without stress.
Deliciously Decadent: Rich, chocolatey goodness enhanced by creamy frosting ensures each bite is a joyful indulgence.
Customizable: Feel free to experiment! You can switch up decorations or frosting flavors, making each batch uniquely yours. For more festive ideas, check out Grinch Cupcakes Festive for another fun treat!
Perfect for Gatherings: Whether it’s a Halloween party or a cozy family night, these cupcakes are guaranteed to be crowd-pleasers!
Halloween Dirt Cupcakes Ingredients
For the Cupcakes
• All-purpose flour – Provides structure; can substitute with gluten-free flour if needed.
• Cocoa powder – Adds rich chocolate flavor; use unsweetened cocoa for the best result.
• Baking powder – Leavening agent for a light texture; ensure it’s fresh for optimal rising.
• Salt – Enhances flavor; a pinch is sufficient.
• Eggs – Contributes moisture and richness; use room temperature for better incorporation.
• Granulated sugar – Sweetens cupcakes; brown sugar can add moisture and depth but may alter texture.
• Vegetable oil – Adds moisture; can substitute with melted coconut oil for a slight flavor change.
• Milk – Adds moisture and flavor; use buttermilk for added richness.
• Vanilla extract – Enhances flavor profile; use pure extract for best results.
• Milk chocolate chips – Adds richness to the frosting; can substitute with dark chocolate for a richer taste.
For the Frosting
• Unsalted butter – Provides creaminess in frosting; if using salted butter, omit additional salt.
• Cream cheese – Adds tang and creaminess; ensure it’s soft for easy blending.
• Powdered sugar – Sweetens frosting and adjusts thickness; can be substituted with erythritol for a sugar-free option.
For the Decoration
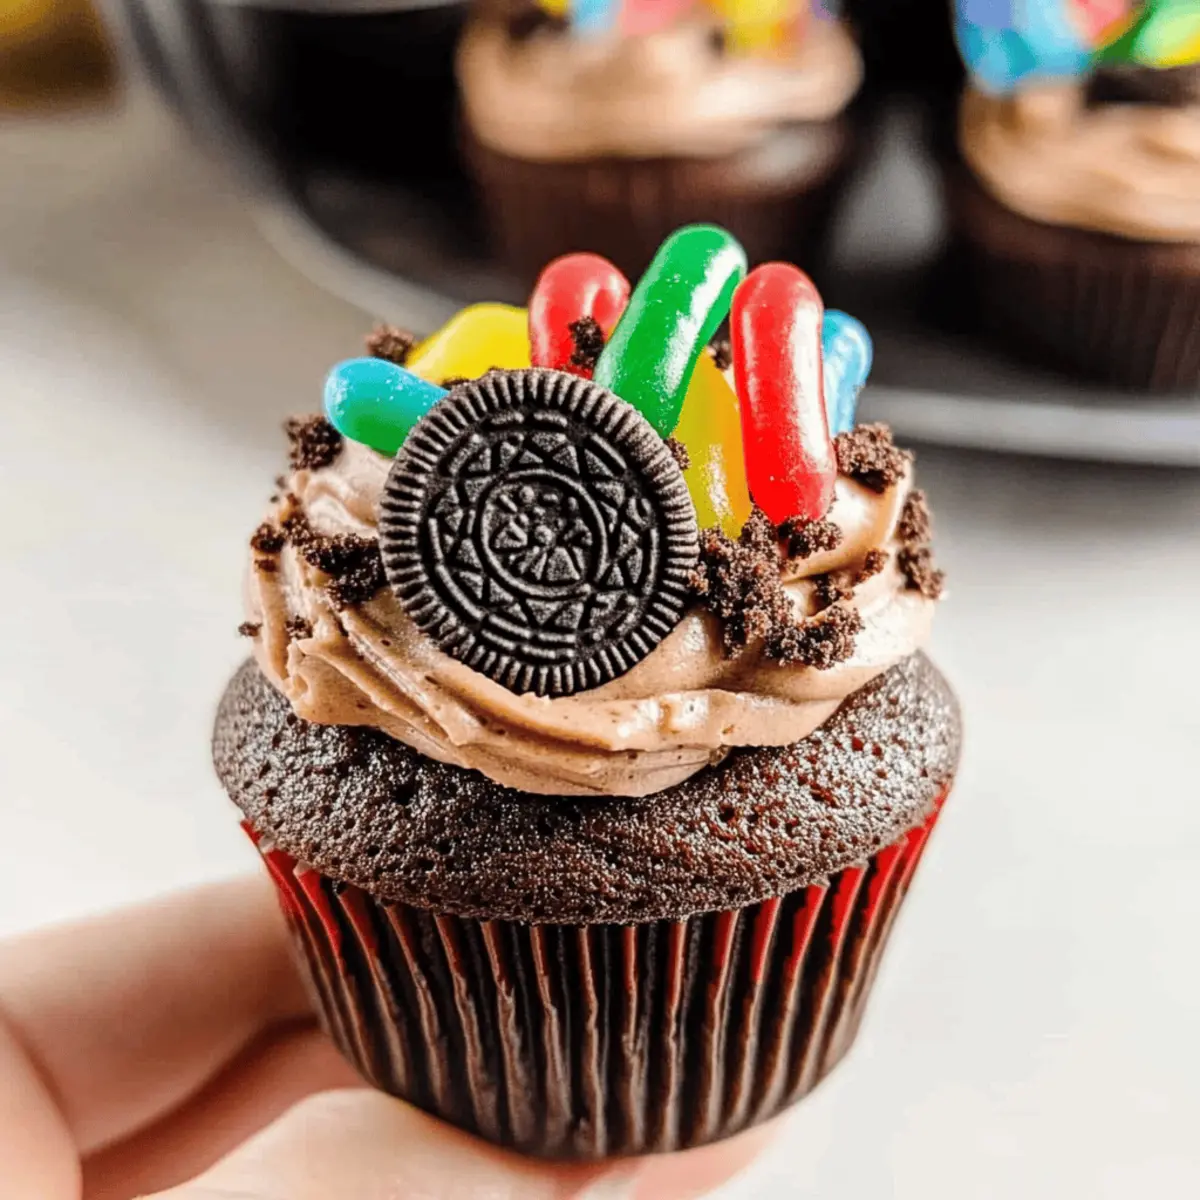
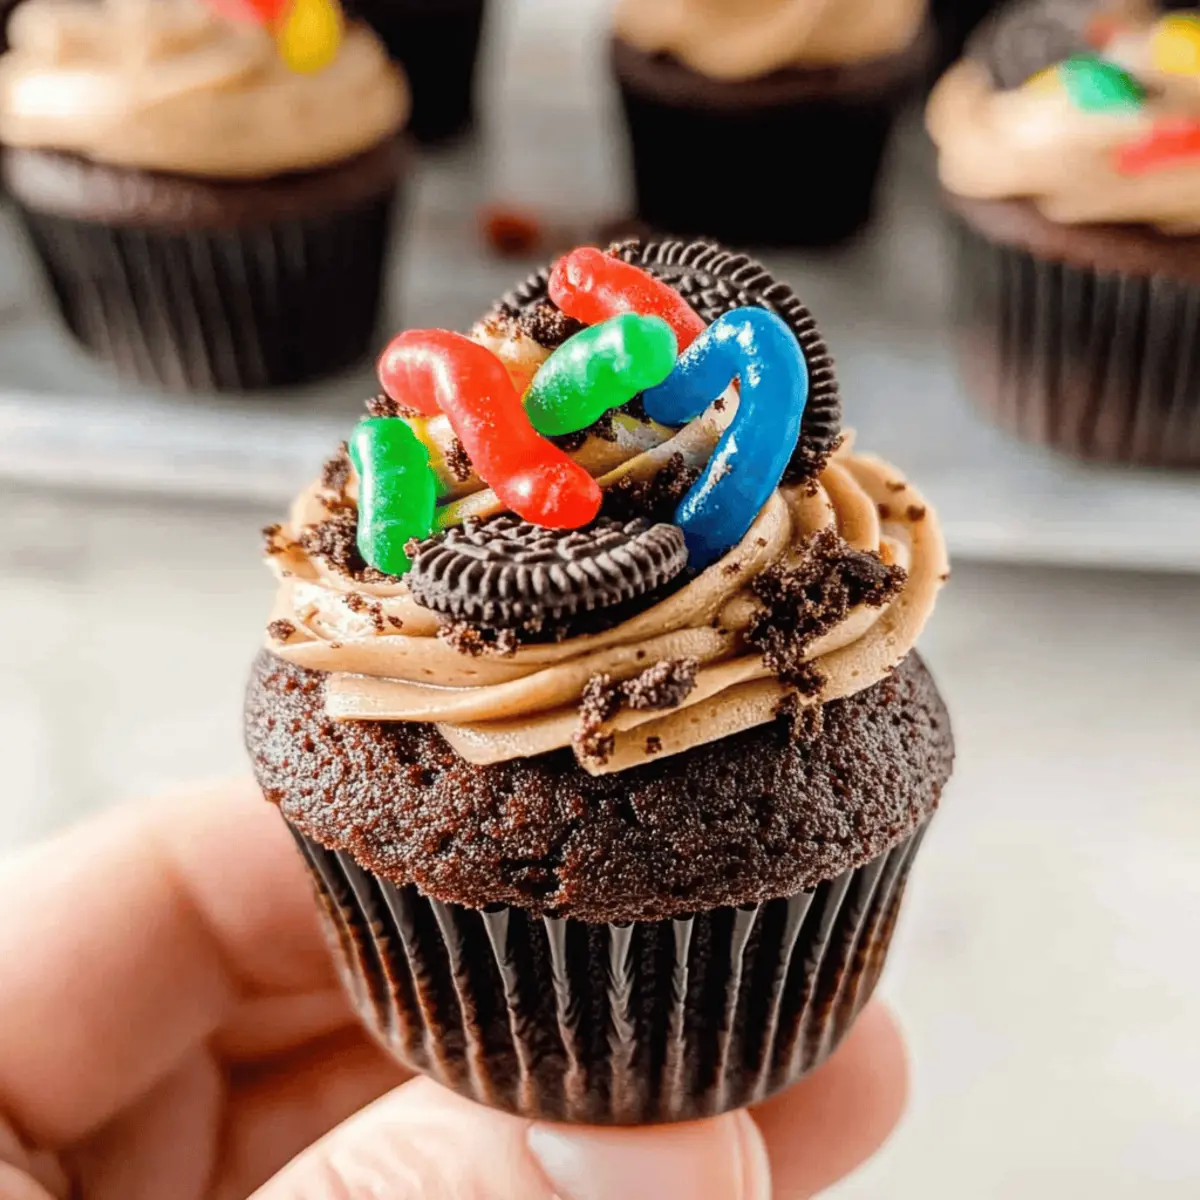
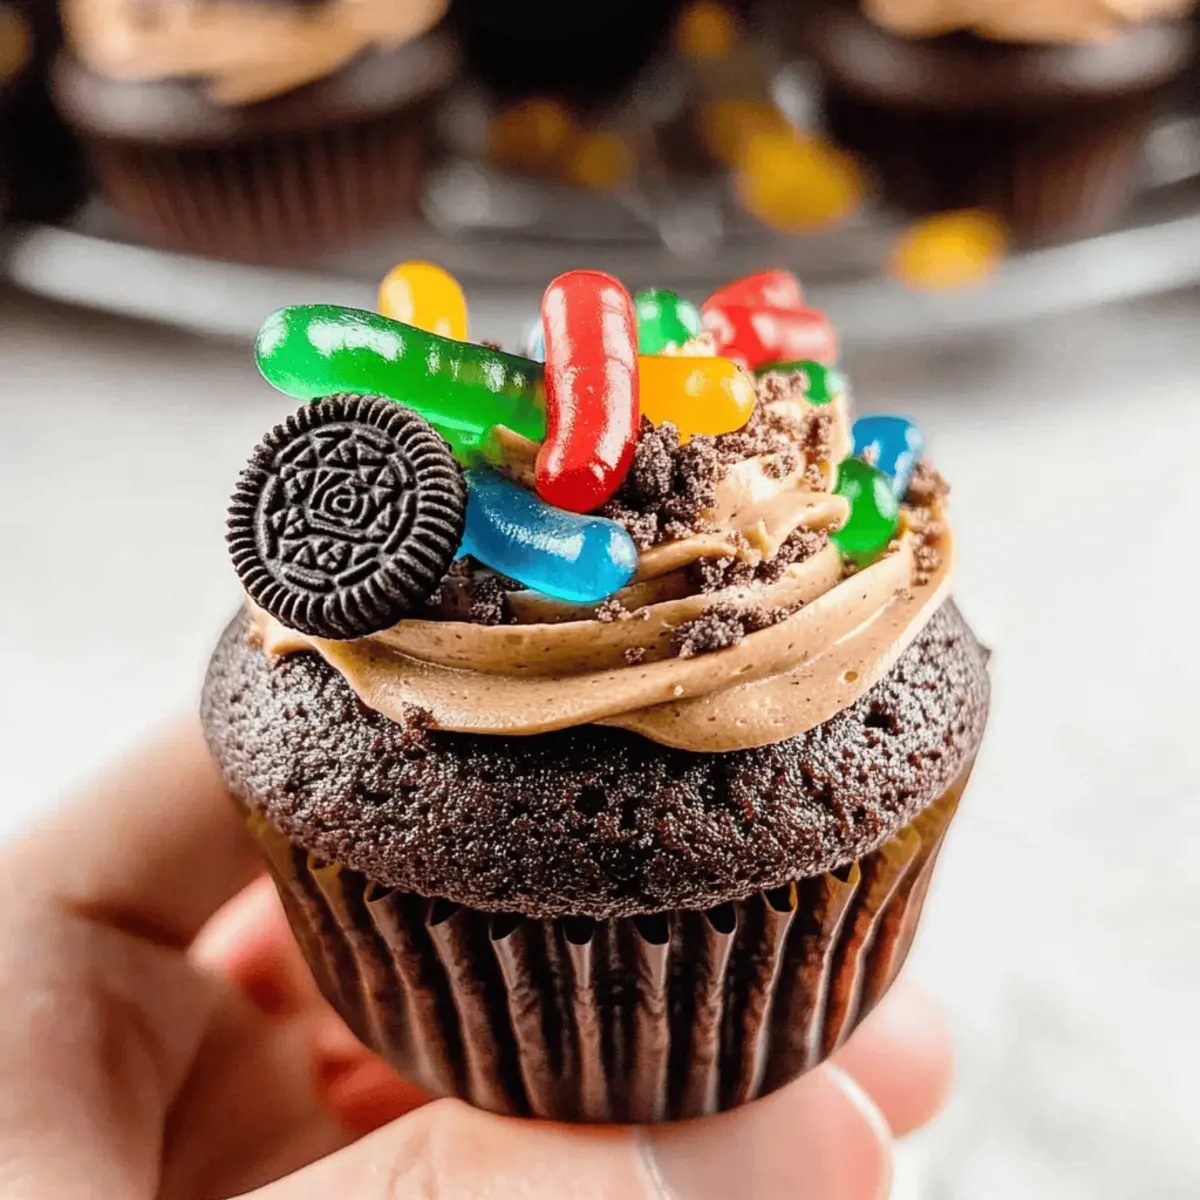
• Oreo cookies – Creates the “dirt” topping; double-stuffed Oreos can be used but yield a different texture.
• Gummy worms – Fun decoration; other gummy candies can also work if desired.
These Halloween Dirt Cupcakes are not just tasty, they’re also a chance to unleash your creativity! Get ready for a spooky baking adventure!
Step‑by‑Step Instructions for Halloween Dirt Cupcakes
Step 1: Preheat the Oven
Begin by preheating your oven to 350°F (180°C). This ensures even baking for your Halloween Dirt Cupcakes. While the oven heats up, prepare your cupcake liners in a cupcake pan, making sure they are securely placed and ready to be filled.
Step 2: Combine Dry Ingredients
In a large mixing bowl, sift together the all-purpose flour, cocoa powder, baking powder, and salt. Whisk these dry ingredients well to ensure there are no lumps and they are evenly combined. This step is essential for achieving that rich, chocolatey flavor in your cupcakes.
Step 3: Whisk Wet Ingredients
In a separate bowl, whisk together the eggs, granulated sugar, vegetable oil, milk, and vanilla extract until smooth and well combined. Ensure that the mixture is fully blended and that the sugar has dissolved. This creates a moist batter that will keep your Halloween Dirt Cupcakes deliciously rich.
Step 4: Mix Ingredients Together
Slowly add the dry ingredient mixture to the wet ingredients. Gently fold them together using a spatula until just combined; be careful not to overmix. The batter should be slightly lumpy, which ensures a light texture in your cupcakes.
Step 5: Fill and Bake
Use a ladle or a scoop to fill each cupcake liner about ¾ full with batter. Bake in the preheated oven for 18-22 minutes, or until a toothpick inserted in the center comes out clean. The cupcakes should rise nicely and have a soft, spongy texture.
Step 6: Cool the Cupcakes
Once baked, remove the cupcakes from the oven and let them cool in the pan for about 5 minutes. Afterward, transfer them to a wire rack. Allow the Halloween Dirt Cupcakes to cool completely before frosting to prevent the frosting from melting.
Step 7: Prepare the Frosting
While the cupcakes cool, melt the milk chocolate chips in a microwave-safe bowl. In another bowl, beat together the unsalted butter and cream cheese until creamy and smooth. Gradually mix in the melted chocolate, followed by the powdered sugar and cocoa powder, until the frosting is silky and spreadable.
Step 8: Crush Oreos for Decoration
Take the Oreo cookies and crush them into fine crumbs using a food processor or by placing them in a sealed bag and rolling over them with a rolling pin. These will serve as the “dirt” for your cupcakes, so make sure they are finely crushed for the best look.
Step 9: Frost and Decorate
Once the cupcakes are completely cool, pipe the prepared frosting generously on top of each cupcake. You can use a piping bag for decorative swirls or simply spread it on with a knife. Sprinkle Oreo crumbs over the frosted cupcakes, creating a delightful “dirt” layer, and finish by placing gummy worms on top as a fun decoration.
Make Ahead Options
These Halloween Dirt Cupcakes are perfect for busy home cooks looking to save time! You can prepare the cupcakes up to three days in advance by allowing them to cool completely and storing them in an airtight container at room temperature. For the frosting, you can make it up to 24 hours ahead; simply refrigerate it in an airtight container to maintain its creamy texture. When you’re ready to serve, just bring the frosting to room temperature and give it a quick stir before piping it onto the cupcakes. Add the Oreo crumbs and gummy worms just before serving to keep them fresh and visually appealing. Enjoy the time-saving benefits while still delivering a delightful treat!
How to Store and Freeze Halloween Dirt Cupcakes
Airtight Container: Store unfrosted Halloween Dirt Cupcakes in an airtight container at room temperature for up to 3-4 days to maintain their moisture and flavor.
Refrigeration for Frosted Cupcakes: If frosted, keep your cupcakes in the refrigerator for up to 5 days. This helps preserve the cream cheese frosting’s freshness.
Freezer-Friendly: To freeze, wrap unfrosted cupcakes individually in plastic wrap and place them in a freezer-safe bag. They can be stored for up to 3 months.
Reheating Tips: Thaw frozen cupcakes at room temperature before decorating. For a warm treat, microwave for 10-15 seconds, then frost and decorate as desired.
Halloween Dirt Cupcakes Variations
Feel free to get creative and make these Halloween Dirt Cupcakes completely your own with a few tasty twists!
-
Gluten-Free: Substitute all-purpose flour with a 1:1 gluten-free blend for a delightful, inclusive treat. These cupcakes will still be rich and chocolaty, just like the original!
-
Dairy-Free: Use a dairy-free milk alternative and vegan butter for the frosting, while coconut cream can replace cream cheese. The result is a deliciously inclusive cupcake everyone can enjoy.
-
Dark Chocolate: Swap milk chocolate chips for dark chocolate for an indulgent, deeper flavor. This variation pairs beautifully with the sweetness of the frosting.
-
Nutty Crunch: Add chopped nuts like pecans or walnuts to the batter for an extra crunch. This will make each bite a tantalizing mix of textures and flavors.
-
Spiced Up: Incorporate a pinch of cinnamon or pumpkin spice into the batter for a warm autumn twist. This adds a lovely seasonal flavor that complements the chocolate perfectly.
-
Gummy Alternatives: Use different gummy candies or sour worms for varied flavors and textures. Experimenting with candy can make each batch unique and exciting!
-
Flavored Frosting: Try a peanut butter or vanilla bean frosting instead for a delicious flavor twist. Each option brings its own character and charm to your Halloween celebration!
-
Theme It Up: For added fun, decorate with various Halloween-themed toppings like edible eyes or spooky sprinkles. Just like your cupcakes, creativity knows no bounds!
These delightful variations will ensure that your Halloween Dirt Cupcakes are not only a treat but a memorable experience! If you’re looking for more festive inspiration, be sure to check out Grinch Cupcakes Festive for another enchanting dessert!
What to Serve with Halloween Dirt Cupcakes?
These playful treats are perfect to elevate any Halloween gathering, igniting the festive spirit with every delicious bite.
-
Spooky Fruit Salad: A mix of seasonal fruits like oranges, apples, and grapes adds a fresh contrast and vibrant colors, making it a healthy sidekick.
-
Mummy Hot Dogs: These fun and easy-to-make treats wrapped in crescent dough resemble mummies, playing perfectly into the Halloween theme that children will love.
-
Witch’s Brew Punch: A fruity, fizzy punch with added gummy worms will delight guests while offering a refreshing sip between bites of chocolatey goodness.
-
Creepy Cheese Platter: Arrange a variety of cheeses and crackers, garnished with black olives for “eyes” and sliced veggies, for a savory option to pair with the sweet cupcakes.
-
Monster Marshmallow Treats: Featuring colorful marshmallows and chocolate, these delightful bites not only satisfy a sweet craving but also tie in the playful spirit of the season.
-
Graveyard Dirt Cake: For major chocolate lovers, this layered dessert made with chocolate pudding and crushed Oreos is the perfect celebration of all things spooky!
-
Pumpkin Spice Latte: A warm, comforting drink that balances out the sweetness of the cupcakes and provides an aromatic experience that ushers in the fall season beautifully.
Helpful Tricks for Halloween Dirt Cupcakes
-
Cool Completely: Allow your cupcakes to cool entirely before frosting to prevent melting. This ensures your decorations look perfect!
-
Don’t Overmix: Mix the batter just until incorporated. Overmixing can lead to dense cupcakes instead of light, fluffy Halloween Dirt Cupcakes.
-
Refrigerate Decorations: Keep gummy worms refrigerated until ready to use. This helps them maintain their shape and appearance on your spooky treats.
-
Use Room Temperature Ingredients: Ensure eggs and cream cheese are at room temperature before mixing. This helps create a smoother batter and frosting.
-
Piping Bags for Pizzazz: While spreading frosting is fine, using a piping bag adds a professional touch and enhances the visual appeal of your cupcakes. Enjoy the fun!
Halloween Dirt Cupcakes Recipe FAQs
What is the best way to select ripe ingredients?
Absolutely! For the freshest cupcakes, choose room temperature eggs without cracks, fresh cocoa powder without lumps, and all-purpose flour without any dark spots. Always check your baking powder’s expiration date to ensure it’s still effective; a simple test is to mix a teaspoon with vinegar—if it fizzes, it’s good to go!
How should I store leftover Halloween Dirt Cupcakes?
You can store unfrosted Halloween Dirt Cupcakes in an airtight container at room temperature for up to 3-4 days. If you’ve frosted them, keep them in the refrigerator to maintain freshness for up to 5 days. Just remember to add the gummy worms right before serving to keep them looking their best!
Can I freeze Halloween Dirt Cupcakes?
Yes! To freeze, wrap each unfrosted cupcake tightly in plastic wrap and place them in a freezer-safe bag. They can be stored for up to 3 months. When you’re ready to enjoy them, simply thaw them in the refrigerator overnight, and then frost and decorate as you please!
What should I do if my cupcakes are too dense?
Very! If your cupcakes turned out denser than expected, it’s likely due to overmixing the batter. Next time, be sure to mix until just combined and avoid beating the batter too much. Also, check that your ingredients—especially baking powder—are fresh. Leave the batter a little lumpy; it will rise beautifully!
Are these cupcakes pet-friendly?
No, they are not! Remember that Halloween Dirt Cupcakes contain ingredients like chocolate and sugar that can be harmful to pets. It’s always best to keep these delightful treats away from your furry friends and stick to pet-safe snacks instead.
Can I substitute any of these ingredients for dietary restrictions?
Absolutely! If you’re looking for a gluten-free option, using a high-quality gluten-free flour blend works wonderfully. For a lower-sugar version, swap out granulated sugar for coconut sugar or erythritol and adjust the liquid ingredients accordingly. Happy baking and feel free to experiment!
Spooktacular Halloween Dirt Cupcakes for Fun Family Treats
Ingredients
Equipment
Method
- Preheat your oven to 350°F (180°C) and prepare cupcake liners in a pan.
- In a large bowl, sift together all-purpose flour, cocoa powder, baking powder, and salt.
- In another bowl, whisk together eggs, granulated sugar, vegetable oil, milk, and vanilla extract until smooth.
- Slowly add dry ingredients to wet ingredients and gently fold together until just combined.
- Fill each cupcake liner about ¾ full and bake for 18-22 minutes, until a toothpick comes out clean.
- Cool cupcakes in the pan for 5 minutes before transferring to a wire rack to cool completely.
- Melt the milk chocolate chips in a microwave-safe bowl.
- In another bowl, beat together unsalted butter and cream cheese until creamy, then mix in melted chocolate and powdered sugar.
- Crush Oreos into fine crumbs for decoration.
- Once cooled, frost each cupcake with the prepared frosting and sprinkle with Oreo crumbs, placing gummy worms on top.
")