")
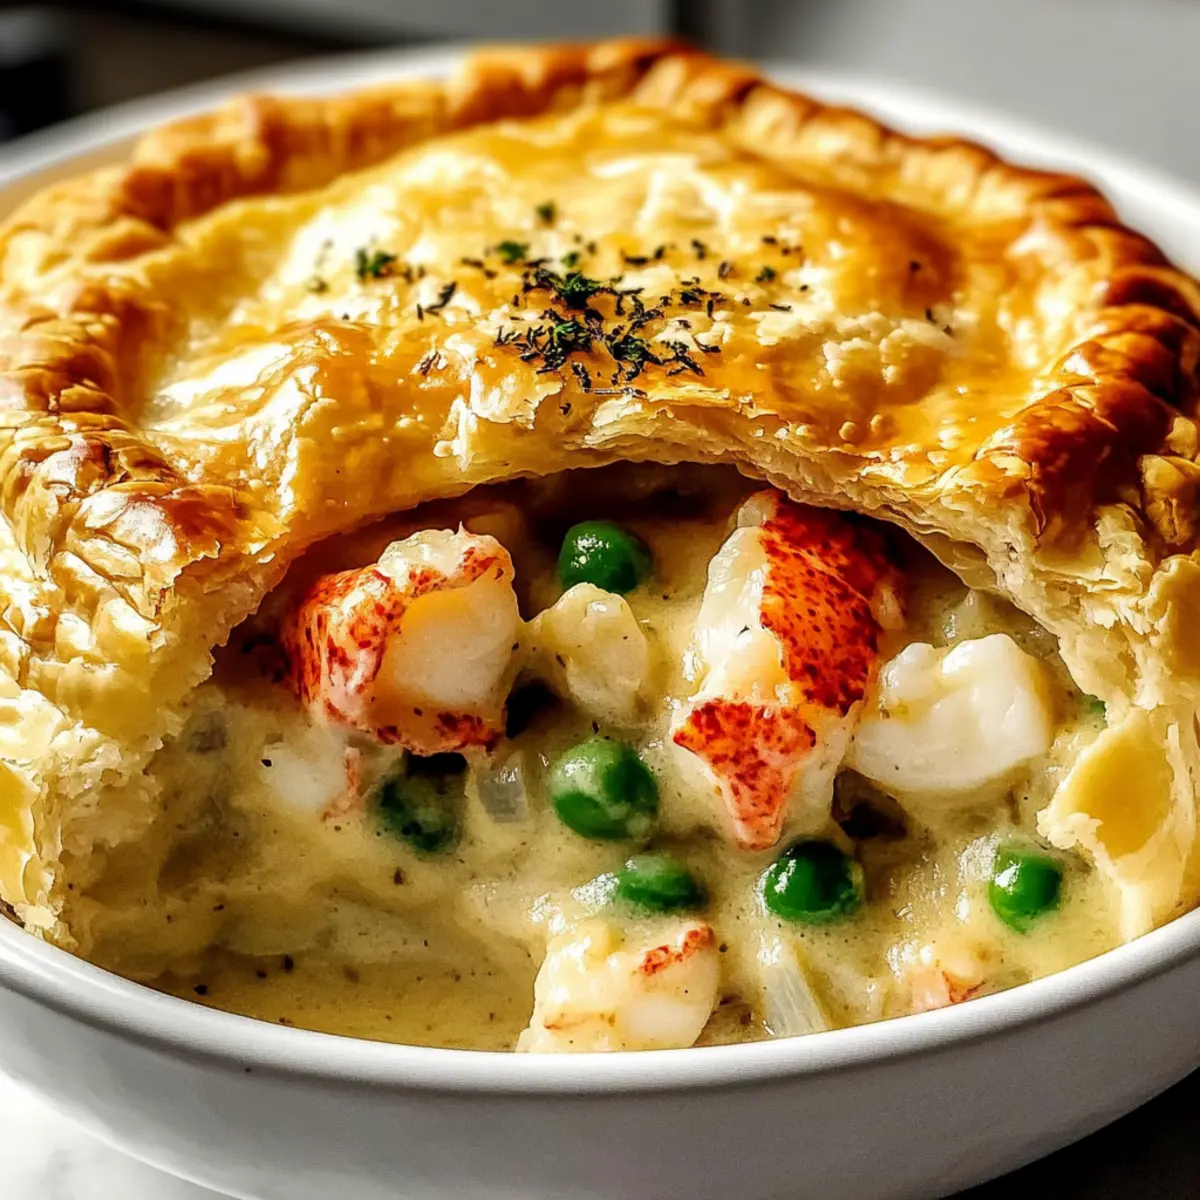
As I stood in my kitchen, the scent of sautéed garlic and aromatics filled the air, whisking me away to the cozy coastal shores of New England. Today, I’m bringing you a delightful twist on comfort food with my Ultimate Lobster Pot Pie. This seafood delight features tender lobster enveloped in a rich, creamy sauce and encased in a buttery, flaky crust. It’s not only a show-stopper for gatherings but also effortlessly adaptable—feel free to swap in shrimp or your favorite seafood! Plus, it can be prepped ahead of time, making those busy nights a little more special. Are you ready to embark on a culinary journey that celebrates the warmth of home cooking? Let’s dive into this comforting dish together!

Why is Lobster Pot Pie a Must-Try?
Comforting, this dish evokes the warm vibes of New England, making it perfect for cozy nights. Versatile, customize it with shrimp or seasonal veggies to suit your taste. Easy to prepare, using pre-made crusts saves time while maintaining deliciousness. Make-ahead magic: Prepare in advance for effortless entertaining without sacrificing quality. Each bite offers a rich, creamy filling bursting with flavor, perfect for impressing guests or treating yourself! Consider pairing it with a crisp green salad or some warm garlic bread for a fantastic complete meal.
Lobster Pot Pie Ingredients
Crafting the ultimate Lobster Pot Pie is a delightful journey in your kitchen! Here’s everything you’ll need to make this comforting seafood dish.
For the Filling
• Lobster Meat – Use fresh claws or tails for rich flavor; thaw frozen lobster if using.
• Heavy Cream – Creates a luxurious, creamy texture in the sauce.
• Chicken or Seafood Stock – Deepens the flavors, enhancing the overall taste profile of the Lobster Pot Pie.
• Onion – Adds aromatic sweetness; be sure to dice for even cooking.
• Garlic – Provides a fragrant backnote; mince for quick flavor infusion.
• Carrots – Adds both sweetness and vibrant color; diced for consistency.
• Celery – Infuses additional flavor and crunch; small diced to match other vegetables.
• Frozen Peas – Offers sweetness and color; these come ready-to-use with no prep needed.
• Fresh Thyme – Imparts an earthy aroma, bringing an additional layer of flavor.
• Lemon Juice – Brightens the filling and balances the creaminess with a zesty touch.
• Salt – Enhances all the delicious flavors.
• Black Pepper – Delivers subtle warmth and depth.
• Olive Oil – Used for sautéing vegetables, enriching the overall filling.
For the Crust
• Pre-made Pie Crusts – Simplifies the process; although a homemade crust can bring more richness.
• Egg (Beaten) – Brush on the crust for a beautiful, golden finish.
Get ready to create something decadent with these ingredients that will fill your home with the irresistible aroma of Lobster Pot Pie!
Step‑by‑Step Instructions for Lobster Pot Pie
Step 1: Preheat the Oven
Begin by preheating your oven to 400°F (204°C). This ensures the Lobster Pot Pie will bake evenly. While the oven heats up, gather your ingredients and equipment, setting yourself up for a smooth cooking experience.
Step 2: Sauté Aromatics
In a large skillet, heat 2 tablespoons of olive oil over medium heat. Add the diced onion and minced garlic, cooking for about 4-5 minutes until the onion becomes translucent and fragrant. This step will build a flavorful base for your luxurious lobster filling.
Step 3: Add Vegetables
Next, stir in the diced carrots and celery into the skillet. Sauté the mixture for an additional 5 minutes, allowing the vegetables to soften and blend with the onion and garlic. The vibrant colors will brighten your kitchen and hint at the delicious Lobster Pot Pie to come.
Step 4: Create Creamy Base
Pour in 1 cup of heavy cream and 1 cup of chicken or seafood stock into the skillet, stirring well to combine. Increase the heat slightly and bring the mixture to a simmer, cooking until it thickens slightly, about 5-7 minutes. You want a luscious sauce that will envelop the lobster.
Step 5: Fold in Lobster and Peas
Gently fold in the chopped lobster meat and frozen peas, stirring for another 5 minutes until everything is heated through. The filling should be warm and fragrant, with the lobster swimming delightfully in the creamy sauce, ready to become the star of your Lobster Pot Pie.
Step 6: Season the Filling
Remove the skillet from the heat and add in 1 tablespoon of fresh thyme, a squeeze of lemon juice, salt, and black pepper to taste. Mix everything well, as these seasonings will add depth and enhance the flavors of your filling, bringing the Lobster Pot Pie together beautifully.
Step 7: Assemble the Pie
With the filling ready, fit one pre-made pie crust into a 9-inch pie dish. Carefully pour the lobster filling into the crust, spreading it evenly. Top it with the second crust, ensuring it fully covers the filling and seals it in for baking bliss.
Step 8: Seal the Pie
Crimp the edges of the pie crust together to secure the filling inside, and use a sharp knife to cut several vents in the top crust for steam to escape. This will prevent your Lobster Pot Pie from becoming soggy and help it bake to a golden perfection.
Step 9: Brush with Egg Wash
Brush the top crust with a beaten egg, giving it a beautiful golden finish during baking. This simple step adds an enticing color and shine to your Lobster Pot Pie, making it visually irresistible when it emerges from the oven.
Step 10: Bake
Place the assembled Lobster Pot Pie in the preheated oven and bake for 30-35 minutes or until the crust is golden brown and the filling is bubbling. The enticing aroma wafting through your kitchen will have everyone eagerly awaiting this comforting dish.
Step 11: Rest Before Serving
Once baked to perfection, remove the Lobster Pot Pie from the oven and let it sit for 10-15 minutes before slicing. This resting period allows the filling to set, ensuring that each slice holds its shape as you serve this comforting delight to friends and family.
Expert Tips for Lobster Pot Pie
-
Flavor Boost: Allow the filling to rest for a few minutes before assembling. This helps meld the flavors, ensuring every bite of your Lobster Pot Pie is rich and satisfying.
-
Prevent Sogginess: Consider pre-baking the bottom crust for 5-7 minutes. This clever trick ensures a perfect texture that prevents any sogginess from the creamy filling.
-
Crust Perfection: Keep an eye on the crust during baking. It should be golden brown without burning; rotating the pie halfway through can help achieve an even color.
-
Thaw Properly: If using frozen lobster, make sure it is fully thawed before cooking; this avoids a watery filling and enhances the flavor in your Lobster Pot Pie.
-
Creative Options: Feel free to customize your recipe by adding a splash of sherry or white wine for an additional flavor layer that truly elevates your comforting dish.
-
Storage Tips: If making ahead, refrigerate the unbaked pie for no more than 24 hours, or freeze it for up to 3 months to retain freshness.
Lobster Pot Pie Variations & Substitutions
Feel free to let your creativity flow and customize this Lobster Pot Pie recipe to suit your taste or to accommodate dietary preferences!
- Seafood Swap: Substitute lobster with shrimp, crab, or a mix of your favorite seafood for delightful variety.
- Dairy-Free Option: Replace heavy cream with unsweetened coconut milk, giving the filling a lighter, tropical twist.
- Seasonal Veggies: Swap in parsnips or sautéed leeks. Fresh peas in summer lend an extra sweetness to your pot pie.
- Herb Enhancements: Add fresh herbs like dill or parsley for a burst of aromatic freshness in every bite.
- Spicy Ingredient: Sprinkle a pinch of red pepper flakes into the filling for a warming kick that excites the palate.
- Texture Adjustment: Top the pie with panko breadcrumbs mixed with melted butter before baking, adding a crunchy contrast to the creamy filling.
- Umami Boost: Incorporate a tablespoon of Worcestershire sauce into the filling. This savory addition brings rich depth to your dish.
- Low-Carb Version: Use a cauliflower crust instead of a traditional pie crust, making it gluten-free and perfect for keto diets.
Don’t hesitate to explore these variations! They can transform your Lobster Pot Pie into a unique, personalized dish that speaks to your preferred flavors. And if you find yourself with leftover lobster, consider trying out some incredible Leftover Pot Roast recipes to keep the deliciousness going. Or if you’re in the mood to simmer something new, check out my guide on Mastering the Art of Simmering Pot for even more culinary inspiration.
Make Ahead Options
These delightful Lobster Pot Pies are perfect for meal prep enthusiasts looking to save time on busy weeknights! You can prepare the creamy filling and refrigerate it for up to 3 days in advance. Simply sauté the vegetables, mix in the heavy cream and stock, and fold in the lobster and peas. Once the filling is cooled, store it in an airtight container, ensuring to cover it to maintain its fresh flavors. Alternatively, you can assemble the unbaked pot pie and refrigerate it for up to 24 hours before baking. When you’re ready to enjoy, bake straight from the fridge; just remember to add a few extra minutes to the baking time if it’s cold! Enjoy the luxury of a homemade meal without the last-minute rush!
How to Store and Freeze Lobster Pot Pie
-
Fridge: Store cooked Lobster Pot Pie in an airtight container for up to 2 days. Allow it to cool completely before refrigerating to maintain its delicious flavor and texture.
-
Unbaked Pie: You can refrigerate the assembled Lobster Pot Pie for up to 24 hours. Just cover it tightly in plastic wrap or foil to preserve its freshness until you’re ready to bake it.
-
Freezer: For extended storage, freeze the unbaked Lobster Pot Pie for up to 3 months. Ensure it’s wrapped securely in plastic wrap and then in aluminum foil to prevent freezer burn. Bake directly from frozen, allowing extra time as needed.
-
Reheating: To reheat leftover cooked pie, simply place it in a preheated oven at 350°F (175°C) for about 20-25 minutes, or until warmed through. Enjoy the comforting flavors once again!
What to Serve with Lobster Pot Pie
The warm, comforting aroma of freshly baked lobster pot pie envelops the kitchen, setting the stage for a hearty meal that delights the senses.
- Crisp Green Salad: A fresh salad with mixed greens and a zesty vinaigrette adds a refreshing crunch, balancing the rich and creamy filling.
- Warm Garlic Bread: This classic side is perfect for soaking up any extra sauce from your pot pie, providing satisfying texture and buttery flavor.
- Creamy Mashed Potatoes: Their velvety smoothness complements the pie, enhancing the overall comfort food experience.
- Roasted Asparagus: The slight crispness and earthy flavor of roasted asparagus beautifully contrast the indulgent lobster filling.
- Chardonnay: A chilled glass of this light white wine elevates the dining experience, harmonizing with the seafood’s delicate flavors.
- Tangy Lemon Tart: A slice of lemon tart provides a perfect sweet and tangy finale, cleansing the palate while echoing the lemon brightness in the pie.
- Herbed Rice Pilaf: Lightly flavored with fresh herbs, this dish can absorb the savory essence of the lobster pot pie, creating a cohesive meal.
- Buttery Corn on the Cob: This sweet side brings a delightful summer flair and natural sweetness, rounding out the meal with texture and flavor.
- Savory Biscuits: Soft, flaky biscuits invite you to soak up the delicious lobster goodness, making every bite more enjoyable.

Lobster Pot Pie Recipe FAQs
How do I choose the best lobster meat for my Lobster Pot Pie?
Absolutely! For the best flavor and texture, I recommend using fresh cooked lobster from the claws or tails. If fresh lobster isn’t available, frozen lobster can be a great alternative; just ensure it’s fully thawed before using to avoid a watery filling.
What is the best way to store leftover Lobster Pot Pie?
Cooked Lobster Pot Pie can be stored in an airtight container in the fridge for up to 2 days. Allow it to cool entirely before refrigerating to maintain the best taste and texture. If you want to save it for longer, I suggest freezing; wrap the unbaked pie in plastic wrap and then foil, keeping it fresh for up to 3 months!
Can I freeze my unbaked Lobster Pot Pie?
Yes, you can! To freeze your unbaked Lobster Pot Pie for up to 3 months, ensure it’s tightly wrapped in plastic wrap followed by aluminum foil. When you’re ready to bake it, no need to thaw—just pop it in the oven directly from the freezer, allowing extra cooking time to ensure it cooks through.
What can I do if my filling is too runny?
If you find that your filling is a bit runny, don’t worry! To fix this, return the mixture to the stove and simmer it on low for an additional 5-10 minutes, stirring constantly until it thickens to your desired consistency. You can also gradually mix in a little cornstarch slurry (1 tablespoon of cornstarch mixed with water) while it’s simmering to achieve that silky, thick filling you crave.
Are there any dietary considerations for Lobster Pot Pie?
Indeed! Lobster Pot Pie contains shellfish, so it’s essential to consider any shellfish allergies among your guests. If you’re cooking for someone with lactose intolerance, you can substitute the heavy cream with unsweetened coconut milk or a dairy-free cream alternative, ensuring everyone can enjoy this comforting dish!
How long will my Lobster Pot Pie keep in the refrigerator?
Once cooked, your Lobster Pot Pie will stay fresh in the refrigerator for up to 2 days. Just be sure it’s covered well to keep out any odors. After this, it’s typically best to reheat it or incorporate it into another meal to prevent any quality loss!

Heavenly Lobster Pot Pie: Comfort Food for Any Occasion
Ingredients
Equipment
Method
- Preheat your oven to 400°F (204°C). Gather your ingredients and equipment.
- Heat 2 tablespoons of olive oil in a large skillet over medium heat. Add diced onion and minced garlic, cooking for 4-5 minutes until translucent.
- Stir in diced carrots and celery, sautéing for an additional 5 minutes.
- Pour in 1 cup heavy cream and 1 cup chicken or seafood stock, stirring well. Bring to a simmer and cook for 5-7 minutes until thickened.
- Fold in chopped lobster meat and frozen peas, stirring for another 5 minutes until heated through.
- Remove from heat, add fresh thyme, lemon juice, salt, and black pepper to taste. Mix well.
- Fit one pre-made pie crust into a 9-inch pie dish. Pour the lobster filling into the crust, spreading evenly.
- Top it with the second crust, sealing the edges and cutting vents for steam.
- Brush the top crust with a beaten egg.
- Bake for 30-35 minutes or until the crust is golden brown and filling is bubbling.
- Remove from oven and let the pie rest for 10-15 minutes before serving.
")


