")
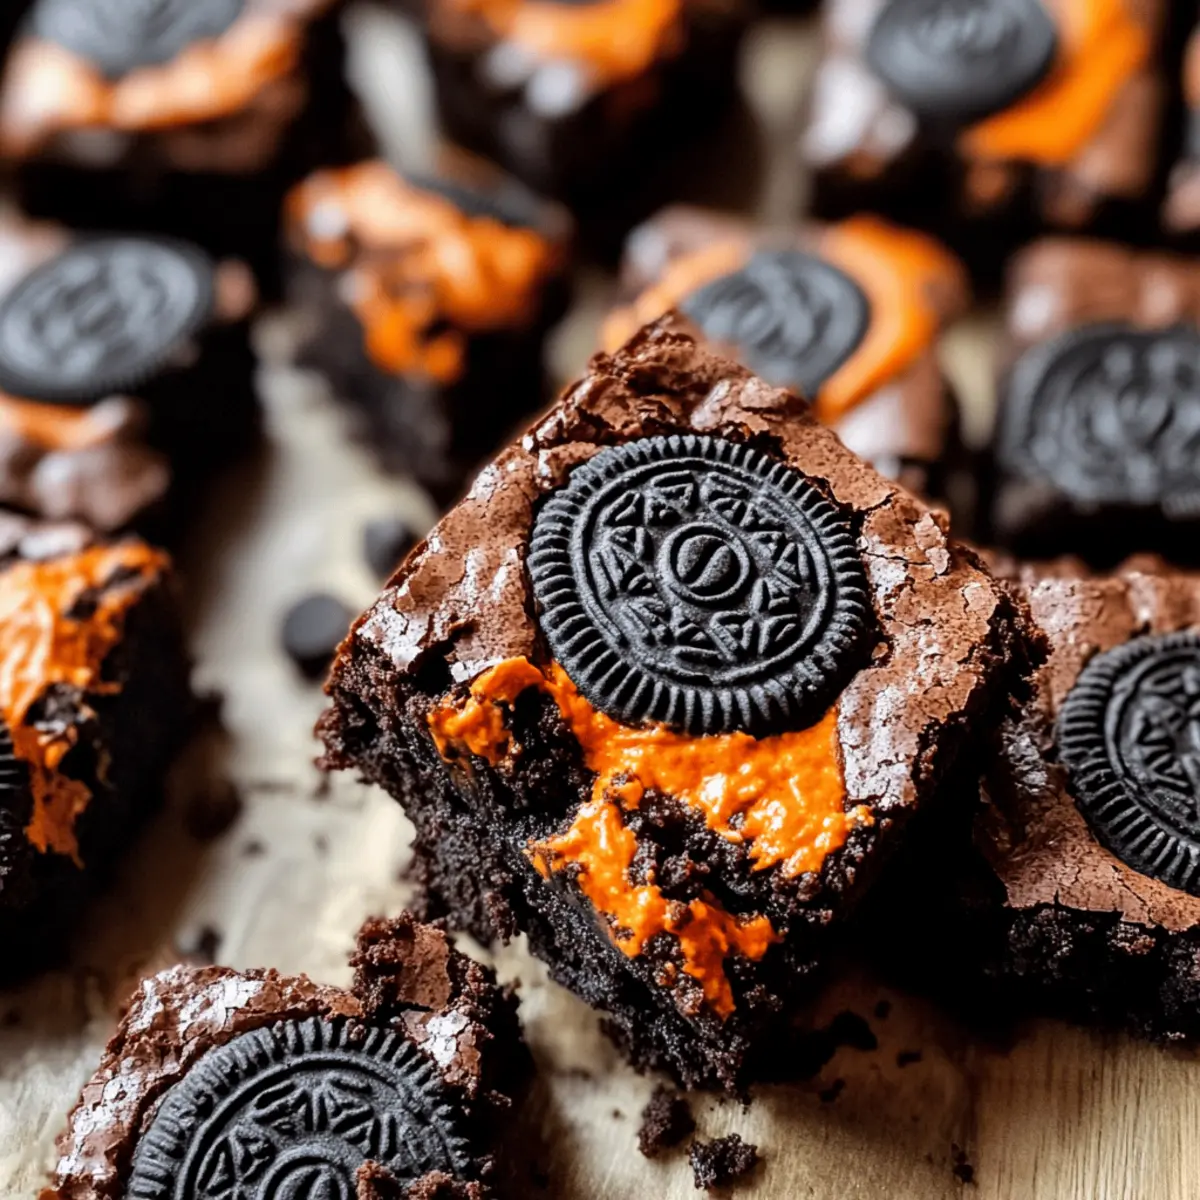
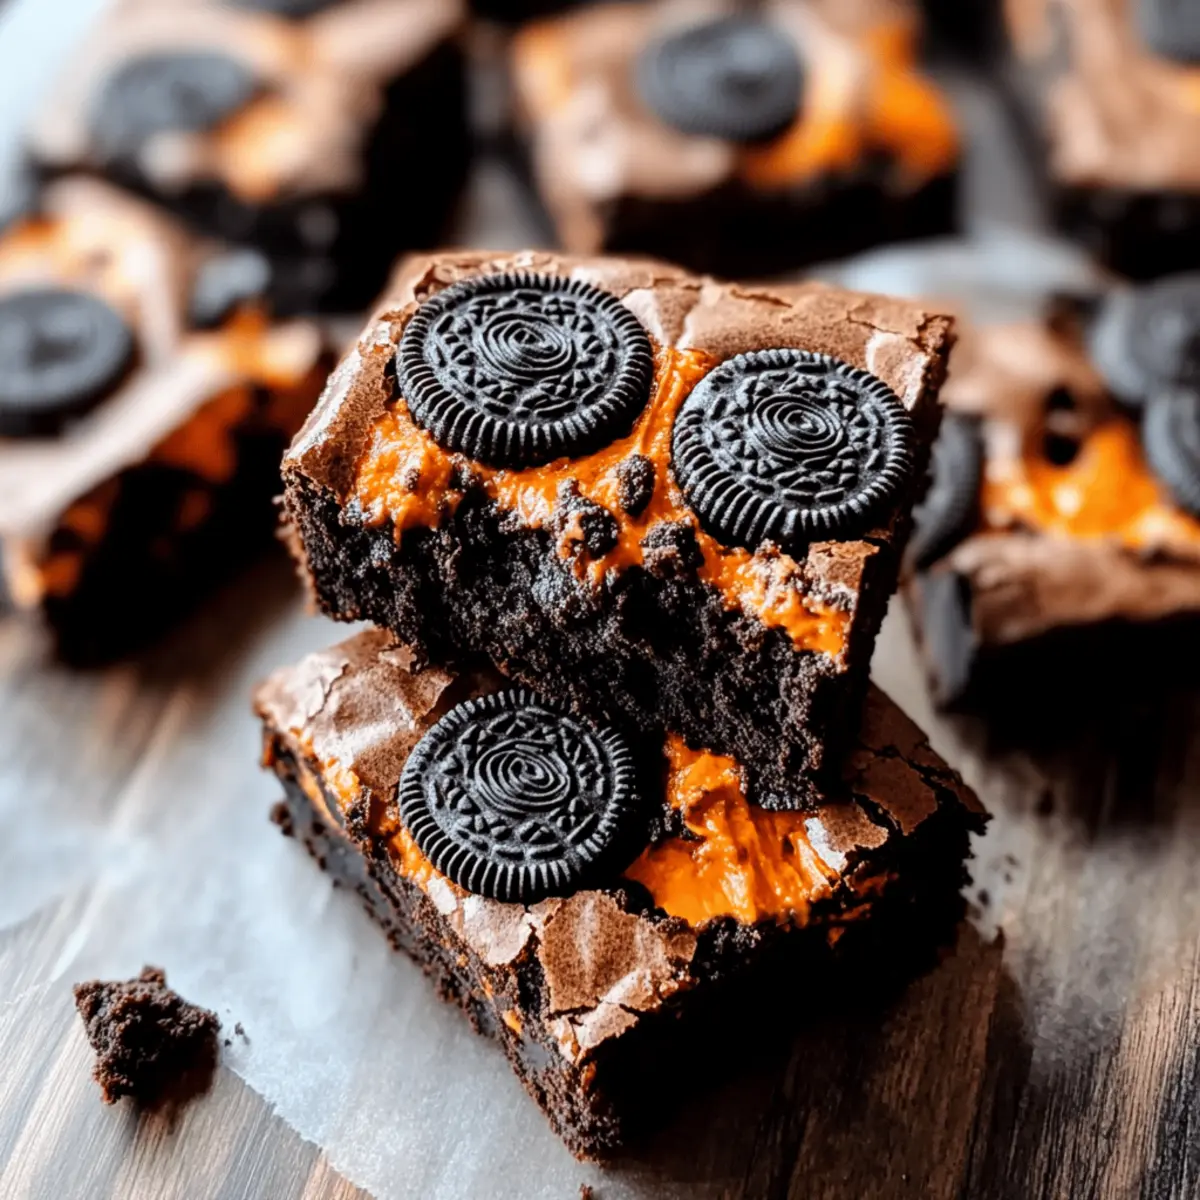
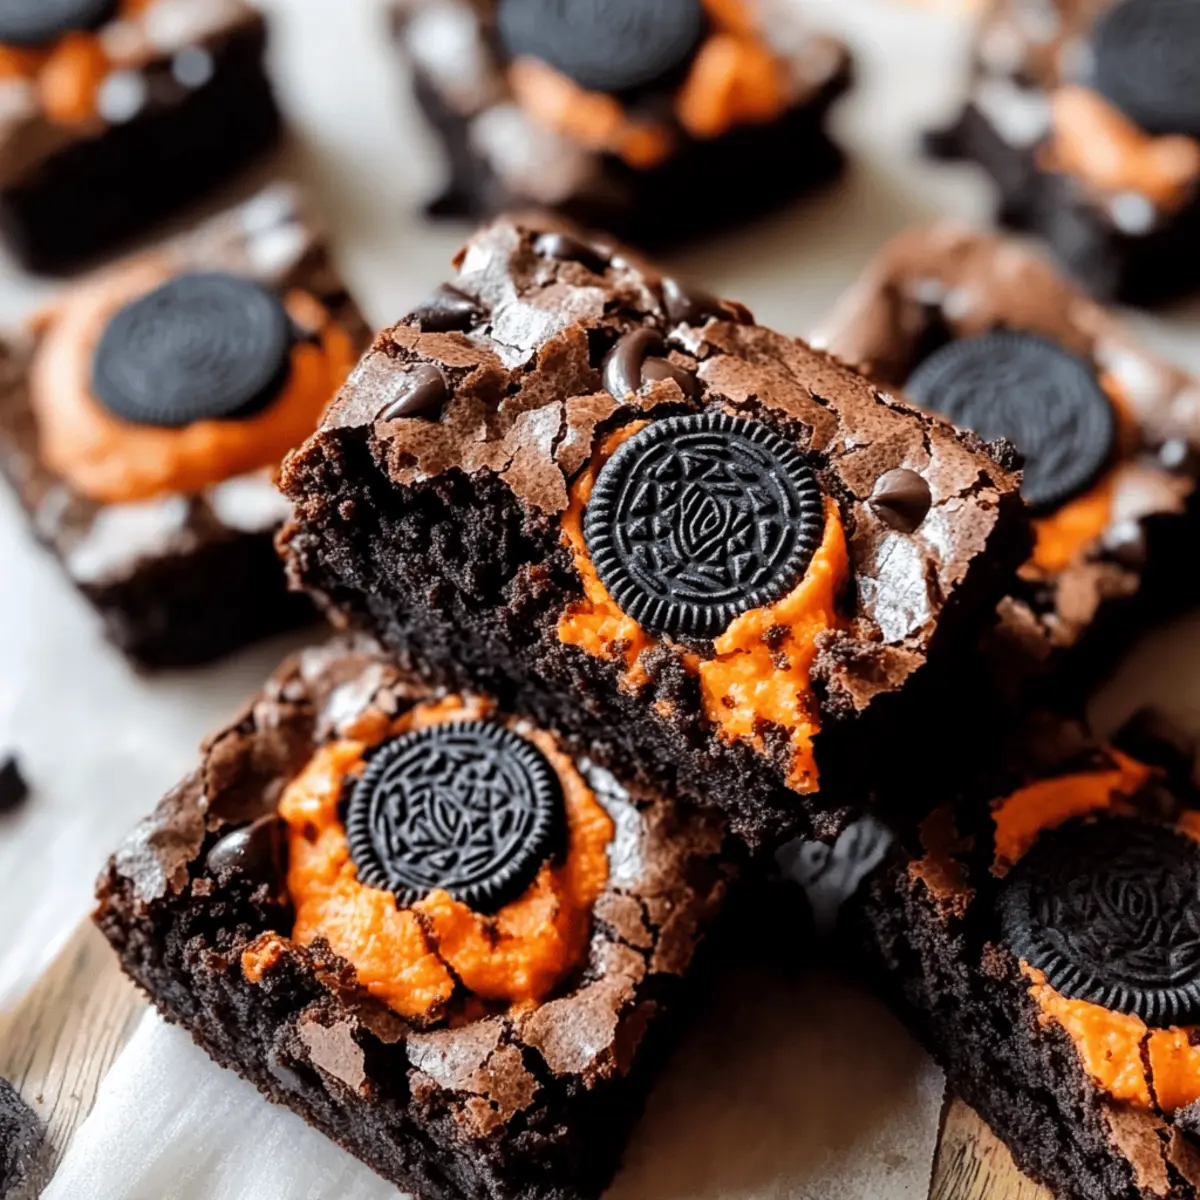
As I pulled the first batch of brownies from the oven, the whole kitchen filled with a warm, chocolatey aroma that instantly invoked a sense of celebration. These Halloween Oreo Cookie Boo Brownies are not just a treat; they’re a festive delight that takes your classic brownie game up a notch. With a chewy texture and the added crunch of crushed Oreos, you’ll find that these brownies are a cinch to whip up, perfect for those busy family evenings or last-minute party plans. Plus, the easy decorating allows you to unleash your inner artist, making this the ultimate crowd-pleaser for all ages! Ready to enchant your guests with a spooky twist this Halloween? Let’s dive in!
Why Are These Brownies So Irresistible?
Spooky Fun: These Halloween Oreo Cookie Boo Brownies bring festive joy to your dessert table, creating a delightful treat everyone will love.
Easy to Make: With minimal fuss and simple ingredients, these chewy brownies are perfect for busy weeknights or last-minute gatherings.
Unique Twist: Combining classic brownies with crushed Oreos offers a delicious texture that elevates them from standard treats.
Flexible Decorating: The straightforward topping method lets you customize designs effortlessly, whether for a party or just to impress your family.
Crowd Favorite: The rich chocolate flavor appeals to both kids and adults, making them a guaranteed hit at Halloween parties! Check out Slutty Brownies Layers for another tasty treat that’s sure to wow your guests!
Halloween Oreo Cookie Boo Brownie Ingredients
These Halloween Oreo Cookie Boo Brownies require just a few simple ingredients to create deliciously chewy and spooky treats!
For the Batter
- Oreo cookies – Use any variety of Oreos; crushed for the batter and whole for topping to add texture.
- Chocolate chips – Choose between milk or dark chocolate chips to enhance the brownies’ fudginess.
- Eggs – These provide essential structure and moisture; flax eggs can substitute for a vegan option.
- Butter – Adds richness; consider coconut oil for an easy dairy-free alternative.
- Sugar – Sweetens the brownies lovely; reduce slightly if you prefer a less sweet treat.
- Flour – Essential for structure; gluten-free flour can be used for a tasty substitution.
- Salt – Elevates the flavor; try sea salt for a touch of gourmet flair.
For Topping
- Whole Oreo cookies – Place them on top before baking for a visual treat and added crunch.
- Decorative sprinkles – Use Halloween-themed sprinkles to enhance the festive look easily.
These ingredients will yield the perfect spooktacular treat for your gatherings, ensuring that your Halloween Oreo Cookie Boo Brownies will be a delightful hit!
Step‑by‑Step Instructions for Halloween Oreo Cookie Boo Brownies
Step 1: Preheat and Prepare the Pan
Begin your spooky baking adventure by preheating the oven to 350°F (175°C). While it warms up, grab a 9×9 inch baking pan and line it with parchment paper, allowing some overhang for easy removal later. This step will ensure your Halloween Oreo Cookie Boo Brownies come out effortlessly, ready for slicing.
Step 2: Mix Butter and Sugar
In a large mixing bowl, combine 1/2 cup of melted butter with 1 cup of granulated sugar. Use a whisk to mix until the mixture is smooth and glossy, which should take about 2 minutes. This creamy blend is the foundation of your delicious brownies, so make sure it’s well combined for that rich flavor!
Step 3: Incorporate the Eggs
Next, add two large eggs to the buttery-sugary mix, one at a time. Beat well after each addition, ensuring a smooth consistency. This process will take about 3 minutes. The eggs will provide moisture and structure while enriching the overall flavor of your Halloween Oreo Cookie Boo Brownies.
Step 4: Add Oreos and Chocolate Chips
With your mixture well beaten, gently fold in 1 cup of crushed Oreo cookies and 1/2 cup of chocolate chips. Use a spatula to ensure the Oreos and chips are evenly distributed throughout the batter, creating delightful pockets of flavor. This step adds both texture and decadence to your brownies!
Step 5: Transfer to the Baking Pan
Pour the brownie batter into the prepared pan, spreading it evenly with your spatula. Take care to create a smooth layer that fills the edges of the pan. This is where the magic of your Halloween Oreo Cookie Boo Brownies begins, as they’ll rise beautifully during baking.
Step 6: Decorate with Whole Oreos
To elevate the festive spirit, place whole Oreo cookies on top of the batter, spacing them evenly apart. This lovely decoration will not only enhance the presentation but also provide extra crunch in each bite. Now your masterpiece is ready for the oven!
Step 7: Bake to Perfection
Slide the pan into the preheated oven and bake for approximately 32 minutes. To check for doneness, insert a toothpick into the center; it should come out with a few moist crumbs. Avoid overbaking to keep your Halloween Oreo Cookie Boo Brownies fudgy and chewy, delivering the perfect texture.
Step 8: Cool and Slice
Once baked, remove the brownies from the oven and allow them to cool in the pan for about 15 to 20 minutes. Then, using the overhanging parchment paper, lift them out onto a cutting board. Slice into squares, and admire the delightful contrast of Oreos peeking through your chewy brownies!
Halloween Oreo Cookie Boo Brownies Variations
Feel free to make these Halloween Oreo Cookie Boo Brownies your own with some fun twists and substitutions!
-
Vegan Option: Replace eggs with flax eggs and butter with coconut oil for a dairy-free and vegan delight.
-
Gluten-Free: Swap regular flour with a gluten-free blend to ensure everyone can enjoy these spooktacular treats.
-
Oreo Alternatives: Experiment with other favorite sandwich cookies, like Peanut Butter or Golden Oreos, to change the flavor profile.
-
Fun Toppings: Drizzle melted white chocolate over the cooled brownies for a ghostly effect, or sprinkle with festive Halloween-themed mixes.
-
Extra Crunch: Add chopped nuts like walnuts or pecans into the batter for a lovely texture contrast, enhancing the chewiness.
-
Minty Surprise: Use mint-flavored Oreos or a few drops of peppermint extract to create a refreshing twist suitable for Halloween gatherings.
-
Layer Cake Idea: Bake the batter in a larger pan and cut out circles for cookie cakes, stacking them for a beautiful (and sweet) Halloween tower!
These delicious variations will not only cater to different dietary needs but can also make your Halloween gatherings even more fun! And if you love creating marvelous desserts, check out Condensed Milk Brownies or Ultimate Red Velvet Brownies for more inspiration!
Storage Tips for Halloween Oreo Cookie Boo Brownies
Room Temperature: Store your brownies in an airtight container at room temperature for up to 5 days to keep them fresh and chewy.
Fridge: If you prefer a cooler treat, these brownies can be kept in the fridge for up to a week; just ensure they are well-wrapped to prevent drying out.
Freezer: For longer-lasting goodness, freeze your brownies wrapped tightly in plastic wrap and placed in a freezer-safe container for up to 3 months.
Reheating: To enjoy your Halloween Oreo Cookie Boo Brownies warm, simply microwave them for about 10-15 seconds, just enough to soften them without compromising their fudgy texture.
Make Ahead Options
These Halloween Oreo Cookie Boo Brownies are fantastic for meal prep and a great time saver, making your festive baking a breeze! You can prepare the batter up to 24 hours in advance—just mix all ingredients and store it covered in the refrigerator, which ensures freshness. For the best results, wait to top the brownies with whole Oreos and bake them until you’re ready to serve. When you’re ready to enjoy, simply pour the chilled batter into your prepared pan, add the whole Oreos, and bake as directed. This method keeps the brownies just as chewy and delicious while allowing you to enjoy more time with family and friends!
What to Serve with Halloween Oreo Cookie Boo Brownies?
Indulge your senses and create a delightful Halloween spread by pairing these chewy brownies with fun and festive sides.
- Vanilla Ice Cream: The creamy, cool contrast to warm brownies creates an irresistible combination that everyone’s sure to love.
- Pumpkin Spice Whipped Cream: This seasonal twist adds a hint of autumn flavor and a light, fluffy texture, enhancing every bite of your brownie.
- Chocolate-Covered Strawberries: Juicy berries dipped in rich chocolate provide a refreshing and fruity touch alongside the fudgy brownies.
- Spooky Fruit Salad: A mix of seasonal fruits like apple slices, grapes, and clementines adds a fresh element that balances the sweetness.
- Ghostly Meringue Cookies: Light and airy, these whimsical treats make for a fun and festive play on the Halloween theme, perfect for the dessert table.
- Hot Apple Cider: This warm beverage, with its spiced aroma, wraps up your Halloween dessert experience in a cozy, comforting hug.
- Chocolate Milkshake: Rich and thick, this classic pairing will have everyone feeling nostalgic and satisfied as flavors mingle beautifully.
- Halloween-Themed Cupcakes: Mini cakes decorated with orange and black icing create a whimsical dessert spread that complements the brownies perfectly.
- Candied Nuts: A savory and sweet crunch contrasts beautifully with the soft brownies, adding an exciting texture to your table.
Expert Tips for Halloween Oreo Cookie Boo Brownies
-
Use Quality Oreos: Select fresh Oreo cookies for the best flavor and texture; stale cookies can diminish the chewiness of your brownies.
-
Check Baking Time: Start checking at 30 minutes; you want fudgy brownies with a few moist crumbs on the toothpick. Overbaking leads to dry brownies.
-
Chill Before Cutting: Allow the brownies to cool completely before slicing to achieve cleaner cuts and maintain that chewy, indulgent texture.
-
Layer with Toppings: Consider drizzling melted chocolate or adding festive sprinkles right after baking for a fun visual appeal.
-
Experiment with Flavors: Don’t hesitate to switch up the Oreos—try seasonal flavors like pumpkin spice or peppermint for a festive twist!
These tips will help you create the ultimate Halloween Oreo Cookie Boo Brownies that are sure to impress friends and family!

Halloween Oreo Cookie Boo Brownies Recipe FAQs
How should I select the best Oreos?
Absolutely! Look for Oreos that are fresh and free of visible damage. A good visual cue is to check for dark spots all over or a broken cookie which indicates staleness. You can use any variety of Oreos, but I recommend the classic ones for that nostalgic flavor.
What’s the best way to store leftovers?
You can keep your Halloween Oreo Cookie Boo Brownies in an airtight container at room temperature for up to 5 days. If you’d prefer them chilled, you can store them in the fridge for up to a week. Just be sure they are well-wrapped to keep them from drying out!
Can I freeze these brownies?
Very! To freeze your brownies, wrap each piece tightly in plastic wrap and place them in a freezer-safe container. They can last up to 3 months in the freezer. When ready to enjoy, simply thaw them in the refrigerator overnight or lightly microwave for 10-15 seconds to warm them up.
What if my brownies are too dry?
If you find yourself with dry brownies, next time ensure you avoid overbaking. Brownies should come out of the oven with a toothpick showing a few moist crumbs. If it happens, you can revive dry brownies slightly by reheating them in the microwave for just a few seconds; this can restore some moisture and soften them.
Are these brownies pet-friendly?
No, it’s best to keep these Halloween Oreo Cookie Boo Brownies away from pets! The chocolate and sugar can be harmful to animals, particularly dogs. Always check with your vet if you’re unsure about specific ingredients and their effects on pets.
Can I make these brownies gluten-free?
Absolutely! Simply swap out regular flour for a gluten-free flour blend. Some brands work beautifully in baked goods without compromising texture. Just make sure it’s a blend formulated for baking since that will give you the best results for your Halloween Oreo Cookie Boo Brownies!
Halloween Oreo Cookie Boo Brownies - Chewy, Spooky Treats!
Ingredients
Equipment
Method
- Preheat the oven to 350°F (175°C) and line a 9x9 inch baking pan with parchment paper.
- In a mixing bowl, combine 1/2 cup melted butter and 1 cup granulated sugar until smooth.
- Add 2 large eggs, one at a time, beating well after each addition.
- Fold in 1 cup crushed Oreo cookies and 1/2 cup chocolate chips.
- Pour the batter into the baking pan, spreading it evenly.
- Place whole Oreo cookies on top before baking.
- Bake in the oven for approximately 32 minutes.
- Cool the brownies for about 15-20 minutes, then slice them into squares.
")