")
As I stood by the kitchen counter, a cascade of colorful sprinkles spilled from my hands, creating a mini rainbow of edible joy. Today, I’m thrilled to share my recipe for Vegan Rice Krispie Treat Lollipops—a delightful twist on a classic favorite that’s perfect for celebrating springtime occasions or simply adding a splash of color to your dessert table. These lollipops come together in a flash, combining the nostalgic crunch of Rice Krispies with vegan mini marshmallows, making them a fun and accessible treat for everyone. Not only are they a breeze to whip up, but these charming pops can be shaped and colored to match any event, ensuring smiles all around. Are you ready to transform your kitchen into a vibrant wonderland? Let’s grab our ingredients and dive in!
Why are Rice Krispie Treat Lollipops so special?
Creative, Colorful Fun: These delightful lollipops bring a creative twist to classic treats, making them an enticing option for kids and adults alike.
Vegan & Gluten-Free: With ingredients like vegan mini marshmallows and Rice Krispies, everyone can enjoy these festive pops, including those with dietary restrictions.
Quick & Easy: A simple microwave method means you can whip these up in no time, perfect for last-minute party planning or unexpected guests.
Endless Customization: Feel free to switch up colors and shapes for any occasion—try heart shapes for Valentine’s Day or pumpkin shapes for Halloween!
Perfect for Gifting: Simply wrap them and add a tag for homemade party favors or seasonal gifts that bring joy to family and friends.
Check out my other treats, like Cool Whip Cookies for effortless baking or Fryer Biscuits Treat to complement your dessert presentation!
Rice Krispie Treat Lollipop Ingredients
For the Base
• Vegan Mini Marshmallows – These are essential for sweetness and texture. Substitution: Use any vegan marshmallows (like Trader Joe’s) available.
• Coconut Oil – This acts as a binding agent while adding richness. Substitution: Can be replaced with any vegan butter or margarine.
• Rice Krispies Cereal – This forms the crunchy base of the treats. Note: Ensure gluten-free options for celiacs.
For Color and Decoration
• Vegan Food Coloring – Adds visual appeal; powdered or gel forms work best. Substitution: Various plant-based food colorings can be used.
• Amy’s Dreamy Bars – Great for creating cute eyes on bunny pops. Note: Optional; can be omitted if not desired.
• Quin Sprinkles – Perfect for that decorative touch on the eyes. Substitution: Ensure they are vegan when purchasing.
Step‑by‑Step Instructions for Rice Krispie Treat Lollipop
Step 1: Prepare Your Pan
Start by lining a flat container, such as a 9” square pan, with parchment paper. Make sure to leave some overhang for easy removal later. This step is essential for achieving those perfect Rice Krispie Treat Lollipops without sticking. Preheat your microwave to ensure it’s ready for melting the mixture.
Step 2: Melt the Marshmallows
In a microwave-safe bowl, combine 1 cup of vegan mini marshmallows and 1 tablespoon of coconut oil. Microwave the mixture for 30 seconds, then stir to combine. Return it to the microwave for an additional 30 seconds, or until fully melted and smooth. The marshmallows should be bubbly and sticky, indicating they’re ready for the next step.
Step 3: Add Color
Once you have a smooth marshmallow mixture, mix in your chosen vegan food coloring until well combined. This is where the fun begins! Choose vibrant colors that will make your Rice Krispie Treat Lollipops pop with joy. Stir until the color is consistent throughout the melted mixture, ensuring that your pops are visually appealing.
Step 4: Combine with Rice Krispies
Grease your hands with a little coconut oil to prevent sticking, then add 1½ cups of Rice Krispies cereal to the colored marshmallow mixture. Gently mix everything together until the cereal is evenly coated and the mixture is consistent. The perfect texture will be sticky yet manageable, creating the ideal base for your lollipops.
Step 5: Press and Chill
Transfer about a third of the mixture into the lined container and press it down firmly to create a dense layer. Use your hands or a spatula to ensure it’s compact. Once pressed evenly, place the container in the refrigerator for about 20-30 minutes to allow it to set. This step is crucial for a sturdy Rice Krispie Treat Lollipop.
Step 6: Repeat with Different Colors
While the first layer is chilling, repeat the previous steps with your remaining colors, ensuring you create the same pressed layers. Grease your hands again if needed, and chill each layer once pressed. This results in a beautiful, colorful multi-layer treat that will amaze everyone!
Step 7: Cut and Shape
After chilling the layered mixture, remove it from the container using the parchment overhang. Cut out fun shapes with cookie cutters to create your Rice Krispie Treat Lollipops. Insert the lollipop sticks into the bottom of each shape, pressing gently to secure. This part can be a joyous creative experience for everyone.
Step 8: Add the Finishing Touches
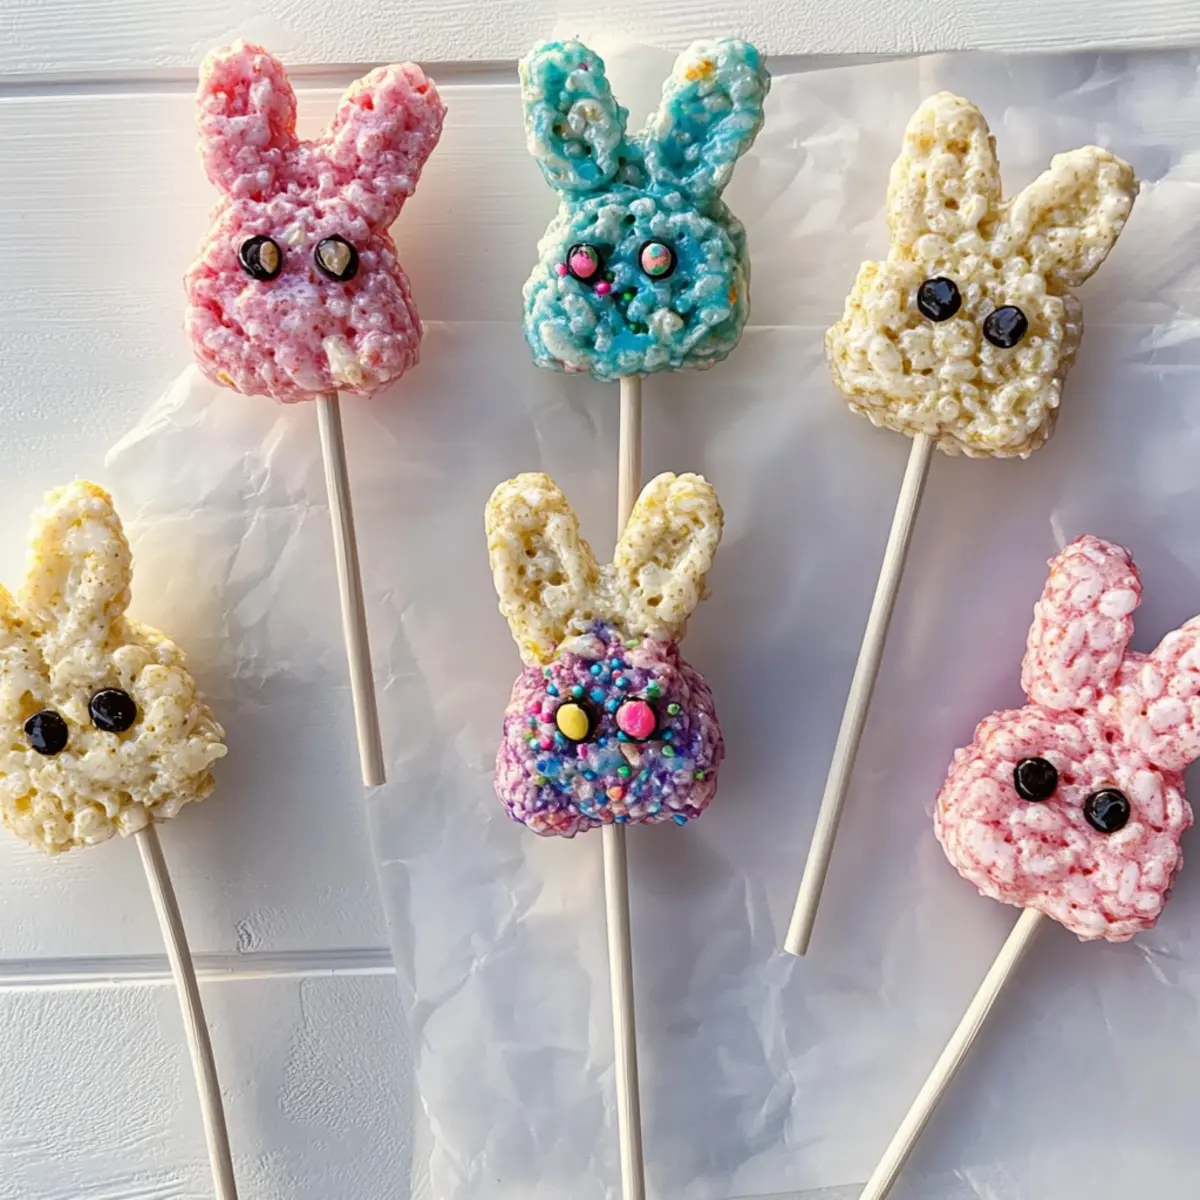
If you’re making bunny lollipops, melt Amy’s Dreamy Bars in a microwave-safe bowl. Once melted, use a toothpick or piping bag to create eyes on the bunny shapes, attaching decorative Quin sprinkles for detail. This step adds personality and charm to your already delightful Rice Krispie Treat Lollipops.
Step 9: Wrap for Freshness
To keep your Rice Krispie Treat Lollipops fresh, wrap each one in cling wrap or place them in an airtight container. Store them at room temperature. This will maintain their chewy sweetness and vibrant appearance, making them ready for any sweet occasion ahead!

Rice Krispie Treat Lollipop Variations
Embrace your creativity by customizing these delightful treats to suit your taste and occasion!
-
Flavor Boost: Mix in ½ cup of mini chocolate chips or dried fruit for added texture and sweetness. Chocolate brings a rich depth, while dried fruits offer a chewy surprise.
-
Color Explosion: Use multiple vegan food colorings to create swirling patterns. Children will love the unpredictable beauty of colorful lollipops, making each one unique!
-
Nutty Add-In: Toss in ¼ cup of finely chopped nuts for a delightful crunch. Almonds or pecans complement the sweetness beautifully, offering an extra layer of flavor.
-
Seasonal Shapes: Craft festive designs for holidays, like stars for Christmas or leaves for fall. Shaping these treats to match the season gives them added charm and fun!
-
Sweet Spice: Sprinkle in cinnamon or pumpkin spice for a warm, comforting flavor. This twist makes them perfect for cozy gatherings, evoking holiday memories.
-
Dairy-Free Alternative: For added creaminess, swap coconut oil with almond or cashew butter. This small change adds a nutty depth that pairs perfectly with the sweetness.
-
Spicy Kick: Add a hint of cayenne or chili powder for a surprising kick. This unique twist can make for delightful party conversation and a new favorite combination.
-
Fruity Fun: Incorporate fruit-flavored vegan marshmallows for vibrant colors and refreshing tastes. This bold flavor swap will have everyone guessing your secret ingredient!
Where will your imagination take you with these variations? For more inspiration on creative desserts, don’t miss my festive Grinch Cupcakes or whip up some fun with Fryer Biscuits Treat!
Make Ahead Options
These Vegan Rice Krispie Treat Lollipops are a fantastic choice for meal prep, saving you valuable time during busy weeks! You can prepare the base mixture up to 24 hours in advance. Simply make the Rice Krispie mixture and press it into the lined container, then refrigerate until set. Once firm, use cookie cutters to shape the lollipops, adding the sticks before wrapping them in cling wrap or storing them in an airtight container. If made ahead, they’ll stay fresh and just as delicious! To finish, simply melt the Amy’s Dreamy Bars for decorating just before serving, and your vibrant treats will be ready to dazzle!
Expert Tips for Rice Krispie Treat Lollipops
-
Grease Hands Well: Prevent sticky disasters by generously greasing your hands with coconut oil before shaping the treats. This makes the process smoother and more enjoyable.
-
Watch the Melting: Keep an eye on the marshmallows while melting; overheating can burn them. Stop microwaving as soon as they’re smoothly melted.
-
Clean Cookie Cutters: To ensure clean shapes, regularly clean your cookie cutters between cuts. This helps maintain the integrity of your Rice Krispie Treat Lollipop designs.
-
Use Gloves: Consider wearing gloves while mixing the sticky ingredients. This not only keeps your hands clean but also makes it easier to handle the mixture.
-
Layering for Color: For vibrant pops, let each layer chill completely before adding the next color. This helps keep colors distinct and creates beautiful, eye-catching treats.
Storage Tips for Rice Krispie Treat Lollipops
Room Temperature: Store your Rice Krispie Treat Lollipops in an airtight container at room temperature for up to 1 week. This keeps them chewy and delicious.
Fridge: If you’d like to extend their freshness, you can refrigerate them for up to 2 weeks. Just ensure they’re wrapped well to avoid absorbing any moisture.
Freezer: For longer storage, freeze your lollipops in a single layer to prevent sticking, then place in a freezer-safe bag for up to 3 months. Thaw in the fridge before serving.
Reheating: If your pops lose their shape after freezing, briefly sit them at room temperature before enjoying. Avoid reheating in the microwave as it can make them too soft.
What to Serve with Vegan Rice Krispie Treat Lollipops?
There’s nothing quite like a colorful array of treats to brighten your dessert table and spark joy for all ages.
-
Fresh Fruit Skewers: These provide a light, refreshing contrast to the sweetness of the lollipops, making them a perfect balance on the plate. Pair juicy strawberries or tangy pineapple with your pops for a delightful mix of flavors.
-
Vegan Chocolate Dipping Sauce: Drizzling or dipping the lollipops in rich vegan chocolate elevates the experience, infusing each bite with a decadent taste. This sauce takes just minutes to prepare and brings a gourmet touch to your playful treats.
-
Rainbow Spritzers: Serve up these fizzy beverages embellished with colorful fruits or herbs. The sparkling fizz and vivid colors enhance the cheerful presentation of your lollipops, inviting guests to indulge in a lively celebration.
-
Creamy Coconut Whipped Cream: This fluffy dessert adds an intriguing tropical flair to your lollipops. The rich, velvety texture perfectly complements the chewy sweetness of the rice treats, creating a delightful palatable experience.
-
Mini Vegan Cupcakes: These bite-sized delights bring a pop of color and flavor, harmonizing well with your lollipops. The playful nature of both treats makes them perfect companions for birthday parties or celebrations of all kinds.
-
Colorful Garden Salad: A crisp salad bursting with bright, seasonal vegetables brings fresh, vibrant flavors to your dessert layout. The crunch and zest offer a refreshing contrast, balancing the sweetness of the Rice Krispie Treat Lollipops.
-
Iced Herbal Teas: An unsweetened herbal tea, like hibiscus or mint, cools the palate while providing an aromatic companion to your pops. Serve it ice-cold for a refreshing sip alongside your fun, colorful treats.
-
Vegan Chocolate Chip Cookies: Pair these chewy delights with your lollipops for a nostalgic snack duo. The classic taste of cookie meets the whimsical joy of the pops, making every bite a sweet adventure.

Rice Krispie Treat Lollipop Recipe FAQs
How do I choose the best vegan mini marshmallows?
Absolutely! When selecting vegan mini marshmallows, look for brands that specifically state “vegan” on the packaging, such as Dandies or Trader Joe’s. It’s essential to check for gelatin-free options since traditional marshmallows contain animal-derived gelatin.
How should I store my Rice Krispie Treat Lollipops?
These sweet treats are best stored in an airtight container at room temperature for up to 1 week. This keeps their delightful chewiness intact. If you live in a particularly humid area, storing them in the fridge can help maintain their freshness but be sure they are wrapped well to prevent moisture absorption!
Can I freeze Rice Krispie Treat Lollipops?
Very! To freeze your Rice Krispie Treat Lollipops, first lay them flat in a single layer on a baking sheet to freeze individually. Once firm, transfer them to a freezer-safe bag or container and store for up to 3 months. When ready to enjoy, thaw them in the refrigerator overnight for the best texture.
What should I do if my Rice Krispie mixture is too sticky?
If your mixture turns out too sticky, don’t worry! First, try greasing your hands with a little more coconut oil when shaping. If it remains too sticky, you could add an extra ½ cup of Rice Krispies to balance the mixture’s consistency. This should make it easier to handle while still keeping that delightful crunch.
Are there any common allergens in this recipe?
Yes, while these Rice Krispie Treat Lollipops are vegan and gluten-free, it’s always crucial to check your product labels. Some brands of Rice Krispies may not be labeled gluten-free. Additionally, be cautious if you have allergies to coconut, as coconut oil is used in this recipe, and double-check the ingredients in any food coloring or sprinkles you decide to use.
Can I customize the shapes and colors for different occasions?
Absolutely! The more the merrier! You can use various cookie cutters to create unique shapes to match seasonal celebrations—think pumpkin shapes for Halloween or heart shapes for Valentine’s Day. Mixing different colors using vegan food coloring allows you to customize these pops for any festive occasion, making them a fun and engaging treat for all ages!

Colorful Rice Krispie Treat Lollipops for Sweet Fun
Ingredients
Equipment
Method
- Prepare Your Pan: Line a 9” square pan with parchment paper, leaving overhang for easy removal.
- Melt the Marshmallows: In a microwave-safe bowl, combine 1 cup vegan mini marshmallows and 1 tablespoon coconut oil, microwave for 30 seconds, stir, and repeat until melted.
- Add Color: Mix in vegan food coloring to the melted marshmallow mixture until well combined.
- Combine with Rice Krispies: Grease hands, add 1.5 cups Rice Krispies, and mix until evenly coated.
- Press and Chill: Transfer a third of the mixture into the lined container, press down, and refrigerate for 20-30 minutes.
- Repeat with Different Colors: Repeat previous steps with remaining colors and chill each layer.
- Cut and Shape: Once chilled, remove from container and cut out shapes, inserting lollipop sticks.
- Add the Finishing Touches: Melt Amy's Dreamy Bars and create eyes on bunny shapes using Quin sprinkles.
- Wrap for Freshness: Wrap each lollipop in cling wrap or place in an airtight container.
")