
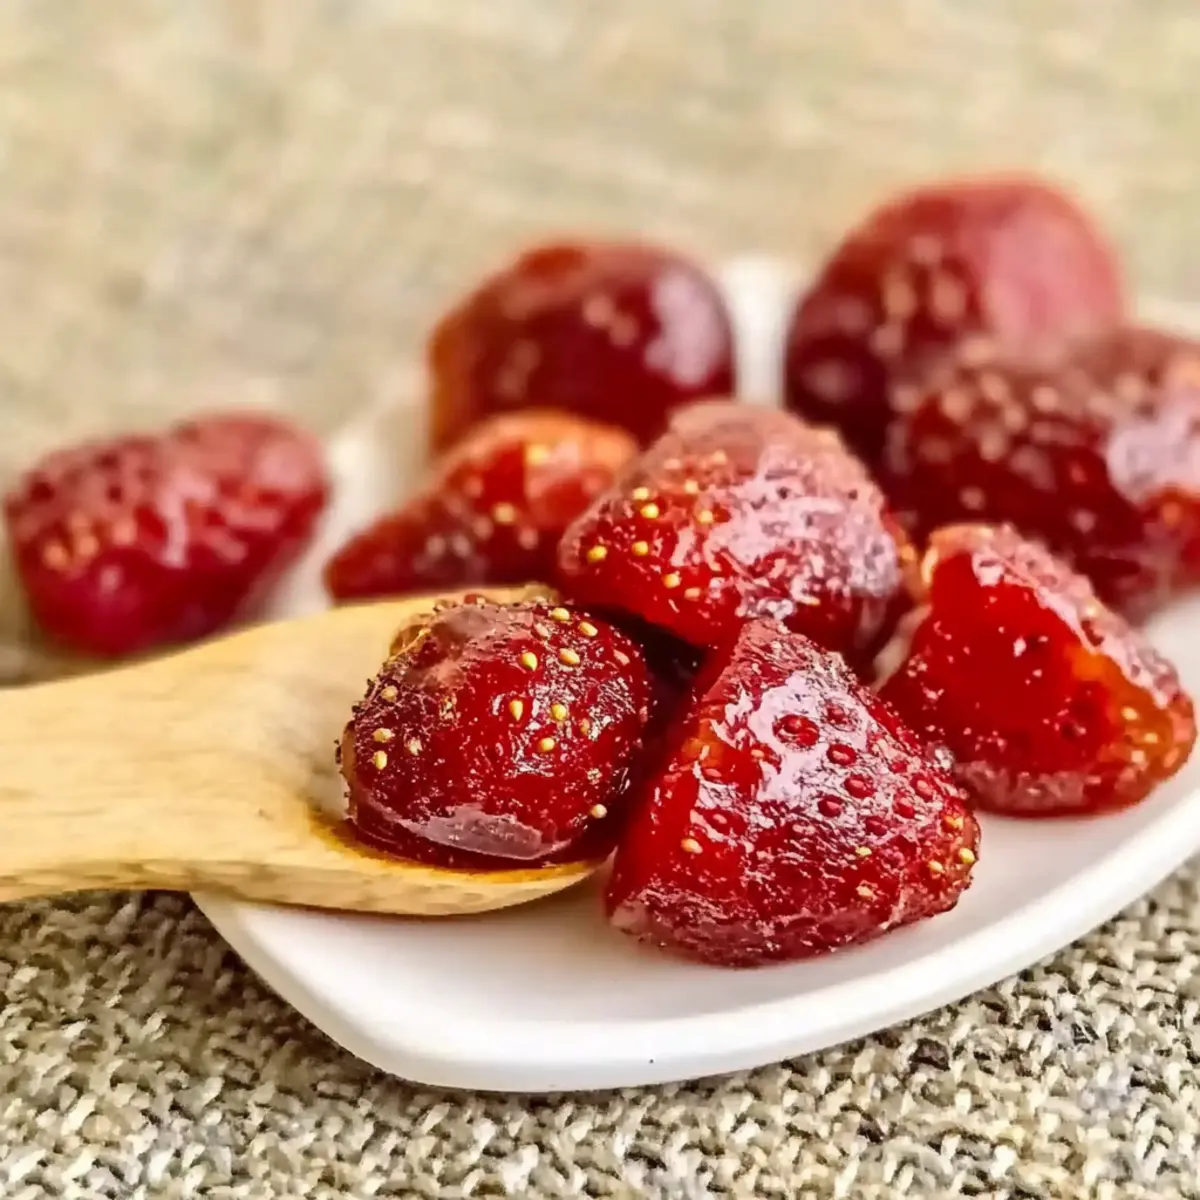
As I pulled open the oven door, a sweet, captivating aroma wafted through my kitchen, instantly transporting me to summer picnics. What I was crafting were oven-baked candied strawberries, an utterly delightful treat that makes fresh fruit taste like candy. This candied strawberries recipe is not just a way to enjoy strawberries; it’s a perfect blend of health and indulgence. With just a few simple ingredients, you can transform these berries into a chewy, irresistible delicacy that lasts far beyond the fruit’s natural shelf life. These gems serve as a unique dessert or a nutritious snack option that you can savor anytime. So, are you ready to add a sprinkle of magic to your kitchen and discover the joy of homemade candied strawberries?
Why Are Candied Strawberries So Irresistible?
Sweet Transformation: This candied strawberries recipe elevates simple strawberries into a chewy, candy-like treat that delights the senses.
Healthier Alternative: With minimal sugar and the natural goodness of fruit, it’s a guilt-free indulgence.
Versatile Snack: Perfect for trail mixes, topping pancakes, or enjoying solo—these strawberries adapt to any occasion!
Easy to Make: Just a few simple steps in the oven mean you can whip up this treat without fuss.
Long-Lasting Enjoyment: Preserve them in jars for an easy, year-round snack that carries summer’s sweetness into the colder months.
Try pairing them with a scoop of ice cream or experimenting with flavors like this Lipton Onion Soup for a delightful twist!
Candied Strawberries Recipe Ingredients
• Here’s everything you need to whip up this delightful treat!
For the Strawberries
- Fresh Strawberries – Use ripe, juicy strawberries for the sweetest flavor and best texture.
For the Syrup
- Sugar – This is essential for creating the candy texture; adjust to your taste for the perfect level of sweetness.
- Water – Necessary for dissolving the sugar into a syrup that coats the strawberries beautifully.
Optional Uses
- Additional Sweetener – Substitute sugar with alternatives like honey or agave syrup for a healthier twist.
Unlock the deliciousness of this candied strawberries recipe and enjoy your homemade treat!
Step‑by‑Step Instructions for Oven Baked Candied Strawberries Recipe
Step 1: Create the Syrup
In a medium pot, combine equal parts water and sugar over medium heat. Stir continuously until the sugar dissolves, then bring the mixture to a gentle boil. Allow it to simmer for about 5 minutes, until it thickens slightly and becomes syrupy, creating a beautiful glaze to coat the strawberries.
Step 2: Prepare the Strawberries
Once the syrup is ready, gently add the fresh strawberries into the pot. Boil them lightly in the syrup for around 10 minutes, making sure they soften without losing their structure. The strawberries should glisten and absorb the syrup, becoming luxuriously sweet and flavorful.
Step 3: Drain Excess Syrup
After boiling, carefully drain the strawberries through a fine mesh sieve, retaining the syrup for future use if desired. Allow the strawberries to sit for a few moments to let any excess syrup drip off, ensuring that they are ready for the next stage of transforming into oven-baked candied strawberries.
Step 4: Preheat the Oven
Preheat your oven to 200°F (93°C). This low temperature is essential for slowly drying out the strawberries, allowing them to maintain their flavor and chewy texture. While the oven warms, prepare your baking tray lined with parchment paper to prevent sticking.
Step 5: Arrange on Baking Tray
Spread the drained strawberries evenly on the prepared baking tray, ensuring they are not overlapping. This helps them dry uniformly. Place the tray in the preheated oven and allow the strawberries to bake for approximately 4-5 hours, turning them occasionally for even drying.
Step 6: Check for Doneness
After about 4 hours, check the strawberries; they should be dry to the touch but still slightly tender inside. If they need more time, continue to dry them, checking every 30 minutes. The finished product should feel chewy, resembling a perfect candy-like texture in your candied strawberries recipe.
Step 7: Cool and Store
Once finished, remove the tray from the oven and let the strawberries cool completely on the baking tray. Once cooled, store the oven-baked candied strawberries in airtight containers or mason jars to maintain their delightful chewiness. Enjoy your creations as a snack or in various dessert toppings!

Candied Strawberries Recipe Variations
Feel free to get creative and customize your candied strawberries for a delightful twist on this classic recipe!
-
Fruit Medley: Substitute strawberries with blueberries, peaches, or apples for an exciting mix of flavors. Experimenting with different fruits can create a colorful and tasty treat that’s perfect for sharing.
-
Honey-Sweetened: Use honey or agave syrup instead of sugar to sweeten your strawberries more naturally. This not only adds a distinct flavor but can also make the treat a bit healthier!
-
Spiced Up: Add a sprinkle of cinnamon or a touch of vanilla extract to your syrup for a warm, cozy flavor. This adds depth to the sweetness, making each bite a bit more sophisticated.
-
Melt-in-Your-Mouth: Instead of drying them completely, reduce the oven time, leaving a bit more moisture for a gooey texture. This makes the strawberries incredibly chewy, reminiscent of candied fruit but softer to enjoy.
-
Citrus Infusion: Boost flavor by incorporating zest from lemons or oranges into your syrup. This brightens the candied strawberries and adds a refreshing kick that balances their sweetness beautifully.
-
Chocolate Drizzle: After cooling, drizzle some melted dark or white chocolate over the strawberries for an irresistible treat. Chocolate pairs perfectly with the sweetness of the candied strawberries and adds some visual flair.
-
Trail Mix Twist: Mix candied strawberries with nuts or seeds for a crunchy trail mix. This creates a unique snack that’s perfect for healthy munching on the go, whether at work or on an adventure.
Dive into this versatile candied strawberries recipe and let your imagination shine—such as making them part of a delightful pancake breakfast with hints of your favorite flavors, just like with our Alice Springs Chicken recipe!
Expert Tips for Candied Strawberries Recipe
-
Choose Wisely: Select ripe, juicy strawberries as they provide the best natural sweetness and flavor for your candied strawberries recipe.
-
Syrup Consistency: Ensure the syrup isn’t too watery; it should thicken slightly during boiling to create a good coating for the strawberries.
-
Drying Time Adjustment: Monitor the drying time closely; strawberries should be slightly chewy inside to avoid a hard texture.
-
Storage Secrets: Keep candied strawberries in airtight containers for up to a year. They are best enjoyed within a few months for maximum flavor.
-
Experiment with Flavors: Consider using different fruits or sweeteners to customize the recipe, ensuring delicious variations of your candied strawberries!
How to Store and Freeze Candied Strawberries
Airtight Containers: Store candied strawberries in airtight containers or mason jars to maintain their chewy texture and sweetness. They can last up to a year if properly sealed.
Fridge: If you plan to enjoy your candied strawberries recipe within a few months, keeping them in the fridge is ideal. Just remember to use a snug container to prevent moisture.
Freezer: For long-term preservation, freeze the strawberries in a single layer on a baking sheet before transferring them to a freezer-safe bag. They should keep well for up to six months.
Reheating: Enjoy them straight from their storage or toss them onto hot pancakes or oatmeal for a warm, sweet treat!
Make Ahead Options
These candied strawberries are perfect for meal prep enthusiasts! You can prepare the strawberries in syrup up to 24 hours in advance. Simply create the syrup and soak the strawberries as outlined in the recipe, then drain and refrigerate the syrup separately. This helps retain the strawberries’ delicious flavor while maintaining their texture. When you’re ready to enjoy your treat, simply preheat your oven and arrange the soaked strawberries on a baking tray. Bake them for approximately 4-5 hours until they reach that chewy, candy-like consistency. By prepping ahead, you save time on busy weeknights, making it easy to indulge in a delightful homemade dessert!
What to Serve with Oven Baked Candied Strawberries
Indulge in a sweet symphony of flavors while complementing your delightful candied strawberries with these perfect pairings.
-
Whipped Cream: The light, airy texture of whipped cream adds a rich contrast to the chewy strawberries, enhancing every bite.
-
Vanilla Ice Cream: Creamy vanilla ice cream beautifully balances the sweet tartness of candied strawberries, creating a heavenly dessert experience.
-
Greek Yogurt: A dollop of creamy Greek yogurt introduces a tangy note, making for a deliciously balanced snack or breakfast option.
-
Pancakes: Stack up fluffy pancakes and drizzle with warm syrup for a delightful brunch that highlights the strawberries’ sweet essence.
-
Trail Mix: Combine candied strawberries with nuts and seeds for a chewy, nutritious snack that’s perfect for a mid-day boost or hiking adventure.
-
Sparkling Water: A refreshing glass of sparkling water with a splash of lime or mint brings a fizzy brightness, making it a delightful beverage choice.
These delightful pairings will not only enhance the flavors of your oven-baked candied strawberries but also create a memorable dining experience for you and your loved ones.

Oven Baked Candied Strawberries Recipe FAQs
How do I choose the best strawberries for this recipe?
Absolutely! For the best results, look for ripe, juicy strawberries that are bright red and free from green spots. A little shine on the skin is a great sign of freshness. Avoid any that have dark spots or are overly soft, as they won’t yield the best flavor or texture for your candied strawberries recipe.
How should I store my candied strawberries?
You can store your candied strawberries in airtight containers or mason jars. If kept sealed properly, they can last up to a year—though for the best flavor, enjoy them within the first few months. Keep them somewhere cool and dry, ideally in the refrigerator, to maintain their delightful chewiness.
Can I freeze candied strawberries, and if so, how?
Certainly! For freezing, first place the candied strawberries in a single layer on a baking sheet to prevent them from sticking together. Freeze them for about 2 hours until solid, then transfer them to a freezer-safe bag or container. They’ll last for up to six months in the freezer. Just be sure to label the container with the date!
What should I do if my strawberries become too hard?
If your strawberries turn out too hard during the drying process, don’t worry! You can always pop them back into the syrup mixture and give them a quick boil for a few minutes to reintroduce moisture before drying them again. Aim for a chewy texture, and feel free to adjust the drying time based on your preference.
Are there any dietary restrictions I should consider with this recipe?
Yes, when making your candied strawberries recipe, keep in mind that people with sugar sensitivities should look for alternatives, like honey or agave syrup. Always ensure your strawberries are washed thoroughly, especially if anyone has allergies, to prevent any reaction from pesticide residues.
How long will my homemade candied strawberries last?
When stored properly in airtight conditions, candied strawberries can last up to a year! However, to enjoy them at their absolute best, aim to consume them within 3 to 4 months. This ensures you experience their peak flavor and chewy goodness.

Memorable Candied Strawberries Recipe for Sweet Indulgence
Ingredients
Equipment
Method
- In a medium pot, combine equal parts water and sugar over medium heat. Stir continuously until the sugar dissolves, then bring to a gentle boil. Allow to simmer for about 5 minutes until slightly thickened.
- Gently add fresh strawberries into the pot and boil them lightly in the syrup for around 10 minutes.
- Carefully drain the strawberries through a fine mesh sieve, retaining syrup for future use if desired.
- Preheat oven to 200°F (93°C). Prepare your baking tray lined with parchment paper.
- Spread the drained strawberries evenly on the baking tray, ensuring they are not overlapping. Bake for approximately 4-5 hours.
- Check the strawberries after about 4 hours; they should be dry to the touch but slightly tender inside.
- Once finished, remove tray from oven and let strawberries cool completely. Store in airtight containers.