")
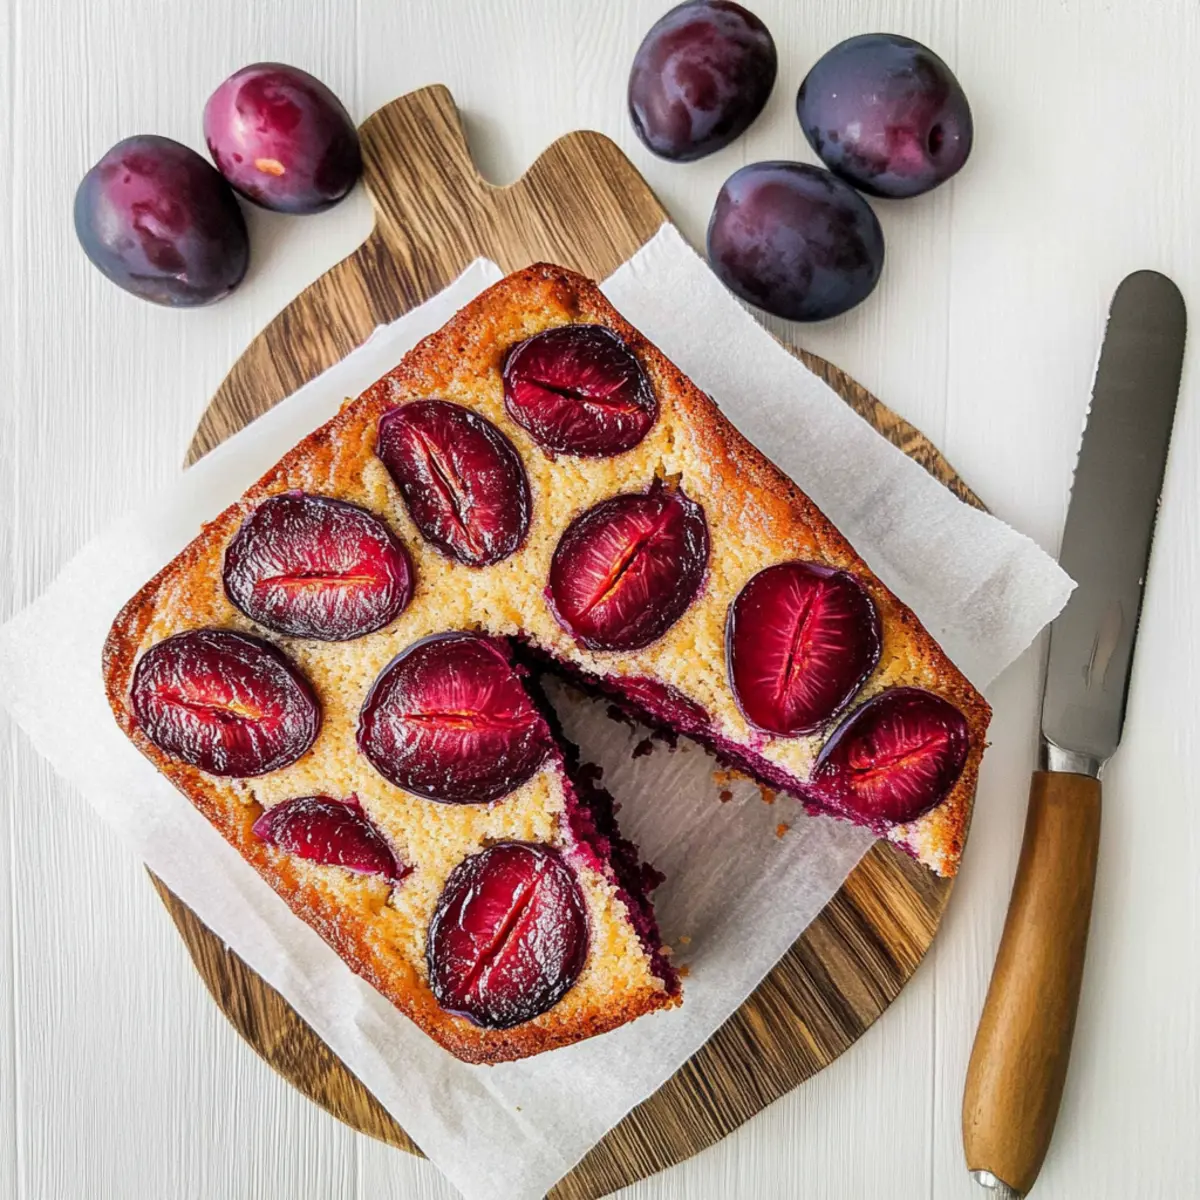
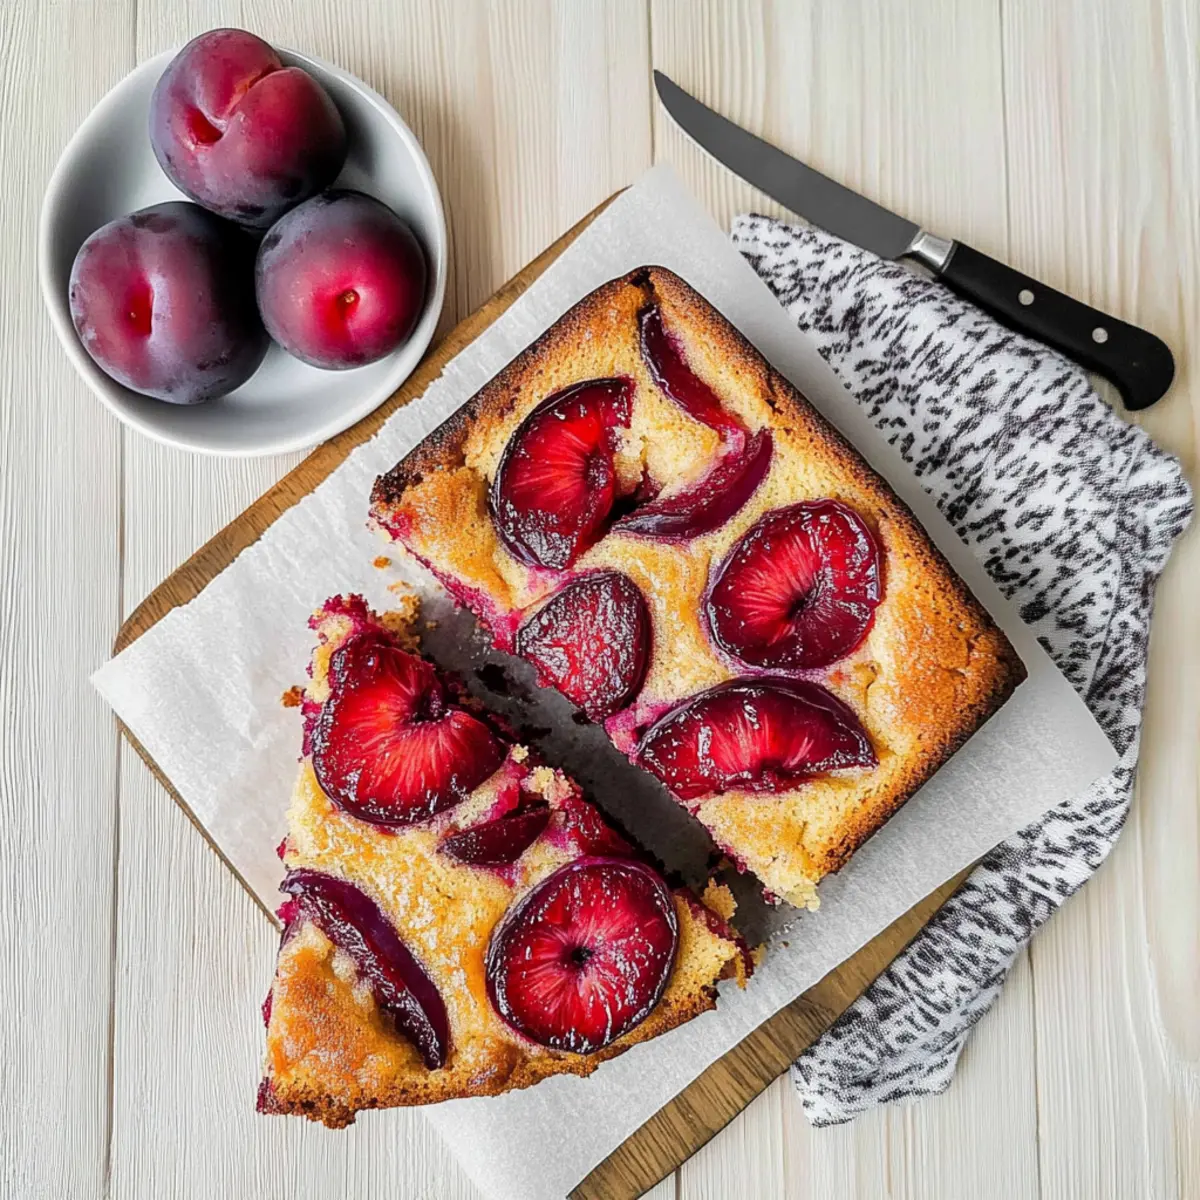
As I stood in my kitchen, the aroma of sun-ripened blood plums filled the air, instantly transporting me to lazy summer afternoons. That’s the magic of this Easy One-Bowl Plum Yogurt Cake—it brings a taste of sunshine right into your home. With its moist, tangy texture and vibrant fruit topping, it’s not just a cake; it’s a little slice of joy that requires minimal fuss. You can whip it up with just one bowl, making cleanup a breeze after enjoying this delightful treat. Ideal for dessert paired with a scoop of vanilla ice cream or as a satisfying snack, this cake is both versatile and stunningly delicious. Ready to impress yourself and your loved ones? Let’s dive into this simple yet irresistible recipe!
Why is this cake a must-try?
One-Bowl Wonder: This recipe requires only one bowl, making it a breeze to prepare and clean up.
Moist and Tangy: The yogurt and fresh blood plums create a wonderfully moist texture, enhanced by a delightful tang that keeps you coming back for more.
Versatile Delight: Serve it as a casual snack, or elevate it as a stunning dessert topped with vanilla ice cream or whipped cream—perfect for sharing at gatherings!
Stress-Free Baking: No electric mixer needed means that even novice bakers can shine, making this a fantastic option for anyone tired of fast food meals.
Substitution-Friendly: Don’t have blood plums on hand? Feel free to swap with your favorite variety for delicious results every time.
Plum Yogurt Cake Ingredients
For the Cake
- Blood Plums – Adds natural sweetness and vibrant color; substitute with any variety of plums if blood plums aren’t available.
- Granulated Sugar – Provides sweetness and contributes to overall moisture; no substitutions recommended.
- Eggs – Acts as a binder and adds structure; use room temperature eggs for best results.
- Lemon Zest – Enhances flavor with bright, citrus notes; about 1 large lemon gives enough zest.
- Vanilla Extract – Adds depth to flavor; always use pure vanilla extract for the best taste.
- Extra Virgin Olive Oil – Provides moisture and a slight fruitiness; can substitute with vegetable oil if needed.
- Plain Greek Yogurt – Contributes to the cake’s moist texture and subtle tanginess; sour cream can be a substitution.
- All-Purpose Flour – Creates the cake’s body and texture; ensure to scoop and level for accurate measurement.
- Baking Powder – Helps the cake rise; ensure it’s fresh for optimal results.
- Salt – Balances sweetness and enhances flavor; essential for overall taste.
This delightful Plum Yogurt Cake is a perfect way to add a burst of flavorful joy to your baking repertoire!
Step-by-Step Instructions for Easy One-Bowl Plum Yogurt Cake
Step 1: Preheat Oven & Prepare Pan
Begin by preheating your oven to 356°F (180°C). While it warms up, take an 8×8 inch square baking pan and line it with parchment paper, allowing some to hang over the edges for easy removal later. This preparation will ensure your Plum Yogurt Cake bakes evenly and comes out effortlessly.
Step 2: Prepare Plums
Next, wash the blood plums thoroughly and slice them into wedges, keeping the skin intact for added texture and color. Set the prepared plum slices aside; they will be used later as a beautiful topping for your cake. Aim for even cuts to ensure uniform cooking throughout the Easy One-Bowl Plum Yogurt Cake.
Step 3: Mix Base
In a large mixing bowl, whisk together the granulated sugar, eggs, and fresh lemon zest for about 30 seconds until the mixture is well combined and slightly frothy. This step creates a sweet and citrusy base that will enhance the cake’s flavor while adding moisture.
Step 4: Incorporate Oil
Gradually pour in the extra virgin olive oil while continuing to whisk the mixture. Emulsifying the oil should take about a minute; you’ll notice the batter becoming smoother as the oil blends in with the other ingredients. Achieving this consistency is key to ensuring your Plum Yogurt Cake retains its moisture.
Step 5: Add Yogurt & Vanilla
Stir in the plain Greek yogurt and pure vanilla extract until the mixture is completely smooth. This additional moisture and flavor are essential for the cake’s signature tanginess. Make sure to blend well without overmixing, as you want a light texture for your Easy One-Bowl Plum Yogurt Cake.
Step 6: Combine Dry Ingredients
Now, gently add the all-purpose flour, baking powder, and a pinch of salt into the wet mixture. Using a spatula, fold the dry ingredients in until just combined; this should take care not to overmix, which could lead to a denser cake. The batter should be somewhat lumpy but cohesive, perfect for your cake.
Step 7: Transfer & Arrange
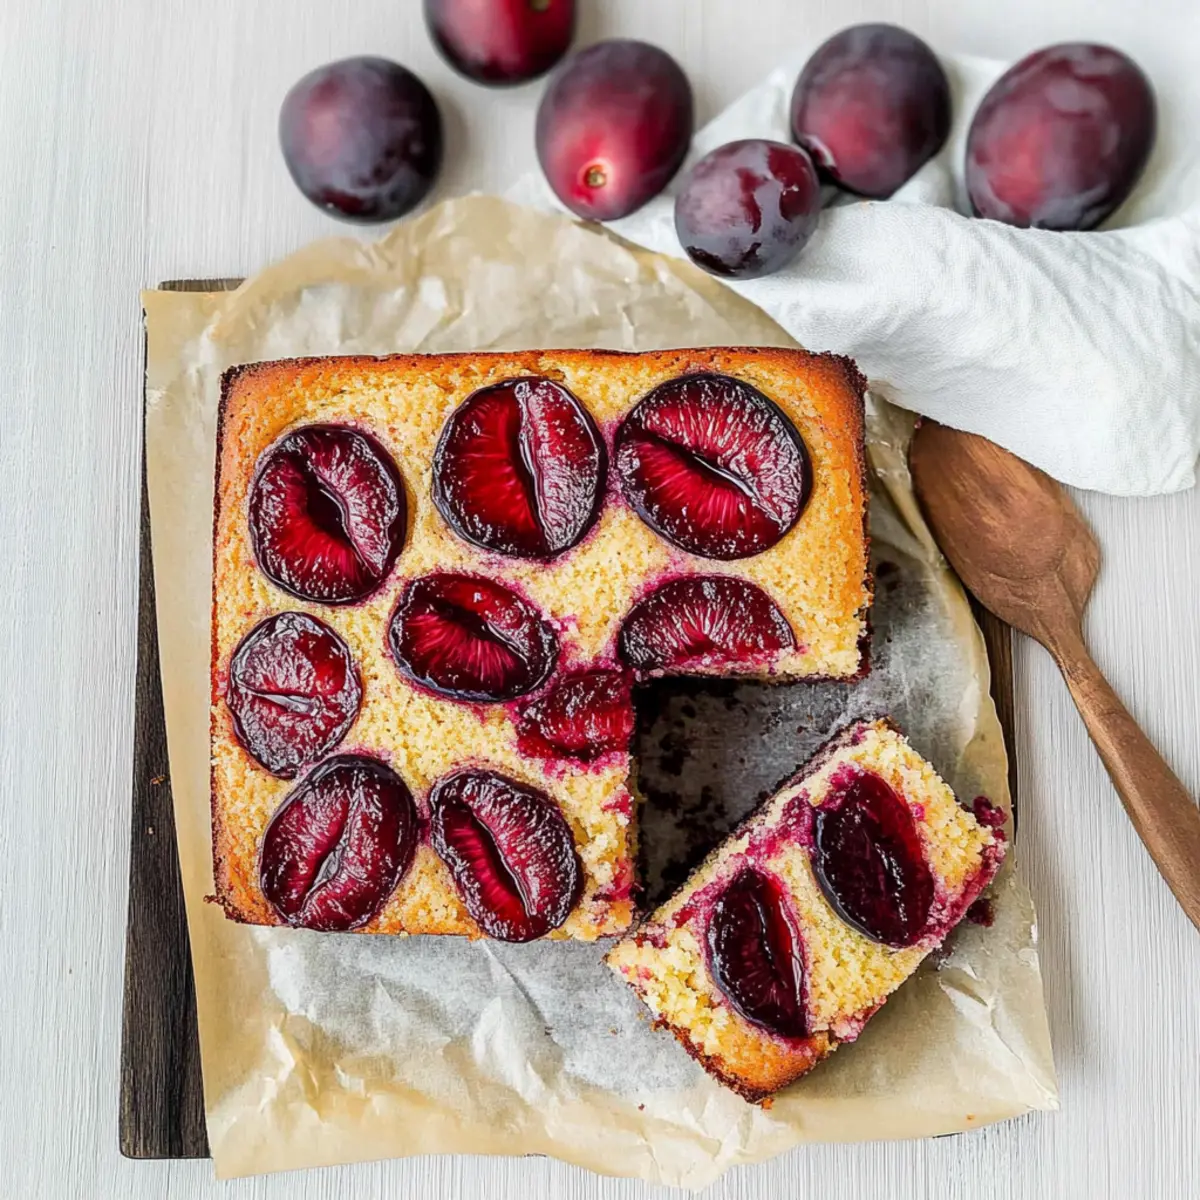
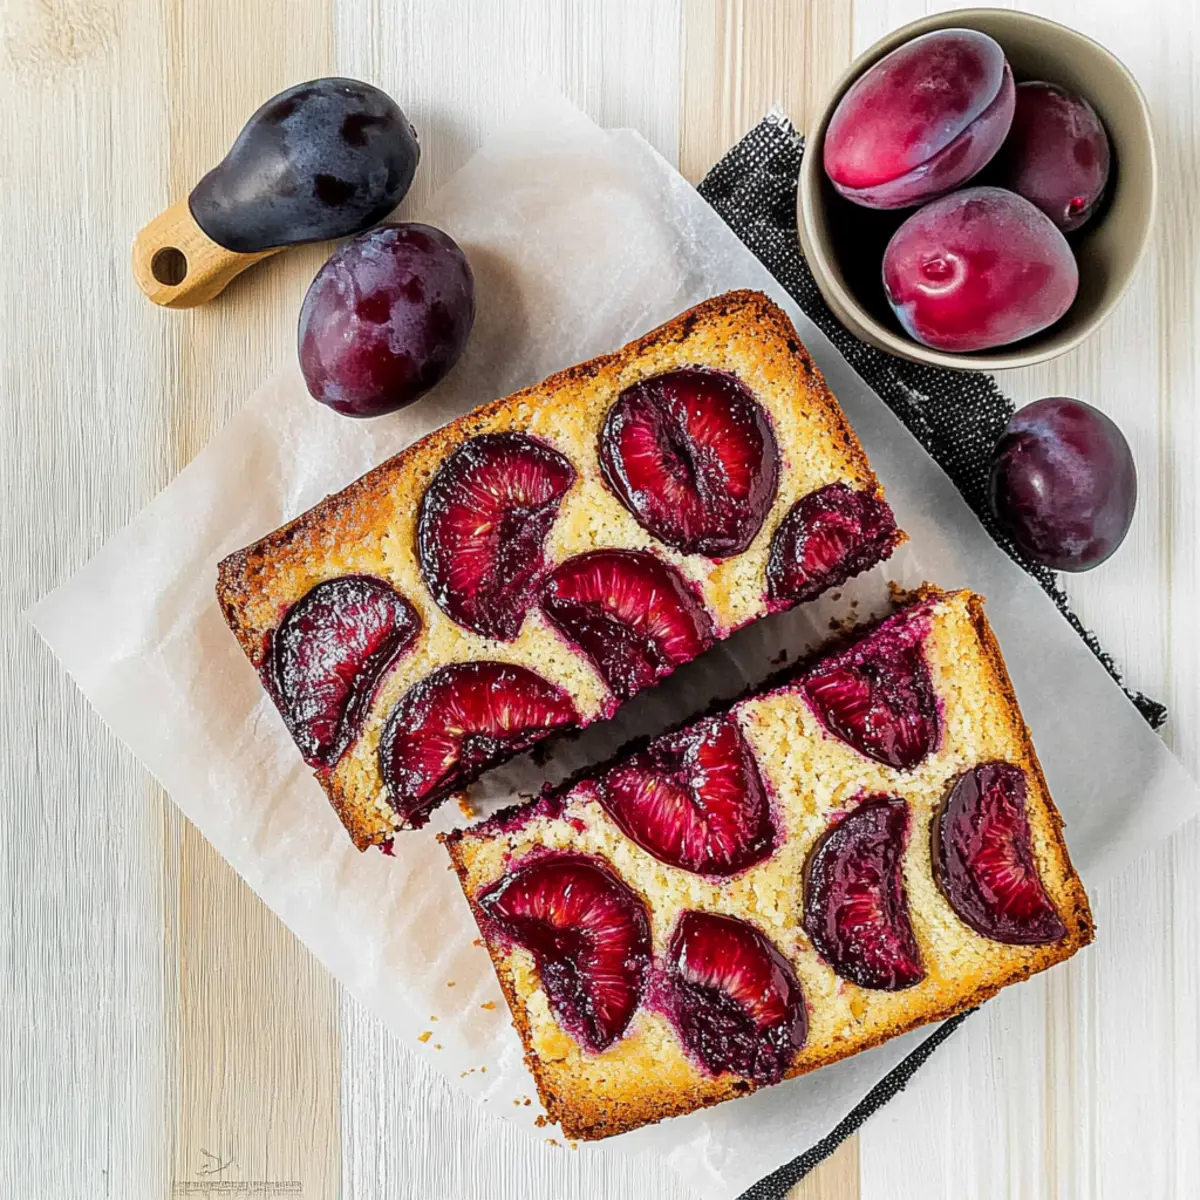
Pour the batter into the prepared baking pan, using the spatula to spread it evenly. Next, artfully arrange the plum slices on top of the batter, gently pressing them in so they secure in place as the cake bakes. This presentation will make your Easy One-Bowl Plum Yogurt Cake look as vibrant as it tastes.
Step 8: Bake
Place the cake in the preheated oven and bake for 30-35 minutes. You’ll know it’s done when the edges are golden brown and a toothpick inserted in the center comes out clean with a few moist crumbs. Keep an eye on the cake to avoid overbaking—it should remain moist inside.
Step 9: Cool
Once baked, carefully remove the cake from the oven and let it cool in the pan for 10 minutes. After this initial cooling period, use the parchment paper to gently lift the cake out and transfer it to a wire rack to cool completely. This step is crucial for allowing the cake to set before slicing into its delightful, moist texture.
Variations & Substitutions for Plum Yogurt Cake
Feel free to get creative with this easy recipe, making it your own with delightful twists and swaps!
- Other Plums: Swap blood plums for yellow or green plums to explore new flavors and colors.
- Nutty Crunch: Add a handful of chopped almonds or walnuts into the batter for a satisfying crunch.
- Cinnamon Twist: Incorporate a pinch of cinnamon or nutmeg for a cozy spice that adds depth to the cake.
- Dairy-Free Option: Replace Greek yogurt with coconut yogurt to make this cake completely dairy-free without sacrificing moisture.
- Gluten-Free Version: Use a gluten-free all-purpose flour blend to adapt this recipe for gluten-sensitive friends and family.
- Fruity Variations: Try adding fresh blueberries or diced apples alongside the plums for a bursting fruit medley in every bite.
- Lemon Zing: For a citrusy kick, increase lemon zest or add a splash of lemon juice for extra brightness.
- Sweet Kick: Drizzle a bit of honey or maple syrup over the top after baking for a touch of natural sweetness.
These fun variations can elevate your baking experience and bring new life to your kitchen! For a delightful lemony twist, check out my Lemon Cake Mix for more fruity flavors. And if you’re exploring global desserts, my Fricassee Cake might spark some inspiration!
Expert Tips for Plum Yogurt Cake
-
Don’t Over-Mix: After adding the dry ingredients, mix just until combined to keep the cake light and fluffy. Over-mixing can lead to a dense result.
-
Use Room Temperature Eggs: This ensures better emulsification when mixing, leading to a perfectly moist texture in your one-bowl cake.
-
Check for Doneness: Insert a toothpick in the center; it should come out with a few moist crumbs clinging—but no wet batter, indicating that your Plum Yogurt Cake is perfectly baked.
-
Cool Completely: Let your cake cool fully before slicing. A warm cake can crumble and fall apart, so give it time to set for beautiful slices.
-
Adjust Plum Placement: Feel free to experiment with the presentation of plum slices. Strategically place them for a stunning visual that makes your cake pop!
How to Store and Freeze Plum Yogurt Cake
Fridge: Store the cake in an airtight container in the refrigerator for up to 3-4 days to maintain its moist texture and fresh flavor.
Room Temperature: If you plan to consume it within a day, it can be kept covered at room temperature. However, be mindful of the fresh fruit topping.
Freezer: Freezing is not recommended for this cake due to the fresh plums; they may compromise the texture upon thawing.
Reheating: If you enjoy your cake warm, gently reheat individual slices in the microwave for about 10-15 seconds, keeping the delicious taste intact.
What to Serve with Easy One-Bowl Plum Yogurt Cake
Pairing this delightful cake with the right sides can elevate your dessert experience to new heights.
-
Vanilla Ice Cream: A scoop of creamy vanilla ice cream complements the cake’s moist crumb while enhancing its fruity flavor. The cold ice cream contrasts beautifully with the warm cake.
-
Whipped Cream: A dollop of fresh whipped cream adds fluffiness and richness, accentuating the tanginess of the yogurt and plums. It’s an indulgent touch that feels like a treat.
-
Fresh Berries: Serve with a side of fresh strawberries or raspberries to add a burst of color and a tart bite that balances the sweetness of the cake. Their juiciness enhances the overall flavor profile.
-
Citrus Salad: A refreshing citrus salad featuring oranges and grapefruits adds a bright, zesty note, contrasting the cake’s rich texture. The vibrant colors and flavors create an elegant presentation for gatherings.
-
Herbal Tea: Pairing the cake with a fragrant herbal tea like chamomile or mint enhances the experience and provides a calming touch after a lovely meal.
-
Sparkling Water with Lemon: For a refreshing drink option, sparkling water with a splash of fresh lemon keeps the palate cleansed, making every bite of cake feel as delightful as the first.
-
Chocolate Ganache: Drizzling a silky chocolate ganache over the cake adds a luxurious element that harmonizes well with the fruity flavors, making it a decadent treat for chocolate lovers.
Make Ahead Options
These Easy One-Bowl Plum Yogurt Cakes are perfect for busy home cooks looking to save time! You can prepare the batter and refrigerate it for up to 24 hours before baking to ensure a moist and flavorful cake. To do this, simply mix the wet ingredients and dry ingredients and store the combined batter in an airtight container. When you’re ready to bake, pour the batter into the prepared pan, top with sliced plums, and bake as directed. This not only makes for a quick dessert but also ensures your cake is just as delicious and moist when baked fresh! For even easier planning, keep the plum slices prepped in the fridge in a sealed container—this keeps them fresh for up to 3 days and makes assembly a breeze.
Easy One-Bowl Plum Yogurt Cake Recipe FAQs
How do I choose ripe plums for this recipe?
Absolutely! Look for plums that yield slightly to gentle pressure, indicating they are ripe and juicy. A vibrant color is also a good sign; for blood plums, look for a deep reddish-purple hue without dark spots all over. If you pick unripe plums, leave them at room temperature for a few days to soften before using.
How should I store the Plum Yogurt Cake after baking?
I recommend storing the cake in an airtight container in the refrigerator for up to 3-4 days. This helps retain its moist texture. If you’re short on time, you can also cover it tightly with plastic wrap or aluminum foil. If kept at room temperature, consume it within a day to prevent the fresh fruit from spoilage.
Can I freeze the Plum Yogurt Cake?
Freezing is not recommended for this cake due to the fresh plums, which may become mushy when thawed. However, if you have leftover batter or need to store it for any reason, consider baking the cake and enjoying it fresh instead. The flavor and texture are delightful when it’s made and enjoyed soon after!
What should I do if my cake turns out dense?
If your Plum Yogurt Cake turns out dense, the likely culprit is over-mixing the batter after adding the dry ingredients. To avoid this, mix gently until just combined, even if the batter appears lumpy. For future reference, always aim for a light hand when mixing—think tender love and care!
Is this cake suitable for people with allergies?
Great question! This recipe contains eggs and dairy in the form of Greek yogurt, so it may not be suitable for those with egg or dairy allergies. You could try using vegan yogurt or an egg replacer (like a flax egg) to accommodate dietary restrictions, but I encourage testing to ensure a similar texture and flavor. Always check for any specific allergens based on individual needs.
Can I add nuts or other fruits to the recipe?
Very much! Feel free to incorporate a handful of chopped nuts like almonds or walnuts for added crunch. Alternatively, you can mix in other fruits like diced apples or peaches if you’re inspired. Just ensure that whatever fruits you use complement the flavor of the plums, and enjoy your creative baking adventure!
Moist Plum Yogurt Cake in One Bowl, No Mixer Needed!
Ingredients
Equipment
Method
- Preheat your oven to 356°F (180°C) and line an 8x8 inch square baking pan with parchment paper.
- Wash the blood plums and slice them into wedges, keeping the skin intact.
- In a large mixing bowl, whisk together the granulated sugar, eggs, and lemon zest for about 30 seconds until well combined.
- Gradually pour in the extra virgin olive oil while whisking continuously for about a minute.
- Stir in the plain Greek yogurt and vanilla extract until the mixture is smooth.
- Gently fold in the all-purpose flour, baking powder, and salt until just combined; the batter should be somewhat lumpy.
- Pour the batter into the prepared baking pan and arrange the plum slices on top, gently pressing them in.
- Bake in the preheated oven for 30-35 minutes, or until golden brown and a toothpick comes out clean.
- Let the cake cool in the pan for 10 minutes before transferring it to a wire rack to cool completely.
")